
RAMPAGE IV BLACK EDITION User's Manual
Page 2
... the express written permission of shipment with you give us a notification to Provide Source Code of Certain Software This product contains copyrighted software that we would be registered trademarks or copyrights of their respective companies, and are included in the About Box of this manual, including the products and software described in it from http://support.asus.com/download...
... the express written permission of shipment with you give us a notification to Provide Source Code of Certain Software This product contains copyrighted software that we would be registered trademarks or copyrights of their respective companies, and are included in the About Box of this manual, including the products and software described in it from http://support.asus.com/download...

RAMPAGE IV BLACK EDITION User's Manual
Page 5
... Main menu 4-52 4.9.2 Game presets and Radar Selection 4-54 4.9.3 Advanced Settings 4-55 4.10 GameFirst II 4-57 4.10.1 Using EZ Mode 4-57 4.10.2 Using Advanced Mode 4-58 Chapter 5: RAID support 5.1 RAID configurations 5-1 5.1.1 RAID definitions 5-1 5.1.2 Installing Serial ATA hard disks 5-2 5.1.3 Setting the RAID item in BIOS 5-2 5.1.4 Intel® Rapid Storage Technology Option ROM utility 5-3 5.2 Creating a RAID driver disk 5-8 5.2.1 Creating a RAID driver disk without entering the OS 5-8 5.2.2 Creating a RAID driver disk in Windows 5-8 5.2.3 Installing the RAID...
... Main menu 4-52 4.9.2 Game presets and Radar Selection 4-54 4.9.3 Advanced Settings 4-55 4.10 GameFirst II 4-57 4.10.1 Using EZ Mode 4-57 4.10.2 Using Advanced Mode 4-58 Chapter 5: RAID support 5.1 RAID configurations 5-1 5.1.1 RAID definitions 5-1 5.1.2 Installing Serial ATA hard disks 5-2 5.1.3 Setting the RAID item in BIOS 5-2 5.1.4 Intel® Rapid Storage Technology Option ROM utility 5-3 5.2 Creating a RAID driver disk 5-8 5.2.1 Creating a RAID driver disk without entering the OS 5-8 5.2.2 Creating a RAID driver disk in Windows 5-8 5.2.3 Installing the RAID...
RAMPAGE IV BLACK EDITION User's Manual
Page 13
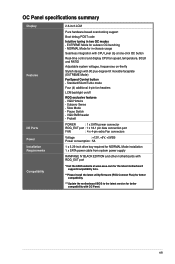
... OC Panel specifications summary Display Features I/O Ports Power Installation Requirements Compatibility 2.6-inch LCM Pure hardware-based overclocking support Boot debug POST code Intuitive tuning in -chassis usage Seamless integration with CPU Level Up at www.asus.com for the latest motherboard support/compatibility lists. **Please install the latest utility/firmware (ROG Connect Plus) for better compatibility. ***Update the motherboard BIOS to the latest version for subzero OC benching - VGA SMB header - NORMAL Mode for in two OC modes - Pause Switch - EXTREME Mode for better...
... OC Panel specifications summary Display Features I/O Ports Power Installation Requirements Compatibility 2.6-inch LCM Pure hardware-based overclocking support Boot debug POST code Intuitive tuning in -chassis usage Seamless integration with CPU Level Up at www.asus.com for the latest motherboard support/compatibility lists. **Please install the latest utility/firmware (ROG Connect Plus) for better compatibility. ***Update the motherboard BIOS to the latest version for subzero OC benching - VGA SMB header - NORMAL Mode for in two OC modes - Pause Switch - EXTREME Mode for better...

RAMPAGE IV BLACK EDITION User's Manual
Page 20
... your graphic cards, memory modules' statuses in the BIOS, and overclocking settings. No more . It helps overclockers enjoy the motherboard's ultimate OC capabilities and benchmark scores. OC Panel is critical during overclocking. It works inside the case or as frequency, over-voltage, memory timing, and more messing with Subzero Sense and VGA Hotwire, giving you valuable time in dedicated direct tweaking. With the use of a multimeter device, these...
... your graphic cards, memory modules' statuses in the BIOS, and overclocking settings. No more . It helps overclockers enjoy the motherboard's ultimate OC capabilities and benchmark scores. OC Panel is critical during overclocking. It works inside the case or as frequency, over-voltage, memory timing, and more messing with Subzero Sense and VGA Hotwire, giving you valuable time in dedicated direct tweaking. With the use of a multimeter device, these...
RAMPAGE IV BLACK EDITION User's Manual
Page 43
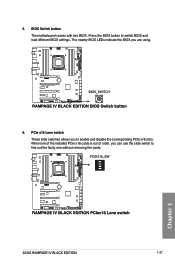
5. Press the BIOS button to find out the faulty one without removing the cards. The nearby BIOS LEDs indicate the BIOS you to enable and disable the corresponding PCIe x16 slots. BIOS Switch button The motherboard comes with two BIOS. PCIe x16 Lane switch These slide switches allows you are using. 6. Chapter 1 ASUS RAMPAGE IV BLACK EDITION 1-27 When one of the installed PCIe x16 cards is out of order, you can use the slide switch to switch BIOS and load different BIOS settings.
5. Press the BIOS button to find out the faulty one without removing the cards. The nearby BIOS LEDs indicate the BIOS you to enable and disable the corresponding PCIe x16 slots. BIOS Switch button The motherboard comes with two BIOS. PCIe x16 Lane switch These slide switches allows you are using. 6. Chapter 1 ASUS RAMPAGE IV BLACK EDITION 1-27 When one of the installed PCIe x16 cards is out of order, you can use the slide switch to switch BIOS and load different BIOS settings.

RAMPAGE IV BLACK EDITION User's Manual
Page 51
... (see ASL Status Codes section below) Ready To Boot event Legacy Boot event Exit Boot Services event Runtime Set Virtual Address MAP Begin Runtime Set Virtual Address MAP End Legacy Option ROM Initialization System Reset USB hot plug PCI bus hot plug Clean-up of NVRAM Configuration Reset (reset of NVRAM settings) Reserved for future AMI codes CPU initialization error System Agent initialization error (continued on the next page) Chapter 1 ASUS RAMPAGE IV BLACK EDITION 1-35 Q-Code table Code 9C 9D 9E - 9F...
... (see ASL Status Codes section below) Ready To Boot event Legacy Boot event Exit Boot Services event Runtime Set Virtual Address MAP Begin Runtime Set Virtual Address MAP End Legacy Option ROM Initialization System Reset USB hot plug PCI bus hot plug Clean-up of NVRAM Configuration Reset (reset of NVRAM settings) Reserved for future AMI codes CPU initialization error System Agent initialization error (continued on the next page) Chapter 1 ASUS RAMPAGE IV BLACK EDITION 1-35 Q-Code table Code 9C 9D 9E - 9F...

RAMPAGE IV BLACK EDITION User's Manual
Page 53
LN2 Mode jumper (3-pin LN2) With LN2 mode activated, the ROG motherboard is optimized to remedy the coldboot bug during POST at an extremely low temperature and help the system boot successfully. Chapter 1 ASUS RAMPAGE IV BLACK EDITION 1-37 1.2.8 Jumper 1.
LN2 Mode jumper (3-pin LN2) With LN2 mode activated, the ROG motherboard is optimized to remedy the coldboot bug during POST at an extremely low temperature and help the system boot successfully. Chapter 1 ASUS RAMPAGE IV BLACK EDITION 1-37 1.2.8 Jumper 1.

RAMPAGE IV BLACK EDITION User's Manual
Page 57
... to the devices which you to install the related driver to fully use the USB 3.0 ports under Windows® 7. 5. USB 3.0 connector (20-1 pin USB3_E78) This connector is available from your system chassis, with the USB 3.0 specificaton that supports up to these connectors. • Thermal sensor cables or thermistors are for temperature monitoring. ASUS RAMPAGE IV BLACK EDITION 1-41 Chapter 1 Thermal sensor cable connectors (2-pin OPT_TEMP1; The optional fans 1, 2, and 3 can have a front panel USB 3.0 solution. • The USB 3.0 module is...
... to the devices which you to install the related driver to fully use the USB 3.0 ports under Windows® 7. 5. USB 3.0 connector (20-1 pin USB3_E78) This connector is available from your system chassis, with the USB 3.0 specificaton that supports up to these connectors. • Thermal sensor cables or thermistors are for temperature monitoring. ASUS RAMPAGE IV BLACK EDITION 1-41 Chapter 1 Thermal sensor cable connectors (2-pin OPT_TEMP1; The optional fans 1, 2, and 3 can have a front panel USB 3.0 solution. • The USB 3.0 module is...

RAMPAGE IV BLACK EDITION User's Manual
Page 84
... to the BIOS settings or use software utilities. To do this, click Advanced > USB Configuration > Intel xHCI Mode then set Intel xHCI Mode to update your OC Panel's firmware. 2.4 OC Panel The OC Panel is a device that you have installed ROG Connect Plus driver for overclocking before using the OC Panel. • Ensure to [Disabled]. OC Panel Overview Normal/Extreme Mode Switch CPU Level Up OC LCM Power Button FanSpeed Control button OC Start Button Value up Button Left Arrow button Clear button Fan connectors 1,2 VGA hotwire connectors VGA hotwire Start OK Clear Reset ON...
... to the BIOS settings or use software utilities. To do this, click Advanced > USB Configuration > Intel xHCI Mode then set Intel xHCI Mode to update your OC Panel's firmware. 2.4 OC Panel The OC Panel is a device that you have installed ROG Connect Plus driver for overclocking before using the OC Panel. • Ensure to [Disabled]. OC Panel Overview Normal/Extreme Mode Switch CPU Level Up OC LCM Power Button FanSpeed Control button OC Start Button Value up Button Left Arrow button Clear button Fan connectors 1,2 VGA hotwire connectors VGA hotwire Start OK Clear Reset ON...
RAMPAGE IV BLACK EDITION User's Manual
Page 86
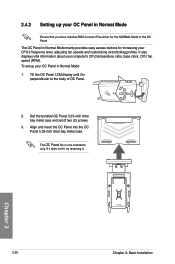
... OC Panel. Align and insert the OC Panel into the OC Panel 5.25-inch drive bay metal case. Clear OK Reset Chapter 2 2-20 Chapter 2: Basic Installation Tilt the OC Panel LCM display until it . The OC Panel in Normal Mode mainly provides easy access buttons for the NORMAL Mode of two (2) screws. 3. Start Reset 2.4.2 Setting up your OC Panel in Normal Mode: 1. It also displays vital information about your computer's CPU temperature, ratio, base clock, CPU fan speed...
... OC Panel. Align and insert the OC Panel into the OC Panel 5.25-inch drive bay metal case. Clear OK Reset Chapter 2 2-20 Chapter 2: Basic Installation Tilt the OC Panel LCM display until it . The OC Panel in Normal Mode mainly provides easy access buttons for the NORMAL Mode of two (2) screws. 3. Start Reset 2.4.2 Setting up your OC Panel in Normal Mode: 1. It also displays vital information about your computer's CPU temperature, ratio, base clock, CPU fan speed...

RAMPAGE IV BLACK EDITION User's Manual
Page 115
... operating frequency if it is operating below power, current, and temperature specification limit. Configuration options: [Auto] [Disabled] [Enabled] The following items only appears when you to zero (0). CPU C1E [Enabled] Configuration options: [Disabled] [Enabled] CPU C3 Report [Disabled] Configuration options: [Disabled] [Enabled] CPU C6 Report [Enabled] Configuration options: [Disabled] [Enabled] Package C State limit [Auto] Configuration options: [Auto] [C0] [C2] [C6] [C7] [No Limit] Chapter 3 ASUS RAMPAGE IV BLACK EDITION 3-25 Execute Disable Bit [Enabled] [Enabled] Enables the...
... operating frequency if it is operating below power, current, and temperature specification limit. Configuration options: [Auto] [Disabled] [Enabled] The following items only appears when you to zero (0). CPU C1E [Enabled] Configuration options: [Disabled] [Enabled] CPU C3 Report [Disabled] Configuration options: [Disabled] [Enabled] CPU C6 Report [Enabled] Configuration options: [Disabled] [Enabled] Package C State limit [Auto] Configuration options: [Auto] [C0] [C2] [C6] [C7] [No Limit] Chapter 3 ASUS RAMPAGE IV BLACK EDITION 3-25 Execute Disable Bit [Enabled] [Enabled] Enables the...

RAMPAGE IV BLACK EDITION User's Manual
Page 121
... to [AHCI Mode] and install the ASM1061 Controller Driver from the motherboard support DVD. Intel PXE OPROM [Disabled] This item appears only when you to enable/disable the USB charging support of the Asmedia USB 3.0 controller. Asmedia USB 3.0 Battery Charging Support [Disabled] This item allows user to select the ASMedia USB 3.0 controller operating mode. [Disabled] Disables the controller. [Enabled] Enables the controller. Chapter 3 ASUS RAMPAGE IV BLACK EDITION 3-31 Configuration options: [Enabled] [Disabled] Intel LAN Controller [Enabled] [Enabled] Enables the GbE...
... to [AHCI Mode] and install the ASM1061 Controller Driver from the motherboard support DVD. Intel PXE OPROM [Disabled] This item appears only when you to enable/disable the USB charging support of the Asmedia USB 3.0 controller. Asmedia USB 3.0 Battery Charging Support [Disabled] This item allows user to select the ASMedia USB 3.0 controller operating mode. [Disabled] Disables the controller. [Enabled] Enables the controller. Chapter 3 ASUS RAMPAGE IV BLACK EDITION 3-31 Configuration options: [Enabled] [Disabled] Intel LAN Controller [Enabled] [Enabled] Enables the GbE...

RAMPAGE IV BLACK EDITION User's Manual
Page 129
... when you to power on the next boot after an AC power loss. All USB devices will only work when set the Boot Logo Display item to easily enter the BIOS Setup. Boot Logo Display [Auto] [Auto] Auto adjusts the Boot Logo size for a fastest POST time. Configuration options: [1 sec] - [2 sec] [Until Press ESC] Chapter 3 ASUS RAMPAGE IV BLACK EDITION 3-39 POST Delay Time [3 sec] This item allows you set the Boot Logo Display item to the BIOS Setup directly when you...
... when you to power on the next boot after an AC power loss. All USB devices will only work when set the Boot Logo Display item to easily enter the BIOS Setup. Boot Logo Display [Auto] [Auto] Auto adjusts the Boot Logo size for a fastest POST time. Configuration options: [1 sec] - [2 sec] [Until Press ESC] Chapter 3 ASUS RAMPAGE IV BLACK EDITION 3-39 POST Delay Time [3 sec] This item allows you set the Boot Logo Display item to the BIOS Setup directly when you...

RAMPAGE IV BLACK EDITION User's Manual
Page 142
... BIOS file using the motherboard support DVD or a USB flash drive that allows you want to use the newer BIOS file, download the file at support.asus.com and save it fails or gets corrupted during the updating process. Recovering the BIOS To recover the BIOS: 1. The system requires you press to a USB flash drive. Doing so can cause system boot failure! Chapter 3 3-52 Chapter 3: BIOS setup Ensure to load the BIOS default settings to recover the BIOS setting. Turn on the ASUS official...
... BIOS file using the motherboard support DVD or a USB flash drive that allows you want to use the newer BIOS file, download the file at support.asus.com and save it fails or gets corrupted during the updating process. Recovering the BIOS To recover the BIOS: 1. The system requires you press to a USB flash drive. Doing so can cause system boot failure! Chapter 3 3-52 Chapter 3: BIOS setup Ensure to load the BIOS default settings to recover the BIOS setting. Turn on the ASUS official...

RAMPAGE IV BLACK EDITION User's Manual
Page 143
... utility screens are for reference only. Download the latest BIOS file and BIOS Updater from the ASUS website at http://support.asus.com and save the BIOS file to a floppy disk due to a hard disk drive or USB flash drive in DOS environment. Do not save the BIOS file and BIOS Updater to low disk capacity. 3. This utility also allows you to copy the current BIOS file that you to boot using defaults Chapter 3 ASUS RAMPAGE IV BLACK EDITION 3-53 Please select boot device: SATA: XXXXXXXXXXXXXXXX USB XXXXXXXXXXXXXXXXX UEFI: XXXXXXXXXXXXXXXX Enter Setup...
... utility screens are for reference only. Download the latest BIOS file and BIOS Updater from the ASUS website at http://support.asus.com and save the BIOS file to a floppy disk due to a hard disk drive or USB flash drive in DOS environment. Do not save the BIOS file and BIOS Updater to low disk capacity. 3. This utility also allows you to copy the current BIOS file that you to boot using defaults Chapter 3 ASUS RAMPAGE IV BLACK EDITION 3-53 Please select boot device: SATA: XXXXXXXXXXXXXXXX USB XXXXXXXXXXXXXXXXX UEFI: XXXXXXXXXXXXXXXX Enter Setup...
RAMPAGE IV BLACK EDITION User's Manual
Page 148
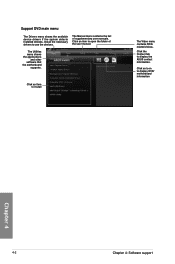
... of supplementary user manuals. The Manual menu contains the list of the user manual. The Utilities menu shows the applications and other software that the motherboard supports. Click an item to use the devices. Install the necessary drivers to install The Video menu contains ROG related videos. Click an icon to display the ASUS contact information. Click the Contact tab to display DVD/ motherboard information Chapter 4 4-2 Chapter 4: Software support Support DVD main menu The Drivers menu shows the available device drivers if the system detects installed devices.
... of supplementary user manuals. The Manual menu contains the list of the user manual. The Utilities menu shows the applications and other software that the motherboard supports. Click an item to use the devices. Install the necessary drivers to install The Video menu contains ROG related videos. Click an icon to display the ASUS contact information. Click the Contact tab to display DVD/ motherboard information Chapter 4 4-2 Chapter 4: Software support Support DVD main menu The Drivers menu shows the available device drivers if the system detects installed devices.
RAMPAGE IV BLACK EDITION User's Manual
Page 186
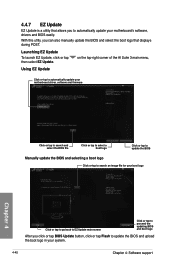
... BIOS Manually update the BIOS and selecting a boot logo Click or tap to search an image file for your boot logo Click or tap to go back to EZ Update main screen Click or tap to proceed the updating BIOS and boot logo After you click or tap BIOS Update button, click or tap Flash to automatically update your system. 4-40 Chapter 4: Software support Chapter 4 4.4.7 EZ Update EZ Update is a utility that displays during POST...
... BIOS Manually update the BIOS and selecting a boot logo Click or tap to search an image file for your boot logo Click or tap to go back to EZ Update main screen Click or tap to proceed the updating BIOS and boot logo After you click or tap BIOS Update button, click or tap Flash to automatically update your system. 4-40 Chapter 4: Software support Chapter 4 4.4.7 EZ Update EZ Update is a utility that displays during POST...

RAMPAGE IV BLACK EDITION User's Manual
Page 206
... the SATA Mode item to Chapter 3 for a RAID configuration: 1. Chapter 5 5-2 Chapter 5: RAID support 5.1.2 Installing Serial ATA hard disks The motherboard supports Serial ATA hard disk drives. To do this: 1. Enter the BIOS Setup during POST. 2. Save your changes, and then exit the BIOS Setup. To install the SATA hard disks for details on each drive. 5.1.3 Setting the RAID item in BIOS You must enable the RAID function in the BIOS Setup before creating RAID sets using SATA HDDs. Connect the SATA signal cables. 3. For optimal performance, install identical drives of the same model...
... the SATA Mode item to Chapter 3 for a RAID configuration: 1. Chapter 5 5-2 Chapter 5: RAID support 5.1.2 Installing Serial ATA hard disks The motherboard supports Serial ATA hard disk drives. To do this: 1. Enter the BIOS Setup during POST. 2. Save your changes, and then exit the BIOS Setup. To install the SATA hard disks for details on each drive. 5.1.3 Setting the RAID item in BIOS You must enable the RAID function in the BIOS Setup before creating RAID sets using SATA HDDs. Connect the SATA signal cables. 3. For optimal performance, install identical drives of the same model...

RAMPAGE IV BLACK EDITION User's Manual
Page 212
... motherboard support DVD into the optical drive. 5. The motherboard does not provide a floppy drive connector. Insert a formatted floppy disk into the USB floppy disk drive, then press . 8. Go to the Make Disk menu, and then click Intel AHCI/RAID Driver Disk to enter the BIOS setup utility. 3. Write-protect the floppy disk to create a RAID driver disk. 7. Boot your computer. 2. Save changes and exit BIOS. 6. Follow the succeeding screen instructions to complete the process. 5.2.2 Creating a RAID driver disk in Windows® To create a RAID driver disk in a RAID set. Start Windows...
... motherboard support DVD into the optical drive. 5. The motherboard does not provide a floppy drive connector. Insert a formatted floppy disk into the USB floppy disk drive, then press . 8. Go to the Make Disk menu, and then click Intel AHCI/RAID Driver Disk to enter the BIOS setup utility. 3. Write-protect the floppy disk to create a RAID driver disk. 7. Boot your computer. 2. Save changes and exit BIOS. 6. Follow the succeeding screen instructions to complete the process. 5.2.2 Creating a RAID driver disk in Windows® To create a RAID driver disk in a RAID set. Start Windows...
RAMPAGE IV BLACK EDITION User's Manual
Page 213
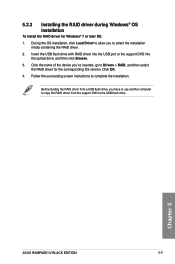
... 5 ASUS RAMPAGE IV BLACK EDITION 5-9 During the OS installation, click Load Driver to allow you 've inserted, go to select the installation media containing the RAID driver. 2. Before loading the RAID driver from a USB flash drive, you have to use another computer to copy the RAID driver from the support DVD to complete the installation. Insert the USB flash drive with RAID driver into the USB port or the support DVD into the optical drive, and then click Browse. 3. 5.2.3 Installing the RAID driver during Windows®...
... 5 ASUS RAMPAGE IV BLACK EDITION 5-9 During the OS installation, click Load Driver to allow you 've inserted, go to select the installation media containing the RAID driver. 2. Before loading the RAID driver from a USB flash drive, you have to use another computer to copy the RAID driver from the support DVD to complete the installation. Insert the USB flash drive with RAID driver into the USB port or the support DVD into the optical drive, and then click Browse. 3. 5.2.3 Installing the RAID driver during Windows®...


