
User Manual
Page 5
Contents 4.3.4 TurboV EVO 4-7 4.3.5 EPU 4-12 4.3.6 ASUS FAN Xpert 4-13 4.3.7 ASUS Probe II 4-14 4.3.8 Ai Charger 4-15 4.3.9 Audio configurations 4-16 4.4 ... Installing the device drivers 5-3 5.1.5 Enabling the ATI® CrossFireX™ technology 5-3 5.2 NVIDIA® SLI™ technology 5-4 5.2.1 Requirements 5-4 5.2.2 Installing two SLI-ready graphics cards 5-4 5.2.3 Installing the device drivers 5-5 5.2.4 Enabling the NVIDIA® SLI™ technology 5-5 5.3 LucidLogix® Virtu™ solution 5-8 5.3.1 Hardware installation 5-8 5.3.2 Software configuration ...
Contents 4.3.4 TurboV EVO 4-7 4.3.5 EPU 4-12 4.3.6 ASUS FAN Xpert 4-13 4.3.7 ASUS Probe II 4-14 4.3.8 Ai Charger 4-15 4.3.9 Audio configurations 4-16 4.4 ... Installing the device drivers 5-3 5.1.5 Enabling the ATI® CrossFireX™ technology 5-3 5.2 NVIDIA® SLI™ technology 5-4 5.2.1 Requirements 5-4 5.2.2 Installing two SLI-ready graphics cards 5-4 5.2.3 Installing the device drivers 5-5 5.2.4 Enabling the NVIDIA® SLI™ technology 5-5 5.3 LucidLogix® Virtu™ solution 5-8 5.3.1 Hardware installation 5-8 5.3.2 Software configuration ...

User Manual
Page 8
... Your product package may include optional documentation, such as warranty flyers, that you need when installing and configuring the motherboard. ASUS websites The ASUS website provides updated information on the motherboard. • Chapter 3: BIOS setup This chapter tells how to install and configure ...multiple ATI® CrossFireX™ and NVIDIA® SLI™ graphics cards. How this guide This user guide contains the information you...
... Your product package may include optional documentation, such as warranty flyers, that you need when installing and configuring the motherboard. ASUS websites The ASUS website provides updated information on the motherboard. • Chapter 3: BIOS setup This chapter tells how to install and configure ...multiple ATI® CrossFireX™ and NVIDIA® SLI™ graphics cards. How this guide This user guide contains the information you...

User Manual
Page 13
... guide Support DVD • If any of ASUS quality motherboards! Actual product specifications may vary with the list below. 1.2 Package contents Check your retailer. • The illustrated items above are for the following items. ASUS P8Z68-V PRO/GEN3 motherboard 1 x ASUS Q-Shield 2 x Serial ATA 3.0 Gb/s cables 2 x Serial ATA 6.0 Gb/s cables 1 x ASUS SLI™ bridge connector 1 x 2-in your package with...
... guide Support DVD • If any of ASUS quality motherboards! Actual product specifications may vary with the list below. 1.2 Package contents Check your retailer. • The illustrated items above are for the following items. ASUS P8Z68-V PRO/GEN3 motherboard 1 x ASUS Q-Shield 2 x Serial ATA 3.0 Gb/s cables 2 x Serial ATA 6.0 Gb/s cables 1 x ASUS SLI™ bridge connector 1 x 2-in your package with...
User Manual
Page 14
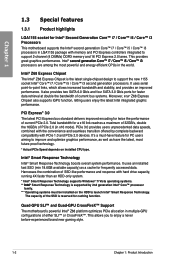
... bandwidth and stability, and provides an improved performance. Total bandwidth for a x16 link reaches a maximum of 32GB/s, double the 16GB/s of either SLI™ or CrossFireX™. Quad-GPU SLI™ and Quad-GPU CrossFireX™ Support The motherboard's powerful Intel® Z68 platform optimizes PCIe allocation in multiple-GPU configurations of...
... bandwidth and stability, and provides an improved performance. Total bandwidth for a x16 link reaches a maximum of 32GB/s, double the 16GB/s of either SLI™ or CrossFireX™. Quad-GPU SLI™ and Quad-GPU CrossFireX™ Support The motherboard's powerful Intel® Z68 platform optimizes PCIe allocation in multiple-GPU configurations of...

User Manual
Page 31
...shared - - - - - IRQ assignments for details. shared - - - - PCIEx1_2/USB3_1234 - LAN_1 - - - shared - Marvell® SATA 6G Controller - - - PCIEx16_2 shared - - - - - ASUS P8Z68-V PRO/GEN3 G H - - - - - - - - - - - - - - - - - Chapter 2 PCIEX16_3 PCI Express sharing mode configuration PCIEX16_3 PCIEX1_1 Auto Mode X1 X1 X4 Mode X4 (Recommend for high... PCI Express x16 graphics cards to get better performance. • In CrossFireX™ or SLI™ mode, use the PCIe 3.0/ 2.0 x16_1 and PCIe 3.0/ 2.0 x16_2 slots for details...
...shared - - - - - IRQ assignments for details. shared - - - - PCIEx1_2/USB3_1234 - LAN_1 - - - shared - Marvell® SATA 6G Controller - - - PCIEx16_2 shared - - - - - ASUS P8Z68-V PRO/GEN3 G H - - - - - - - - - - - - - - - - - Chapter 2 PCIEX16_3 PCI Express sharing mode configuration PCIEX16_3 PCIEX1_1 Auto Mode X1 X1 X4 Mode X4 (Recommend for high... PCI Express x16 graphics cards to get better performance. • In CrossFireX™ or SLI™ mode, use the PCIe 3.0/ 2.0 x16_1 and PCIe 3.0/ 2.0 x16_2 slots for details...

User Manual
Page 138
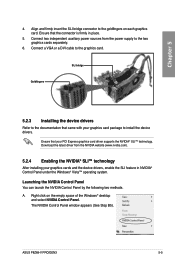
... Visit the NVIDIA zone website (http://www.nzone.com) for the latest certified graphics card and supported 3D application list. 5.2.2 Installing two SLI-ready graphics cards The following pictures are for multi-graphics card installation. 3. Download the latest driver from the NVIDIA website (www.nvidia.com).... slots recommended for reference only. See Chapter 2 for details. • We recommend that your graphics card driver supports the NVIDIA SLI technology. Insert the two graphics card into the PCIEX16 slots. The graphics cards and the motherboard layout may vary with models, but...
... Visit the NVIDIA zone website (http://www.nzone.com) for the latest certified graphics card and supported 3D application list. 5.2.2 Installing two SLI-ready graphics cards The following pictures are for multi-graphics card installation. 3. Download the latest driver from the NVIDIA website (www.nvidia.com).... slots recommended for reference only. See Chapter 2 for details. • We recommend that your graphics card driver supports the NVIDIA SLI technology. Insert the two graphics card into the PCIEX16 slots. The graphics cards and the motherboard layout may vary with models, but...
User Manual
Page 139
.... Connect two independent auxiliary power sources from the NVIDIA website (www.nvidia.com). 5.2.4 Enabling the NVIDIA® SLI™ technology After installing your PCI Express graphics card driver supports the NVIDIA® SLI™ technology. ASUS P8Z68-V PRO/GEN3 5-5 Launching the NVIDIA Control Panel You can launch the NVIDIA Control Panel by the following two methods...
.... Connect two independent auxiliary power sources from the NVIDIA website (www.nvidia.com). 5.2.4 Enabling the NVIDIA® SLI™ technology After installing your PCI Express graphics card driver supports the NVIDIA® SLI™ technology. ASUS P8Z68-V PRO/GEN3 5-5 Launching the NVIDIA Control Panel You can launch the NVIDIA Control Panel by the following two methods...
User Manual
Page 141
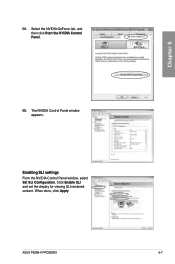
Select the NVIDIA GeForce tab, and then click Start the NVIDIA Control Panel. When done, click Apply. Enabling SLI settings From the NVIDIA Control Panel window, select Set SLI Configuration. The NVIDIA Control Panel window appears. ASUS P8Z68-V PRO/GEN3 5-7 Chapter 5 B5. B4. Click Enable SLI and set the display for viewing SLI rendered content.
Select the NVIDIA GeForce tab, and then click Start the NVIDIA Control Panel. When done, click Apply. Enabling SLI settings From the NVIDIA Control Panel window, select Set SLI Configuration. The NVIDIA Control Panel window appears. ASUS P8Z68-V PRO/GEN3 5-7 Chapter 5 B5. B4. Click Enable SLI and set the display for viewing SLI rendered content.


