User Manual
Page 12
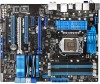
... voltage at 0.00625V increment - vDRAM Bus: 160-step memory voltage control - BCLK/PEG frequency tuning from 80MHz up to change without notice. P8P67 PRO REV 3.1 specifications summary ASUS exclusive overclocking features Precision Tweaker 2 - ASUS C.P.R. (CPU Parameter Recall) 1 x PS/2 mouse port (green) 1 x PS/2 keyboard port (purple) 1 x Coaxial S/PDIF Out port 1 x Optical S/PDIF Out port 1 x Bluetooth module 2 x eSATA...
... voltage at 0.00625V increment - vDRAM Bus: 160-step memory voltage control - BCLK/PEG frequency tuning from 80MHz up to change without notice. P8P67 PRO REV 3.1 specifications summary ASUS exclusive overclocking features Precision Tweaker 2 - ASUS C.P.R. (CPU Parameter Recall) 1 x PS/2 mouse port (green) 1 x PS/2 keyboard port (purple) 1 x Coaxial S/PDIF Out port 1 x Optical S/PDIF Out port 1 x Bluetooth module 2 x eSATA...
User Manual
Page 39
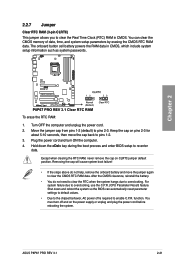
... the cap will cause system boot failure! • If the steps above do not need to clear the RTC when the system hangs due to overclocking. function. 2.2.7 Jumper Clear RTC RAM (3-pin CLRTC) This jumper allows you to clear the Real Time Clock (RTC) RAM in CMOS, which include ...ON the computer. 4. ASUS P8P67 PRO REV 3.1 2-21 Keep the cap on pins 2-3 for about 5-10 seconds, then move the jumper again to clear the CMOS RTC RAM data. After the CMOS clearance, reinstall the battery. • You do not help, remove the onboard battery and move the cap back to overclocking, use the C.P.R. (...
... the cap will cause system boot failure! • If the steps above do not need to clear the RTC when the system hangs due to overclocking. function. 2.2.7 Jumper Clear RTC RAM (3-pin CLRTC) This jumper allows you to clear the Real Time Clock (RTC) RAM in CMOS, which include ...ON the computer. 4. ASUS P8P67 PRO REV 3.1 2-21 Keep the cap on pins 2-3 for about 5-10 seconds, then move the jumper again to clear the CMOS RTC RAM data. After the CMOS clearance, reinstall the battery. • You do not help, remove the onboard battery and move the cap back to overclocking, use the C.P.R. (...
User Manual
Page 67
... �S�e�e��s�e��c�ti�o�n� 2.2.8 Jumper for BIOS item modification. Chapter 3 ASUS P8P67 PRO REV 3.1 3-1 Inappropriate settings of a trained service personnel.ç 3.2 BIOS setup program A BIOS setup program is provided for information ... under two modes: EZ Mode and Advanced Mode. Being a menu-driven program, it as storage device configuration, overclocking settings, advanced power management, and boot device configuration that are for reference purposes only, and may result to instability...
... �S�e�e��s�e��c�ti�o�n� 2.2.8 Jumper for BIOS item modification. Chapter 3 ASUS P8P67 PRO REV 3.1 3-1 Inappropriate settings of a trained service personnel.ç 3.2 BIOS setup program A BIOS setup program is provided for information ... under two modes: EZ Mode and Advanced Mode. Being a menu-driven program, it as storage device configuration, overclocking settings, advanced power management, and boot device configuration that are for reference purposes only, and may result to instability...
User Manual
Page 69
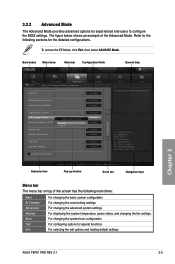
...the following main items: Main Ai Tweaker Advanced Monitor Boot Tool Exit For changing the basic system configuration For changing the overclocking settings For changing the advanced system settings For displaying the system temperature, power status, and changing the fan settings. Back...shows an example of the screen has the following sections for special functions For selecting the exit options and loading default settings Chapter 3 ASUS P8P67 PRO REV 3.1 3-3 F1: General Help F2: Previous Values F5: Optimized Defaults F10: Save ESC: Exit Submenu item Version 2.00.1201. To...
...the following main items: Main Ai Tweaker Advanced Monitor Boot Tool Exit For changing the basic system configuration For changing the overclocking settings For changing the advanced system settings For displaying the system temperature, power status, and changing the fan settings. Back...shows an example of the screen has the following sections for special functions For selecting the exit options and loading default settings Chapter 3 ASUS P8P67 PRO REV 3.1 3-3 F1: General Help F2: Previous Values F5: Optimized Defaults F10: Save ESC: Exit Submenu item Version 2.00.1201. To...
User Manual
Page 73
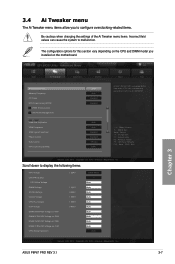
Advanced Mode Exit Main Ai Tweaker Advanced Monitor Ai Overclock Tuner Auto Memory Frequency Auto OC Tuner Disabled EPU Power Saving MODE Disabled > DRAM Timing ... down to malfunction. The configuration options for this section vary depending on the CPU and DIMM model you to configure overclocking-related items. Be cautious when changing the settings of the Ai Tweaker menu items. Incorrect field values can cause the...F5: Optimized Defaults F10: Save ESC: Exit Chapter 3 Version 2.00.1201. Copyright (C) 2010 American Megatrends, Inc. ASUS P8P67 PRO REV 3.1 3-7
Advanced Mode Exit Main Ai Tweaker Advanced Monitor Ai Overclock Tuner Auto Memory Frequency Auto OC Tuner Disabled EPU Power Saving MODE Disabled > DRAM Timing ... down to malfunction. The configuration options for this section vary depending on the CPU and DIMM model you to configure overclocking-related items. Be cautious when changing the settings of the Ai Tweaker menu items. Incorrect field values can cause the...F5: Optimized Defaults F10: Save ESC: Exit Chapter 3 Version 2.00.1201. Copyright (C) 2010 American Megatrends, Inc. ASUS P8P67 PRO REV 3.1 3-7
User Manual
Page 77
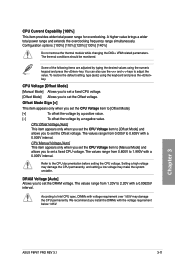
... higher value brings a wider total power range and extends the overclocking frequency range simultaneously. Some of the following items are adjusted by a negative value. The values range from 0.005V to set the Offset voltage. Chapter 3 ASUS P8P67 PRO REV 3.1 3-11 The thermal conditions should be monitored. DRAM Voltage ... press the key. Refer to adjust the value. CPU Current Capability [100%] This item provides wider total power range for overclocking. You can also use the and keys to the CPU documentation before setting the CPU voltage. Offset Mode Sign [+] This ...
... higher value brings a wider total power range and extends the overclocking frequency range simultaneously. Some of the following items are adjusted by a negative value. The values range from 0.005V to set the Offset voltage. Chapter 3 ASUS P8P67 PRO REV 3.1 3-11 The thermal conditions should be monitored. DRAM Voltage ... press the key. Refer to adjust the value. CPU Current Capability [100%] This item provides wider total power range for overclocking. You can also use the and keys to the CPU documentation before setting the CPU voltage. Offset Mode Sign [+] This ...
User Manual
Page 113
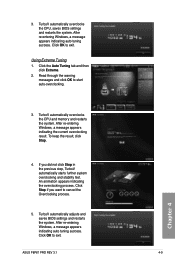
... Read through the warning messages and click OK to exit. ASUS P8P67 PRO REV 3.1 4-9 Chapter 4 After re-entering Windows, a message appears indicating auto tuning success. After re-entering Windows, a message appears indicating the current overclocking result. TurboV automatically adjusts and saves BIOS settings and restarts ...Click the Auto Tuning tab and then click Extreme. 2. TurboV automatically overclocks the CPU and memory and restarts the system. To keep the result, click Stop. 4. TurboV automatically overclocks the CPU, saves BIOS settings and restarts the system. An animation...
... Read through the warning messages and click OK to exit. ASUS P8P67 PRO REV 3.1 4-9 Chapter 4 After re-entering Windows, a message appears indicating auto tuning success. After re-entering Windows, a message appears indicating the current overclocking result. TurboV automatically adjusts and saves BIOS settings and restarts ...Click the Auto Tuning tab and then click Extreme. 2. TurboV automatically overclocks the CPU and memory and restarts the system. To keep the result, click Stop. 4. TurboV automatically overclocks the CPU, saves BIOS settings and restarts the system. An animation...


