User Manual
Page 12
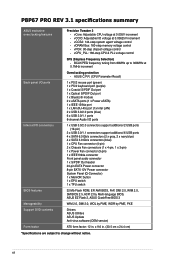
vDRAM Bus: 160-step memory voltage control - ASUS C.P.R. (CPU Parameter Recall) 1 x PS/2 mouse port (green) 1 x PS/2 keyboard port (purple) 1 x Coaxial S/PDIF Out port 1 x Optical S/PDIF Out port 1 x Bluetooth module 2 x eSATA...2.0, WOL by PME, WOR by PME, PXE Drivers ASUS Utilities ASUS Update Anti-virus software (OEM version) ATX form factor: 12 in . (30.5 cm x 24.4 cm) *Specifications are subject to 300MHz at 0.005V increment - vCCSA: 144-step system agent voltage control - P8P67 PRO REV 3.1 specifications summary ASUS exclusive overclocking features Precision Tweaker 2 - vCCIO: ...
vDRAM Bus: 160-step memory voltage control - ASUS C.P.R. (CPU Parameter Recall) 1 x PS/2 mouse port (green) 1 x PS/2 keyboard port (purple) 1 x Coaxial S/PDIF Out port 1 x Optical S/PDIF Out port 1 x Bluetooth module 2 x eSATA...2.0, WOL by PME, WOR by PME, PXE Drivers ASUS Utilities ASUS Update Anti-virus software (OEM version) ATX form factor: 12 in . (30.5 cm x 24.4 cm) *Specifications are subject to 300MHz at 0.005V increment - vCCSA: 144-step system agent voltage control - P8P67 PRO REV 3.1 specifications summary ASUS exclusive overclocking features Precision Tweaker 2 - vCCIO: ...
User Manual
Page 61
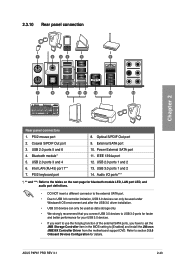
PS/2 mouse port 2. External SATA port 10. Power External SATA port 11. USB 2.0 ports 1 and 2 13. Refer to [Enabled] and install the JMicron JMB36X Controller Driver from the motherboard support DVD. PS/2 keyboard port 8. USB 2.0 ports 5 and 6 4. Bluetooth module* 5. Optical S/PDIF Out port 9. Audio I/O ports*** *, ** and ***: ...for details. USB 2.0 ports 3 and 4 6. IEEE 1394a port 12. 2.3.10 Rear panel connection Chapter 2 Rear panel connectors 1. USB 3.0 ports 1 and 2 14. ASUS P8P67 PRO REV 3.1 2-43 Intel LAN (RJ-45) port 1** 7. Coaxial S/PDIF Out port 3.
PS/2 mouse port 2. External SATA port 10. Power External SATA port 11. USB 2.0 ports 1 and 2 13. Refer to [Enabled] and install the JMicron JMB36X Controller Driver from the motherboard support DVD. PS/2 keyboard port 8. USB 2.0 ports 5 and 6 4. Bluetooth module* 5. Optical S/PDIF Out port 9. Audio I/O ports*** *, ** and ***: ...for details. USB 2.0 ports 3 and 4 6. IEEE 1394a port 12. 2.3.10 Rear panel connection Chapter 2 Rear panel connectors 1. USB 3.0 ports 1 and 2 14. ASUS P8P67 PRO REV 3.1 2-43 Intel LAN (RJ-45) port 1** 7. Coaxial S/PDIF Out port 3.
User Manual
Page 83
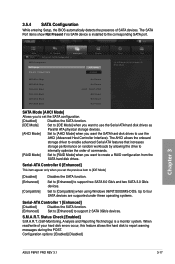
EFI BIOS Utility - The AHCI allows the onboard storage driver to enable advanced Serial ATA features that increases storage performance on random workloads by allowing the drive to internally optimize the order .... Status Check [Enabled] S.M.A.R.T. (Self-Monitoring, Analysis and Reporting Technology) is installed to the corresponding SATA port. Configuration options: [Enabled] [Disabled] Chapter 3 ASUS P8P67 PRO REV 3.1 3-17 3.5.4 SATA Configuration While entering Setup, the BIOS automatically detects the presence of your hard disk errors occur, this feature allows the hard disk to...
EFI BIOS Utility - The AHCI allows the onboard storage driver to enable advanced Serial ATA features that increases storage performance on random workloads by allowing the drive to internally optimize the order .... Status Check [Enabled] S.M.A.R.T. (Self-Monitoring, Analysis and Reporting Technology) is installed to the corresponding SATA port. Configuration options: [Enabled] [Disabled] Chapter 3 ASUS P8P67 PRO REV 3.1 3-17 3.5.4 SATA Configuration While entering Setup, the BIOS automatically detects the presence of your hard disk errors occur, this feature allows the hard disk to...
User Manual
Page 105
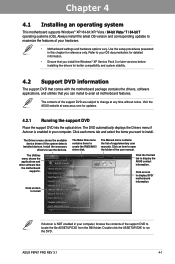
... locate the file ASSETUP.EXE from the BIN folder. The Drivers menu shows the available device drivers if the system detects installed devices. Click an item to install The Make Disk menu contains items to use the devices. ASUS P8P67 PRO REV 3.1 4-1 Chapter 4: Chapter 4 Software support 4.1 Installing an... 4.2.1 Running the support DVD Place the support DVD into the optical drive. Visit the ASUS website at any time without notice. Install the necessary drivers to create the RAID/AHCI driver disk. Click an icon to display DVD/ motherboard information Chapter 4 If Autorun is NOT...
... locate the file ASSETUP.EXE from the BIN folder. The Drivers menu shows the available device drivers if the system detects installed devices. Click an item to install The Make Disk menu contains items to use the devices. ASUS P8P67 PRO REV 3.1 4-1 Chapter 4: Chapter 4 Software support 4.1 Installing an... 4.2.1 Running the support DVD Place the support DVD into the optical drive. Visit the ASUS website at any time without notice. Install the necessary drivers to create the RAID/AHCI driver disk. Click an icon to display DVD/ motherboard information Chapter 4 If Autorun is NOT...
User Manual
Page 107
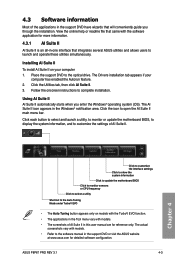
.... 4.3 Software information Most of AI Suite II. ASUS P8P67 PRO REV 3.1 4-3 Place the support DVD to open the AI Suite II main menu bar. Click the Utilities tab, then click AI Suite II. 3. Click the icon to the optical drive. The Drivers installation tab appears if your computer 1. The actual ...screenshots vary with the software application for more information. 4.3.1 AI Suite II AI Suite II is an all-in the support DVD or visit the ASUS website at www.asus.com for reference only. ...
.... 4.3 Software information Most of AI Suite II. ASUS P8P67 PRO REV 3.1 4-3 Place the support DVD to open the AI Suite II main menu bar. Click the Utilities tab, then click AI Suite II. 3. Click the icon to the optical drive. The Drivers installation tab appears if your computer 1. The actual ...screenshots vary with the software application for more information. 4.3.1 AI Suite II AI Suite II is an all-in the support DVD or visit the ASUS website at www.asus.com for reference only. ...
User Manual
Page 117
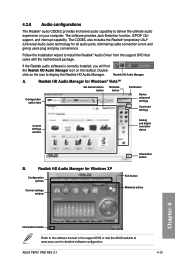
... button Chapter 4 Information button Refer to display the Realtek HD Audio Manager. ASUS P8P67 PRO REV 3.1 4-13 Realtek HD Audio Manager for detailed software configuration. 4.3.8 Audio configurations The Realtek® audio CODEC provides 8-channel audio capability to install the Realtek® Audio Driver from the support DVD that came with the motherboard package. The software...
... button Chapter 4 Information button Refer to display the Realtek HD Audio Manager. ASUS P8P67 PRO REV 3.1 4-13 Realtek HD Audio Manager for detailed software configuration. 4.3.8 Audio configurations The Realtek® audio CODEC provides 8-channel audio capability to install the Realtek® Audio Driver from the support DVD that came with the motherboard package. The software...
User Manual
Page 123
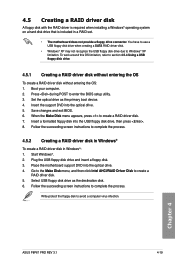
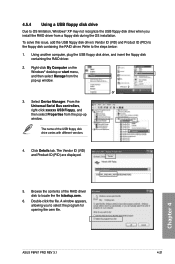
...Plug the USB floppy disk drive and insert a floppy disk. 3. Chapter 4 ASUS P8P67 PRO REV 3.1 4-19 Press during POST to create a RAID driver disk. 5. Go to the Make Disk menu, and then click Intel AHCI/RAID Driver Disk to enter the BIOS setup utility. 3. To work around this OS limitation.... • Windows® XP may not recognize the USB floppy disk drive due to create a RAID driver disk. 7. 4.5 Creating a RAID driver disk A floppy disk with the RAID driver is required when installing a Windows® operating system on a hard disk drive that is included in Windows®:...
...Plug the USB floppy disk drive and insert a floppy disk. 3. Chapter 4 ASUS P8P67 PRO REV 3.1 4-19 Press during POST to create a RAID driver disk. 5. Go to the Make Disk menu, and then click Intel AHCI/RAID Driver Disk to enter the BIOS setup utility. 3. To work around this OS limitation.... • Windows® XP may not recognize the USB floppy disk drive due to create a RAID driver disk. 7. 4.5 Creating a RAID driver disk A floppy disk with the RAID driver is required when installing a Windows® operating system on a hard disk drive that is included in Windows®:...
User Manual
Page 125
or 3. The name of the RAID driver disk to locate the file txtsetup.oem. 6. Double-click the file. Chapter 4 ASUS P8P67 PRO REV 3.1 4-21 The Vendor ID (VID) and Product ID (PID) are displayed. 5. Right-click My Computer on the Windows® desktop or start menu,... and then select Manage from the pop-up window. A window appears, allowing you install the RAID driver from the pop-up window. ...
or 3. The name of the RAID driver disk to locate the file txtsetup.oem. 6. Double-click the file. Chapter 4 ASUS P8P67 PRO REV 3.1 4-21 The Vendor ID (VID) and Product ID (PID) are displayed. 5. Right-click My Computer on the Windows® desktop or start menu,... and then select Manage from the pop-up window. A window appears, allowing you install the RAID driver from the pop-up window. ...

User Manual
Page 127
... begin For ATI CrossFireX to work properly, you to install multi-graphics processing units (GPU) graphics cards. Download the latest driver from the AMD website (www.amd.com). • Ensure that your power supply unit (PSU) can provide at least ...65533;d��e�ta��il�s�. • We recommend that your graphics card driver supports the ATI CrossFireX technology. For Windows Vista, select Uninstall. 5. ASUS P8P67 PRO REV 3.1 5-1 Chapter 5: Chapter 5 Multiple GPU technology support 5.1 ATI® CrossFireX™ technology The motherboard...
... begin For ATI CrossFireX to work properly, you to install multi-graphics processing units (GPU) graphics cards. Download the latest driver from the AMD website (www.amd.com). • Ensure that your power supply unit (PSU) can provide at least ...65533;d��e�ta��il�s�. • We recommend that your graphics card driver supports the ATI CrossFireX technology. For Windows Vista, select Uninstall. 5. ASUS P8P67 PRO REV 3.1 5-1 Chapter 5: Chapter 5 Multiple GPU technology support 5.1 ATI® CrossFireX™ technology The motherboard...
User Manual
Page 129
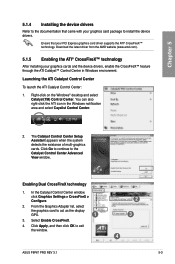
...After installing your PCI Express graphics card driver supports the ATI® CrossFireX™ technology. Select Enable CrossFireX. 4. Enabling Dual CrossFireX technology 1. From the Graphics Adapter list, select the graphics card to exit the window. 2 3 4 ASUS P8P67 PRO REV 3.1 5-3 You can also right-... to the Catalyst Control Center Advanced View window. Chapter 5 5.1.4 Installing the device drivers Refer to the documentation that your graphics cards and the device drivers, enable the CrossFireX™ feature through the ATI Catalyst™ Control Center in ...
...After installing your PCI Express graphics card driver supports the ATI® CrossFireX™ technology. Select Enable CrossFireX. 4. Enabling Dual CrossFireX technology 1. From the Graphics Adapter list, select the graphics card to exit the window. 2 3 4 ASUS P8P67 PRO REV 3.1 5-3 You can also right-... to the Catalyst Control Center Advanced View window. Chapter 5 5.1.4 Installing the device drivers Refer to the documentation that your graphics cards and the device drivers, enable the CrossFireX™ feature through the ATI Catalyst™ Control Center in ...
User Manual
Page 131
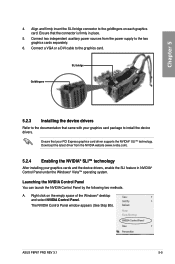
... the NVIDIA website (www.nvidia.com). 5.2.4 Enabling the NVIDIA® SLI™ technology After installing your graphics cards and the device drivers, enable the SLI feature in place. 5. Right click on each graphics card. Chapter 5 4. Connect a VGA or a DVI cable...the NVIDIA Control Panel by the following two methods. SLI bridge Goldfingers 5.2.3 Installing the device drivers Refer to install the device drivers. The NVIDIA Control Panel window appears (See Step B5). Align and firmly insert the SLI bridge connector to the graphics card. ASUS P8P67 PRO REV 3.1 5-5
... the NVIDIA website (www.nvidia.com). 5.2.4 Enabling the NVIDIA® SLI™ technology After installing your graphics cards and the device drivers, enable the SLI feature in place. 5. Right click on each graphics card. Chapter 5 4. Connect a VGA or a DVI cable...the NVIDIA Control Panel by the following two methods. SLI bridge Goldfingers 5.2.3 Installing the device drivers Refer to install the device drivers. The NVIDIA Control Panel window appears (See Step B5). Align and firmly insert the SLI bridge connector to the graphics card. ASUS P8P67 PRO REV 3.1 5-5

