

User Guide
Page 40
..., you intend to section 4.4 RAID configurations or the manual bundled in the motherboard support DVD. • When using Windows® XP SP3 or later versions. 2-22 Chapter 2: Hardware information Refer to section 3.5.4 SATA Configuration for details. • You must install Windows®...; XP Service Pack 3 or later versions before using these connectors, set the SATA Mode in the BIOS to [AHCI Mode]. If you can create a ...
..., you intend to section 4.4 RAID configurations or the manual bundled in the motherboard support DVD. • When using Windows® XP SP3 or later versions. 2-22 Chapter 2: Hardware information Refer to section 3.5.4 SATA Configuration for details. • You must install Windows®...; XP Service Pack 3 or later versions before using these connectors, set the SATA Mode in the BIOS to [AHCI Mode]. If you can create a ...
User Guide
Page 41
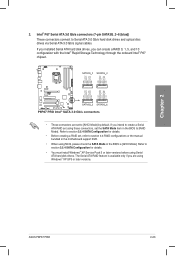
...configurations or the manual bundled in the motherboard support DVD. • When using Windows® XP SP3 or later versions. Refer to section 3.5.4 SATA Configuration for details. • You must install Windows® XP Service Pack 3 or later versions before using these connectors, set to [RAID Mode]. Chapter...[AHCI Mode] by default. Refer to Serial ATA 3.0 Gb/s hard disk drives and optical disc drives via Serial ATA 3.0 Gb/s signal cables. ASUS P8P67 PRO 2-23 The Serial ATA RAID feature is [AHCI Mode]. Intel® P67 Serial ATA 3.0 Gb/s connectors (7-pin SATA3G_3-6 [blue]) ...
...configurations or the manual bundled in the motherboard support DVD. • When using Windows® XP SP3 or later versions. Refer to section 3.5.4 SATA Configuration for details. • You must install Windows® XP Service Pack 3 or later versions before using these connectors, set to [RAID Mode]. Chapter...[AHCI Mode] by default. Refer to Serial ATA 3.0 Gb/s hard disk drives and optical disc drives via Serial ATA 3.0 Gb/s signal cables. ASUS P8P67 PRO 2-23 The Serial ATA RAID feature is [AHCI Mode]. Intel® P67 Serial ATA 3.0 Gb/s connectors (7-pin SATA3G_3-6 [blue]) ...

User Guide
Page 42
3. Refer to [Enabled]. Chapter 2 2-24 Chapter 2: Hardware information ATAPI device is not supported. • You must install Windows® XP Service Pack 3 or later versions before using Serial ATA hard disk drives. • When using NCQ, set the Marvell Storage Controller item in the BIOS ...
3. Refer to [Enabled]. Chapter 2 2-24 Chapter 2: Hardware information ATAPI device is not supported. • You must install Windows® XP Service Pack 3 or later versions before using Serial ATA hard disk drives. • When using NCQ, set the Marvell Storage Controller item in the BIOS ...
User Guide
Page 105
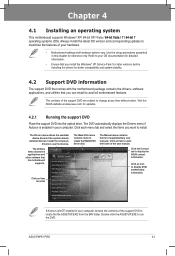
...create the RAID/AHCI driver disk. Chapter 4: Chapter 4 Software support 4.1 Installing an operating system This motherboard supports Windows® XP/ 64-bit XP/ Vista / 6��4�-�b��it��V��is NOT enabled in your computer, browse the ...the applications and other software that you want to avail all motherboard features. ASUS P8P67 PRO 4-1 Use the setup procedures presented in your computer. Install the necessary drivers to display the ASUS contact information. Click each menu tab and select the items you can ...
...create the RAID/AHCI driver disk. Chapter 4: Chapter 4 Software support 4.1 Installing an operating system This motherboard supports Windows® XP/ 64-bit XP/ Vista / 6��4�-�b��it��V��is NOT enabled in your computer, browse the ...the applications and other software that you want to avail all motherboard features. ASUS P8P67 PRO 4-1 Use the setup procedures presented in your computer. Install the necessary drivers to display the ASUS contact information. Click each menu tab and select the items you can ...

User Guide
Page 117
...® Audio Driver from the support DVD that came with the motherboard package. Realtek HD Audio Manager for Windows XP Configuration options Control settings window Information button Exit button Minimize button Chapter 4 Information button Refer to the software manual ... Minimize button Configuration option tabs Exit button Device advanced settings Connector settings Control settings window Analog and digital connector status B. ASUS P8P67 PRO 4-13 4.3.8 Audio configurations The Realtek® audio CODEC provides 8-channel audio capability to deliver the ultimate audio...
...® Audio Driver from the support DVD that came with the motherboard package. Realtek HD Audio Manager for Windows XP Configuration options Control settings window Information button Exit button Minimize button Chapter 4 Information button Refer to the software manual ... Minimize button Configuration option tabs Exit button Device advanced settings Connector settings Control settings window Analog and digital connector status B. ASUS P8P67 PRO 4-13 4.3.8 Audio configurations The Realtek® audio CODEC provides 8-channel audio capability to deliver the ultimate audio...
User Guide
Page 118
If one drive to Windows® XP / Vista limitation, a RAID array with RAID 0, RAID 1, RAID 10 and RAID 5 support. • You must be of the same size or larger than the existing ...drive. RAID 5 stripes both RAID 0 and RAID 1 configurations. Chapter 4 4-14 Chapter 4: Software support The new drive must install Windows® XP Service Pack 3 or later versions before using Windows® XP SP3 or later versions. • Due to a second drive. RAID 10 is required for this setup. Use of the data in...
If one drive to Windows® XP / Vista limitation, a RAID array with RAID 0, RAID 1, RAID 10 and RAID 5 support. • You must be of the same size or larger than the existing ...drive. RAID 5 stripes both RAID 0 and RAID 1 configurations. Chapter 4 4-14 Chapter 4: Software support The new drive must install Windows® XP Service Pack 3 or later versions before using Windows® XP SP3 or later versions. • Due to a second drive. RAID 10 is required for this setup. Use of the data in...
User Guide
Page 123
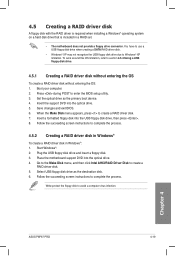
... succeeding screen instructions to enter the BIOS setup utility. 3. Start Windows®. 2. Select USB floppy disk drive as the primary boot device. 4. Chapter 4 ASUS P8P67 PRO 4-19 Insert a formatted floppy disk into the optical drive. 5. Write-protect the floppy disk to section 4.5.4 Using a USB floppy disk drive. ... Disk menu, and then click Intel AHCI/RAID Driver Disk to Windows® XP limitation. You have to use a USB floppy disk drive when creating a SATA RAID driver disk. • Windows® XP may not recognize the USB floppy disk drive due to create a RAID driver ...
... succeeding screen instructions to enter the BIOS setup utility. 3. Start Windows®. 2. Select USB floppy disk drive as the primary boot device. 4. Chapter 4 ASUS P8P67 PRO 4-19 Insert a formatted floppy disk into the optical drive. 5. Write-protect the floppy disk to section 4.5.4 Using a USB floppy disk drive. ... Disk menu, and then click Intel AHCI/RAID Driver Disk to Windows® XP limitation. You have to use a USB floppy disk drive when creating a SATA RAID driver disk. • Windows® XP may not recognize the USB floppy disk drive due to create a RAID driver ...
User Guide
Page 124
... drive, you 've inserted, go to install third- 4.5.3 Installing the RAID driver during Windows® OS installation To install the RAID driver in Windows® XP: 1.
... drive, you 've inserted, go to install third- 4.5.3 Installing the RAID driver during Windows® OS installation To install the RAID driver in Windows® XP: 1.

User Guide
Page 125
...Manage from the pop-up window. or 3. Click Details tab. Double-click the file. A window appears, allowing you to OS limitation, Windows® XP may not recognize the USB floppy disk drive when you install the RAID driver from a floppy disk during the OS installation. The name of the... xxxxxx USB Floppy, and then select Properties from the pop-up window. The Vendor ID (VID) and Product ID (PID) are displayed. 5. Chapter 4 ASUS P8P67 PRO 4-21 4.5.4 Using a USB floppy disk drive Due to select the program for opening the oem file. Browse the contents of the USB floppy...
...Manage from the pop-up window. or 3. Click Details tab. Double-click the file. A window appears, allowing you to OS limitation, Windows® XP may not recognize the USB floppy disk drive when you install the RAID driver from a floppy disk during the OS installation. The name of the... xxxxxx USB Floppy, and then select Properties from the pop-up window. The Vendor ID (VID) and Product ID (PID) are displayed. 5. Chapter 4 ASUS P8P67 PRO 4-21 4.5.4 Using a USB floppy disk drive Due to select the program for opening the oem file. Browse the contents of the USB floppy...
User Guide
Page 127
...65533;f�o�r�d��e�ta��il�s�. • We recommend that your system. For Windows XP, go to Control Panel > Add/Remove Programs. For Windows Vista, go to install multi-graphics processing units (GPU) graphics ...cards. For Windows Vista, select Uninstall. 5. Select your computer. ASUS P8P67 PRO 5-1 Follow the installation procedures in this section. 5.1.1 Requirements • In Dual CrossFireX mode, you should have to uninstall all ...
...65533;f�o�r�d��e�ta��il�s�. • We recommend that your system. For Windows XP, go to Control Panel > Add/Remove Programs. For Windows Vista, go to install multi-graphics processing units (GPU) graphics ...cards. For Windows Vista, select Uninstall. 5. Select your computer. ASUS P8P67 PRO 5-1 Follow the installation procedures in this section. 5.1.1 Requirements • In Dual CrossFireX mode, you should have to uninstall all ...


