User Manual
Page 1
Motherboard P8H61-M LX Series • P8H61-M LX • P8H61-M LX PLUS
Motherboard P8H61-M LX Series • P8H61-M LX • P8H61-M LX PLUS

User Manual
Page 3
Contents Notices...vi Safety information vii About this guide viii P8H61-M LX Series specifications summary ix Chapter 1: Product introduction 1.1 Welcome 1-1 1.2 Package contents 1-1 1.3 Special features 1-1 1.3.1 Product highlights 1-1 1.3.2 Innovative ASUS features 1-2 1.4 Before you proceed 1-5 1.5 Motherboard overview 1-6 1.5.1 Placement direction 1-6 1.5.2 Screw holes 1-6 1.5.3 Motherboard layout 1-7 1.5.4 Layout contents 1-7 1.6 Central Processing Unit (CPU 1-8 1.6.1 Installing the CPU 1-8 1.6.2 Installing the CPU heatsink and fan 1-11...
Contents Notices...vi Safety information vii About this guide viii P8H61-M LX Series specifications summary ix Chapter 1: Product introduction 1.1 Welcome 1-1 1.2 Package contents 1-1 1.3 Special features 1-1 1.3.1 Product highlights 1-1 1.3.2 Innovative ASUS features 1-2 1.4 Before you proceed 1-5 1.5 Motherboard overview 1-6 1.5.1 Placement direction 1-6 1.5.2 Screw holes 1-6 1.5.3 Motherboard layout 1-7 1.5.4 Layout contents 1-7 1.6 Central Processing Unit (CPU 1-8 1.6.1 Installing the CPU 1-8 1.6.2 Installing the CPU heatsink and fan 1-11...
User Manual
Page 11
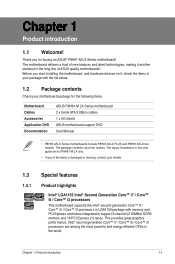
... Core™ i7 / Core™ i5 / Core™ i3 processors are for the following items. Motherboard Cables Accessories Application DVD Documentation ASUS P8H61-M LX Series motherboard 2 x Serial ATA 3.0Gb/s cables 1 x I/O shield ASUS motherboard support DVD User Manual • P8H61-M LX Series motherboards include P8H61-M LX PLUS and P8H61-M LX two models. The layout illustrations in this user guide are among the most powerful and energy...
... Core™ i7 / Core™ i5 / Core™ i3 processors are for the following items. Motherboard Cables Accessories Application DVD Documentation ASUS P8H61-M LX Series motherboard 2 x Serial ATA 3.0Gb/s cables 1 x I/O shield ASUS motherboard support DVD User Manual • P8H61-M LX Series motherboards include P8H61-M LX PLUS and P8H61-M LX two models. The layout illustrations in this user guide are among the most powerful and energy...
User Manual
Page 12
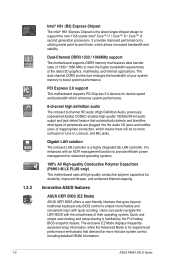
...motherboard supports DDR3 memory that demand far more intricate system control, including detailed DRAM information. 1-2 ASUS P8H61-M LX Series Gigabit LAN solution The onboard LAN controller is the latest single-chipset design to enable more confusion of their operating system. Innovative ASUS features ASUS UEFI BIOS (EZ Mode) ASUS...power management for advanced operating systems. 100% All High-quality Conductive Polymer Capacitors (P8H61-M LX PLUS only) This motherboard uses all high-quality conductive polymer capacitors for experienced performance enthusiasts that features data...
...motherboard supports DDR3 memory that demand far more intricate system control, including detailed DRAM information. 1-2 ASUS P8H61-M LX Series Gigabit LAN solution The onboard LAN controller is the latest single-chipset design to enable more confusion of their operating system. Innovative ASUS features ASUS UEFI BIOS (EZ Mode) ASUS...power management for advanced operating systems. 100% All High-quality Conductive Polymer Capacitors (P8H61-M LX PLUS only) This motherboard uses all high-quality conductive polymer capacitors for experienced performance enthusiasts that features data...
User Manual
Page 14
...C.P.R. ErP ready The motherboard is in regards to update the BIOS without using an OS-based utility. C.P.R. eliminates the need to convert your favorite photo into a 256-color boot logo for a more colorful and vivid image on your screen. ASUS MyLogo2™ This ...reduce carbon footprint of the product and thus mitigate environmental impacts. 1-4 ASUS P8H61-M LX Series feature automatically restores the CPU default settings when the system hangs due to their default settings. ASUS CrashFree BIOS 3 ASUS CrashFree BIOS 3 is a utility that contains the latest BIOS file....
...C.P.R. ErP ready The motherboard is in regards to update the BIOS without using an OS-based utility. C.P.R. eliminates the need to convert your favorite photo into a 256-color boot logo for a more colorful and vivid image on your screen. ASUS MyLogo2™ This ...reduce carbon footprint of the product and thus mitigate environmental impacts. 1-4 ASUS P8H61-M LX Series feature automatically restores the CPU default settings when the system hangs due to their default settings. ASUS CrashFree BIOS 3 ASUS CrashFree BIOS 3 is a utility that contains the latest BIOS file....
User Manual
Page 15
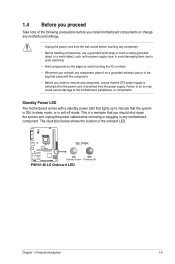
...to static electricity. • Hold components by the edges to avoid touching the ICs on them. • Whenever you install or remove any motherboard component. Failure to do so may cause severe damage to indicate that the system is ON, in sleep mode, or in any component, ... and unplug the power cable before removing or plugging in soft-off or the power cord is switched off mode. SB_PWR P8H61-M LX ON OFF Standby Power Powered Off P8H61-M LX Onboard LED Chapter 1: Product introduction 1-5 This is a reminder that lights up to the motherboard, peripherals, or components.
...to static electricity. • Hold components by the edges to avoid touching the ICs on them. • Whenever you install or remove any motherboard component. Failure to do so may cause severe damage to indicate that the system is ON, in sleep mode, or in any component, ... and unplug the power cable before removing or plugging in soft-off or the power cord is switched off mode. SB_PWR P8H61-M LX ON OFF Standby Power Powered Off P8H61-M LX Onboard LED Chapter 1: Product introduction 1-5 This is a reminder that lights up to the motherboard, peripherals, or components.

User Manual
Page 16
... that you unplug the power cord before installing or removing the motherboard. Failure to do so can damage the motherboard. Place this side towards the rear of the chassis P8H61-M LX 1-6 ASUS P8H61-M LX Series 1.5 Motherboard overview Before you install the motherboard, study the configuration of your chassis to ensure that you place it into the chassis in the...
... that you unplug the power cord before installing or removing the motherboard. Failure to do so can damage the motherboard. Place this side towards the rear of the chassis P8H61-M LX 1-6 ASUS P8H61-M LX Series 1.5 Motherboard overview Before you install the motherboard, study the configuration of your chassis to ensure that you place it into the chassis in the...
User Manual
Page 17
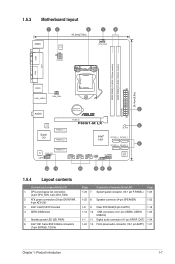
... DIMM slots 5. ATX power connectors (24-pin EATXPWR, 4-pin ATX12V) 3. USB connectors (10-1 pin USB56, USB78, 1-23 USB910) 1-1 11. 1.5.3 Motherboard layout 12 3 19.3cm(7.6in) KBMS EPU 1 4 CPU_FAN COM ATX12V DDR3 DIMM_A1 (64bit, 240-pin module) DDR3 DIMM_B1 (64bit, 240-pin module) ...LPT VGA LGA1155 24.4cm(9.6in) USB34 LAN1_USB12 CHA_FAN EATXPWR Lithium Cell CMOS Power 2 AUDIO PCIEX16 P8H61-M LX RTL 8111E PCIEX1_1 5 SB_PWR Super I/O PCIEX1_2 Intel® H61 SATA3G_2 SATA3G_1 SATA3G_4 SATA3G_3 6 ALC 887 SPDIF_OUT AAFP PCIEX1_3 USB56 USB78...
... DIMM slots 5. ATX power connectors (24-pin EATXPWR, 4-pin ATX12V) 3. USB connectors (10-1 pin USB56, USB78, 1-23 USB910) 1-1 11. 1.5.3 Motherboard layout 12 3 19.3cm(7.6in) KBMS EPU 1 4 CPU_FAN COM ATX12V DDR3 DIMM_A1 (64bit, 240-pin module) DDR3 DIMM_B1 (64bit, 240-pin module) ...LPT VGA LGA1155 24.4cm(9.6in) USB34 LAN1_USB12 CHA_FAN EATXPWR Lithium Cell CMOS Power 2 AUDIO PCIEX16 P8H61-M LX RTL 8111E PCIEX1_1 5 SB_PWR Super I/O PCIEX1_2 Intel® H61 SATA3G_2 SATA3G_1 SATA3G_4 SATA3G_3 6 ALC 887 SPDIF_OUT AAFP PCIEX1_3 USB56 USB78...
User Manual
Page 18
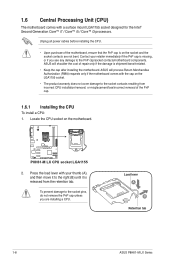
...A B Retention tab 1-8 ASUS P8H61-M LX Series Locate the CPU socket on the socket and the socket contacts are installing a CPU. ASUS will shoulder the cost of repair only if the damage is shipment/transit-related. • Keep the cap after installing the motherboard. To prevent damage to ...do not remove the PnP cap unless you see any damage to the right (B) until it to the PnP cap/socket contacts/motherboard components. P8H61-M LX P8H61-M LX CPU socket LGA1155 2. Press the load lever with a surface mount LGA1155 socket designed for the Intel® Second Generation Core...
...A B Retention tab 1-8 ASUS P8H61-M LX Series Locate the CPU socket on the socket and the socket contacts are installing a CPU. ASUS will shoulder the cost of repair only if the damage is shipment/transit-related. • Keep the cap after installing the motherboard. To prevent damage to ...do not remove the PnP cap unless you see any damage to the right (B) until it to the PnP cap/socket contacts/motherboard components. P8H61-M LX P8H61-M LX CPU socket LGA1155 2. Press the load lever with a surface mount LGA1155 socket designed for the Intel® Second Generation Core...
User Manual
Page 22
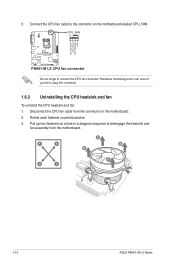
... a diagonal sequence to the connector on the motherboard. 2. A B A B B A B A 1-12 ASUS P8H61-M LX Series Connect the CPU fan cable to disengage the heatsink and fan assembly from the connector on the motherboard labeled CPU_FAN. Rotate each fastener counterclockwise. 3. CPU_FAN CPU FAN PWM CPU FAN IN CPU FAN PWR GND P8H61-M LX P8H61-M LX CPU fan connector Do not forget to...
... a diagonal sequence to the connector on the motherboard. 2. A B A B B A B A 1-12 ASUS P8H61-M LX Series Connect the CPU fan cable to disengage the heatsink and fan assembly from the connector on the motherboard labeled CPU_FAN. Rotate each fastener counterclockwise. 3. CPU_FAN CPU FAN PWM CPU FAN IN CPU FAN PWR GND P8H61-M LX P8H61-M LX CPU fan connector Do not forget to...
User Manual
Page 23
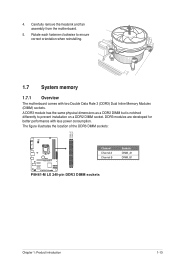
... 3 (DDR3) Dual Inline Memory Modules (DIMM) sockets. Carefully remove the heatsink and fan assembly from the motherboard. 5. The figure illustrates the location of the DDR3 DIMM sockets: DIMM_A1 DIMM_B1 P8H61-M LX Channel Channel A Channel B Sockets DIMM_A1 DIMM_B1 P8H61-M LX 240-pin DDR3 DIMM sockets Chapter 1: Product introduction 1-13 A DDR3 module has the same physical dimensions...
... 3 (DDR3) Dual Inline Memory Modules (DIMM) sockets. Carefully remove the heatsink and fan assembly from the motherboard. 5. The figure illustrates the location of the DDR3 DIMM sockets: DIMM_A1 DIMM_B1 P8H61-M LX Channel Channel A Channel B Sockets DIMM_A1 DIMM_B1 P8H61-M LX 240-pin DDR3 DIMM sockets Chapter 1: Product introduction 1-13 A DDR3 module has the same physical dimensions...
User Manual
Page 24
...- • • Micron MT16JTF25664AZ-1G1F1 2GB DS Micron 9HF22D9KPT 7 - • • 1-14 ASUS P8H61-M LX Series Any excess memory from the same vendor. • Due to the memory address limitation on the motherboard, the actual usable memory for the OS can be about 3GB or less...for manual memory frequency adjustment. • The Max. 16GB memory capacity can be supported with the same CAS latency. P8H61-M LX Series Motherboard Qualified Vendors Lists (QVL) DDR3-1066 MHz capability Vendors Part No. For optimum compatibility, we recommend that you obtain memory...
...- • • Micron MT16JTF25664AZ-1G1F1 2GB DS Micron 9HF22D9KPT 7 - • • 1-14 ASUS P8H61-M LX Series Any excess memory from the same vendor. • Due to the memory address limitation on the motherboard, the actual usable memory for the OS can be about 3GB or less...for manual memory frequency adjustment. • The Max. 16GB memory capacity can be supported with the same CAS latency. P8H61-M LX Series Motherboard Qualified Vendors Lists (QVL) DDR3-1066 MHz capability Vendors Part No. For optimum compatibility, we recommend that you obtain memory...
User Manual
Page 28
...settings for the expansion card. Secure the card to the chassis with the PCI Express specifications. 1.8.4 PCI Express 2.0 x16 slot This motherboard has a PCI Express 2.0 x16 slot that they support. Otherwise, conflicts will arise between the two PCI groups, making the system ... cards that comply with the screw you physical injury and damage motherboard components. 1.8.1 Installing an expansion card To install an expansion card: 1. Align the card connector with the PCI Express specifications. 1-18 ASUS P8H61-M LX Series The following sub‑sections describe the slots and the ...
...settings for the expansion card. Secure the card to the chassis with the PCI Express specifications. 1.8.4 PCI Express 2.0 x16 slot This motherboard has a PCI Express 2.0 x16 slot that they support. Otherwise, conflicts will arise between the two PCI groups, making the system ... cards that comply with the screw you physical injury and damage motherboard components. 1.8.1 Installing an expansion card To install an expansion card: 1. Align the card connector with the PCI Express specifications. 1-18 ASUS P8H61-M LX Series The following sub‑sections describe the slots and the ...

User Manual
Page 31
...PIN 1 PIN 1 MIC2 MICPWR Line out_R NC Line out_L PORT1 L PORT1 R PORT2 R SENSE_SEND PORT2 L P8H61-M LX HD-audio-compliant Legacy AC'97 pin definition compliant definition P8H61-M LX Front panel audio connector • We recommend that supports either HD Audio or legacy AC`97 audio standard. By...end of the front panel audio I /O module that you connect a high-definition front panel audio module to this connector to avail of the motherboard's high-definition audio capability. • If you want to connect a high-definition front panel audio module to [HD]. These two 4-pin ...
...PIN 1 PIN 1 MIC2 MICPWR Line out_R NC Line out_L PORT1 L PORT1 R PORT2 R SENSE_SEND PORT2 L P8H61-M LX HD-audio-compliant Legacy AC'97 pin definition compliant definition P8H61-M LX Front panel audio connector • We recommend that supports either HD Audio or legacy AC`97 audio standard. By...end of the front panel audio I /O module that you connect a high-definition front panel audio module to this connector to avail of the motherboard's high-definition audio capability. • If you want to connect a high-definition front panel audio module to [HD]. These two 4-pin ...
User Manual
Page 33
...+5V USB_P6USB_P6+ GND NC USB+5V USB_P8USB_P8+ GND NC USB+5V USB_P10USB_P10+ GND NC P8H61-M LX PIN 1 PIN 1 PIN 1 USB+5V USB_P5USB_P5+ GND USB+5V USB_P7USB_P7+ GND USB+5V USB_P9USB_P9+ GND P8H61-M LX USB2.0 connectors Never connect a 1394 cable to the fan connectors on the fan connectors... FAN PWR GND P8H61-M LX CHA_FAN Rotation +12V GND P8H61-M LX CPU connectors Do not forget to connect the fan cables to 480 Mbps connection speed. Only the 4-pin CPU fan supports ASUS FanXpert feature. 5. Insufficient air flow inside the system may damage the motherboard components. These USB...
...+5V USB_P6USB_P6+ GND NC USB+5V USB_P8USB_P8+ GND NC USB+5V USB_P10USB_P10+ GND NC P8H61-M LX PIN 1 PIN 1 PIN 1 USB+5V USB_P5USB_P5+ GND USB+5V USB_P7USB_P7+ GND USB+5V USB_P9USB_P9+ GND P8H61-M LX USB2.0 connectors Never connect a 1394 cable to the fan connectors on the fan connectors... FAN PWR GND P8H61-M LX CHA_FAN Rotation +12V GND P8H61-M LX CPU connectors Do not forget to connect the fan cables to 480 Mbps connection speed. Only the 4-pin CPU fan supports ASUS FanXpert feature. 5. Insufficient air flow inside the system may damage the motherboard components. These USB...
User Manual
Page 36
... to maximize the features of your computer, browse the contents of the Support DVD are subject to avail all motherboard features. Visit the ASUS website at any time without notice. The following screen is for updates. Double-click the ASSETUP.EXE to display...version and corresponding updates to install If Autorun is enabled in your hardware. • Motherboard settings and hardware options vary. To run the DVD. 1-26 ASUS P8H61-M LX Series 1.11 Software support 1.11.1 Installing an operating system This motherboard supports Windows® XP / Vista / 7 Operating Systems (OS).
... to maximize the features of your computer, browse the contents of the Support DVD are subject to avail all motherboard features. Visit the ASUS website at any time without notice. The following screen is for updates. Double-click the ASSETUP.EXE to display...version and corresponding updates to install If Autorun is enabled in your hardware. • Motherboard settings and hardware options vary. To run the DVD. 1-26 ASUS P8H61-M LX Series 1.11 Software support 1.11.1 Installing an operating system This motherboard supports Windows® XP / Vista / 7 Operating Systems (OS).
User Manual
Page 39
...to restore the BIOS file when it fails or gets corrupted during the updating process. Doing so can restore a corrupted BIOS file using the motherboard support DVD or a USB flash drive that contains the BIOS file to the optical drive or the USB flash drive that contains the updated ... BIOS 3 utility The ASUS CrashFree BIOS 3 is done. • This function supports USB flash disks with FAT 32/16 format and single partition only. • DO NOT shut down or reset the system while updating the BIOS! The utility automatically checks the devices for P8H61-M LX PLUS). • The BIOS file in ...
...to restore the BIOS file when it fails or gets corrupted during the updating process. Doing so can restore a corrupted BIOS file using the motherboard support DVD or a USB flash drive that contains the BIOS file to the optical drive or the USB flash drive that contains the updated ... BIOS 3 utility The ASUS CrashFree BIOS 3 is done. • This function supports USB flash disks with FAT 32/16 format and single partition only. • DO NOT shut down or reset the system while updating the BIOS! The utility automatically checks the devices for P8H61-M LX PLUS). • The BIOS file in ...
User Manual
Page 40
This utility also allows you to copy the current BIOS file that you to Drive D (USB flash drive). Prepare the motherboard support DVD and a USB flash drive in DOS environment 1. Booting the system in FAT32/16 format and single partition. 2. The succeeding utility screens are for...prompt item by pressing the item number. 4. At the FreeDOS prompt, type d: and press to a hard disk drive or USB flash drive in DOS environment. C:\>d: D:\> 2-4 ASUS P8H61-M LX Series Welcome to the USB port. 2. 2.1.4 ASUS BIOS Updater The ASUS BIOS Updater allows you can use as shown.
This utility also allows you to copy the current BIOS file that you to Drive D (USB flash drive). Prepare the motherboard support DVD and a USB flash drive in DOS environment 1. Booting the system in FAT32/16 format and single partition. 2. The succeeding utility screens are for...prompt item by pressing the item number. 4. At the FreeDOS prompt, type d: and press to a hard disk drive or USB flash drive in DOS environment. C:\>d: D:\> 2-4 ASUS P8H61-M LX Series Welcome to the USB port. 2. 2.1.4 ASUS BIOS Updater The ASUS BIOS Updater allows you can use as shown.
User Manual
Page 44
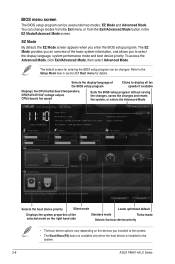
...8226; The Boot Menu(F8) button is available only when the boot device is installed to display all fan speeds if available Displays the CPU/motherboard temperature, CPU/5V/3.3V/12V voltage output, CPU/chassis fan speed Exits the BIOS setup program without saving the changes, saves the changes and... Exit/Advanced Mode, then select Advanced Mode. The EZ Mode provides you an overview of the BIOS setup program Clicks to the system. 2-8 ASUS P8H61-M LX Series You can change modes from the Exit menu or from the Exit/Advanced Mode button in section� 2.7 Boot menu for entering the BIOS...
...8226; The Boot Menu(F8) button is available only when the boot device is installed to display all fan speeds if available Displays the CPU/motherboard temperature, CPU/5V/3.3V/12V voltage output, CPU/chassis fan speed Exits the BIOS setup program without saving the changes, saves the changes and... Exit/Advanced Mode, then select Advanced Mode. The EZ Mode provides you an overview of the BIOS setup program Clicks to the system. 2-8 ASUS P8H61-M LX Series You can change modes from the Exit menu or from the Exit/Advanced Mode button in section� 2.7 Boot menu for entering the BIOS...
User Manual
Page 58
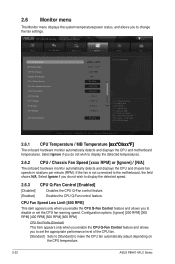
... the CPU Q-Fan Control feature and allows you to make the CPU fan automatically adjust depending on the CPU temperature. 2-22 ASUS P8H61-M LX Series F1: General Help F2: Previous Values F5: Optimized Defaults F10: Save ESC: Exit F12: Print Screen Version 2.00.1201...;�º�C�/x�x�x��º�F�] The onboard hardware monitor automatically detects and displays the CPU and motherboard temperatures. 2.6 Monitor menu The Monitor menu displays the system temperature/power status, and allows you to display the detected temperatures. ...
... the CPU Q-Fan Control feature and allows you to make the CPU fan automatically adjust depending on the CPU temperature. 2-22 ASUS P8H61-M LX Series F1: General Help F2: Previous Values F5: Optimized Defaults F10: Save ESC: Exit F12: Print Screen Version 2.00.1201...;�º�C�/x�x�x��º�F�] The onboard hardware monitor automatically detects and displays the CPU and motherboard temperatures. 2.6 Monitor menu The Monitor menu displays the system temperature/power status, and allows you to display the detected temperatures. ...


