P8H61-M LX R2 User's Manual
Page 7
... motherboard. Conventions used in this guide To ensure that you MUST follow to navigating and setting up the BIOS. IMPORTANT: Instructions you perform certain tasks properly, take note of the motherboard. • Chapter 2: BIOS information This chapter provides a detailed guide to complete a task. DANGER/WARNING: Information to prevent injury to the components...
... motherboard. Conventions used in this guide To ensure that you MUST follow to navigating and setting up the BIOS. IMPORTANT: Instructions you perform certain tasks properly, take note of the motherboard. • Chapter 2: BIOS information This chapter provides a detailed guide to complete a task. DANGER/WARNING: Information to prevent injury to the components...
P8H61-M LX R2 User's Manual
Page 9
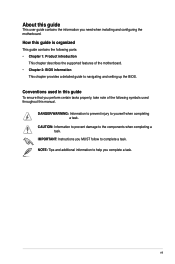
... Chipset: 4 x Serial ATA 3.0 Gb/s connectors - Resolution: 1920 x 1200 @60Hz D-SUB with Max. P8H61-M LX2 R2.0 specifications summary CPU Chipset Memory Graphics Expansion slots Storage LAN Audio USB ASUS unique features LGA1155 socket for Intel® 3rd/2nd generation Core™ i7/ i5 / i3 / Pentium®... 10 x USB 2.0 ports (4 ports at the mid-board, 6 ports at the back panel) ASUS Crash Free BIOS3 ASUS Network iControl ASUS MyLogo 2 ASUS Fan Xpert ASUS UEFI BIOS ASUS Anti-Surge Protection ASUS GPU Boost (continued on the next page) ix We recommend a maximum of 4GB capacity or more,...
... Chipset: 4 x Serial ATA 3.0 Gb/s connectors - Resolution: 1920 x 1200 @60Hz D-SUB with Max. P8H61-M LX2 R2.0 specifications summary CPU Chipset Memory Graphics Expansion slots Storage LAN Audio USB ASUS unique features LGA1155 socket for Intel® 3rd/2nd generation Core™ i7/ i5 / i3 / Pentium®... 10 x USB 2.0 ports (4 ports at the mid-board, 6 ports at the back panel) ASUS Crash Free BIOS3 ASUS Network iControl ASUS MyLogo 2 ASUS Fan Xpert ASUS UEFI BIOS ASUS Anti-Surge Protection ASUS GPU Boost (continued on the next page) ix We recommend a maximum of 4GB capacity or more,...
P8H61-M LX R2 User's Manual
Page 10
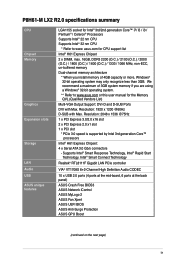
... panel audio connector 1 x System panel connector 1 x TPM header 1 x S/PDIF-out header 1 x COM header 64 Mb Flash ROM, EFI BIOS, PnP, DMI v2.0, WfM 2.0, SMBIOS v2.5, ACPI v2.0a, Multi-language BIOS WOL, PXE, PME Wake Up, WOR by Ring 2 x Serial ATA 3.0Gb/s cables 1 x I/O shield 1 x User Manual 1 x Support... DVD Drivers ASUS PC Probe II ASUS Update Anti-virus software (OEM version) uATX form factor: 9.6 in x 7.8 in (24.4 cm x ...
... panel audio connector 1 x System panel connector 1 x TPM header 1 x S/PDIF-out header 1 x COM header 64 Mb Flash ROM, EFI BIOS, PnP, DMI v2.0, WfM 2.0, SMBIOS v2.5, ACPI v2.0a, Multi-language BIOS WOL, PXE, PME Wake Up, WOR by Ring 2 x Serial ATA 3.0Gb/s cables 1 x I/O shield 1 x User Manual 1 x Support... DVD Drivers ASUS PC Probe II ASUS Update Anti-virus software (OEM version) uATX form factor: 9.6 in x 7.8 in (24.4 cm x ...
P8H61-M LX R2 User's Manual
Page 28
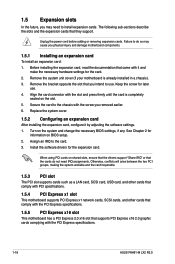
... or removing expansion cards. Remove the system unit cover (if your motherboard is completely seated on the system and change the necessary BIOS settings, if any. Remove the bracket opposite the slot that you physical injury and damage motherboard components. 1.5.1 Installing an expansion card...configure it and make the necessary hardware settings for later use . When using PCI cards on BIOS setup. 2. Failure to do not need to the chassis with the PCI Express specifications. 1-18 ASUS P8H61-M LX2 R2.0 Assign an IRQ to use . 4. See Chapter 2 for the expansion card. Otherwise, ...
... or removing expansion cards. Remove the system unit cover (if your motherboard is completely seated on the system and change the necessary BIOS settings, if any. Remove the bracket opposite the slot that you physical injury and damage motherboard components. 1.5.1 Installing an expansion card...configure it and make the necessary hardware settings for later use . When using PCI cards on BIOS setup. 2. Failure to do not need to the chassis with the PCI Express specifications. 1-18 ASUS P8H61-M LX2 R2.0 Assign an IRQ to use . 4. See Chapter 2 for the expansion card. Otherwise, ...
P8H61-M LX R2 User's Manual
Page 29
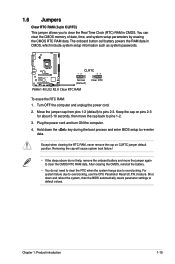
...19 1.6 Jumpers Clear RTC RAM (3-pin CLRTC) This jumper allows you to pins 1-2. 3. Shut down the key during the boot process and enter BIOS setup to default values. Keep the cap on CLRTC jumper default position. Except when clearing the RTC RAM, never remove the cap on pins 2-3 for... such as system passwords. For system failure due to pins 2-3. Turn OFF the computer and unplug the power cord. 2. P8H61-M LX2 R2.0 CLRTC 12 23 Normal (Default) Clear RTC P8H61-M LX2 R2.0 Clear RTC RAM To erase the RTC RAM: 1. Move the jumper cap from pins 1-2 (default) to overclocking, use...
...19 1.6 Jumpers Clear RTC RAM (3-pin CLRTC) This jumper allows you to pins 1-2. 3. Shut down the key during the boot process and enter BIOS setup to default values. Keep the cap on CLRTC jumper default position. Except when clearing the RTC RAM, never remove the cap on pins 2-3 for... such as system passwords. For system failure due to pins 2-3. Turn OFF the computer and unplug the power cord. 2. P8H61-M LX2 R2.0 CLRTC 12 23 Normal (Default) Clear RTC P8H61-M LX2 R2.0 Clear RTC RAM To erase the RTC RAM: 1. Move the jumper cap from pins 1-2 (default) to overclocking, use...
P8H61-M LX R2 User's Manual
Page 31
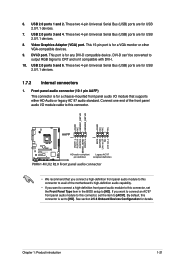
... ports are for a VGA monitor or other VGA-compatible devices. 9. This 15-pin port is set the Front Panel Type item in the BIOS setup to this connector. DVI-D port. AGND NC SENSE1_RETUR SENSE2_RETUR AGND NC NC NC AAFP PIN 1 PIN 1 MIC2 MICPWR Line out_R NC Line... out_L PORT1 L PORT1 R PORT2 R SENSE_SEND PORT2 L P8H61-M LX2 R2.0 HD-audio-compliant Legacy AC'97 pin definition compliant definition P8H61-M LX2 R2.0 Front panel audio connector • We recommend that supports either HD Audio or legacy AC`97 audio standard. 6....
... ports are for a VGA monitor or other VGA-compatible devices. 9. This 15-pin port is set the Front Panel Type item in the BIOS setup to this connector. DVI-D port. AGND NC SENSE1_RETUR SENSE2_RETUR AGND NC NC NC AAFP PIN 1 PIN 1 MIC2 MICPWR Line out_R NC Line... out_L PORT1 L PORT1 R PORT2 R SENSE_SEND PORT2 L P8H61-M LX2 R2.0 HD-audio-compliant Legacy AC'97 pin definition compliant definition P8H61-M LX2 R2.0 Front panel audio connector • We recommend that supports either HD Audio or legacy AC`97 audio standard. 6....

P8H61-M LX R2 User's Manual
Page 34
... change the SATA type. • To configure the SATA type in the BIOS to a slot opening at the back of the system chassis. +5V SPDIFOUT GND P8H61-M LX2 R2.0 SPDIF_OUT P8H61-M LX2 R2.0 Digital audio connector The S/PDIF module is purchased separately. 1-24 ASUS P8H61-M LX2 R2.0 See section 2.5.4 SATA Configuration for an additional Sony/Philips Digital Interface...
... change the SATA type. • To configure the SATA type in the BIOS to a slot opening at the back of the system chassis. +5V SPDIFOUT GND P8H61-M LX2 R2.0 SPDIF_OUT P8H61-M LX2 R2.0 Digital audio connector The S/PDIF module is purchased separately. 1-24 ASUS P8H61-M LX2 R2.0 See section 2.5.4 SATA Configuration for an additional Sony/Philips Digital Interface...
P8H61-M LX R2 User's Manual
Page 39
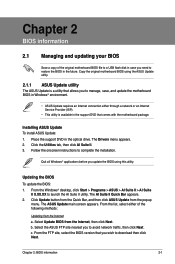
...). • This utility is a utility that comes with the motherboard package. Copy the original motherboard BIOS using this utility. c. Quit all Windows® applications before you update the BIOS using the ASUS Update utility. 2.1.1 ASUS Update utility The ASUS Update is available in the support DVD that allows you need to manage, save, and update...
...). • This utility is a utility that comes with the motherboard package. Copy the original motherboard BIOS using this utility. c. Quit all Windows® applications before you update the BIOS using the ASUS Update utility. 2.1.1 ASUS Update utility The ASUS Update is available in the support DVD that allows you need to manage, save, and update...
P8H61-M LX R2 User's Manual
Page 40
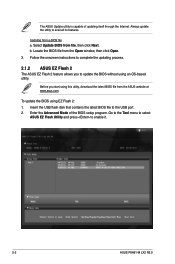
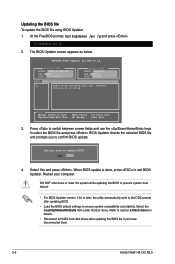
... Flash 2: 1. Locate the BIOS file from file, then click Next. Updating from the ASUS website at www.asus.com. To update the BIOS using this utility, download the latest BIOS file from a BIOS file a. Enter the Advanced Mode of updating itself through the Internet. Follow the onscreen instructions to enable it. 2-2 ASUS P8H61-M LX2 R2.0 The ASUS Update utility is...
... Flash 2: 1. Locate the BIOS file from file, then click Next. Updating from the ASUS website at www.asus.com. To update the BIOS using this utility, download the latest BIOS file from a BIOS file a. Enter the Advanced Mode of updating itself through the Internet. Follow the onscreen instructions to enable it. 2-2 ASUS P8H61-M LX2 R2.0 The ASUS Update utility is...
P8H61-M LX R2 User's Manual
Page 41
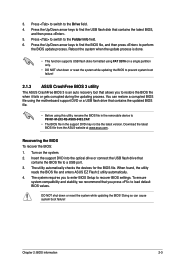
... disks formatted using this utility, rename the BIOS file in the removable device to P8H61-M-LX2-R2-ASUS-0402.CAP. • The BIOS file in the support DVD may not be the latest version. Recovering the BIOS To recover the BIOS: 1. When found, the utility reads the BIOS file and enters ASUS EZ Flash 2 utility automatically. 4. Press the Up...
... disks formatted using this utility, rename the BIOS file in the removable device to P8H61-M-LX2-R2-ASUS-0402.CAP. • The BIOS file in the support DVD may not be the latest version. Recovering the BIOS To recover the BIOS: 1. When found, the utility reads the BIOS file and enters ASUS EZ Flash 2 utility automatically. 4. Press the Up...
P8H61-M LX R2 User's Manual
Page 42
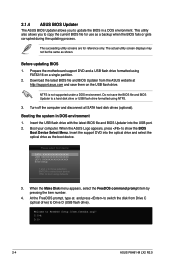
... prompt, type d: and press to switch the disk from the ASUS website at http://support.asus.com and save the BIOS file and BIOS Updater to a hard disk drive or USB flash drive formatted using defaults 3. Before updating BIOS 1. C:\>d: D:\> 2-4 ASUS P8H61-M LX2 R2.0 Boot your computer. When the ASUS Logo appears, press to FreeDOS (http://www.freedos.org)! Do...
... prompt, type d: and press to switch the disk from the ASUS website at http://support.asus.com and save the BIOS file and BIOS Updater to a hard disk drive or USB flash drive formatted using defaults 3. Before updating BIOS 1. C:\>d: D:\> 2-4 ASUS P8H61-M LX2 R2.0 Boot your computer. When the ASUS Logo appears, press to FreeDOS (http://www.freedos.org)! Do...
P8H61-M LX R2 User's Manual
Page 43
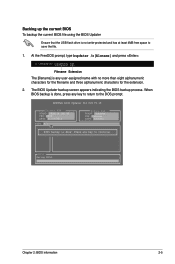
... P8H61-M LX2 R2 VER: 0402 DATE: 01/13/2012 Update ROM BOARD: Unknown VER: Unknown DATE: Unknown PATH: A:\ BIOS backup is done! The BIOS Updater backup screen appears indicating the BIOS backup process. ASUSTek BIOS Updater for the extension. 2. Backing up the current BIOS To backup the current BIOS file using the BIOS Updater... Ensure that the USB flash drive is done, press any key to return to the DOS prompt. Note Saving BIOS: Chapter 2: BIOS information 2-5 When BIOS backup is not write-protected and has at least 4MB free space to continue. Press any key to save the file....
... P8H61-M LX2 R2 VER: 0402 DATE: 01/13/2012 Update ROM BOARD: Unknown VER: Unknown DATE: Unknown PATH: A:\ BIOS backup is done! The BIOS Updater backup screen appears indicating the BIOS backup process. ASUSTek BIOS Updater for the extension. 2. Backing up the current BIOS To backup the current BIOS file using the BIOS Updater... Ensure that the USB flash drive is done, press any key to return to the DOS prompt. Note Saving BIOS: Chapter 2: BIOS information 2-5 When BIOS backup is not write-protected and has at least 4MB free space to continue. Press any key to save the file....
P8H61-M LX R2 User's Manual
Page 44
...exits to the DOS prompt after updating the BIOS file if you sure to update BIOS? Press to switch between screen fields and use the keys to exit BIOS Updater. D:\>bupdater /pc /g 2. Are you have disconnected them. 2-6 ASUS P8H61-M LX2 R2.0 Refer to section 2.9 Exit menu for ...DOS V1.18 Current ROM BOARD: P8H61-M LX2 R2 VER: 0402 DATE: 01/13/2012 Update ROM BOARD: Unknown VER: Unknown DATE: Unknown PATH: A:\ A: P8H61-M-LX2-R2-ASUS-0402....
...exits to the DOS prompt after updating the BIOS file if you sure to update BIOS? Press to switch between screen fields and use the keys to exit BIOS Updater. D:\>bupdater /pc /g 2. Are you have disconnected them. 2-6 ASUS P8H61-M LX2 R2.0 Refer to section 2.9 Exit menu for ...DOS V1.18 Current ROM BOARD: P8H61-M LX2 R2 VER: 0402 DATE: 01/13/2012 Update ROM BOARD: Unknown VER: Unknown DATE: Unknown PATH: A:\ A: P8H61-M-LX2-R2-ASUS-0402....
P8H61-M LX R2 User's Manual
Page 45
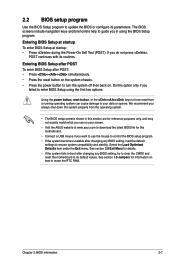
... stability. Do this section are for information on your data or system. 2.2 BIOS setup program Use the BIOS Setup program to your screen. • Visit the ASUS website at startup: • Press during the Power-On Self Test (POST). The BIOS screens include navigation keys and brief online help to guide you failed to...
... stability. Do this section are for information on your data or system. 2.2 BIOS setup program Use the BIOS Setup program to your screen. • Visit the ASUS website at startup: • Press during the Power-On Self Test (POST). The BIOS screens include navigation keys and brief online help to guide you failed to...
P8H61-M LX R2 User's Manual
Page 46
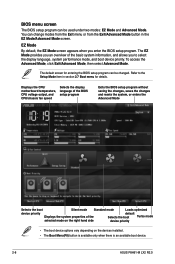
...available only when there is an available boot device. 2-8 ASUS P8H61-M LX2 R2.0 Displays the CPU/ motherboard temperature, CPU voltage output, and CPU/chassis fan speed Selects the display language of the BIOS setup program Exits the BIOS setup program without saving the changes, saves the changes and ... device priority Displays the system properties of the basic system information, and allows you enter the BIOS setup program. The default screen for details. BIOS menu screen The BIOS setup program can be used under two modes: EZ Mode and Advanced Mode. You can change...
...available only when there is an available boot device. 2-8 ASUS P8H61-M LX2 R2.0 Displays the CPU/ motherboard temperature, CPU voltage output, and CPU/chassis fan speed Selects the display language of the BIOS setup program Exits the BIOS setup program without saving the changes, saves the changes and ... device priority Displays the system properties of the basic system information, and allows you enter the BIOS setup program. The default screen for details. BIOS menu screen The BIOS setup program can be used under two modes: EZ Mode and Advanced Mode. You can change...

P8H61-M LX R2 User's Manual
Page 47
To access the EZ Mode, click Exit, then select ASUS EZ Mode. Back button Menu items Menu bar Configuration fields General help Submenu item Pop-up window Navigation keys Menu bar The menu bar on ... figure below shows an example of the screen has the following sections for special functions For selecting the exit options and loading default settings Chapter 2: BIOS information 2-9 Refer to configure the...
To access the EZ Mode, click Exit, then select ASUS EZ Mode. Back button Menu items Menu bar Configuration fields General help Submenu item Pop-up window Navigation keys Menu bar The menu bar on ... figure below shows an example of the screen has the following sections for special functions For selecting the exit options and loading default settings Chapter 2: BIOS information 2-9 Refer to configure the...
P8H61-M LX R2 User's Manual
Page 48
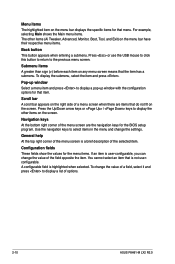
...Menu items The highlighted item on the screen. Use the navigation keys to select items in the menu and change the value of options. 2-10 ASUS P8H61-M LX2 R2.0 Press the Up/Down arrow keys or / keys to display a list of the field opposite the item. You cannot select an item that ...item. Scroll bar A scroll bar appears on the screen. Configuration fields These fields show the values for the BIOS setup program. For example, selecting Main shows ...
...Menu items The highlighted item on the screen. Use the navigation keys to select items in the menu and change the value of options. 2-10 ASUS P8H61-M LX2 R2.0 Press the Up/Down arrow keys or / keys to display a list of the field opposite the item. You cannot select an item that ...item. Scroll bar A scroll bar appears on the screen. Configuration fields These fields show the values for the BIOS setup program. For example, selecting Main shows ...

P8H61-M LX R2 User's Manual
Page 49
Chapter 2: BIOS information 2-11 Configuration options: [English] [Español 2.3.2 System Date [Day xx/xx/xxxx] Allows you to choose the BIOS language version from the options. The Main menu provides you with an overview of the BIOS Setup program. 2.3 Main menu The Main menu screen appears when you enter the Advanced Mode of basic system information, and allows you to set the system date, time, language, and security settings. 2.3.1 System Language [English] Allows you to set the system date. 2.3.3 System Time [xx:xx:xx] Allows you to set the system time.
Chapter 2: BIOS information 2-11 Configuration options: [English] [Español 2.3.2 System Date [Day xx/xx/xxxx] Allows you to choose the BIOS language version from the options. The Main menu provides you with an overview of the BIOS Setup program. 2.3 Main menu The Main menu screen appears when you enter the Advanced Mode of basic system information, and allows you to set the system date, time, language, and security settings. 2.3.1 System Language [English] Allows you to set the system date. 2.3.3 System Time [xx:xx:xx] Allows you to set the system time.

P8H61-M LX R2 User's Manual
Page 50
...Administrator Password If you have forgotten your BIOS password, erase the CMOS Real Time Clock (RTC) RAM to clear the BIOS password. After you clear the password, the Administrator Password item on top of the screen shows Not Installed. 2-12 ASUS P8H61-M LX2 R2.0 After you set a password, these ... items on top of the screen show Installed. To set an administrator password: 1. From the Create New Password box, key in the BIOS setup program. To clear the administrator password, follow the same steps as in the current password, then press . 3. Select the Administrator ...
...Administrator Password If you have forgotten your BIOS password, erase the CMOS Real Time Clock (RTC) RAM to clear the BIOS password. After you clear the password, the Administrator Password item on top of the screen shows Not Installed. 2-12 ASUS P8H61-M LX2 R2.0 After you set a password, these ... items on top of the screen show Installed. To set an administrator password: 1. From the Create New Password box, key in the BIOS setup program. To clear the administrator password, follow the same steps as in the current password, then press . 3. Select the Administrator ...
P8H61-M LX R2 User's Manual
Page 51
... the screen shows Not Installed. To set a user password: 1. To clear the user password, follow the same steps as in a new password, then press . 4. Chapter 2: BIOS information 2-13
... the screen shows Not Installed. To set a user password: 1. To clear the user password, follow the same steps as in a new password, then press . 4. Chapter 2: BIOS information 2-13


