P8H61-M LX R2 User's Manual
Page 2
... INC. ("ASUS"). No part of this manual, including the products and software described in this information. Product warranty or service will be much obliged if you wish to : ASUSTeK Computer Inc. to duly provide complete source code as source code archives, etc. SPECIFICATIONS AND INFORMATION CONTAINED IN THIS MANUAL ARE FURNISHED FOR INFORMATIONAL USE ONLY, AND ARE SUBJECT TO CHANGE AT...
... INC. ("ASUS"). No part of this manual, including the products and software described in this information. Product warranty or service will be much obliged if you wish to : ASUSTeK Computer Inc. to duly provide complete source code as source code archives, etc. SPECIFICATIONS AND INFORMATION CONTAINED IN THIS MANUAL ARE FURNISHED FOR INFORMATIONAL USE ONLY, AND ARE SUBJECT TO CHANGE AT...

P8H61-M LX R2 User's Manual
Page 3
... CPU heatsink and fan 1-7 1.3.3 Uninstalling the CPU heatsink and fan 1-8 1.4 System memory 1-9 1.4.1 Overview 1-9 1.4.2 Memory configurations 1-10 1.4.3 Installing a DIMM 1-17 1.4.4 Removing a DIMM 1-17 1.5 Expansion slots 1-18 1.5.1 Installing an expansion card 1-18 1.5.2 Configuring an expansion card 1-18 1.5.3 PCI slot 1-18 1.5.4 PCI Express x1 slot 1-18 1.5.5 PCI Express x16 slot 1-18 1.6 Jumpers 1-19 1.7 Connectors 1-20 1.7.1 Rear panel connectors 1-20 1.7.2 Internal connectors 1-21 1.8 Software support 1-27 1.8.1 Installing an operating system 1-27 1.8.2 Support DVD...
... CPU heatsink and fan 1-7 1.3.3 Uninstalling the CPU heatsink and fan 1-8 1.4 System memory 1-9 1.4.1 Overview 1-9 1.4.2 Memory configurations 1-10 1.4.3 Installing a DIMM 1-17 1.4.4 Removing a DIMM 1-17 1.5 Expansion slots 1-18 1.5.1 Installing an expansion card 1-18 1.5.2 Configuring an expansion card 1-18 1.5.3 PCI slot 1-18 1.5.4 PCI Express x1 slot 1-18 1.5.5 PCI Express x16 slot 1-18 1.6 Jumpers 1-19 1.7 Connectors 1-20 1.7.1 Rear panel connectors 1-20 1.7.2 Internal connectors 1-21 1.8 Software support 1-27 1.8.1 Installing an operating system 1-27 1.8.2 Support DVD...
P8H61-M LX R2 User's Manual
Page 9
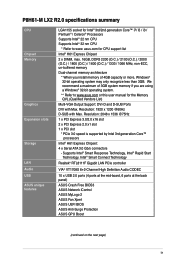
... or this user manual for the Memory QVL (Qualified Vendors List) Multi-VGA Output Support: DVI-D and D-SUB Ports DVI with Max. Resolution: 1920 x 1200 @60Hz D-SUB with Max. P8H61-M LX2 R2.0 specifications summary CPU Chipset Memory Graphics Expansion slots Storage LAN Audio USB ASUS unique features LGA1155 socket for CPU support list Intel® H61 Express Chipset 2 x DIMM, max. 16GB, DDR3 2200 (O.C.) / 2100 (O.C.) / 2000 (O.C.) / 1800 (O.C.) / 1600 (O.C.) / 1333 / 1066 MHz, non-ECC, un-buffered memory Dual-channel memory architecture * When you install memory of 3GB...
... or this user manual for the Memory QVL (Qualified Vendors List) Multi-VGA Output Support: DVI-D and D-SUB Ports DVI with Max. Resolution: 1920 x 1200 @60Hz D-SUB with Max. P8H61-M LX2 R2.0 specifications summary CPU Chipset Memory Graphics Expansion slots Storage LAN Audio USB ASUS unique features LGA1155 socket for CPU support list Intel® H61 Express Chipset 2 x DIMM, max. 16GB, DDR3 2200 (O.C.) / 2100 (O.C.) / 2000 (O.C.) / 1800 (O.C.) / 1600 (O.C.) / 1333 / 1066 MHz, non-ECC, un-buffered memory Dual-channel memory architecture * When you install memory of 3GB...
P8H61-M LX R2 User's Manual
Page 20
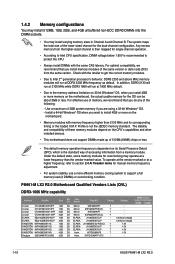
... 512Mb (64MB) chips or less. • The default memory operation frequency is dependent on its corresponding timing or the loaded X.M.P. Install a 64-bit Windows® OS when you are using a 32-bit Windows® OS. - P8H61-M LX2 R2.0 Motherboard Qualified Vendors Lists (QVL) DDR3-1066 MHz capability Vendors Part No. Timing Voltage DIMM socket support (optional) 1DIMM 2DIMM Crucial CT12864BA1067.8FF 1GB SS Micron 9GF22D9KPT 7 - 1.4.2 Memory configurations You may install 512MB, 1GB, 2GB...
... 512Mb (64MB) chips or less. • The default memory operation frequency is dependent on its corresponding timing or the loaded X.M.P. Install a 64-bit Windows® OS when you are using a 32-bit Windows® OS. - P8H61-M LX2 R2.0 Motherboard Qualified Vendors Lists (QVL) DDR3-1066 MHz capability Vendors Part No. Timing Voltage DIMM socket support (optional) 1DIMM 2DIMM Crucial CT12864BA1067.8FF 1GB SS Micron 9GF22D9KPT 7 - 1.4.2 Memory configurations You may install 512MB, 1GB, 2GB...
P8H61-M LX R2 User's Manual
Page 28
... to the chassis with it by adjusting the software settings. 1. Align the card connector with the PCI Express specifications. 1-18 ASUS P8H61-M LX2 R2.0 Secure the card to use . 4. Replace the system cover. 1.5.2 Configuring an expansion card After installing the expansion card, configure it and make the necessary hardware settings for information on shared slots, ensure that the drivers support "Share IRQ" or that came with the screw you removed earlier. 6. When using PCI cards on BIOS setup. 2. Otherwise...
... to the chassis with it by adjusting the software settings. 1. Align the card connector with the PCI Express specifications. 1-18 ASUS P8H61-M LX2 R2.0 Secure the card to use . 4. Replace the system cover. 1.5.2 Configuring an expansion card After installing the expansion card, configure it and make the necessary hardware settings for information on shared slots, ensure that the drivers support "Share IRQ" or that came with the screw you removed earlier. 6. When using PCI cards on BIOS setup. 2. Otherwise...
P8H61-M LX R2 User's Manual
Page 32
... V Specification 2.0 (or later version) and provides a minimum power of the system chassis. The system may become unstable or may not boot up . • We recommend that you use a power supply unit (PSU) that you are uncertain about the minimum power supply requirement for ATX power supply plugs. com/PowerSupplyCalculator/PSCalculator.aspx?SLanguage=en-us for a serial (COM) port. Serial port connector (10-1 pin COM1) This connector is purchased separately. 1-22 ASUS P8H61-M LX2 R2...
... V Specification 2.0 (or later version) and provides a minimum power of the system chassis. The system may become unstable or may not boot up . • We recommend that you use a power supply unit (PSU) that you are uncertain about the minimum power supply requirement for ATX power supply plugs. com/PowerSupplyCalculator/PSCalculator.aspx?SLanguage=en-us for a serial (COM) port. Serial port connector (10-1 pin COM1) This connector is purchased separately. 1-22 ASUS P8H61-M LX2 R2...
P8H61-M LX R2 User's Manual
Page 33
... P8H61-M LX2 R2.0 USB2.0 connectors Never connect a 1394 cable to the fan connectors. These are for USB 2.0 ports. These USB connectors comply with USB 2.0 specification that the black wire of each cable matches the ground pin of the system chassis. Connect the USB module cable to any of maximum 2A (24 W) fan power. 5. Doing so will damage the motherboard! USB connectors (10-1 pin USB78, USB910) These connectors are not jumpers! Chapter 1: Product introduction 1-23 CPU and chassis fan connectors (4-pin CPU_FAN, 3-pin CHA_FAN) Connect the fan cables...
... P8H61-M LX2 R2.0 USB2.0 connectors Never connect a 1394 cable to the fan connectors. These are for USB 2.0 ports. These USB connectors comply with USB 2.0 specification that the black wire of each cable matches the ground pin of the system chassis. Connect the USB module cable to any of maximum 2A (24 W) fan power. 5. Doing so will damage the motherboard! USB connectors (10-1 pin USB78, USB910) These connectors are not jumpers! Chapter 1: Product introduction 1-23 CPU and chassis fan connectors (4-pin CPU_FAN, 3-pin CHA_FAN) Connect the fan cables...

P8H61-M LX R2 User's Manual
Page 34
... to change the SATA type. • To configure the SATA type in the BIOS to H61 Chipset limitation, AHCI Mode only works on Windows® Vista / Windows® 7. Intel® H61 Serial ATA 3.0Gb/s connectors (7-pin SATA3G_1~4) These connectors connect to a slot opening at the back of the system chassis. +5V SPDIFOUT GND P8H61-M LX2 R2.0 SPDIF_OUT P8H61-M LX2 R2.0 Digital audio connector The S/PDIF module is the default SATA type. Please use IDE Mode on Windows® Vista / Windows® 7, set the SATA Mode item in BIOS...
... to change the SATA type. • To configure the SATA type in the BIOS to H61 Chipset limitation, AHCI Mode only works on Windows® Vista / Windows® 7. Intel® H61 Serial ATA 3.0Gb/s connectors (7-pin SATA3G_1~4) These connectors connect to a slot opening at the back of the system chassis. +5V SPDIFOUT GND P8H61-M LX2 R2.0 SPDIF_OUT P8H61-M LX2 R2.0 Digital audio connector The S/PDIF module is the default SATA type. Please use IDE Mode on Windows® Vista / Windows® 7, set the SATA Mode item in BIOS...

P8H61-M LX R2 User's Manual
Page 37
... Drivers, Utilities, Manual, Contact, and Specials tabs to locate the file ASSETUP.EXE from the BIN folder. Click an icon to display Support DVD/ motherboard information Click an item to install If Autorun is NOT enabled in your hardware. • Motherboard settings and hardware options vary. Always install the latest OS version and corresponding updates to change at www.asus.com for updates. To run the DVD. 1.8 Software support 1.8.1 Installing an operating system This motherboard supports Windows...
... Drivers, Utilities, Manual, Contact, and Specials tabs to locate the file ASSETUP.EXE from the BIN folder. Click an icon to display Support DVD/ motherboard information Click an item to install If Autorun is NOT enabled in your hardware. • Motherboard settings and hardware options vary. Always install the latest OS version and corresponding updates to change at www.asus.com for updates. To run the DVD. 1.8 Software support 1.8.1 Installing an operating system This motherboard supports Windows...
P8H61-M LX R2 User's Manual
Page 39
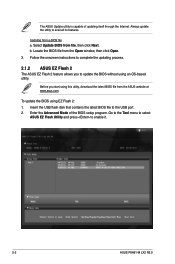
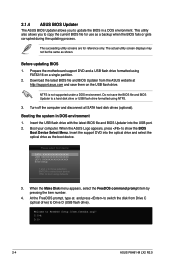
... II X.XX.XX to complete the installation. Place the support DVD in the optical drive. Select Update BIOS from the popup menu. Chapter 2 BIOS information 2.1 Managing and updating your BIOS Save a copy of the original motherboard BIOS file to a USB flash disk in case you to manage, save, and update the motherboard BIOS in Windows® environment. • ASUS Update requires an Internet connection either of the following methods: Updating from the Internet a. The ASUS Update main screen appears.
... II X.XX.XX to complete the installation. Place the support DVD in the optical drive. Select Update BIOS from the popup menu. Chapter 2 BIOS information 2.1 Managing and updating your BIOS Save a copy of the original motherboard BIOS file to a USB flash disk in case you to manage, save, and update the motherboard BIOS in Windows® environment. • ASUS Update requires an Internet connection either of the following methods: Updating from the Internet a. The ASUS Update main screen appears.
P8H61-M LX R2 User's Manual
Page 40
Always update the utility to the USB port. 2. Enter the Advanced Mode of updating itself through the Internet. Select Update BIOS from the Open window, then click Open. 3. Locate the BIOS file from file, then click Next. Updating from the ASUS website at www.asus.com. The ASUS Update utility is capable of the BIOS setup program. Before you to update the BIOS without using an OS‑based utility. Insert the USB flash disk that contains the latest BIOS file to...
Always update the utility to the USB port. 2. Enter the Advanced Mode of updating itself through the Internet. Select Update BIOS from the Open window, then click Open. 3. Locate the BIOS file from file, then click Next. Updating from the ASUS website at www.asus.com. The ASUS Update utility is capable of the BIOS setup program. Before you to update the BIOS without using an OS‑based utility. Insert the USB flash disk that contains the latest BIOS file to...
P8H61-M LX R2 User's Manual
Page 41
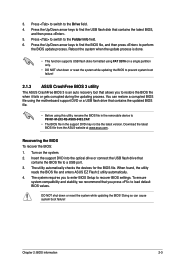
... keys to a USB port. 3. You can cause system boot failure! To ensure system compatibility and stability, we recommend that you to enter BIOS Setup to perform the BIOS update process. Turn on a single partition only. • DO NOT shut down or reset the system while updating the BIOS! Chapter 2: BIOS information 2-3 Press the Up/Down arrow keys to find the USB flash disk that contains the updated BIOS file. • Before using the motherboard support DVD or a USB flash drive...
... keys to a USB port. 3. You can cause system boot failure! To ensure system compatibility and stability, we recommend that you to enter BIOS Setup to perform the BIOS update process. Turn on a single partition only. • DO NOT shut down or reset the system while updating the BIOS! Chapter 2: BIOS information 2-3 Press the Up/Down arrow keys to find the USB flash disk that contains the updated BIOS file. • Before using the motherboard support DVD or a USB flash drive...
P8H61-M LX R2 User's Manual
Page 42
... SATA hard disk drives (optional). At the FreeDOS prompt, type d: and press to switch the disk from the ASUS website at http://support.asus.com and save the BIOS file and BIOS Updater to a hard disk drive or USB flash drive formatted using defaults 3. Insert the USB flash drive with the latest BIOS file and BIOS Updater into the optical drive and select the optical drive as the boot device. Insert the support DVD into the USB port. 2. Welcome to boot using NTFS. 3. C:\>d: D:\> 2-4 ASUS P8H61-M LX2 R2.0 Prepare the motherboard support DVD and a USB flash drive formatted using...
... SATA hard disk drives (optional). At the FreeDOS prompt, type d: and press to switch the disk from the ASUS website at http://support.asus.com and save the BIOS file and BIOS Updater to a hard disk drive or USB flash drive formatted using defaults 3. Insert the USB flash drive with the latest BIOS file and BIOS Updater into the optical drive and select the optical drive as the boot device. Insert the support DVD into the USB port. 2. Welcome to boot using NTFS. 3. C:\>d: D:\> 2-4 ASUS P8H61-M LX2 R2.0 Prepare the motherboard support DVD and a USB flash drive formatted using...
P8H61-M LX R2 User's Manual
Page 44
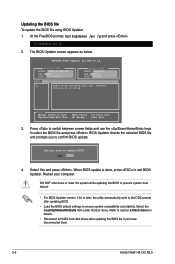
.../13/2012 Update ROM BOARD: Unknown VER: Unknown DATE: Unknown PATH: A:\ A: P8H61-M-LX2-R2-ASUS-0402.CAP 4068078 2012-01-11 17:30:48 Note [Enter] Select or Load [Up/Down/Home/End] Move [Tab] Switch [B] Backup [V] Drive Info [Esc] Exit 3. Press to switch between screen fields and use the keys to exit BIOS Updater. ASUSTek BIOS Updater for details. • Reconnect all SATA hard disk drives after updating BIOS. • Load the BIOS default settings to update BIOS? Yes...
.../13/2012 Update ROM BOARD: Unknown VER: Unknown DATE: Unknown PATH: A:\ A: P8H61-M-LX2-R2-ASUS-0402.CAP 4068078 2012-01-11 17:30:48 Note [Enter] Select or Load [Up/Down/Home/End] Move [Tab] Switch [B] Backup [V] Drive Info [Esc] Exit 3. Press to switch between screen fields and use the keys to exit BIOS Updater. ASUSTek BIOS Updater for details. • Reconnect all SATA hard disk drives after updating BIOS. • Load the BIOS default settings to update BIOS? Yes...
P8H61-M LX R2 User's Manual
Page 53
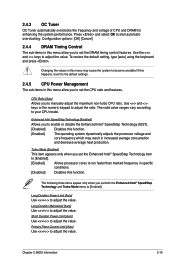
... default setting, type [auto] using the keyboard and press . Use and keys or the numeric keypad to start automatic overclocking. Turbo Mode [Enabled] This item appears only when you to set both the Enhanced Intel® SpeedStep Technology and Turbo Mode items to become unstable! Long Duration Power Limit [Auto] Use / to adjust the value. Short Duration Power Limit [Auto] Use / to adjust the value. 2.4.3 OC Tuner OC Tuner automatically overclocks the frequency and voltage of CPU...
... default setting, type [auto] using the keyboard and press . Use and keys or the numeric keypad to start automatic overclocking. Turbo Mode [Enabled] This item appears only when you to set both the Enhanced Intel® SpeedStep Technology and Turbo Mode items to become unstable! Long Duration Power Limit [Auto] Use / to adjust the value. Short Duration Power Limit [Auto] Use / to adjust the value. 2.4.3 OC Tuner OC Tuner automatically overclocks the frequency and voltage of CPU...
P8H61-M LX R2 User's Manual
Page 56
.... [Disabled] Disables this function. Use and keys to enable or disable the Enhanced Intel® SpeedStep Technology (EIST). [Disabled] The CPU runs at its default speed. [Enabled] The operating system controls the CPU speed. Enhanced Intel SpeedStep Technology [Enabled] Allows you to run faster than marked frequency in order to virtually function as several systems. [Disabled] Disables this function. CPU Power Management Configuration CPU Ratio [Auto] Allows you to adjust the ratio. CPU C1E [Auto] [Enabled] Enables the C1E support function...
.... [Disabled] Disables this function. Use and keys to enable or disable the Enhanced Intel® SpeedStep Technology (EIST). [Disabled] The CPU runs at its default speed. [Enabled] The operating system controls the CPU speed. Enhanced Intel SpeedStep Technology [Enabled] Allows you to run faster than marked frequency in order to virtually function as several systems. [Disabled] Disables this function. CPU Power Management Configuration CPU Ratio [Auto] Allows you to adjust the ratio. CPU C1E [Auto] [Enabled] Enables the C1E support function...
P8H61-M LX R2 User's Manual
Page 58
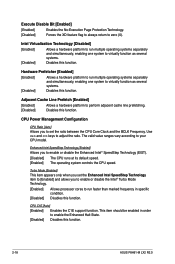
...Key in the desired value using the numeric keypad. The SATA Port items show Not Present if no SATA device is a monitor system. SATA Mode Selection [IDE Mode] Allows you to set the SATA configuration. [Disabled] Disables the SATA function. [IDE Mode] Set to [IDE Mode] when you want the SATA hard disk drives to use the Serial ATA hard disk drives as Parallel ATA physical storage devices. [AHCI Mode] Set to [AHCI Mode] when you to enable or disable the ISCT configuration. Configuration options: [Enabled] [Disabled] 2-20 ASUS P8H61-M LX2 R2.0 Intel(R) Smart Connect Technology...
...Key in the desired value using the numeric keypad. The SATA Port items show Not Present if no SATA device is a monitor system. SATA Mode Selection [IDE Mode] Allows you to set the SATA configuration. [Disabled] Disables the SATA function. [IDE Mode] Set to [IDE Mode] when you want the SATA hard disk drives to use the Serial ATA hard disk drives as Parallel ATA physical storage devices. [AHCI Mode] Set to [AHCI Mode] when you to enable or disable the ISCT configuration. Configuration options: [Enabled] [Disabled] 2-20 ASUS P8H61-M LX2 R2.0 Intel(R) Smart Connect Technology...
P8H61-M LX R2 User's Manual
Page 59
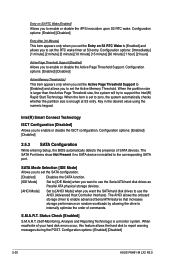
...] [PCI] iGPU Memory [64M] Allows you to decide which graphics controller to configure the NB PCI Express settings. Chapter 2: BIOS information 2-21 Configuration options: [Auto] [32M] [64M] [96M] [128M] ~ [448M] [480M] [512M] [1024M] Render Standby [Enabled] Allows you to use IDE Mode on Windows® XP. • [IDE] is detected, the item shows None. The USB Devices item shows the auto-detected values. Configuration options: [Disabled] [Enabled] NB PCIe Configuration Allows you to enable or disable the internal graphics device's multi-monitor support for internal graphics...
...] [PCI] iGPU Memory [64M] Allows you to decide which graphics controller to configure the NB PCI Express settings. Chapter 2: BIOS information 2-21 Configuration options: [Auto] [32M] [64M] [96M] [128M] ~ [448M] [480M] [512M] [1024M] Render Standby [Enabled] Allows you to use IDE Mode on Windows® XP. • [IDE] is detected, the item shows None. The USB Devices item shows the auto-detected values. Configuration options: [Disabled] [Enabled] NB PCIe Configuration Allows you to enable or disable the internal graphics device's multi-monitor support for internal graphics...

P8H61-M LX R2 User's Manual
Page 60
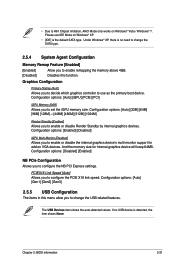
... High Definition Audio Controller. [Disabled] Disables the controller. Front Panel Type [HD] Allows you set the HD Audio Controller item to detect the presence of the Realtek LAN controller. Configuration options: [Enabled] [Disabled] Serial Port Configuration The sub-items in this menu allow you set the serial port configuration. If no USB device is detected, the legacy USB support is enabled. Realtek PXE OPROM [Disabled] This item appears only when you to legacy AC'97. Configuration options: [Enabled] [Disabled] Change Settings [IO=3F8h; IRQ=3] 2-22 ASUS P8H61-M LX2 R2...
... High Definition Audio Controller. [Disabled] Disables the controller. Front Panel Type [HD] Allows you set the HD Audio Controller item to detect the presence of the Realtek LAN controller. Configuration options: [Enabled] [Disabled] Serial Port Configuration The sub-items in this menu allow you set the serial port configuration. If no USB device is detected, the legacy USB support is enabled. Realtek PXE OPROM [Disabled] This item appears only when you to legacy AC'97. Configuration options: [Enabled] [Disabled] Change Settings [IO=3F8h; IRQ=3] 2-22 ASUS P8H61-M LX2 R2...
P8H61-M LX R2 User's Manual
Page 64
... Chassis Q-Fan Control feature and allows you to set the chassis fan warning speed. Chassis Fan Max. Chassis Lower Temperature [40] Displays the lower limit of the CPU temperature. When the chassis temperature is under 40ºC, the chassis fan will operate at the minimum duty cycle. 2.6.6 Anti Surge Support [Enabled] This item allows you to 90ºC. Chassis Upper Temperature [70] Use the and keys to adjust the upper limit of the chassis temperature. CPU Fan Min. Configuration options: [Disabled] [Enabled] 2-26 ASUS P8H61...
... Chassis Q-Fan Control feature and allows you to set the chassis fan warning speed. Chassis Fan Max. Chassis Lower Temperature [40] Displays the lower limit of the CPU temperature. When the chassis temperature is under 40ºC, the chassis fan will operate at the minimum duty cycle. 2.6.6 Anti Surge Support [Enabled] This item allows you to 90ºC. Chassis Upper Temperature [70] Use the and keys to adjust the upper limit of the chassis temperature. CPU Fan Min. Configuration options: [Disabled] [Enabled] 2-26 ASUS P8H61...


