
User Manual
Page 1
P7P55D-E LX Motherboard
P7P55D-E LX Motherboard

User Manual
Page 3
Contents Contents...iii Notices...vi Safety information vii About this guide viii P7P55D-E LX specifications summary ix Chapter 1: Product introduction 1-1 1.1 Welcome 1-1 1.2 Package contents 1-1 1.3 Special features 1-1 1.3.1 Product highlights 1-1 1.4 Before you proceed 1-2 1.5 Motherboard overview 1-2 1.5.1 Placement direction 1-2 1.5.2 Screw holes 1-2 1.5.3 Motherboard layout 1-3 1.5.4 Layout contents 1-3 1.6 Central Processing Unit (CPU 1-4 1.6.1 Installing the CPU 1-4 1.6.2 Installing the CPU heatsink and fan 1-7 1.6.3 Uninstalling the...
Contents Contents...iii Notices...vi Safety information vii About this guide viii P7P55D-E LX specifications summary ix Chapter 1: Product introduction 1-1 1.1 Welcome 1-1 1.2 Package contents 1-1 1.3 Special features 1-1 1.3.1 Product highlights 1-1 1.4 Before you proceed 1-2 1.5 Motherboard overview 1-2 1.5.1 Placement direction 1-2 1.5.2 Screw holes 1-2 1.5.3 Motherboard layout 1-3 1.5.4 Layout contents 1-3 1.6 Central Processing Unit (CPU 1-4 1.6.1 Installing the CPU 1-4 1.6.2 Installing the CPU heatsink and fan 1-7 1.6.3 Uninstalling the...

User Manual
Page 6
... radio noise emissions from that the product (electrical and electronic equipment) should not be placed in our products at ASUS REACH website at http://green.asus.com/english/REACH.htm. DO NOT throw the motherboard in municipal waste. vi REACH Complying with Canadian ICES-003. Operation is connected. • Consult the dealer or...
... radio noise emissions from that the product (electrical and electronic equipment) should not be placed in our products at ASUS REACH website at http://green.asus.com/english/REACH.htm. DO NOT throw the motherboard in municipal waste. vi REACH Complying with Canadian ICES-003. Operation is connected. • Consult the dealer or...

User Manual
Page 7
... away from connectors, slots, sockets and circuitry. • Avoid dust, humidity, and temperature extremes. Operation safety • Before installing the motherboard and adding devices on a stable surface. • If you are using an adapter or extension cord. vii Contact a qualified service technician ...the power cable from the electrical outlet before relocating the system. • When adding or removing devices to or from the motherboard, ensure that all power cables are unplugged. • Seek professional assistance before the signal cables are connected. If possible, disconnect...
... away from connectors, slots, sockets and circuitry. • Avoid dust, humidity, and temperature extremes. Operation safety • Before installing the motherboard and adding devices on a stable surface. • If you are using an adapter or extension cord. vii Contact a qualified service technician ...the power cable from the electrical outlet before relocating the system. • When adding or removing devices to or from the motherboard, ensure that all power cables are unplugged. • Seek professional assistance before the signal cables are connected. If possible, disconnect...

User Manual
Page 8
...provides updated information on ASUS hardware and software products. Conventions used in the less-than and greater-than sign means that may have been added by your dealer. Used to help you perform certain tasks properly, take note of the motherboard and the new technology... for additional information and for product and software updates. 1. DANGER/WARNING: Information to prevent injury to yourself when trying to the ASUS contact information. 2. Example: ++ viii Detailed descriptions of the standard package. Keys enclosed in this guide To make sure that you...
...provides updated information on ASUS hardware and software products. Conventions used in the less-than and greater-than sign means that may have been added by your dealer. Used to help you perform certain tasks properly, take note of the motherboard and the new technology... for additional information and for product and software updates. 1. DANGER/WARNING: Information to prevent injury to yourself when trying to the ASUS contact information. 2. Example: ++ viii Detailed descriptions of the standard package. Keys enclosed in this guide To make sure that you...

User Manual
Page 13
... one of the most powerful and energy efficient CPU in the long line of the above items is damaged or missing, contact your motherboard package for the following items. Motherboard Cables Accessories Application DVD Documentations ASUS P7P55D-E LX motherboard 2 x Serial ATA 3.0Gb/s signal cable 1 x Serial ATA 6.0Gb/s signal cable 1x Ultra DMA 133/100 cable 1 x Q-Shield...
... one of the most powerful and energy efficient CPU in the long line of the above items is damaged or missing, contact your motherboard package for the following items. Motherboard Cables Accessories Application DVD Documentations ASUS P7P55D-E LX motherboard 2 x Serial ATA 3.0Gb/s signal cable 1 x Serial ATA 6.0Gb/s signal cable 1x Ultra DMA 133/100 cable 1 x Q-Shield...

User Manual
Page 14
...generation components and peripherals, USB 3.0 transfers data 10X faster and is detached from the wall socket before you install motherboard components or change any motherboard settings. • Unplug the power cord from the power supply. Do not overtighten the screws! Additionally, get enhanced... with USB 3.0-the latest connectivity standard. True SATA 6Gb/s Support Supporting next-generation Serial ATA (SATA) storage interface, this motherboard delivers up to 6.0Gb/s data transfer rates. True USB 3.0 Support Experience ultra-fast data transfers at 4.8Gbps with external ...
...generation components and peripherals, USB 3.0 transfers data 10X faster and is detached from the wall socket before you install motherboard components or change any motherboard settings. • Unplug the power cord from the power supply. Do not overtighten the screws! Additionally, get enhanced... with USB 3.0-the latest connectivity standard. True SATA 6Gb/s Support Supporting next-generation Serial ATA (SATA) storage interface, this motherboard delivers up to 6.0Gb/s data transfer rates. True USB 3.0 Support Experience ultra-fast data transfers at 4.8Gbps with external ...

User Manual
Page 15
... chassis. MemOK! Digital audio connector (4-1 pin SPDIF_OUT) 1-26 1-23 15. 1.5.3 Motherboard layout Ensure that you install the motherboard into the chassis in the correct orientation. switch 6. Clear RTC RAM (3-pin CLRTC) 1-18 1-19 13. Serial port connector (10-1 pin COM1) 1-25 ASUS P7P55D-E LX 1-3 Intel® P55 Serial ATA connectors (7-pin SATA 1-6) 8. Standby power LED...
... chassis. MemOK! Digital audio connector (4-1 pin SPDIF_OUT) 1-26 1-23 15. 1.5.3 Motherboard layout Ensure that you install the motherboard into the chassis in the correct orientation. switch 6. Clear RTC RAM (3-pin CLRTC) 1-18 1-19 13. Serial port connector (10-1 pin COM1) 1-25 ASUS P7P55D-E LX 1-3 Intel® P55 Serial ATA connectors (7-pin SATA 1-6) 8. Standby power LED...

User Manual
Page 16
..., or misplacement/loss/incorrect removal of the PnP cap. 1.6.1 Installing the CPU To install a CPU: 1. ASUS will shoulder the cost of the motherboard, ensure that all power cables are unplugged before installing the CPU. • Upon purchase of repair only if.../transit-related. • Keep the cap after installing the motherboard. 1.6 Central Processing Unit (CPU) The motherboard comes with the cap on the motherboard. 2. ASUS will process Return Merchandise Authorization (RMA) requests only if the motherboard comes with a surface mount LGA1156 socket designed for the Intel...
..., or misplacement/loss/incorrect removal of the PnP cap. 1.6.1 Installing the CPU To install a CPU: 1. ASUS will shoulder the cost of the motherboard, ensure that all power cables are unplugged before installing the CPU. • Upon purchase of repair only if.../transit-related. • Keep the cap after installing the motherboard. 1.6 Central Processing Unit (CPU) The motherboard comes with the cap on the motherboard. 2. ASUS will process Return Merchandise Authorization (RMA) requests only if the motherboard comes with a surface mount LGA1156 socket designed for the Intel...

User Manual
Page 19
... no tool to install. • Use an LGA1156-compatible CPU heatsink and fan assembly only. To install the CPU heatsink and fan: 1. ASUS P7P55D-E LX 1-7 If you purchased a separate CPU heatsink and fan assembly, ensure that the CPU fan cable is incompatible with the LGA775 and LGA1366 sockets ... Place the heatsink on top of the installed CPU, making sure that you have installed the motherboard to the CPU fan connector. Ensure that the four fasteners match the holes on the motherboard. 2. If you install the heatsink and fan assembly. The LGA1156 socket is closest to the...
... no tool to install. • Use an LGA1156-compatible CPU heatsink and fan assembly only. To install the CPU heatsink and fan: 1. ASUS P7P55D-E LX 1-7 If you purchased a separate CPU heatsink and fan assembly, ensure that the CPU fan cable is incompatible with the LGA775 and LGA1366 sockets ... Place the heatsink on top of the installed CPU, making sure that you have installed the motherboard to the CPU fan connector. Ensure that the four fasteners match the holes on the motherboard. 2. If you install the heatsink and fan assembly. The LGA1156 socket is closest to the...

User Manual
Page 20
...to connect the CPU fan connector! Disconnect the CPU fan cable from the connector on the motherboard labeled CPU_FAN. DO NOT forget to the connector on the motherboard. 2. Rotate each fastener counterclockwise. 3. Hardware monitoring errors can occur if you fail to ...disengage the heatsink and fan assembly from the motherboard. 1-8 Chapter 1: Product introduction Pull up two fasteners at a time in a B ...
...to connect the CPU fan connector! Disconnect the CPU fan cable from the connector on the motherboard labeled CPU_FAN. DO NOT forget to the connector on the motherboard. 2. Rotate each fastener counterclockwise. 3. Hardware monitoring errors can occur if you fail to ...disengage the heatsink and fan assembly from the motherboard. 1-8 Chapter 1: Product introduction Pull up two fasteners at a time in a B ...
User Manual
Page 21
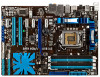
... performance with four Double Data Rate 3 (DDR3) Dual Inline Memory Modules (DIMM) sockets. Two DIMMs (dual-channel operation): Four DIMMs (dual-channel operation): ASUS P7P55D-E LX 1-9 1.7 System memory 1.7.1 Overview The motherboard comes with less power consumption. The figure illustrates the location of the DDR3 DIMM sockets: Recommended memory configurations One DIMM: Install only one...
... performance with four Double Data Rate 3 (DDR3) Dual Inline Memory Modules (DIMM) sockets. Two DIMMs (dual-channel operation): Four DIMMs (dual-channel operation): ASUS P7P55D-E LX 1-9 1.7 System memory 1.7.1 Overview The motherboard comes with less power consumption. The figure illustrates the location of the DDR3 DIMM sockets: Recommended memory configurations One DIMM: Install only one...
User Manual
Page 22
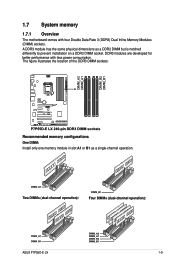
... single-channel operation. • Due to the Microsoft® support site at http://support.microsoft.com/kb/929605/en-us. • This motherboard does not support DIMMs made up to support a full memory load (4 DIMMs) or overclocking condition. 1-10 Chapter 1: Product introduction 1.7.2 Memory ... memory module. Profile feature in Megabit, 8 Megabit/Mb = 1 Megabyte/MB). • The default memory operation frequency is dependent on the motherboard, the actual usable memory for one DIMM per channel only. • According to Intel CPU spec, DIMM voltage below 1.65V is the standard ...
... single-channel operation. • Due to the Microsoft® support site at http://support.microsoft.com/kb/929605/en-us. • This motherboard does not support DIMMs made up to support a full memory load (4 DIMMs) or overclocking condition. 1-10 Chapter 1: Product introduction 1.7.2 Memory ... memory module. Profile feature in Megabit, 8 Megabit/Mb = 1 Megabyte/MB). • The default memory operation frequency is dependent on the motherboard, the actual usable memory for one DIMM per channel only. • According to Intel CPU spec, DIMM voltage below 1.65V is the standard ...

User Manual
Page 23
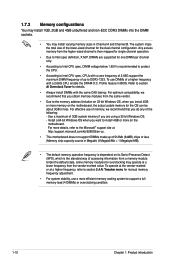
...8226; • • • • • • 1.5 • • • • • • • • • • • • • • • P7P55D-E LX Motherboard Qualified Vendors Lists (QVL) DDR3-1333MHz capability for CPU at 2.66, 2.8 and 2.93GHz Vendor A-DATA A-DATA A-DATA Apacer Apacer Apacer Apacer Apacer Apacer CORSAIR CORSAIR...; 9-9-9-24(1066-7-7-7-20) 1.70 9-9-9-24(1333-9-9-9-24) 1.5 9(1333-9-9-9-24) (1333-9-9-9-24) 9(1333-9-9-9-24) 9(1333-9-9-9-24) •• •• • ASUS P7P55D-E LX 1-11
...8226; • • • • • • 1.5 • • • • • • • • • • • • • • • P7P55D-E LX Motherboard Qualified Vendors Lists (QVL) DDR3-1333MHz capability for CPU at 2.66, 2.8 and 2.93GHz Vendor A-DATA A-DATA A-DATA Apacer Apacer Apacer Apacer Apacer Apacer CORSAIR CORSAIR...; 9-9-9-24(1066-7-7-7-20) 1.70 9-9-9-24(1333-9-9-9-24) 1.5 9(1333-9-9-9-24) (1333-9-9-9-24) 9(1333-9-9-9-24) 9(1333-9-9-9-24) •• •• • ASUS P7P55D-E LX 1-11

User Manual
Page 24
...XMP) Transcend TS128MLK64V3U Transcend TS256MLK64V3U Asint SLY3128M8-EDJ Asint SLY3128M8-EDJE Asint SLZ3128M8-EDJ Asint SLZ3128M8-EDJE ASUS N/A BUFFALO FSX1333D3G-1G BUFFALO FSH1333D3G-T3G(XMP) BUFFALO FSX1333D3G-2G Patriot PDC32G1333LLK Patriot PVT33G1333ELK Patriot ...• • 9(1333-9-9-9-24) •• • 9(1333-9-9-9-24) •• • 1-12 Chapter 1: Product introduction P7P55D-E LX Motherboard Qualified Vendors Lists (QVL) DDR3-1333MHz capability for CPU at 2.66, 2.8 and 2.93GHz (continued) Vendor Part No. Size SS/ DS Chip Brand...
...XMP) Transcend TS128MLK64V3U Transcend TS256MLK64V3U Asint SLY3128M8-EDJ Asint SLY3128M8-EDJE Asint SLZ3128M8-EDJ Asint SLZ3128M8-EDJE ASUS N/A BUFFALO FSX1333D3G-1G BUFFALO FSH1333D3G-T3G(XMP) BUFFALO FSX1333D3G-2G Patriot PDC32G1333LLK Patriot PVT33G1333ELK Patriot ...• • 9(1333-9-9-9-24) •• • 9(1333-9-9-9-24) •• • 1-12 Chapter 1: Product introduction P7P55D-E LX Motherboard Qualified Vendors Lists (QVL) DDR3-1333MHz capability for CPU at 2.66, 2.8 and 2.93GHz (continued) Vendor Part No. Size SS/ DS Chip Brand...

User Manual
Page 25
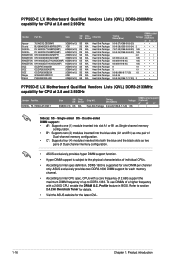
P7P55D-E LX Motherboard Qualified Vendors Lists (QVL) DDR3-1600MHz capability for CPU at 2.66GHz Vendor Part No. A-DATA AD31600E001GMU 3072MB(Kit of 3) SS N/A Heat-Sink Package ...8226;• • P7P55D-E LX Motherboard Qualified Vendors Lists (QVL) DDR3-1625MHz capability for CPU at 2.66GHz Vendor KINGSTON KINGSTON KINGSTON Part No. Heat-Sink Package Heat-Sink Package Heat-Sink Package Timing Dimm(Bios) Voltage DIMM socket support (Optional) A* B* C* 1.9 • • • 1.9 • • • 1.9 • • ASUS P7P55D-E LX 1-13 Size SS/ ...
P7P55D-E LX Motherboard Qualified Vendors Lists (QVL) DDR3-1600MHz capability for CPU at 2.66GHz Vendor Part No. A-DATA AD31600E001GMU 3072MB(Kit of 3) SS N/A Heat-Sink Package ...8226;• • P7P55D-E LX Motherboard Qualified Vendors Lists (QVL) DDR3-1625MHz capability for CPU at 2.66GHz Vendor KINGSTON KINGSTON KINGSTON Part No. Heat-Sink Package Heat-Sink Package Heat-Sink Package Timing Dimm(Bios) Voltage DIMM socket support (Optional) A* B* C* 1.9 • • • 1.9 • • • 1.9 • • ASUS P7P55D-E LX 1-13 Size SS/ ...

User Manual
Page 26
...• • • Heat-Sink Package 1.9 • • • Heat-Sink Package 1.9 • • • P7P55D-E LX Motherboard Qualified Vendors Lists (QVL) DDR3-1800MHz capability for CPU at 2.8 and 2.93GHz Vendor Part No. Size SS/ Chip DS Brand 78.0AGCD-CDZ...8 1.9 •• Heat-Sink Package 8 •• • Heat-Sink Package 8-8-8-20(1066-7-7-7-20) 1.9 •• P7P55D-E LX Motherboard Qualified Vendors Lists (QVL) DDR3-1800MHz capability for CPU at 2.8 and 2.93GHz Vendor KINGSTON KINGSTON KINGSTON Part No. KHX13000D3LLK2/2GN(EPP)...
...• • • Heat-Sink Package 1.9 • • • Heat-Sink Package 1.9 • • • P7P55D-E LX Motherboard Qualified Vendors Lists (QVL) DDR3-1800MHz capability for CPU at 2.8 and 2.93GHz Vendor Part No. Size SS/ Chip DS Brand 78.0AGCD-CDZ...8 1.9 •• Heat-Sink Package 8 •• • Heat-Sink Package 8-8-8-20(1066-7-7-7-20) 1.9 •• P7P55D-E LX Motherboard Qualified Vendors Lists (QVL) DDR3-1800MHz capability for CPU at 2.8 and 2.93GHz Vendor KINGSTON KINGSTON KINGSTON Part No. KHX13000D3LLK2/2GN(EPP)...

User Manual
Page 27
...Package 9-8-8(1066-8-7-7-20) 1.8 • • Gingle 9CAASS37AZZ01D1 2GB DS N/A Heat-Sink Package 9-9-9-24 • • • ASUS P7P55D-E LX 1-15 Size SS/ DS Chip Brand Chip NO. Timing Dimm(Bios) DIMM socket Voltage support (Optional) A* B* C* Apacer 78.0AGCQ... 9 9-8-8(1066-8-7-7-20) 9-9-9-24 Voltage 2 1.65 1.65 2.0 1.65 1.65 1.65 1.9 1.9 1.8 DIMM socket support (Optional) A* B* C P7P55D-E LX Motherboard Qualified Vendors Lists (QVL) DDR3-1866MHz capability for CPU at 2.66GHz Vendor Part No. Size SS/ DS Chip Brand Chip NO. Timing Dimm(Bios...
...Package 9-8-8(1066-8-7-7-20) 1.8 • • Gingle 9CAASS37AZZ01D1 2GB DS N/A Heat-Sink Package 9-9-9-24 • • • ASUS P7P55D-E LX 1-15 Size SS/ DS Chip Brand Chip NO. Timing Dimm(Bios) DIMM socket Voltage support (Optional) A* B* C* Apacer 78.0AGCQ... 9 9-8-8(1066-8-7-7-20) 9-9-9-24 Voltage 2 1.65 1.65 2.0 1.65 1.65 1.65 1.9 1.9 1.8 DIMM socket support (Optional) A* B* C P7P55D-E LX Motherboard Qualified Vendors Lists (QVL) DDR3-1866MHz capability for CPU at 2.66GHz Vendor Part No. Size SS/ DS Chip Brand Chip NO. Timing Dimm(Bios...
User Manual
Page 28
...8226;• 9-9-9-24 ••• 9-9-9-24(1066-7-7-7-20) 2 •• P7P55D-E LX Motherboard Qualified Vendors Lists (QVL) DDR3-2133MHz capability for CPU at 2.8 and 2.93GHz Vendor Part No. ASUS exclusively provides two DDR3-1600 DIMM support for each memory channel. • According to Intel... CPU spec, CPUs with a 2.66G CPU, enable the DRAM O.C. P7P55D-E LX Motherboard Qualified Vendors Lists (QVL) DDR3-2000MHz capability...
...8226;• 9-9-9-24 ••• 9-9-9-24(1066-7-7-7-20) 2 •• P7P55D-E LX Motherboard Qualified Vendors Lists (QVL) DDR3-2133MHz capability for CPU at 2.8 and 2.93GHz Vendor Part No. ASUS exclusively provides two DDR3-1600 DIMM support for each memory channel. • According to Intel... CPU spec, CPUs with a 2.66G CPU, enable the DRAM O.C. P7P55D-E LX Motherboard Qualified Vendors Lists (QVL) DDR3-2000MHz capability...
User Manual
Page 29
...physical injury and damage motherboard components. 1.8.1 Installing an expansion card To install an expansion card: 1. Failure to do so may cause you may need to install expansion cards. Keep the screw for later use . Secure the card to use . 4. ASUS P7P55D-E LX 1-17 Unplug the ...Replace the system cover. 1.8.2 Configuring an expansion card After installing the expansion card, configure it supports. Assign an IRQ to section 1-6 Motherboard overview for the card. 2. Turn on BIOS setup. 2. Install the software drivers for information on the system and change the necessary...
...physical injury and damage motherboard components. 1.8.1 Installing an expansion card To install an expansion card: 1. Failure to do so may cause you may need to install expansion cards. Keep the screw for later use . Secure the card to use . 4. ASUS P7P55D-E LX 1-17 Unplug the ...Replace the system cover. 1.8.2 Configuring an expansion card After installing the expansion card, configure it supports. Assign an IRQ to section 1-6 Motherboard overview for the card. 2. Turn on BIOS setup. 2. Install the software drivers for information on the system and change the necessary...


