
User Manual
Page 77
...15] [20] [25] [30] [35] 3.4.3 AHCI Configuration This menu is used . Main AHCI Settings BIOS SETUP UTILITY SATA Port1 [Not Detected] SATA Port2 [Not Detected] SATA Port3 [Not Detected] SATA Port4 [Not Detected]...Sec) [35] Selects the time out value for detecting ATA/ATAPI devices. Chapter 3 ASUS P7P55D-E Deluxe 3-13 3.4.2 Storage Configuration The Storage Configuration menu allows you to [AHCI]. The AHCI allows...keep the default setting [IDE]. • If you want to create a RAID 0, RAID 1, RAID 5, RAID 10, or the Intel® Matrix Storage Technology configuration from the Serial ATA...
...15] [20] [25] [30] [35] 3.4.3 AHCI Configuration This menu is used . Main AHCI Settings BIOS SETUP UTILITY SATA Port1 [Not Detected] SATA Port2 [Not Detected] SATA Port3 [Not Detected] SATA Port4 [Not Detected]...Sec) [35] Selects the time out value for detecting ATA/ATAPI devices. Chapter 3 ASUS P7P55D-E Deluxe 3-13 3.4.2 Storage Configuration The Storage Configuration menu allows you to [AHCI]. The AHCI allows...keep the default setting [IDE]. • If you want to create a RAID 0, RAID 1, RAID 5, RAID 10, or the Intel® Matrix Storage Technology configuration from the Serial ATA...
User Manual
Page 105
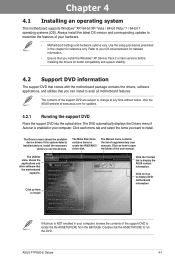
...Windows® XP/ 64-bit XP/ Vista / 64-bit Vista / 7 / 64-bit 7 operating systems (OS). Use the setup procedures presented in this chapter for updates. 4.2.1 Running the support DVD Place the support DVD into the optical drive. The DVD automatically ...any time without notice. Click each menu tab and select the items you want to display the ASUS contact information. ASUS P7P55D-E Deluxe 4-1 The contents of your computer, browse the contents of the support DVD to open the .... • Motherboard settings and hardware options vary. Click an icon to create the RAID/AHCI driver disk.
...Windows® XP/ 64-bit XP/ Vista / 64-bit Vista / 7 / 64-bit 7 operating systems (OS). Use the setup procedures presented in this chapter for updates. 4.2.1 Running the support DVD Place the support DVD into the optical drive. The DVD automatically ...any time without notice. Click each menu tab and select the items you want to display the ASUS contact information. ASUS P7P55D-E Deluxe 4-1 The contents of your computer, browse the contents of the support DVD to open the .... • Motherboard settings and hardware options vary. Click an icon to create the RAID/AHCI driver disk.
User Manual
Page 115
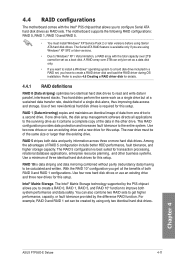
...RAID function. The Serial ATA RAID feature is best suited for this setup. Two hard disks perform the same work as RAID sets. RAID 5 stripes both system performance and data safety. With the RAID 10* configuration you to create a RAID 0, RAID 1, RAID 5, and RAID 10* function to create a RAID driver disk and load the RAID... 4 ASUS P7P55D-E Deluxe 4-11 The motherboard supports the following RAID configurations: RAID 0, RAID 1, RAID 10 and RAID 5. • You must be set , you to Windows® XP / Vista limitation, a RAID array with the Intel® P55 chipset that of RAID 5 ...
...RAID function. The Serial ATA RAID feature is best suited for this setup. Two hard disks perform the same work as RAID sets. RAID 5 stripes both system performance and data safety. With the RAID 10* configuration you to create a RAID 0, RAID 1, RAID 5, and RAID 10* function to create a RAID driver disk and load the RAID... 4 ASUS P7P55D-E Deluxe 4-11 The motherboard supports the following RAID configurations: RAID 0, RAID 1, RAID 10 and RAID 5. • You must be set , you to Windows® XP / Vista limitation, a RAID array with the Intel® P55 chipset that of RAID 5 ...
User Manual
Page 116
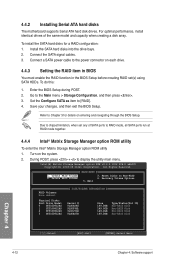
...your changes, and then exit the BIOS Setup. Create RAID Volume 2. Connect a SATA power cable to the power connector on each drive. 4.4.3 Setting the RAID item in BIOS You must enable the RAID function in the BIOS Setup before creating RAID set any of the same model and... the Configure SATA as item to the Main menu > Storage Configuration, and then press . 3. Delete RAID Volume 3. Enter the BIOS Setup during POST. 2. Refer to Non-RAID 4. Reset Disks to Chapter 3 for a RAID configuration: 1. Install the SATA hard disks into the drive bays. 2. Physical Disks: Port Drive Model ...
...your changes, and then exit the BIOS Setup. Create RAID Volume 2. Connect a SATA power cable to the power connector on each drive. 4.4.3 Setting the RAID item in BIOS You must enable the RAID function in the BIOS Setup before creating RAID set any of the same model and... the Configure SATA as item to the Main menu > Storage Configuration, and then press . 3. Delete RAID Volume 3. Enter the BIOS Setup during POST. 2. Refer to Non-RAID 4. Reset Disks to Chapter 3 for a RAID configuration: 1. Install the SATA hard disks into the drive bays. 2. Physical Disks: Port Drive Model ...

User Manual
Page 117
...through the menus and select the menu options. Enter a name for the RAID set 1. From the utility main menu, select 1. The RAID BIOS setup screens shown in the RAID set. The utility supports maximum four hard disk drives for reference only and...RAID Disk Non-RAID Disk Non-RAID Disk Non-RAID Disk Select 2 to 6 disks to include in this section are for RAID configuration. The navigation keys at the bottom of the screen allow you want to use in creating the volume. [↑↓]-Prev/Next [SPACE]-SelectDisk [ENTER]-Done Chapter 4 ASUS P7P55D-E Deluxe 4-13 Create RAID...
...through the menus and select the menu options. Enter a name for the RAID set 1. From the utility main menu, select 1. The RAID BIOS setup screens shown in the RAID set. The utility supports maximum four hard disk drives for reference only and...RAID Disk Non-RAID Disk Non-RAID Disk Non-RAID Disk Select 2 to 6 disks to include in this section are for RAID configuration. The navigation keys at the bottom of the screen allow you want to use in creating the volume. [↑↓]-Prev/Next [SPACE]-SelectDisk [ENTER]-Done Chapter 4 ASUS P7P55D-E Deluxe 4-13 Create RAID...

User Manual
Page 120
Insert the support DVD into the optical drive. 4. Follow the succeeding screen instructions to create an Intel® RAID driver disk. 5. Start Windows®. 2. Follow the succeeding screen instructions to enter the BIOS setup utility. 3. Press during POST to complete the process. Place the motherboard support DVD into the optical drive. 5. Write-protect...
Insert the support DVD into the optical drive. 4. Follow the succeeding screen instructions to create an Intel® RAID driver disk. 5. Start Windows®. 2. Follow the succeeding screen instructions to enter the BIOS setup utility. 3. Press during POST to complete the process. Place the motherboard support DVD into the optical drive. 5. Write-protect...


