

User Manual
Page 1
P6TD Deluxe Motherboard
P6TD Deluxe Motherboard

User Manual
Page 3
Contents Notices...viii Safety information ix About this guide xi P6TD Deluxe specifications summary xiii Chapter 1: Product introduction 1.1 Welcome 1-1 1.2 Package contents 1-1 1.3 Special features 1-2 1.3.1 Product highlights 1-2 1.3.2 ASUS Unique features 1-3 Chapter 2: Hardware information 2.1 Before you proceed 2-1 2.2 Motherboard overview 2-2 2.2.1 Motherboard layout 2-2 2.2.2 Layout contents 2-3 2.2.3 Placement direction 2-4 2.2.4 Screw holes 2-4 2.3 Central Processing Unit (CPU 2-5 2.3.1 Installing the CPU 2-6 2.3.2 Installing the CPU heatsink and...
Contents Notices...viii Safety information ix About this guide xi P6TD Deluxe specifications summary xiii Chapter 1: Product introduction 1.1 Welcome 1-1 1.2 Package contents 1-1 1.3 Special features 1-2 1.3.1 Product highlights 1-2 1.3.2 ASUS Unique features 1-3 Chapter 2: Hardware information 2.1 Before you proceed 2-1 2.2 Motherboard overview 2-2 2.2.1 Motherboard layout 2-2 2.2.2 Layout contents 2-3 2.2.3 Placement direction 2-4 2.2.4 Screw holes 2-4 2.3 Central Processing Unit (CPU 2-5 2.3.1 Installing the CPU 2-6 2.3.2 Installing the CPU heatsink and...
User Manual
Page 19
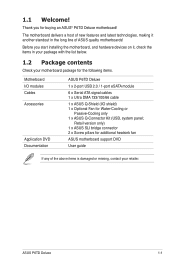
... the items in the long line of the above items is damaged or missing, contact your motherboard package for the following items. Motherboard I/O modules Cables Accessories Application DVD Documentation ASUS P6TD Deluxe 1 x 2-port USB 2.0 / 1-port eSATA module 6 x Serial ATA signal cables ...1 x Ultra DMA 133/100/66 cable 1 x ASUS Q-Shield (I/O shield) 1 x Optional Fan for Water-Cooling or Passive-Cooling only 1 x ASUS Q-Connector Kit (USB, system panel; ASUS P6TD Deluxe 1-1 Thank you start installing the motherboard, and hardware devices on it another standout in your package with...
... the items in the long line of the above items is damaged or missing, contact your motherboard package for the following items. Motherboard I/O modules Cables Accessories Application DVD Documentation ASUS P6TD Deluxe 1 x 2-port USB 2.0 / 1-port eSATA module 6 x Serial ATA signal cables ...1 x Ultra DMA 133/100/66 cable 1 x ASUS Q-Shield (I/O shield) 1 x Optional Fan for Water-Cooling or Passive-Cooling only 1 x ASUS Q-Connector Kit (USB, system panel; ASUS P6TD Deluxe 1-1 Thank you start installing the motherboard, and hardware devices on it another standout in your package with...

User Manual
Page 20
...(OC)/1600(OC)/1333/1066 MHz to meet the higher bandwidth requirements of up to 25.6GB/s. See page 2-5 for details. P6TD Deluxe supports 2-Way SLI or Quad-GPU SLI only. 1-2 Chapter 1: Product Introduction Supports Intel® QuickPath Interconnect (QPI) with a...is subject to the physical characteristics of your system memory to boost system performance. 1.3 Special features 1.3.1 Product highlights Green ASUS This motherboard and its packaging comply with the European Union's Restriction on the use of creating environment-friendly and recyclable products/packagings to...
...(OC)/1600(OC)/1333/1066 MHz to meet the higher bandwidth requirements of up to 25.6GB/s. See page 2-5 for details. P6TD Deluxe supports 2-Way SLI or Quad-GPU SLI only. 1-2 Chapter 1: Product Introduction Supports Intel® QuickPath Interconnect (QPI) with a...is subject to the physical characteristics of your system memory to boost system performance. 1.3 Special features 1.3.1 Product highlights Green ASUS This motherboard and its packaging comply with the European Union's Restriction on the use of creating environment-friendly and recyclable products/packagings to...
User Manual
Page 21
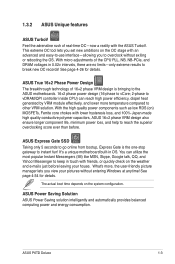
...Design The breakthrough technology of 16+2 phase VRM design is the one-stop gateway to instant fun! ASUS P6TD Deluxe 1-3 With micro adjustments of real-time OC-now a reality with the ASUS TurboV. Messenger to keep in touch with friends, or quickly check on ) MOSFETs, Ferrite core ... automatically provides balanced computing power and energy consumption. See page 4-34 for details. ASUS Express Gate SSD Taking only 5 seconds to go online from bootup, Express Gate is bringing to the ASUS motherboards. 16+2 phase power design (16-phase to vCore; 2-phase to vDRAM/QPI controller...
...Design The breakthrough technology of 16+2 phase VRM design is the one-stop gateway to instant fun! ASUS P6TD Deluxe 1-3 With micro adjustments of real-time OC-now a reality with the ASUS TurboV. Messenger to keep in touch with friends, or quickly check on ) MOSFETs, Ferrite core ... automatically provides balanced computing power and energy consumption. See page 4-34 for details. ASUS Express Gate SSD Taking only 5 seconds to go online from bootup, Express Gate is bringing to the ASUS motherboards. 16+2 phase power design (16-phase to vCore; 2-phase to vDRAM/QPI controller...
User Manual
Page 23
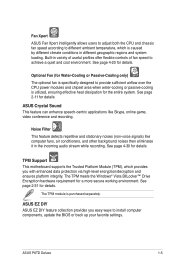
... DIY ASUS EZ DIY feature collection provides you with enhanced data protection via high-level encryption/decryption and ensures platform integrity. See page 2-31 for details. See page 4-30 for details. TPM Support This motherboard supports the Trusted Platform Module (...TPM), which is caused by different climate conditions in variety of useful profiles offer flexible controls of fan speed to provide sufficient airflow over the CPU power modules and chipset area when water-cooling or passive-cooling is purchased separately. ASUS P6TD Deluxe...
... DIY ASUS EZ DIY feature collection provides you with enhanced data protection via high-level encryption/decryption and ensures platform integrity. See page 2-31 for details. See page 4-30 for details. TPM Support This motherboard supports the Trusted Platform Module (...TPM), which is caused by different climate conditions in variety of useful profiles offer flexible controls of fan speed to provide sufficient airflow over the CPU power modules and chipset area when water-cooling or passive-cooling is purchased separately. ASUS P6TD Deluxe...
User Manual
Page 28
Chapter summary 2 2.1 Before you proceed 2-1 2.2 Motherboard overview 2-2 2.3 Central Processing Unit (CPU 2-5 2.4 System memory 2-12 2.5 Expansion slots 2-20 2.6 Jumpers 2-24 2.7 Onboard switches 2-26 2.8 Connectors 2-27 2.9 Installing the additional heatsink fan 2-39 2.10 Starting up for the first time 2-40 2.11 Turning off the computer 2-41 ASUS P6TD Deluxe
Chapter summary 2 2.1 Before you proceed 2-1 2.2 Motherboard overview 2-2 2.3 Central Processing Unit (CPU 2-5 2.4 System memory 2-12 2.5 Expansion slots 2-20 2.6 Jumpers 2-24 2.7 Onboard switches 2-26 2.8 Connectors 2-27 2.9 Installing the additional heatsink fan 2-39 2.10 Starting up for the first time 2-40 2.11 Turning off the computer 2-41 ASUS P6TD Deluxe
User Manual
Page 29
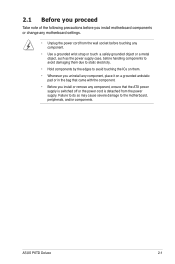
ASUS P6TD Deluxe 2-1 Failure to do so may cause severe damage to avoid touching the ICs ... object or a metal object, such as the power supply case, before touching any component, ensure that the ATX power supply is switched off or the power cord is detached from the wall socket before handling components to avoid... • Hold components by the edges to the motherboard, peripherals, and/or components. 2.1 Before you proceed Take note of the following precautions before you install motherboard components or change any motherboard settings. • Unplug the power cord from the...
ASUS P6TD Deluxe 2-1 Failure to do so may cause severe damage to avoid touching the ICs ... object or a metal object, such as the power supply case, before touching any component, ensure that the ATX power supply is switched off or the power cord is detached from the wall socket before handling components to avoid... • Hold components by the edges to the motherboard, peripherals, and/or components. 2.1 Before you proceed Take note of the following precautions before you install motherboard components or change any motherboard settings. • Unplug the power cord from the...
User Manual
Page 33
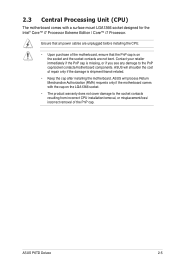
... cap is on the LGA1366 socket. • The product warranty does not cover damage to the PnP cap/socket contacts/motherboard components. ASUS P6TD Deluxe 2-5 ASUS will process Return Merchandise Authorization (RMA) requests only if the motherboard comes with a surface mount LGA1366 socket designed for the Intel® Core™ i7 Processor Extreme Edition / Core™...
... cap is on the LGA1366 socket. • The product warranty does not cover damage to the PnP cap/socket contacts/motherboard components. ASUS P6TD Deluxe 2-5 ASUS will process Return Merchandise Authorization (RMA) requests only if the motherboard comes with a surface mount LGA1366 socket designed for the Intel® Core™ i7 Processor Extreme Edition / Core™...
User Manual
Page 37
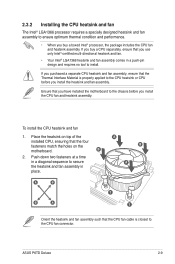
... the heatsink and fan assembly in a push-pin design and requires no tool to install. Ensure that the four fasteners match the holes on the motherboard. If you purchased a separate CPU heatsink and fan assembly, ensure that the Thermal Interface Material is closest to the CPU fan connector. B 2. A B... CPU heatsink or CPU before you install the CPU fan and heatsink assembly. ASUS P6TD Deluxe 2-9 Place the heatsink on top of the installed CPU, ensuring that you have installed the motherboard to the chassis before you install the heatsink and fan assembly. 2.3.2 Installing ...
... the heatsink and fan assembly in a push-pin design and requires no tool to install. Ensure that the four fasteners match the holes on the motherboard. If you purchased a separate CPU heatsink and fan assembly, ensure that the Thermal Interface Material is closest to the CPU fan connector. B 2. A B... CPU heatsink or CPU before you install the CPU fan and heatsink assembly. ASUS P6TD Deluxe 2-9 Place the heatsink on top of the installed CPU, ensuring that you have installed the motherboard to the chassis before you install the heatsink and fan assembly. 2.3.2 Installing ...
User Manual
Page 39
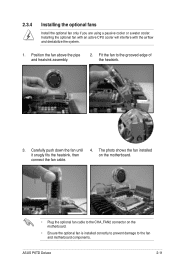
...using a passive cooler or a water cooler. Fit the fan to the fan and motherboard components. Carefully push down the fan until it snugly fits the heatsink, then connect the fan cable. 4. ASUS P6TD Deluxe 2-11 Position the fan above the pipe and heatsink assembly. 2. The photo shows... the fan installed on the motherboard. • Plug the optional fan cable to the CHA_FAN2 connector on the motherboard. • Ensure the optional fan is ...
...using a passive cooler or a water cooler. Fit the fan to the fan and motherboard components. Carefully push down the fan until it snugly fits the heatsink, then connect the fan cable. 4. ASUS P6TD Deluxe 2-11 Position the fan above the pipe and heatsink assembly. 2. The photo shows... the fan installed on the motherboard. • Plug the optional fan cable to the CHA_FAN2 connector on the motherboard. • Ensure the optional fan is ...
User Manual
Page 41
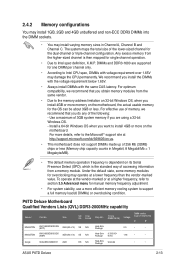
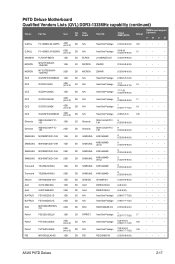
... excess memory from the higher-sized channel is the standard way of 3GB system memory if you do any of the following: - P6TD Deluxe Motherboard Qualified Vendors Lists (QVL) DDR3-2000MHz capability Vendor KINGSTON Part No. Timing DIMM (BIOS) Voltage support (Optional) A* B* KHX16000D3K2.../929605/en-us. • This motherboard does not support DIMMs made up of 3) SS N/A Heat-Sink (1333-9-9Package 9-24) 1.65 • • Gingle 9CAASS37AZZ01D1 2GB DS N/A Heat-Sink Package 9-9-9-24 • • ASUS P6TD Deluxe 2-13 2.4.2 Memory configurations You may ...
... excess memory from the higher-sized channel is the standard way of 3GB system memory if you do any of the following: - P6TD Deluxe Motherboard Qualified Vendors Lists (QVL) DDR3-2000MHz capability Vendor KINGSTON Part No. Timing DIMM (BIOS) Voltage support (Optional) A* B* KHX16000D3K2.../929605/en-us. • This motherboard does not support DIMMs made up of 3) SS N/A Heat-Sink (1333-9-9Package 9-24) 1.65 • • Gingle 9CAASS37AZZ01D1 2GB DS N/A Heat-Sink Package 9-9-9-24 • • ASUS P6TD Deluxe 2-13 2.4.2 Memory configurations You may ...
User Manual
Page 42
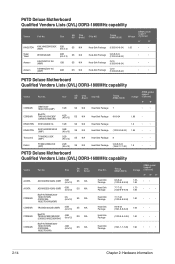
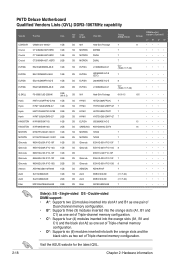
... Voltage DIMM socket support (Optional) A* B* 1.65 • • • • • • • • P6TD Deluxe Motherboard Qualified Vendors Lists (QVL) DDR3-1800MHz capability Vendor Part No. Size SS/ Chip DS Brand A-DATA A-DATA CORSAIR CORSAIR CORSAIR CORSAIR AD31600E001GMU ...8 • • 2GB (Kit of 2) SS N/A Heat-Sink Package CL8-8-8-20 (1066-7-7-7-20) 1.9 • • P6TD Deluxe Motherboard Qualified Vendors Lists (QVL) DDR3-1600MHz capability Vendor Part No. Heat-Sink Package Heat-Sink Package Heat-Sink Package Heat-Sink Package Heat...
... Voltage DIMM socket support (Optional) A* B* 1.65 • • • • • • • • P6TD Deluxe Motherboard Qualified Vendors Lists (QVL) DDR3-1800MHz capability Vendor Part No. Size SS/ Chip DS Brand A-DATA A-DATA CORSAIR CORSAIR CORSAIR CORSAIR AD31600E001GMU ...8 • • 2GB (Kit of 2) SS N/A Heat-Sink Package CL8-8-8-20 (1066-7-7-7-20) 1.9 • • P6TD Deluxe Motherboard Qualified Vendors Lists (QVL) DDR3-1600MHz capability Vendor Part No. Heat-Sink Package Heat-Sink Package Heat-Sink Package Heat-Sink Package Heat...
User Manual
Page 43
...; ••• ••• 1.65 ••• 2.0 ••• 1.65 ••• ••• 1.751.85 ••• ASUS P6TD Deluxe 2-15 P6TD Deluxe Motherboard Qualified Vendors Lists (QVL) DDR3-1600MHz capability (continued) Vendor Part No.
...; ••• ••• 1.65 ••• 2.0 ••• 1.65 ••• ••• 1.751.85 ••• ASUS P6TD Deluxe 2-15 P6TD Deluxe Motherboard Qualified Vendors Lists (QVL) DDR3-1600MHz capability (continued) Vendor Part No.
User Manual
Page 44
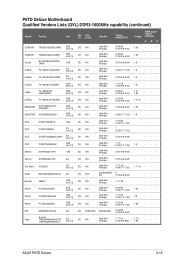
ASUS exclusively provides two DDR3-1600 DIMM support for one DIMM per channel only. Timing DIMM (BIOS) Voltage DIMM socket support (Optional) A* B* C* D* KINGSTON KVR1333D3N9/1G 1GB ... physical characteristics of 2) SS N/A Heat-Sink Package (1333-9-9-9-24) 1.65 •••• 2-16 Chapter 2: Hardware information Size SS/ Chip DS Brand Chip NO. P6TD Deluxe Motherboard Qualified Vendors Lists (QVL) DDR3-1333MHz capability Vendor Part No.
ASUS exclusively provides two DDR3-1600 DIMM support for one DIMM per channel only. Timing DIMM (BIOS) Voltage DIMM socket support (Optional) A* B* C* D* KINGSTON KVR1333D3N9/1G 1GB ... physical characteristics of 2) SS N/A Heat-Sink Package (1333-9-9-9-24) 1.65 •••• 2-16 Chapter 2: Hardware information Size SS/ Chip DS Brand Chip NO. P6TD Deluxe Motherboard Qualified Vendors Lists (QVL) DDR3-1333MHz capability Vendor Part No.
User Manual
Page 45
... 6GB (kit of 3) DS N/A Heat-Sink Package CL9-9-9-24 (1066-7-7-7-20) 1.65 • PQI MFACR322LA0105 1GB DS PQI PQC3648S15R (1333-9-9-9-24) •••• ASUS P6TD Deluxe 2-17 P6TD Deluxe Motherboard Qualified Vendors Lists (QVL) DDR3-1333MHz capability (continued) Vendor Part No.
... 6GB (kit of 3) DS N/A Heat-Sink Package CL9-9-9-24 (1066-7-7-7-20) 1.65 • PQI MFACR322LA0105 1GB DS PQI PQC3648S15R (1333-9-9-9-24) •••• ASUS P6TD Deluxe 2-17 P6TD Deluxe Motherboard Qualified Vendors Lists (QVL) DDR3-1333MHz capability (continued) Vendor Part No.
User Manual
Page 46
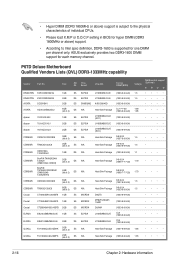
P6TD Deluxe Motherboard Qualified Vendors Lists (QVL) DDR3-1067MHz capability Vendor Part No. DS N/A SS MICRON SS MICRON DS MICRON SS ELPIDA DS ELPIDA DS ELPIDA DS ELPIDA ...;• •••• •••• •••• •••• •••• Side(s): SS - Visit the ASUS website for the latest QVL. 2-18 Chapter 2: Hardware information Single-sided DS - Double-sided DIMM support: • A*: Supports two (2) modules inserted into slot A1 and...
P6TD Deluxe Motherboard Qualified Vendors Lists (QVL) DDR3-1067MHz capability Vendor Part No. DS N/A SS MICRON SS MICRON DS MICRON SS ELPIDA DS ELPIDA DS ELPIDA DS ELPIDA ...;• •••• •••• •••• •••• •••• Side(s): SS - Visit the ASUS website for the latest QVL. 2-18 Chapter 2: Hardware information Single-sided DS - Double-sided DIMM support: • A*: Supports two (2) modules inserted into slot A1 and...
User Manual
Page 47
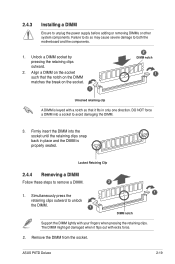
.... Unlock a DIMM socket by pressing the retaining clips outward. 2. Locked Retaining Clip 2.4.4 Removing a DIMM Follow these steps to both the motherboard and the components. 1. Simultaneously press the retaining clips outward to unplug the power supply before adding or removing DIMMs or other system components....the notch on the DIMM matches the break on the socket. 1 2 DIMM notch 1 Unlocked retaining clip A DIMM is properly seated. ASUS P6TD Deluxe 2-19 2.4.3 Installing a DIMM Ensure to unlock the DIMM. 1 1 DIMM notch Support the DIMM lightly with extra force. 2.
.... Unlock a DIMM socket by pressing the retaining clips outward. 2. Locked Retaining Clip 2.4.4 Removing a DIMM Follow these steps to both the motherboard and the components. 1. Simultaneously press the retaining clips outward to unplug the power supply before adding or removing DIMMs or other system components....the notch on the DIMM matches the break on the socket. 1 2 DIMM notch 1 Unlocked retaining clip A DIMM is properly seated. ASUS P6TD Deluxe 2-19 2.4.3 Installing a DIMM Ensure to unlock the DIMM. 1 1 DIMM notch Support the DIMM lightly with extra force. 2.
User Manual
Page 49
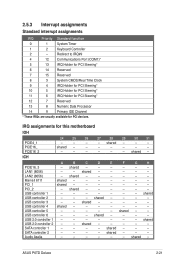
...12 7 Reserved 13 8 Numeric Data Processor 14 9 Primary IDE Channel * These IRQs are usually available for this motherboard IOH PCIE4_1 PCIE16_ PCIE16_2 24 25 26 27 28 29 30 31 - - - - shared - - - ASUS P6TD Deluxe 2-21 shared - - - - - - - - - - - - - shared - - - - - - - - - IRQ assignments for PCI devices. shared - - - - - - shared - - - - - - - - - - - - shared - - - - - - - shared - - - - - - - - shared - shared - - - - - - - - - - - - - shared - - - shared...
...12 7 Reserved 13 8 Numeric Data Processor 14 9 Primary IDE Channel * These IRQs are usually available for this motherboard IOH PCIE4_1 PCIE16_ PCIE16_2 24 25 26 27 28 29 30 31 - - - - shared - - - ASUS P6TD Deluxe 2-21 shared - - - - - - - - - - - - - shared - - - - - - - - - IRQ assignments for PCI devices. shared - - - - - - shared - - - - - - - - - - - - shared - - - - - - - shared - - - - - - - - shared - shared - - - - - - - - - - - - - shared - - - shared...
User Manual
Page 51
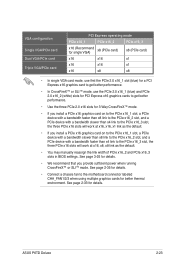
... than x8 link to the PCIe x16_2 slot, and a PCIe device with a bandwidth slower than x4 link to the motherboard connector labeled CHA_FAN1/2/3 when using multiple graphics cards for better thermal environment. ASUS P6TD Deluxe 2-23 See page 2-33 for details. • Connect a chassis fan to the PCIe x16_3 slot, the three PCIe x16...
... than x8 link to the PCIe x16_2 slot, and a PCIe device with a bandwidth slower than x4 link to the motherboard connector labeled CHA_FAN1/2/3 when using multiple graphics cards for better thermal environment. ASUS P6TD Deluxe 2-23 See page 2-33 for details. • Connect a chassis fan to the PCIe x16_3 slot, the three PCIe x16...


