
User Manual
Page 4
... 2-37 Chapter 3: BIOS setup 3.1 Managing and updating your BIOS 3-1 3.1.1 ASUS Update utility 3-1 3.1.2 ASUS EZ Flash 2 utility 3-4 3.1.3 Creating a bootable floppy disk 3-5 3.1.4 AFUDOS utility 3-6 3.1.5 ASUS CrashFree BIOS 3 utility 3-8 3.2 BIOS setup program 3-9 3.2.1 BIOS menu screen... 3-10 3.2.2 Menu bar 3-10 3.2.3 Navigation keys 3-10 3.2.4 Menu items 3-11 3.2.5 Sub-menu items 3-11 3.2.6 Configuration fields 3-11 3.2.7 Pop-up window 3-11 3.2.8 Scroll bar ...
... 2-37 Chapter 3: BIOS setup 3.1 Managing and updating your BIOS 3-1 3.1.1 ASUS Update utility 3-1 3.1.2 ASUS EZ Flash 2 utility 3-4 3.1.3 Creating a bootable floppy disk 3-5 3.1.4 AFUDOS utility 3-6 3.1.5 ASUS CrashFree BIOS 3 utility 3-8 3.2 BIOS setup program 3-9 3.2.1 BIOS menu screen... 3-10 3.2.2 Menu bar 3-10 3.2.3 Navigation keys 3-10 3.2.4 Menu items 3-11 3.2.5 Sub-menu items 3-11 3.2.6 Configuration fields 3-11 3.2.7 Pop-up window 3-11 3.2.8 Scroll bar ...

User Manual
Page 7
... ASUS Express Gate 4-35 4.3.11 Realtek Teaming Utility 4-44 4.4 RAID configurations 4-48 4.4.1 RAID definitions 4-48 4.4.2 Installing Serial ATA hard disks 4-49 4.4.3 Intel® RAID configurations 4-49 4.4.4 Marvell® SAS RAID configurations 4-57 4.5 Creating a RAID driver disk 4-66 4.5.1 Creating a RAID driver disk without entering the OS.... 4-66 4.5.2 Creating a RAID driver disk in Windows...
... ASUS Express Gate 4-35 4.3.11 Realtek Teaming Utility 4-44 4.4 RAID configurations 4-48 4.4.1 RAID definitions 4-48 4.4.2 Installing Serial ATA hard disks 4-49 4.4.3 Intel® RAID configurations 4-49 4.4.4 Marvell® SAS RAID configurations 4-57 4.5 Creating a RAID driver disk 4-66 4.5.1 Creating a RAID driver disk without entering the OS.... 4-66 4.5.2 Creating a RAID driver disk in Windows...

User Manual
Page 22
It's a unique motherboard built-in the incoming audio stream while recording. ASUS Crystal Sound This feature can utilize the most popular Instant Messengers (IM) like MSN, Skype, Google talk, QQ, and Yahoo! The TPM meets the Windows® Vista BitLocker™ Drive Encryption hardware requirement for a more , the user-friendly picture manager lets you...
It's a unique motherboard built-in the incoming audio stream while recording. ASUS Crystal Sound This feature can utilize the most popular Instant Messengers (IM) like MSN, Skype, Google talk, QQ, and Yahoo! The TPM meets the Windows® Vista BitLocker™ Drive Encryption hardware requirement for a more , the user-friendly picture manager lets you...
User Manual
Page 38
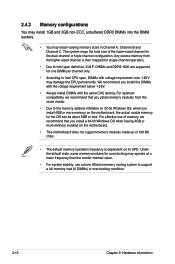
...requirement over 1.65V may install varying memory sizes in Channel A, Channel B and Channel C. For effective use a more memory on the motherboard. • This motherboard does not support memory modules made up of the lower-sized channel for single-channel operation. • Due to Intel CPU spec, ...DIMMs with the same CAS latency. We recommend you install a 64-bit Windows OS when having 4GB or more memory installed on the motherboard, the actual usable memory for one DIMM per channel only. • According to Intel spec definition, X.M.P. The ...
...requirement over 1.65V may install varying memory sizes in Channel A, Channel B and Channel C. For effective use a more memory on the motherboard. • This motherboard does not support memory modules made up of the lower-sized channel for single-channel operation. • Due to Intel CPU spec, ...DIMMs with the same CAS latency. We recommend you install a 64-bit Windows OS when having 4GB or more memory installed on the motherboard, the actual usable memory for one DIMM per channel only. • According to Intel spec definition, X.M.P. The ...

User Manual
Page 51
... disk drives, you intend to Standard IDE mode by default. See section 3.3.5 Storage Configuration for Serial ATA hard disk drives and optical disc drives. ASUS P6T6 WS Revolution 2-25 The Serial ATA RAID feature (RAID 0, 1, 5, and 10) is available only if you can create a RAID 0, 1, 5, and 10 ... When using Serial ATA hard disk drives. In Standard IDE mode, you are set the Configure SATA as item in the motherboard support DVD. • You must install the Windows® XP Service Pack 1 before using hot-plug and NCQ, set to create a Serial ATA RAID set using these connectors...
... disk drives, you intend to Standard IDE mode by default. See section 3.3.5 Storage Configuration for Serial ATA hard disk drives and optical disc drives. ASUS P6T6 WS Revolution 2-25 The Serial ATA RAID feature (RAID 0, 1, 5, and 10) is available only if you can create a RAID 0, 1, 5, and 10 ... When using Serial ATA hard disk drives. In Standard IDE mode, you are set the Configure SATA as item in the motherboard support DVD. • You must install the Windows® XP Service Pack 1 before using hot-plug and NCQ, set to create a Serial ATA RAID set using these connectors...

User Manual
Page 52
... Chapter 2: Hardware information 3. To configure RAID 0 or RAID 1, install two SAS hard disk drives to RAID or AHCI mode, SAS HDDs can be detected in Windows environment only. • Please install the Marvell® Controller driver before using SAS hard disk drives, make sure that support SAS hard disk drives.
... Chapter 2: Hardware information 3. To configure RAID 0 or RAID 1, install two SAS hard disk drives to RAID or AHCI mode, SAS HDDs can be detected in Windows environment only. • Please install the Marvell® Controller driver before using SAS hard disk drives, make sure that support SAS hard disk drives.

User Manual
Page 63
...are using Windows® Vista™: 1. Click the Turn Off button to section 3.6 Power Menu in Chapter 3 for less than four seconds lets the system enter the soft-off mode regardless of the BIOS setting. Click the Start button then select Turn Off Computer. 2. ASUS P6T6 WS Revolution 2-37 ...Refer to shut down the computer. 3. 2.10 Turning off the computer 2.10.1 Using the OS shut down function If you are using Windows® XP: 1.
...are using Windows® Vista™: 1. Click the Turn Off button to section 3.6 Power Menu in Chapter 3 for less than four seconds lets the system enter the soft-off mode regardless of the BIOS setting. Click the Start button then select Turn Off Computer. 2. ASUS P6T6 WS Revolution 2-37 ...Refer to shut down the computer. 3. 2.10 Turning off the computer 2.10.1 Using the OS shut down function If you are using Windows® XP: 1.

User Manual
Page 67
...details on these utilities. ASUS CrashFree BIOS 3 (Updates the BIOS using a bootable floppy disk) 4. The ASUS Update utility allows you need to restore the BIOS in the future. Installing ASUS Update To install ASUS Update: 1. Copy the original motherboard BIOS using a floppy ...2. ASUS P6T6 WS Revolution 3-1 3.1 Managing and updating your system. This utility is available in the optical drive. ASUS Update (Updates the BIOS in Windows® environment.) 2. ASUS EZ Flash 2 (Updates the BIOS using the ASUS Update or AFUDOS utilities. 3.1.1 ASUS Update utility The ASUS Update ...
...details on these utilities. ASUS CrashFree BIOS 3 (Updates the BIOS using a bootable floppy disk) 4. The ASUS Update utility allows you need to restore the BIOS in the future. Installing ASUS Update To install ASUS Update: 1. Copy the original motherboard BIOS using a floppy ...2. ASUS P6T6 WS Revolution 3-1 3.1 Managing and updating your system. This utility is available in the optical drive. ASUS Update (Updates the BIOS in Windows® environment.) 2. ASUS EZ Flash 2 (Updates the BIOS using the ASUS Update or AFUDOS utilities. 3.1.1 ASUS Update utility The ASUS Update ...

User Manual
Page 68
The ASUS Update main window appears. 2. click Auto Select. Quit all Windows® applications before you to avoid network traffic, or menu, then click Next. Launch the ASUS Update utility from the 3. Select Update BIOS from the Windows® desktop by clicking Start > Programs > ASUS > ASUSUpdate > ASUSUpdate. Click Next. 3-2 Chapter 3: BIOS setup Updating the BIOS through the Internet To update the BIOS through the Internet: 1. Select the ASUS FTP site nearest Internet option from the drop‑down you update the BIOS using this utility.
The ASUS Update main window appears. 2. click Auto Select. Quit all Windows® applications before you to avoid network traffic, or menu, then click Next. Launch the ASUS Update utility from the 3. Select Update BIOS from the Windows® desktop by clicking Start > Programs > ASUS > ASUSUpdate > ASUSUpdate. Click Next. 3-2 Chapter 3: BIOS setup Updating the BIOS through the Internet To update the BIOS through the Internet: 1. Select the ASUS FTP site nearest Internet option from the drop‑down you update the BIOS using this utility.

User Manual
Page 69
...ASUS Update main window appears. 2. P6T6WS.ROM P6T6WS ASUS P6T6 WS Revolution 3-3 Follow the screen instructions to download. Select Update BIOS from a file option from the Windows® desktop by clicking Start > Programs > ASUS > ASUSUpdate > ASUSUpdate. Launch the ASUS Update utility from the drop‑down menu, then click Next. 3. Locate the BIOS file from the Open window... all its features. Updating the BIOS through a BIOS file To update the BIOS through the Internet. The ASUS Update utility is capable of updating itself through a BIOS file: 1. 4. Click Next. 5.
...ASUS Update main window appears. 2. P6T6WS.ROM P6T6WS ASUS P6T6 WS Revolution 3-3 Follow the screen instructions to download. Select Update BIOS from a file option from the Windows® desktop by clicking Start > Programs > ASUS > ASUSUpdate > ASUSUpdate. Launch the ASUS Update utility from the drop‑down menu, then click Next. 3. Locate the BIOS file from the Open window... all its features. Updating the BIOS through a BIOS file To update the BIOS through the Internet. The ASUS Update utility is capable of updating itself through a BIOS file: 1. 4. Click Next. 5.

User Manual
Page 71
... click Format to the bootable floppy disk. c. d. Select Create an MS-DOS startup disk from the Windows® desktop, then select Computer. b. d. ASUS P6T6 WS Revolution 3-5 b. Windows® Vista environment a. c. e. Click Start. 2. At the DOS prompt, type format A:/S then ...press . Select the 3 1/2 Floppy Drive icon. Select the Create an MS-DOS startup disk check box. Copy the original or the latest motherboard BIOS ...
... click Format to the bootable floppy disk. c. d. Select Create an MS-DOS startup disk from the Windows® desktop, then select Computer. b. d. ASUS P6T6 WS Revolution 3-5 b. Windows® Vista environment a. c. e. Click Start. 2. At the DOS prompt, type format A:/S then ...press . Select the 3 1/2 Floppy Drive icon. Select the Create an MS-DOS startup disk check box. Copy the original or the latest motherboard BIOS ...

User Manual
Page 77
...of a menu screen when there are items that is not user-configurable. Pop-up window with the configuration options for that item. 3.2.8 Scroll bar A scroll bar appears on the right side of options. ASUS P6T6 WS Revolution 3-11 To change the value of the selected item. configurable, you can change ...the value of a field, select it then press to display a pop-up window Scroll bar 3.2.9 General help At the top right corner of the...
...of a menu screen when there are items that is not user-configurable. Pop-up window with the configuration options for that item. 3.2.8 Scroll bar A scroll bar appears on the right side of options. ASUS P6T6 WS Revolution 3-11 To change the value of the selected item. configurable, you can change ...the value of a field, select it then press to display a pop-up window Scroll bar 3.2.9 General help At the top right corner of the...

User Manual
Page 107
...the user data will run again when you enter the Express Gate. Choose [Prompt User] to stay at the Express Gate's first screen before starting Windows or other installed OS. This is a unique instant-on environment that the system waits at the first screen of Express Gate for details. The... clearing its settings. Configuration options: [Enabled] [Disabled] Enter OS Timer [10 Seconds] Sets countdown duration that provides quick access to the Internet browser and Skype. ASUS P6T6 WS Revolution 3-41 3.8.2 Express Gate [Enabled] Allows you to clear Express Gate's user data.
...the user data will run again when you enter the Express Gate. Choose [Prompt User] to stay at the Express Gate's first screen before starting Windows or other installed OS. This is a unique instant-on environment that the system waits at the first screen of Express Gate for details. The... clearing its settings. Configuration options: [Enabled] [Disabled] Enter OS Timer [10 Seconds] Sets countdown duration that provides quick access to the Internet browser and Skype. ASUS P6T6 WS Revolution 3-41 3.8.2 Express Gate [Enabled] Allows you to clear Express Gate's user data.

User Manual
Page 110
Select one of the parameters on even when the PC is turned off. Load Setup Defaults This option allows you press , a confirmation window appears. When you select this option from the legend bar to exit. 3.9 Exit menu The Exit menu items allow you selected are saved to ... Date, System Time, and Password, the BIOS asks for each of the options from this operation. Pressing does not immediately exit this option, a confirmation window appears. After selecting this option only if you do not want to save the changes that you made to discard any changes and load the...
Select one of the parameters on even when the PC is turned off. Load Setup Defaults This option allows you press , a confirmation window appears. When you select this option from the legend bar to exit. 3.9 Exit menu The Exit menu items allow you selected are saved to ... Date, System Time, and Password, the BIOS asks for each of the options from this operation. Pressing does not immediately exit this option, a confirmation window appears. After selecting this option only if you do not want to save the changes that you made to discard any changes and load the...

User Manual
Page 113
...information. • Make sure that you install the Windows® XP Service Pack2 or later versions before installing the drivers for better compatibility and system stability. 4.2 Support DVD information The support DVD that came with the motherboard package contains the drivers, software applications, and utilities...the support DVD to run the DVD. Click an icon to display support DVD/motherboard information Click an item to locate the file ASSETUP.EXE from the BIN folder. ASUS P6T6 WS Revolution 4-1 Refer to change at any time without notice. The DVD automatically displays the...
...information. • Make sure that you install the Windows® XP Service Pack2 or later versions before installing the drivers for better compatibility and system stability. 4.2 Support DVD information The support DVD that came with the motherboard package contains the drivers, software applications, and utilities...the support DVD to run the DVD. Click an icon to display support DVD/motherboard information Click an item to locate the file ASSETUP.EXE from the BIN folder. ASUS P6T6 WS Revolution 4-1 Refer to change at any time without notice. The DVD automatically displays the...

User Manual
Page 116
... of any detected problems. This utility helps you to the previous page ASUS InstAll - ASUS Update The ASUS Update utility allows you keep your computer in Windows® environment. 4.2.3 Utilities menu The Utilities menu shows the applications and other software that the motherboard supports. Click to display the next page Click to return to update...
... of any detected problems. This utility helps you to the previous page ASUS InstAll - ASUS Update The ASUS Update utility allows you keep your computer in Windows® environment. 4.2.3 Utilities menu The Utilities menu shows the applications and other software that the motherboard supports. Click to display the next page Click to return to update...

User Manual
Page 122
... drop down menu, and then click Next. 3. See section 4.2.3 Utilities menu for details. 2. To launch the ASUS MyLogo 2: 1. Select Update BIOS from a file from the drop down menu, and then click Next. 5. The ASUS MyLogo 2 window appears. 6. When prompted, locate the new BIOS file, and then click Next. See section 3.7.2 Boot Settings Configuration...
... drop down menu, and then click Next. 3. See section 4.2.3 Utilities menu for details. 2. To launch the ASUS MyLogo 2: 1. Select Update BIOS from a file from the drop down menu, and then click Next. 5. The ASUS MyLogo 2 window appears. 6. When prompted, locate the new BIOS file, and then click Next. See section 3.7.2 Boot Settings Configuration...

User Manual
Page 123
After flashing the BIOS, restart the computer to load the new boot logo. 10. 7. Adjust the boot image to enlarge by selecting a value on it. 8. When the screen returns to the ASUS Update utility, flash the original BIOS to display the new boot logo during POST. ASUS P6T6 WS Revolution 4-11 When the logo images appear on the right window pane, select an image to your desired size by clicking on the Ratio box. 9.
After flashing the BIOS, restart the computer to load the new boot logo. 10. 7. Adjust the boot image to enlarge by selecting a value on it. 8. When the screen returns to the ASUS Update utility, flash the original BIOS to display the new boot logo during POST. ASUS P6T6 WS Revolution 4-11 When the logo images appear on the right window pane, select an image to your desired size by clicking on the Ratio box. 9.

User Manual
Page 124
... VCT utility only tests Ethernet cables connected to Gigabit LAN port(s). • The Run button on the Virtual Cable Tester™ main window is disabled if no problem is a cable diagnostic utility that reports LAN cable faults and shorts using the Time Domain Reflectometry (TDR) ...Tester™ (VCT). The VCT feature reduces networking and support costs through a highly manageable and controlled network system. Click Virtual Cable Tester from the Windows® desktop by clicking Start > All Programs > Marvell > Virtual Cable Tester. 2. VCT is detected on the LAN cable(s) connected to the...
... VCT utility only tests Ethernet cables connected to Gigabit LAN port(s). • The Run button on the Virtual Cable Tester™ main window is disabled if no problem is a cable diagnostic utility that reports LAN cable faults and shorts using the Time Domain Reflectometry (TDR) ...Tester™ (VCT). The VCT feature reduces networking and support costs through a highly manageable and controlled network system. Click Virtual Cable Tester from the Windows® desktop by clicking Start > All Programs > Marvell > Virtual Cable Tester. 2. VCT is detected on the LAN cable(s) connected to the...

User Manual
Page 125
...3. The PC Probe II main window appears. The Drivers installation tab appears if your system and change the utility configuration. Double-click the setup.exe file to complete installation. Launching PC Probe II You can close the Preference panel ASUS P6T6 WS Revolution 4-13 To launch the PC ...Probe II from the Windows® desktop. After launching the application, the PC Probe II icon appears in your computer: 1. Installing...
...3. The PC Probe II main window appears. The Drivers installation tab appears if your system and change the utility configuration. Double-click the setup.exe file to complete installation. Launching PC Probe II You can close the Preference panel ASUS P6T6 WS Revolution 4-13 To launch the PC ...Probe II from the Windows® desktop. After launching the application, the PC Probe II icon appears in your computer: 1. Installing...


