
User Manual
Page 4
... 3: BIOS setup 3.1 Managing and updating your BIOS 3-1 3.1.1 ASUS Update utility 3-1 3.1.2 ASUS EZ Flash 2 utility 3-4 3.1.3 Creating a bootable floppy disk 3-5 3.1.4 AFUDOS utility 3-6 3.1.5 ASUS CrashFree BIOS 3 utility 3-8 3.2 BIOS setup program 3-9 3.2.1 BIOS menu screen 3-10 3.2.2 Menu bar 3-10 3.2.3 Navigation keys 3-10 3.2.4 Menu items 3-11 3.2.5 Sub-menu items 3-11 3.2.6 Configuration fields 3-11 3.2.7 Pop-up window 3-11 3.2.8 Scroll bar 3-11 3.2.9 General help 3-11...
... 3: BIOS setup 3.1 Managing and updating your BIOS 3-1 3.1.1 ASUS Update utility 3-1 3.1.2 ASUS EZ Flash 2 utility 3-4 3.1.3 Creating a bootable floppy disk 3-5 3.1.4 AFUDOS utility 3-6 3.1.5 ASUS CrashFree BIOS 3 utility 3-8 3.2 BIOS setup program 3-9 3.2.1 BIOS menu screen 3-10 3.2.2 Menu bar 3-10 3.2.3 Navigation keys 3-10 3.2.4 Menu items 3-11 3.2.5 Sub-menu items 3-11 3.2.6 Configuration fields 3-11 3.2.7 Pop-up window 3-11 3.2.8 Scroll bar 3-11 3.2.9 General help 3-11...

User Manual
Page 7
... 4.3.10 ASUS Express Gate 4-35 4.3.11 Realtek Teaming Utility 4-44 4.4 RAID configurations 4-48 4.4.1 RAID definitions 4-48 4.4.2 Installing Serial ATA hard disks 4-49 4.4.3 Intel® RAID configurations 4-49 4.4.4 Marvell® SAS RAID configurations 4-57 4.5 Creating a RAID driver disk 4-66 4.5.1 Creating a RAID driver disk without entering the OS.... 4-66 4.5.2 Creating a RAID driver disk in Windows...
... 4.3.10 ASUS Express Gate 4-35 4.3.11 Realtek Teaming Utility 4-44 4.4 RAID configurations 4-48 4.4.1 RAID definitions 4-48 4.4.2 Installing Serial ATA hard disks 4-49 4.4.3 Intel® RAID configurations 4-49 4.4.4 Marvell® SAS RAID configurations 4-57 4.5 Creating a RAID driver disk 4-66 4.5.1 Creating a RAID driver disk without entering the OS.... 4-66 4.5.2 Creating a RAID driver disk in Windows...

User Manual
Page 51
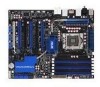
...ASUS P6T6 WS Revolution 2-25 ICH10R Serial ATA connectors (7-pin SATA 1-6 [blue]) These connectors are set using Serial ATA hard disk drives. See section 3.3.5 Storage Configuration for details. • Before creating a RAID set the Configure SATA as in the motherboard support DVD. • You must install the Windows... drives and optical disc drives. If you installed Serial ATA hard disk drives, you can create a RAID 0, 1, 5, and 10 configuration with the Intel® Matrix Storage Technology through the onboard Intel® ICH10R RAID controller. • These connectors are for...
...ASUS P6T6 WS Revolution 2-25 ICH10R Serial ATA connectors (7-pin SATA 1-6 [blue]) These connectors are set using Serial ATA hard disk drives. See section 3.3.5 Storage Configuration for details. • Before creating a RAID set the Configure SATA as in the motherboard support DVD. • You must install the Windows... drives and optical disc drives. If you installed Serial ATA hard disk drives, you can create a RAID 0, 1, 5, and 10 configuration with the Intel® Matrix Storage Technology through the onboard Intel® ICH10R RAID controller. • These connectors are for...

User Manual
Page 63
... turn off after Windows® shuts down . 2.10.2 Using the dual function power switch While the system is ON, pressing the power switch for less than four seconds lets the system enter the soft-off mode regardless of the BIOS setting. ASUS P6T6 WS Revolution 2-37 Click the... Start button then select Turn Off Computer. 2. Pressing the power switch for details. If you are using Windows® Vista™: 1. 2.10 Turning off the computer 2.10.1 Using the OS shut down the computer. 3.
... turn off after Windows® shuts down . 2.10.2 Using the dual function power switch While the system is ON, pressing the power switch for less than four seconds lets the system enter the soft-off mode regardless of the BIOS setting. ASUS P6T6 WS Revolution 2-37 Click the... Start button then select Turn Off Computer. 2. Pressing the power switch for details. If you are using Windows® Vista™: 1. 2.10 Turning off the computer 2.10.1 Using the OS shut down the computer. 3.

User Manual
Page 77
... bar have their respective menu items. System Time System Date Language SATA1 SATA2 SATA3 SATA4 SATA5 SATA6 Storage Configuration System Information [11:56:54] [Thu 10/16/2008] [English] [Not Detected] [Not Detected] [Not Detected] [Not Detected] [Not Detected] [Not Detected] Use [ENTER], [TAB], or [...the selected item. To change the value of options. Refer to 3.2.7 Pop-up window. 3.2.7 Pop-up window Select a menu item then press to display a list of the field opposite the item. ASUS P6T6 WS Revolution 3-11 3.2.4 Menu items The highlighted item on the screen. Press the Up/...
... bar have their respective menu items. System Time System Date Language SATA1 SATA2 SATA3 SATA4 SATA5 SATA6 Storage Configuration System Information [11:56:54] [Thu 10/16/2008] [English] [Not Detected] [Not Detected] [Not Detected] [Not Detected] [Not Detected] [Not Detected] Use [ENTER], [TAB], or [...the selected item. To change the value of options. Refer to 3.2.7 Pop-up window. 3.2.7 Pop-up window Select a menu item then press to display a list of the field opposite the item. ASUS P6T6 WS Revolution 3-11 3.2.4 Menu items The highlighted item on the screen. Press the Up/...

User Manual
Page 107
Configuration options: [Enabled] [Disabled] Enter OS Timer [10 Seconds] Sets countdown duration that the user data will run again when you enter the Express Gate environment after clearing its settings. ASUS P6T6 WS Revolution 3-41 User data includes the Express Gate's settings as well as any personal ... you to stay at the Express Gate's first screen before starting Windows or other installed OS. Configuration options: [No] [Reset] When setting this item to [Reset], make sure to save the setting to section 4.3.10 ASUS Express GATE for user action. Refer to the BIOS so that ...
Configuration options: [Enabled] [Disabled] Enter OS Timer [10 Seconds] Sets countdown duration that the user data will run again when you enter the Express Gate environment after clearing its settings. ASUS P6T6 WS Revolution 3-41 User data includes the Express Gate's settings as well as any personal ... you to stay at the Express Gate's first screen before starting Windows or other installed OS. Configuration options: [No] [Reset] When setting this item to [Reset], make sure to save the setting to section 4.3.10 ASUS Express GATE for user action. Refer to the BIOS so that ...

User Manual
Page 122
... lets you customize the boot logo. Check the option Launch MyLogo to section 3.1.1 ASUS Update utility for details. 2. The ASUS MyLogo 2 window appears. 6. The boot logo is automatically installed when you install the ASUS Update utility from the drop down menu, and then click Next. 3. Refer to...DVD. See section 4.2.3 Utilities menu for details. • Before using the ASUS MyLogo 2, use the AFUDOS utility to use as your boot logo. 4-10 Chapter 4: Software support To launch the ASUS MyLogo 2: 1. The ASUS MyLogo 2 is the image that appears on screen during the Power‑On...
... lets you customize the boot logo. Check the option Launch MyLogo to section 3.1.1 ASUS Update utility for details. 2. The ASUS MyLogo 2 window appears. 6. The boot logo is automatically installed when you install the ASUS Update utility from the drop down menu, and then click Next. 3. Refer to...DVD. See section 4.2.3 Utilities menu for details. • Before using the ASUS MyLogo 2, use the AFUDOS utility to use as your boot logo. 4-10 Chapter 4: Software support To launch the ASUS MyLogo 2: 1. The ASUS MyLogo 2 is the image that appears on screen during the Power‑On...

User Manual
Page 123
After flashing the BIOS, restart the computer to load the new boot logo. 10. 7. Adjust the boot image to enlarge by selecting a value on it. 8. ASUS P6T6 WS Revolution 4-11 When the logo images appear on the right window pane, select an image to your desired size by clicking on the Ratio box. 9. When the screen returns to the ASUS Update utility, flash the original BIOS to display the new boot logo during POST.
After flashing the BIOS, restart the computer to load the new boot logo. 10. 7. Adjust the boot image to enlarge by selecting a value on it. 8. ASUS P6T6 WS Revolution 4-11 When the logo images appear on the right window pane, select an image to your desired size by clicking on the Ratio box. 9. When the screen returns to the ASUS Update utility, flash the original BIOS to display the new boot logo during POST.

User Manual
Page 190
...3-way SLI technology is supported by the following two methods. Launching the NVIDIA Control Panel You can launch the NVIDIA Control Panel by Windows® Vista™ only. 5.2.5 Enabling the NVIDIA® SLI™ technology After installing your PCI Express graphics card driver supports the NVIDIA&#...the documentation that came with your graphics card package to install the NVIDIA® 3-way SLI driver under the Windows® Vista™ operating system. Right click on page 5-10). If you are using a Triple SLI system, ensure to install the device drivers. • Ensure that your...
...3-way SLI technology is supported by the following two methods. Launching the NVIDIA Control Panel You can launch the NVIDIA Control Panel by Windows® Vista™ only. 5.2.5 Enabling the NVIDIA® SLI™ technology After installing your PCI Express graphics card driver supports the NVIDIA&#...the documentation that came with your graphics card package to install the NVIDIA® 3-way SLI driver under the Windows® Vista™ operating system. Right click on page 5-10). If you are using a Triple SLI system, ensure to install the device drivers. • Ensure that your...

User Manual
Page 192
... are rendered, indicating the 3-way SLI status. 5-10 Chapter 5: Multiple GPU technology support When done, click Apply. 2. The NVIDIA Control Panel window appears. B5. Enabling Dual SLI settings From the NVIDIA Control Panel window, select Set SLI Configuration. Click Enable SLI and ...set the display for viewing SLI rendered content. From the NVIDIA Control Panel window, select Set SLI Configuration, and...
... are rendered, indicating the 3-way SLI status. 5-10 Chapter 5: Multiple GPU technology support When done, click Apply. 2. The NVIDIA Control Panel window appears. B5. Enabling Dual SLI settings From the NVIDIA Control Panel window, select Set SLI Configuration. Click Enable SLI and ...set the display for viewing SLI rendered content. From the NVIDIA Control Panel window, select Set SLI Configuration, and...

