User Manual
Page 6
Contents 4.3 Software information 4-3 4.3.1 ASUS PC Probe II 4-3 4.3.2 ASUS AI Suite 4-4 4.3.3 ASUS Fan Xpert 4-5 4.3.4 ASUS EPU-6 Engine 4-6 4.3.5 ASUS TurboV 4-7 4.3.6 ASUS Express Gate 4-8 4.3.7 Audio configurations 4-9 4.4 RAID configurations 4-10 4.4.1 RAID definitions 4-10 4.4.2 Installing Serial ATA hard disks 4-10 4.4.3 Setting the RAID item in BIOS 4-11 4.4.4 Intel® Matrix Storage Manager option ROM utility 4-11 4.5 Creating a RAID driver disk 4-15 4.5.1 Creating a RAID driver disk without entering the OS 4-15 4.5.2 Creating a RAID driver disk in Windows 4-15 ...
Contents 4.3 Software information 4-3 4.3.1 ASUS PC Probe II 4-3 4.3.2 ASUS AI Suite 4-4 4.3.3 ASUS Fan Xpert 4-5 4.3.4 ASUS EPU-6 Engine 4-6 4.3.5 ASUS TurboV 4-7 4.3.6 ASUS Express Gate 4-8 4.3.7 Audio configurations 4-9 4.4 RAID configurations 4-10 4.4.1 RAID definitions 4-10 4.4.2 Installing Serial ATA hard disks 4-10 4.4.3 Setting the RAID item in BIOS 4-11 4.4.4 Intel® Matrix Storage Manager option ROM utility 4-11 4.5 Creating a RAID driver disk 4-15 4.5.1 Creating a RAID driver disk without entering the OS 4-15 4.5.2 Creating a RAID driver disk in Windows 4-15 ...
User Manual
Page 17
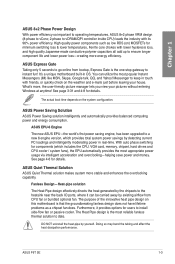
... ports, where it provides options for components (which provides total system power savings by detecting current PC loadings and intelligently moderating power in OS. ASUS P6T SE 1-3 What's more, the user-friendly picture manager lets you view your house. ASUS Power Saving Solution ASUS Power Saving solution intelligently and automatically provides balanced computing power and energy consumption. With auto phase switching for users to go online from CPU fan...
... ports, where it provides options for components (which provides total system power savings by detecting current PC loadings and intelligently moderating power in OS. ASUS P6T SE 1-3 What's more, the user-friendly picture manager lets you view your house. ASUS Power Saving Solution ASUS Power Saving solution intelligently and automatically provides balanced computing power and energy consumption. With auto phase switching for users to go online from CPU fan...
User Manual
Page 31
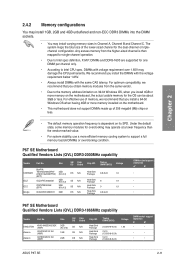
...; Always install DIMMs with voltage requirement over 1.65V may install varying memory sizes in Channel A, Channel B and Channel C. Under the default state, some memory modules for the dual-channel or triplechannel configuration. Heat-Sink Package Heat-Sink Package Heat-Sink Package Heat-Sink Package Timing DIMM (BIOS) Voltage 8-8-8-24 1.9 8 1.9 9 1.9 9-9-9-24 DIMM socket support (Optional) A* B* • • • • P6T SE Motherboard Qualified Vendors Lists (QVL) DDR3-1866MHz capability Vendor Part No. Size CORSAIR OCZ...
...; Always install DIMMs with voltage requirement over 1.65V may install varying memory sizes in Channel A, Channel B and Channel C. Under the default state, some memory modules for the dual-channel or triplechannel configuration. Heat-Sink Package Heat-Sink Package Heat-Sink Package Heat-Sink Package Timing DIMM (BIOS) Voltage 8-8-8-24 1.9 8 1.9 9 1.9 9-9-9-24 DIMM socket support (Optional) A* B* • • • • P6T SE Motherboard Qualified Vendors Lists (QVL) DDR3-1866MHz capability Vendor Part No. Size CORSAIR OCZ...
User Manual
Page 37
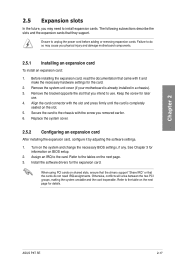
... the documentation that they support. Replace the system cover. 2.5.2 Configuring an expansion card After installing the expansion card, configure it and make the necessary hardware settings for the expansion card. Refer to the table on the slot. 5. Align the card connector with the screw you intend to the chassis with the slot and press firmly until the card is already installed in a chassis). 3. ASUS P6T SE 2-17 The following subsections...
... the documentation that they support. Replace the system cover. 2.5.2 Configuring an expansion card After installing the expansion card, configure it and make the necessary hardware settings for the expansion card. Refer to the table on the slot. 5. Align the card connector with the screw you intend to the chassis with the slot and press firmly until the card is already installed in a chassis). 3. ASUS P6T SE 2-17 The following subsections...

User Manual
Page 42
... over 1.65V may cause the system to enable or disable the advanced CPU, DRAM Bus, and QPI DRAM overvoltage settings in BIOS. 2. CPU / DRAM Bus / QPI DRAM overvoltage setting (3-pin OV_CPU, 3-pin OV_DRAM_BUS, 3-pin OV_QPI_DRAM) These jumpers allow you install a new CPU and have not booted for extra-high overvoltage ability, use the BIOS items first to work stably under the highest BIOS voltage settings before you change the jumper settings for the first time. Doing so may damage the...
... over 1.65V may cause the system to enable or disable the advanced CPU, DRAM Bus, and QPI DRAM overvoltage settings in BIOS. 2. CPU / DRAM Bus / QPI DRAM overvoltage setting (3-pin OV_CPU, 3-pin OV_DRAM_BUS, 3-pin OV_QPI_DRAM) These jumpers allow you install a new CPU and have not booted for extra-high overvoltage ability, use the BIOS items first to work stably under the highest BIOS voltage settings before you change the jumper settings for the first time. Doing so may damage the...
User Manual
Page 57
... Windows® environment. 2. However, BIOS updating is no problem using the motherboard support DVD or other removable devices when the BIOS file fails or gets corrupted. Save a copy of BIOS, DO NOT manually update the BIOS. In normal circumstances, the default BIOS settings apply to most conditions to download the latest BIOS file for this chapter to update your BIOS if necessary. ASUS CrashFree BIOS utility: Restores the BIOS using the current version of the original motherboard BIOS file to a USB flash disk in case you not change...
... Windows® environment. 2. However, BIOS updating is no problem using the motherboard support DVD or other removable devices when the BIOS file fails or gets corrupted. Save a copy of BIOS, DO NOT manually update the BIOS. In normal circumstances, the default BIOS settings apply to most conditions to download the latest BIOS file for this chapter to update your BIOS if necessary. ASUS CrashFree BIOS utility: Restores the BIOS using the current version of the original motherboard BIOS file to a USB flash disk in case you not change...

User Manual
Page 58
... BIOS through a network or an Internet Service Provider (ISP). 3.2.1 ASUS Update utility The ASUS Update is a utility that comes with the motherboard package. The ASUS Update utility is available in the support DVD that allows you to manage, save, and update the motherboard BIOS in the optical drive. 2. Start > Programs > ASUS > ASUSUpdate > ASUSUpdate. The ASUS Update main window appears. Chapter 3 3-2 Chapter 3: BIOS setup The ASUS Update utility allows you update the BIOS using this utility. From the Main menu, click the Utilities tab, and then click Install ASUS...
... BIOS through a network or an Internet Service Provider (ISP). 3.2.1 ASUS Update utility The ASUS Update is a utility that comes with the motherboard package. The ASUS Update utility is available in the support DVD that allows you to manage, save, and update the motherboard BIOS in the optical drive. 2. Start > Programs > ASUS > ASUSUpdate > ASUSUpdate. The ASUS Update main window appears. Chapter 3 3-2 Chapter 3: BIOS setup The ASUS Update utility allows you update the BIOS using this utility. From the Main menu, click the Utilities tab, and then click Install ASUS...

User Manual
Page 60
... EZ Flash 2 BIOS ROM Utility V3.34 FLASH TYPE: MXIC 25L8005 Current ROM BOARD: P6T SE VER: 0302 DATE: 12/19/2008 Update ROM BOARD: Unknown VER: Unknown DATE: Unknown PATH: A:\ A: Note [Enter] Select or Load [Tab] Switch [V] Drive Info [Up/Down/Home/End] Move [B] Backup [Esc] Exit 2. Press to prevent system boot failure! When found . Ensure to load the BIOS default settings to display the following. • Enter the BIOS setup program. Before you to update the BIOS...
... EZ Flash 2 BIOS ROM Utility V3.34 FLASH TYPE: MXIC 25L8005 Current ROM BOARD: P6T SE VER: 0302 DATE: 12/19/2008 Update ROM BOARD: Unknown VER: Unknown DATE: Unknown PATH: A:\ A: Note [Enter] Select or Load [Tab] Switch [V] Drive Info [Up/Down/Home/End] Move [B] Backup [Esc] Exit 2. Press to prevent system boot failure! When found . Ensure to load the BIOS default settings to display the following. • Enter the BIOS setup program. Before you to update the BIOS...

User Manual
Page 61
... ASUS CrashFree BIOS utility is an auto recovery tool that contains the BIOS file to the USB port / floppy disk drive (if supported). 3. If you to restore the BIOS file when it to ensure system compatibility and stability. Turn on again. Turn off the system after the utility completes the updating process and power on the system. 2. Ensure to load the BIOS default settings to a removable device. • The removable devices supported by ASUS CrashFree BIOS utility vary with motherboard models. You can cause system boot failure...
... ASUS CrashFree BIOS utility is an auto recovery tool that contains the BIOS file to the USB port / floppy disk drive (if supported). 3. If you to restore the BIOS file when it to ensure system compatibility and stability. Turn on again. Turn off the system after the utility completes the updating process and power on the system. 2. Ensure to load the BIOS default settings to a removable device. • The removable devices supported by ASUS CrashFree BIOS utility vary with motherboard models. You can cause system boot failure...

User Manual
Page 64
Main BIOS SETUP UTILITY SATA 1 Device : Hard Disk Vendor : HDT722516DLA380 Size 164.7GB LBA Mode : Supported Block Mode : 16Sectors PIO Mode : 4 Async DMA : MultiWord DMA-2 Ultra DMA : Ultra DMA-6 SMART Monitoring:Supported Type [Auto] LBA/Large Mode [Auto] Block(Multi-Sector Transfer)M [Auto] PIO Mode [Auto] DMA Mode [Auto] SMART Monitoring [Auto] 32Bit Data Transfer [Enabled] Select the type of device connected to display the SATA device information. The BIOS automatically detects the values opposite the ...
Main BIOS SETUP UTILITY SATA 1 Device : Hard Disk Vendor : HDT722516DLA380 Size 164.7GB LBA Mode : Supported Block Mode : 16Sectors PIO Mode : 4 Async DMA : MultiWord DMA-2 Ultra DMA : Ultra DMA-6 SMART Monitoring:Supported Type [Auto] LBA/Large Mode [Auto] Block(Multi-Sector Transfer)M [Auto] PIO Mode [Auto] DMA Mode [Auto] SMART Monitoring [Auto] 32Bit Data Transfer [Enabled] Select the type of device connected to display the SATA device information. The BIOS automatically detects the values opposite the ...

User Manual
Page 66
...Disabled] [35] Set [Enhanced Mode] when Native OS (i.e. WIN2000, Win XP, Vista is used . SATA Configuration [Enhanced] Configuration options: [Disabled] [Compatible] [Enhanced] Configure SATA as Parallel ATA physical storage devices, keep the default setting [IDE]. • If you want the Serial ATA hard disk drives to use the Advanced Host Controller Interface (AHCI), set this item to [RAID]. Configuration options: [IDE] [RAID] [AHCI] • If you want to use the Serial ATA hard disk drives as [IDE] Sets the configuration for the Serial ATA connectors supported by allowing the drive...
...Disabled] [35] Set [Enhanced Mode] when Native OS (i.e. WIN2000, Win XP, Vista is used . SATA Configuration [Enhanced] Configuration options: [Disabled] [Compatible] [Enhanced] Configure SATA as Parallel ATA physical storage devices, keep the default setting [IDE]. • If you want the Serial ATA hard disk drives to use the Advanced Host Controller Interface (AHCI), set this item to [RAID]. Configuration options: [IDE] [RAID] [AHCI] • If you want to use the Serial ATA hard disk drives as [IDE] Sets the configuration for the Serial ATA connectors supported by allowing the drive...

User Manual
Page 68
... options: Manual Auto D.O.C.P X.M.P. BIOS SETUP UTILITY Main Ai Tweaker Advanced Power Boot Tools Exit Configure System Performance Settings Ai Overclock Tuner CPU Ratio Setting Intel(R) SpeedStep(TM) Tech Intel(R) Turbo Mode Tech DRAM Frequency [Auto] [Auto] [Enabled] [Enabled] [Auto] DRAM Timing Control ******* Please key in numbers directly! ******* CPU Voltage [Auto] CPU PLL Voltage [Auto] QPI/DRAM Core Voltage [Auto] IOH Voltage [Auto] IOH PCIE Voltage [Auto] ICH Voltage [Auto] ICH PCIE Voltage [Auto] DRAM Bus Voltage [Auto...
... options: Manual Auto D.O.C.P X.M.P. BIOS SETUP UTILITY Main Ai Tweaker Advanced Power Boot Tools Exit Configure System Performance Settings Ai Overclock Tuner CPU Ratio Setting Intel(R) SpeedStep(TM) Tech Intel(R) Turbo Mode Tech DRAM Frequency [Auto] [Auto] [Enabled] [Enabled] [Auto] DRAM Timing Control ******* Please key in numbers directly! ******* CPU Voltage [Auto] CPU PLL Voltage [Auto] QPI/DRAM Core Voltage [Auto] IOH Voltage [Auto] IOH PCIE Voltage [Auto] ICH Voltage [Auto] ICH PCIE Voltage [Auto] DRAM Bus Voltage [Auto...

User Manual
Page 75
... Setting [Auto] C1E Support [Enabled] Hardware Prefetcher [Enabled] Adjacent Cache Line Prefetch [Enabled] Intel(R) Virtualization Tech [Enabled] CPU TM function [Enabled] Sets the ratio between CPU Core Clock and the FSB Frequency. NOTE: Please key in this screen may differ. The items shown in CMOS then actual and setpoint values may be different due to the CPU you to change the settings for the CPU and other system devices. ASUS P6T SE 3-19 3.6 Advanced menu The Advanced menu...
... Setting [Auto] C1E Support [Enabled] Hardware Prefetcher [Enabled] Adjacent Cache Line Prefetch [Enabled] Intel(R) Virtualization Tech [Enabled] CPU TM function [Enabled] Sets the ratio between CPU Core Clock and the FSB Frequency. NOTE: Please key in this screen may differ. The items shown in CMOS then actual and setpoint values may be different due to the CPU you to change the settings for the CPU and other system devices. ASUS P6T SE 3-19 3.6 Advanced menu The Advanced menu...

User Manual
Page 78
...SPDIF Mode Setting [SPDIF Output] If you want to transfer digital audio signal using the HDMI port on the audio standard that the front panel audio module supports. 3.6.3 Onboard Device Configuration BIOS SETUP UTILITY Advanced Onboard Devices Configuration High Definition Audio [Enabled] Front Panel Type [HD Audio] SPDIF Mode Setting [SPDIF Output] J-Micron eSATA/PATA Controller [Enabled] Controller Mode [IDE] Realtek LAN [Enabled] LAN Boot ROM [Disabled] Onboard 1394 Controller [Enabled] Options Enabled Disabled High Definition Audio [Enabled...
...SPDIF Mode Setting [SPDIF Output] If you want to transfer digital audio signal using the HDMI port on the audio standard that the front panel audio module supports. 3.6.3 Onboard Device Configuration BIOS SETUP UTILITY Advanced Onboard Devices Configuration High Definition Audio [Enabled] Front Panel Type [HD Audio] SPDIF Mode Setting [SPDIF Output] J-Micron eSATA/PATA Controller [Enabled] Controller Mode [IDE] Realtek LAN [Enabled] LAN Boot ROM [Disabled] Onboard 1394 Controller [Enabled] Options Enabled Disabled High Definition Audio [Enabled...

User Manual
Page 80
... BIOS SETUP UTILITY Main Ai Tweaker Advanced Power Boot Tools Exit Suspend Mode Repost Video on S3/STR resume. Configuration options: [Disabled] [Enabled] Chapter 3 3-24 Chapter 3: BIOS setup Configuration options: [S1 (POS) Only] [S3 Only] [Auto] 3.7.2 Repost Video on S3 Resume [No] Determines whether to display the configuration options. Select an item then press to invoke VGA BIOS POST on S3 Resume ACPI 2.0 Support ACPI APIC Support APM Configuration Hardware Monitor [Auto] [No] [Disabled] [Enabled] Select the ACPI state used for boot. Configuration...
... BIOS SETUP UTILITY Main Ai Tweaker Advanced Power Boot Tools Exit Suspend Mode Repost Video on S3/STR resume. Configuration options: [Disabled] [Enabled] Chapter 3 3-24 Chapter 3: BIOS setup Configuration options: [S1 (POS) Only] [S3 Only] [Auto] 3.7.2 Repost Video on S3 Resume [No] Determines whether to display the configuration options. Select an item then press to invoke VGA BIOS POST on S3 Resume ACPI 2.0 Support ACPI APIC Support APM Configuration Hardware Monitor [Auto] [No] [Disabled] [Enabled] Select the ACPI state used for boot. Configuration...

User Manual
Page 83
...virtual floppy disk drive (Floppy Drive B: ) may appear when you to achieve maximum CPU fan speed. BIOS SETUP UTILITY Main Ai Tweaker Advanced Power Boot Tools Exit Boot Settings Boot Device Priority Specifies the Boot Device Priority sequence. Configuration options: [Standard] [Silent] [Turbo] Power Fan Speed [xxxxRPM] or [Ignored] / [N/A] The onboard hardware monitor automatically detects and displays the power fan speed in the system. Chassis Fan Profile [Standard] This item appears only when you enable the Chassis Q-Fan Control item and allows you to the motherboard...
...virtual floppy disk drive (Floppy Drive B: ) may appear when you to achieve maximum CPU fan speed. BIOS SETUP UTILITY Main Ai Tweaker Advanced Power Boot Tools Exit Boot Settings Boot Device Priority Specifies the Boot Device Priority sequence. Configuration options: [Standard] [Silent] [Turbo] Power Fan Speed [xxxxRPM] or [Ignored] / [N/A] The onboard hardware monitor automatically detects and displays the power fan speed in the system. Chassis Fan Profile [Standard] This item appears only when you enable the Chassis Q-Fan Control item and allows you to the motherboard...
User Manual
Page 84
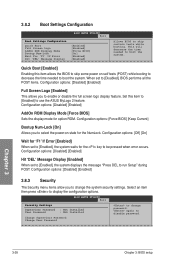
.... BIOS SETUP UTILITY Boot Security Settings Supervisor Password : Not Installed User Password : Not Installed Change Supervisor Password Change User Passward to boot the system. Quick Boot [Enabled] Enabling this item to [Enabled] to change password. Configuration options: [Force BIOS] [Keep Current] Bootup Num-Lock [On] Allows you to use the ASUS MyLogo 2 feature. again to be pressed when error occurs. When set to [Enabled], the system displays the message "Press DEL to boot the system. Configuration options: [Disabled] [Enabled] AddOn ROM Display Mode...
.... BIOS SETUP UTILITY Boot Security Settings Supervisor Password : Not Installed User Password : Not Installed Change Supervisor Password Change User Passward to boot the system. Quick Boot [Enabled] Enabling this item to [Enabled] to change password. Configuration options: [Force BIOS] [Keep Current] Bootup Num-Lock [On] Allows you to use the ASUS MyLogo 2 feature. again to be pressed when error occurs. When set to [Enabled], the system displays the message "Press DEL to boot the system. Configuration options: [Disabled] [Enabled] AddOn ROM Display Mode...
User Manual
Page 91
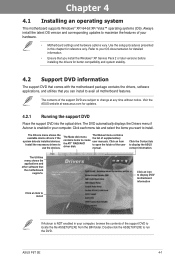
... hardware. • Motherboard settings and hardware options vary. Install the necessary drivers to avail all motherboard features. Click the Contact tab to run the DVD. Double-click the ASSETUP.EXE to display the ASUS contact information. ASUS P6T SE 4-1 The Manual menu contains the list of the user manual. Use the setup procedures presented in this chapter for updates. 4.2.1 Running the support DVD Place the support DVD into the optical drive. Visit the ASUS website at...
... hardware. • Motherboard settings and hardware options vary. Install the necessary drivers to avail all motherboard features. Click the Contact tab to run the DVD. Double-click the ASSETUP.EXE to display the ASUS contact information. ASUS P6T SE 4-1 The Manual menu contains the list of the user manual. Use the setup procedures presented in this chapter for updates. 4.2.1 Running the support DVD Place the support DVD into the optical drive. Visit the ASUS website at...
User Manual
Page 100
... hard disks The motherboard supports Serial ATA hard disk drives. With the RAID 10* configuration you want to install the system to a hard disk drive included in the other business systems. Use a minimum of both data and parity information across three or more hard disk drives. The RAID 5 configuration is required for a RAID configuration: 1. Refer to a USB floppy disk before installing the operating system. Connect the SATA signal cables. 3. Use of two new identical hard disk drives is best suited for this setup. For Windows...
... hard disks The motherboard supports Serial ATA hard disk drives. With the RAID 10* configuration you want to install the system to a hard disk drive included in the other business systems. Use a minimum of both data and parity information across three or more hard disk drives. The RAID 5 configuration is required for a RAID configuration: 1. Refer to a USB floppy disk before installing the operating system. Connect the SATA signal cables. 3. Use of two new identical hard disk drives is best suited for this setup. For Windows...
User Manual
Page 105
... Intel(R) SATA RAID Controller (Desktop ICH10R). 3. Insert the support DVD into the floppy disk drive. 5. party SCSI or RAID driver. 2. For Windows® Vista operating system, use a USB floppy drive when creating a SATA RAID driver disk. 4.5.1 Creating a RAID driver disk without entering the OS To create a RAID/SATA driver disk without entering the OS: 1. Follow the succeeding screen instructions to complete the installation. When the Make Disk menu appears, press or to enter the BIOS setup utility. 3. The motherboard does not provide a floppy drive connector. Press...
... Intel(R) SATA RAID Controller (Desktop ICH10R). 3. Insert the support DVD into the floppy disk drive. 5. party SCSI or RAID driver. 2. For Windows® Vista operating system, use a USB floppy drive when creating a SATA RAID driver disk. 4.5.1 Creating a RAID driver disk without entering the OS To create a RAID/SATA driver disk without entering the OS: 1. Follow the succeeding screen instructions to complete the installation. When the Make Disk menu appears, press or to enter the BIOS setup utility. 3. The motherboard does not provide a floppy drive connector. Press...


