User Guide
Page 2
...AND ARE SUBJECT TO CHANGE AT ANY TIME WITHOUT NOTICE, AND SHOULD NOT BE CONSTRUED AS A COMMITMENT BY ASUS. Products and corporate names appearing in this manual, including the products and software described in writing by the purchaser for identification or explanation and to the owners'...benefit, without the express written permission of their respective companies, and are used only for backup purposes, without intent to infringe. ASUS PROVIDES THIS MANUAL "AS IS" WITHOUT WARRANTY OF ANY KIND, EITHER EXPRESS OR IMPLIED, INCLUDING BUT NOT LIMITED TO THE IMPLIED WARRANTIES OR CONDITIONS...
...AND ARE SUBJECT TO CHANGE AT ANY TIME WITHOUT NOTICE, AND SHOULD NOT BE CONSTRUED AS A COMMITMENT BY ASUS. Products and corporate names appearing in this manual, including the products and software described in writing by the purchaser for identification or explanation and to the owners'...benefit, without the express written permission of their respective companies, and are used only for backup purposes, without intent to infringe. ASUS PROVIDES THIS MANUAL "AS IS" WITHOUT WARRANTY OF ANY KIND, EITHER EXPRESS OR IMPLIED, INCLUDING BUT NOT LIMITED TO THE IMPLIED WARRANTIES OR CONDITIONS...
User Guide
Page 6
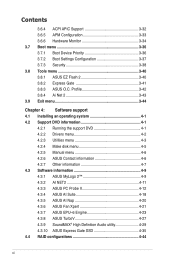
...Boot Device Priority 3-36 3.7.2 Boot Settings Configuration 3-37 3.7.3 Security 3-38 3.8 Tools menu 3-40 3.8.1 ASUS EZ Flash 2 3-40 3.8.2 Express Gate 3-41 3.8.3 ASUS O.C. Profile 3-42 3.8.4 Ai Net 2 3-43 3.9 Exit menu 3-44 Chapter 4: Software support 4.1... menu 4-5 4.2.5 Manual menu 4-6 4.2.6 ASUS Contact information 4-6 4.2.7 Other information 4-7 4.3 Software information 4-9 4.3.1 ASUS MyLogo 2 4-9 4.3.2 AI NET2 4-11 4.3.3 ASUS PC Probe II 4-12 4.3.4 ASUS AI Suite 4-18 4.3.5 ASUS AI Nap 4-20 4.3.6 ASUS Fan Xpert 4-21 4.3.7 ASUS EPU-6 Engine 4-23 4.3.8 ASUS TurboV 4-27 ...
...Boot Device Priority 3-36 3.7.2 Boot Settings Configuration 3-37 3.7.3 Security 3-38 3.8 Tools menu 3-40 3.8.1 ASUS EZ Flash 2 3-40 3.8.2 Express Gate 3-41 3.8.3 ASUS O.C. Profile 3-42 3.8.4 Ai Net 2 3-43 3.9 Exit menu 3-44 Chapter 4: Software support 4.1... menu 4-5 4.2.5 Manual menu 4-6 4.2.6 ASUS Contact information 4-6 4.2.7 Other information 4-7 4.3 Software information 4-9 4.3.1 ASUS MyLogo 2 4-9 4.3.2 AI NET2 4-11 4.3.3 ASUS PC Probe II 4-12 4.3.4 ASUS AI Suite 4-18 4.3.5 ASUS AI Nap 4-20 4.3.6 ASUS Fan Xpert 4-21 4.3.7 ASUS EPU-6 Engine 4-23 4.3.8 ASUS TurboV 4-27 ...
User Guide
Page 9
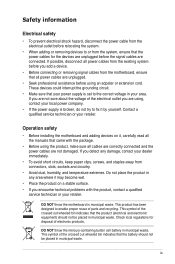
... retailer. Do not place the product in any damage, contact your power supply is broken, do not try to fix it , carefully read all the manuals that all cables are correctly connected and the power cables are connected. If possible, disconnect all power cables from the existing system before you are...
... retailer. Do not place the product in any damage, contact your power supply is broken, do not try to fix it , carefully read all the manuals that all cables are correctly connected and the power cables are connected. If possible, disconnect all power cables from the existing system before you are...

User Guide
Page 11
... enclosed in the less-than and greater-than sign means that you perform certain tasks properly, take note of the following symbols used throughout this manual. If you must press the enclosed key. Example: means that you must press two or more keys simultaneously, the key names are linked with a plus...
... enclosed in the less-than and greater-than sign means that you perform certain tasks properly, take note of the following symbols used throughout this manual. If you must press the enclosed key. Example: means that you must press two or more keys simultaneously, the key names are linked with a plus...
User Guide
Page 12
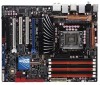
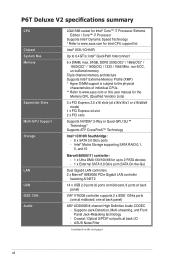
P6T Deluxe V2 specifications summary CPU Chipset System Bus Memory Expansion Slots Multi-GPU Support Storage LAN USB IEEE 1394 Audio LGA1366 socket for Intel® Core™ i7 Processor Extreme Edition / Core™ i7 Processor Supports Intel® Dynamic Speed Technology * Refer to www.asus.com for Intel ...CPU support list Intel® X58 / ICH10R Up to www.asus.com or this user manual for up to 2 PATA devices - 1 x External SATA 3.0 Gb/s port (SATA On-the-...
P6T Deluxe V2 specifications summary CPU Chipset System Bus Memory Expansion Slots Multi-GPU Support Storage LAN USB IEEE 1394 Audio LGA1366 socket for Intel® Core™ i7 Processor Extreme Edition / Core™ i7 Processor Supports Intel® Dynamic Speed Technology * Refer to www.asus.com for Intel ...CPU support list Intel® X58 / ICH10R Up to www.asus.com or this user manual for up to 2 PATA devices - 1 x External SATA 3.0 Gb/s port (SATA On-the-...
User Guide
Page 49
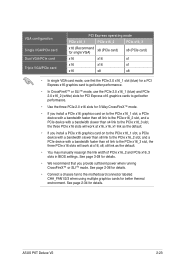
ASUS P6T Deluxe V2 2-23 See page 2-36 for details. • Connect a chassis fan to the motherboard connector labeled CHA_FAN1/2/3 when using multiple graphics cards for details. • We ... x4 link to the PCIe x16_3 slot, the three PCIe x16 slots will work at x16, x8, x8 link as the default. • You may manually reassign the link width of PCIe x16_2 and PCIe x16_3 slots in BIOS settings. See page 3-28 for better thermal environment. See page 2-34 for...
ASUS P6T Deluxe V2 2-23 See page 2-36 for details. • Connect a chassis fan to the motherboard connector labeled CHA_FAN1/2/3 when using multiple graphics cards for details. • We ... x4 link to the PCIe x16_3 slot, the three PCIe x16 slots will work at x16, x8, x8 link as the default. • You may manually reassign the link width of PCIe x16_2 and PCIe x16_3 slots in BIOS settings. See page 3-28 for better thermal environment. See page 2-34 for...

User Guide
Page 57
... RAID set using Serial ATA hard disk drives. ASUS P6T Deluxe V2 2-31 4. ICH10R Serial ATA connectors (7-pin SATA 1-6 [red]) These connectors are using Windows® XP or later version. • When using hot-plug and NCQ, set , refer to section 4.4.3 Intel RAID configurations or the manual bundled in the BIOS to Standard IDE mode...
... RAID set using Serial ATA hard disk drives. ASUS P6T Deluxe V2 2-31 4. ICH10R Serial ATA connectors (7-pin SATA 1-6 [red]) These connectors are using Windows® XP or later version. • When using hot-plug and NCQ, set , refer to section 4.4.3 Intel RAID configurations or the manual bundled in the BIOS to Standard IDE mode...
User Guide
Page 87
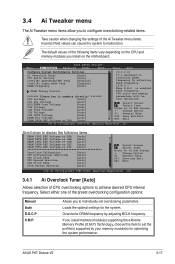
... menu The Ai Tweaker menu items allow you to configure overclocking-related items. Take caution when changing the settings of the preset overclocking configuration options: Manual Auto D.O.C.P X.M.P. BIOS SETUP UTILITY Main Ai Tweaker Advanced Power Boot Tools Exit Configure System Performance Settings Ai Overclock Tuner CPU Ratio Setting Intel(R) SpeedStep(TM... Option F1 General Help F10 Save and Exit ESC Exit v02.61 (C)Copyright 1985-2008, American Megatrends, Inc. Overclocks DRAM frequency by adjusting BCLK frequency. ASUS P6T Deluxe V2 3-17
... menu The Ai Tweaker menu items allow you to configure overclocking-related items. Take caution when changing the settings of the preset overclocking configuration options: Manual Auto D.O.C.P X.M.P. BIOS SETUP UTILITY Main Ai Tweaker Advanced Power Boot Tools Exit Configure System Performance Settings Ai Overclock Tuner CPU Ratio Setting Intel(R) SpeedStep(TM... Option F1 General Help F10 Save and Exit ESC Exit v02.61 (C)Copyright 1985-2008, American Megatrends, Inc. Overclocks DRAM frequency by adjusting BCLK frequency. ASUS P6T Deluxe V2 3-17

User Guide
Page 88
... voltage. Configuration options: [DDR3-1339MHz] [DDR3-1603MHz] eXtreme Memory Profile [High Performance] This item appears only when you set the Ai Overclock Tuner item to [Manual], [D.O.C.P.] or [X.M.P.]. BCLK Frequency [XXX] Allows you set the Ai Overclock Tuner item to [X.M.P.] and allows you to select a DRAM O.C. DRAM O.C. profile, which applies different settings...
... voltage. Configuration options: [DDR3-1339MHz] [DDR3-1603MHz] eXtreme Memory Profile [High Performance] This item appears only when you set the Ai Overclock Tuner item to [Manual], [D.O.C.P.] or [X.M.P.]. BCLK Frequency [XXX] Allows you set the Ai Overclock Tuner item to [X.M.P.] and allows you to select a DRAM O.C. DRAM O.C. profile, which applies different settings...
User Guide
Page 122
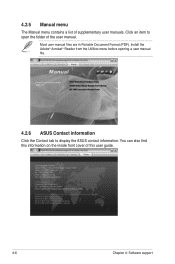
Most user manual files are in Portable Document Format (PDF). You can also find this information on the inside front cover of supplementary user manuals. Click an item to display the ASUS contact information. Install the Adobe® Acrobat® Reader from the Utilities menu before opening a user manual file. 4.2.6 ASUS Contact information Click the Contact tab to open the folder of the user manual. 4.2.5 Manual menu The Manual menu contains a list of this user guide. 4-6 Chapter 4: Software support
Most user manual files are in Portable Document Format (PDF). You can also find this information on the inside front cover of supplementary user manuals. Click an item to display the ASUS contact information. Install the Adobe® Acrobat® Reader from the Utilities menu before opening a user manual file. 4.2.6 ASUS Contact information Click the Contact tab to open the folder of the user manual. 4.2.5 Manual menu The Manual menu contains a list of this user guide. 4-6 Chapter 4: Software support
User Guide
Page 143
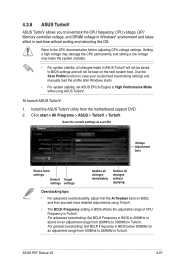
... rebooting the OS. Use the Save Profile function to save your customized overclocking settings and manually load the profile after Windows starts. • For system stability, set ASUS EPU 6-Engine to BIOS settings and will not be kept on the next system boot....TurboV. To launch ASUS TurboV 1. Install the ASUS TurboV utility from 200MHz to the CPU documentation before adjusting CPU voltage settings. Click start > All Programs > ASUS > TurboV > TurboV. Refer to 500MHz in BIOS below 200MHz for an adjustment range from the motherboard support DVD. 2. ASUS P6T Deluxe V2 4-27
... rebooting the OS. Use the Save Profile function to save your customized overclocking settings and manually load the profile after Windows starts. • For system stability, set ASUS EPU 6-Engine to BIOS settings and will not be kept on the next system boot....TurboV. To launch ASUS TurboV 1. Install the ASUS TurboV utility from 200MHz to the CPU documentation before adjusting CPU voltage settings. Click start > All Programs > ASUS > TurboV > TurboV. Refer to 500MHz in BIOS below 200MHz for an adjustment range from the motherboard support DVD. 2. ASUS P6T Deluxe V2 4-27

User Guide
Page 144
.../chip voltage, DRAM Reference voltage, and CPU ratio. Advanced settings menu Click More Setting from the TurboV main screen to display detailed configuration options for manual CPU ratio adjustment. See page 3-26 for details. 4-28 Chapter 4: Software support This is due to Intel's Dynamic Speed Technology of automatic CPU ratio overclocking...
.../chip voltage, DRAM Reference voltage, and CPU ratio. Advanced settings menu Click More Setting from the TurboV main screen to display detailed configuration options for manual CPU ratio adjustment. See page 3-26 for details. 4-28 Chapter 4: Software support This is due to Intel's Dynamic Speed Technology of automatic CPU ratio overclocking...

User Guide
Page 150
Microphone options Click the Microphone tab allows you have to manually enable the directional Array and Speaker Phone function. Directional Array Receives only the sound coming from the reception cone and eliminates interferences including neighboring speakers ... like computer fans, air conditioners, and other side. • The directional Array and Speaker Phone are purchased separately and function only when working with the ASUS Array Mic. • If you are using Windows Vista, you to reduce echoes in the incoming sudio stream while recording. You can enable it for...
Microphone options Click the Microphone tab allows you have to manually enable the directional Array and Speaker Phone function. Directional Array Receives only the sound coming from the reception cone and eliminates interferences including neighboring speakers ... like computer fans, air conditioners, and other side. • The directional Array and Speaker Phone are purchased separately and function only when working with the ASUS Array Mic. • If you are using Windows Vista, you to reduce echoes in the incoming sudio stream while recording. You can enable it for...
User Guide
Page 156
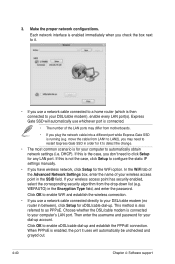
... DSL/cable modem), enable every LAN port(s). Choose whether the DSL/cable modem is not the case, click Setup to configure the static IP settings manually. • If you use a network cable connected to a home router (which is then connected to automatically obtain network settings (i.e. move the cable from LAN1 to...
... DSL/cable modem), enable every LAN port(s). Choose whether the DSL/cable modem is not the case, click Setup to configure the static IP settings manually. • If you use a network cable connected to a home router (which is then connected to automatically obtain network settings (i.e. move the cable from LAN1 to...
User Guide
Page 174
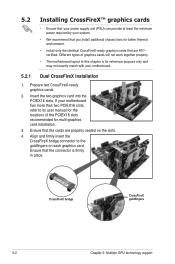
Insert the two graphics card into the PCIEX16 slots. Align and firmly insert the CrossFireX bridge connector to its user manual for the locations of this chapter is firmly in place. Prepare two CrossFireX-ready graphics cards. 2. Ensure that the connector is for reference purpose only ...
Insert the two graphics card into the PCIEX16 slots. Align and firmly insert the CrossFireX bridge connector to its user manual for the locations of this chapter is firmly in place. Prepare two CrossFireX-ready graphics cards. 2. Ensure that the connector is for reference purpose only ...
User Guide
Page 175
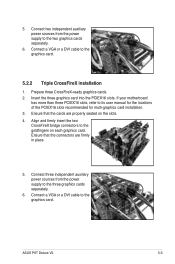
Connect a VGA or a DVI cable to its user manual for the locations of the PCIEX16 slots recommended for multi-graphics card installation. 3. Ensure that the connectors are properly seated on each graphics card. Ensure that the cards are firmly in place. 5. ASUS P6T Deluxe V2 5-3 Connect three independent auxiliary power sources from the power supply to...
Connect a VGA or a DVI cable to its user manual for the locations of the PCIEX16 slots recommended for multi-graphics card installation. 3. Ensure that the connectors are properly seated on each graphics card. Ensure that the cards are firmly in place. 5. ASUS P6T Deluxe V2 5-3 Connect three independent auxiliary power sources from the power supply to...


