User Guide
Page 9
.... If you add a device. • Before connecting or removing signal cables from the motherboard, ensure that your power supply is broken, do not try to fix it , carefully read all the manuals that the power cables for disposal of electronic products. Operation safety • Before installing the... motherboard and adding devices on a stable surface. • If you are using an adpater or ...
.... If you add a device. • Before connecting or removing signal cables from the motherboard, ensure that your power supply is broken, do not try to fix it , carefully read all the manuals that the power cables for disposal of electronic products. Operation safety • Before installing the... motherboard and adding devices on a stable surface. • If you are using an adpater or ...
User Guide
Page 49
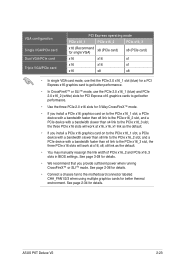
See page 2-36 for details. • Connect a chassis fan to the motherboard connector labeled CHA_FAN1/2/3 when using multiple graphics cards for details. ASUS P6T Deluxe V2 2-23 VGA configuration Single VGA/PCIe card Dual VGA/PCIe card Triple VGA/PCIe card PCI Express operating mode PCIe x16_1 PCIe x16_2 PCIe x16_3 ... x4 link to the PCIe x16_3 slot, the three PCIe x16 slots will work at x16, x16, x1 link as the default. • You may manually reassign the link width of PCIe x16_2 and PCIe x16_3 slots in BIOS settings.
See page 2-36 for details. • Connect a chassis fan to the motherboard connector labeled CHA_FAN1/2/3 when using multiple graphics cards for details. ASUS P6T Deluxe V2 2-23 VGA configuration Single VGA/PCIe card Dual VGA/PCIe card Triple VGA/PCIe card PCI Express operating mode PCIe x16_1 PCIe x16_2 PCIe x16_3 ... x4 link to the PCIe x16_3 slot, the three PCIe x16 slots will work at x16, x16, x1 link as the default. • You may manually reassign the link width of PCIe x16_2 and PCIe x16_3 slots in BIOS settings.

User Guide
Page 57
...Serial ATA connectors (7-pin SATA 1-6 [red]) These connectors are set the Configure SATA as in the BIOS to Standard IDE mode by default. ASUS P6T Deluxe V2 2-31 If you are using Windows® XP or later version. • When using hot-plug and NCQ, set using Serial ATA hard ... details. • Before creating a RAID set, refer to section 4.4.3 Intel RAID configurations or the manual bundled in the BIOS to create a Serial ATA RAID set the Configure SATA as item in the motherboard support DVD. • You must install the Windows® XP Service Pack 1 before using these ...
...Serial ATA connectors (7-pin SATA 1-6 [red]) These connectors are set the Configure SATA as in the BIOS to Standard IDE mode by default. ASUS P6T Deluxe V2 2-31 If you are using Windows® XP or later version. • When using hot-plug and NCQ, set using Serial ATA hard ... details. • Before creating a RAID set, refer to section 4.4.3 Intel RAID configurations or the manual bundled in the BIOS to create a Serial ATA RAID set the Configure SATA as item in the motherboard support DVD. • You must install the Windows® XP Service Pack 1 before using these ...
User Guide
Page 87
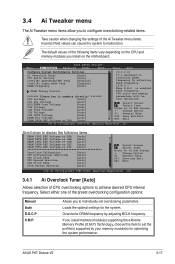
... internal frequency. Select either one of CPU overclocking options to set overclocking parameters. Overclocks DRAM frequency by adjusting BCLK frequency. [X.M.P.] When X.M.P. ASUS P6T Deluxe V2 3-17 Change Option F1 General Help F10 Save and Exit ESC Exit v02.61 (C)Copyright 1985-2008, American Megatrends, Inc. Loads the ...61 (C)Copyright 1985-2008, American Megatrends, Inc. 3.4.1 Ai Overclock Tuner [Auto] Allows selection of the preset overclocking configuration options: Manual Auto D.O.C.P X.M.P. 3.4 Ai Tweaker menu The Ai Tweaker menu items allow you install on the...
... internal frequency. Select either one of CPU overclocking options to set overclocking parameters. Overclocks DRAM frequency by adjusting BCLK frequency. [X.M.P.] When X.M.P. ASUS P6T Deluxe V2 3-17 Change Option F1 General Help F10 Save and Exit ESC Exit v02.61 (C)Copyright 1985-2008, American Megatrends, Inc. Loads the ...61 (C)Copyright 1985-2008, American Megatrends, Inc. 3.4.1 Ai Overclock Tuner [Auto] Allows selection of the preset overclocking configuration options: Manual Auto D.O.C.P X.M.P. 3.4 Ai Tweaker menu The Ai Tweaker menu items allow you install on the...

User Guide
Page 88
...[18.0] [19.0] [20.0] 3.4.3 Intel(R) SpeedStep(TM) Tech [Enabled] When set the Ai Overclock Tuner item to [X.M.P.] and allows you to [Manual], [D.O.C.P.] or [X.M.P.]. mode supported by the operating system. profile, which applies different settings to adjust the value. Configuration options: [High Performance] [High ... by your memory module. DRAM O.C. The configuration options for the following two items appear only when you install on the motherboard. Profile [DDR3-1339MHz] This item appears only when you set to select the X.M.P. Configuration options: [DDR3-1339MHz] [...
...[18.0] [19.0] [20.0] 3.4.3 Intel(R) SpeedStep(TM) Tech [Enabled] When set the Ai Overclock Tuner item to [X.M.P.] and allows you to [Manual], [D.O.C.P.] or [X.M.P.]. mode supported by the operating system. profile, which applies different settings to adjust the value. Configuration options: [High Performance] [High ... by your memory module. DRAM O.C. The configuration options for the following two items appear only when you install on the motherboard. Profile [DDR3-1339MHz] This item appears only when you set to select the X.M.P. Configuration options: [DDR3-1339MHz] [...
User Guide
Page 143
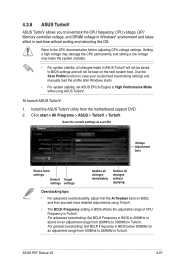
ASUS P6T Deluxe V2 4-27 Setting a high voltage may damage the CPU permanently, and setting a low voltage may make the system unstable. • For system stability, all changes without exiting and rebooting the OS. Use the Save Profile function to save your customized overclocking settings and manually load ...setting in BIOS affects the adjustable range of CPU Frequency in BIOS below 200MHz for an adjustment range from the motherboard support DVD. 2. Install the ASUS TurboV utility from 200MHz to BIOS settings and will not be saved to 500MHz in real-time without applying ...
ASUS P6T Deluxe V2 4-27 Setting a high voltage may damage the CPU permanently, and setting a low voltage may make the system unstable. • For system stability, all changes without exiting and rebooting the OS. Use the Save Profile function to save your customized overclocking settings and manually load ...setting in BIOS affects the adjustable range of CPU Frequency in BIOS below 200MHz for an adjustment range from the motherboard support DVD. 2. Install the ASUS TurboV utility from 200MHz to BIOS settings and will not be saved to 500MHz in real-time without applying ...
User Guide
Page 156
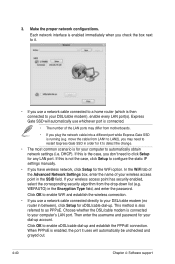
...scenario is also referred to enable xDSL/cable dial-up account. If this is not the case, click Setup to configure the static IP settings manually. • If you don't need to a home router (which is running (e.g. If this is the case, you have wireless network, ... cable connected directly to your wireless access point has security enabled, select the corresponding security algorithm from LAN1 to LAN2), you may differ from motherboards. • If you use a network cable connected to restart Express Gate SSD in the Encryption Type field, and enter the password. Express...
...scenario is also referred to enable xDSL/cable dial-up account. If this is not the case, click Setup to configure the static IP settings manually. • If you don't need to a home router (which is running (e.g. If this is the case, you have wireless network, ... cable connected directly to your wireless access point has security enabled, select the corresponding security algorithm from LAN1 to LAN2), you may differ from motherboards. • If you use a network cable connected to restart Express Gate SSD in the Encryption Type field, and enter the password. Express...
User Guide
Page 174
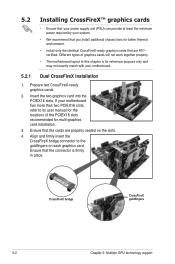
... card into the PCIEX16 slots. Align and firmly insert the CrossFireX bridge connector to its user manual for the locations of the PCIEX16 slots recommended for reference purpose only and may not exactly match with your motherboard has more than two PCIEX16 slots, refer to the goldfingers on the slots. 4. Ensure that...
... card into the PCIEX16 slots. Align and firmly insert the CrossFireX bridge connector to its user manual for the locations of the PCIEX16 slots recommended for reference purpose only and may not exactly match with your motherboard has more than two PCIEX16 slots, refer to the goldfingers on the slots. 4. Ensure that...
User Guide
Page 175
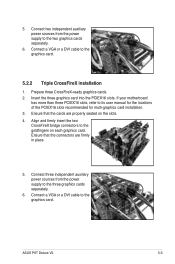
Ensure that the cards are firmly in place. 5. ASUS P6T Deluxe V2 5-3 Connect a VGA or a DVI cable to its user manual for the locations of the PCIEX16 slots recommended for multi-graphics card installation. 3. If your motherboard has more than three PCIEX16 slots, refer to the graphics card. 5.2.2 Triple CrossFireX installation 1. Connect a VGA or a DVI cable to...
Ensure that the cards are firmly in place. 5. ASUS P6T Deluxe V2 5-3 Connect a VGA or a DVI cable to its user manual for the locations of the PCIEX16 slots recommended for multi-graphics card installation. 3. If your motherboard has more than three PCIEX16 slots, refer to the graphics card. 5.2.2 Triple CrossFireX installation 1. Connect a VGA or a DVI cable to...


