
P5WDG2-WS User's Manual for English Edition
Page 4
... the computer 3-2 3.2.1 Using the OS shut down function 3-2 3.2.2 Using the dual function power switch 3-2 Chapter 4: BIOS setup 4.1 Managing and updating your BIOS 4-1 4.1.1 ASUS Update utility 4-1 4.1.2 Creating a bootable floppy disk 4-4 4.1.3 ASUS EZ Flash utility 4-5 4.1.4 AFUDOS utility 4-6 4.1.5 ASUS CrashFree BIOS 2 utility 4-9 4.2 BIOS setup program 4-11 4.2.1 BIOS menu screen 4-12 4.2.2 Menu bar 4-12 4.2.3 Navigation keys 4-12 4.2.4 Menu items 4-13 4.2.5 Sub-menu...
... the computer 3-2 3.2.1 Using the OS shut down function 3-2 3.2.2 Using the dual function power switch 3-2 Chapter 4: BIOS setup 4.1 Managing and updating your BIOS 4-1 4.1.1 ASUS Update utility 4-1 4.1.2 Creating a bootable floppy disk 4-4 4.1.3 ASUS EZ Flash utility 4-5 4.1.4 AFUDOS utility 4-6 4.1.5 ASUS CrashFree BIOS 2 utility 4-9 4.2 BIOS setup program 4-11 4.2.1 BIOS menu screen 4-12 4.2.2 Menu bar 4-12 4.2.3 Navigation keys 4-12 4.2.4 Menu items 4-13 4.2.5 Sub-menu...

P5WDG2-WS User's Manual for English Edition
Page 8
...viii It includes description of the switches, jumpers, and connectors on ASUS hardware and software products. Detailed descriptions of the BIOS parameters are not part of shutting down the system. • Chapter 4: BIOS setup This chapter tells how to perform when installing system components....product package may include optional documentation, such as warranty flyers, that may have to change system settings through the BIOS Setup menus. ASUS websites The ASUS website provides updated information on the motherboard. • Chapter 3: Powering up This chapter describes the power up ...
...viii It includes description of the switches, jumpers, and connectors on ASUS hardware and software products. Detailed descriptions of the BIOS parameters are not part of shutting down the system. • Chapter 4: BIOS setup This chapter tells how to perform when installing system components....product package may include optional documentation, such as warranty flyers, that may have to change system settings through the BIOS Setup menus. ASUS websites The ASUS website provides updated information on the motherboard. • Chapter 3: Powering up This chapter describes the power up ...
P5WDG2-WS User's Manual for English Edition
Page 11
P5WDG2-WS specifications summary High Definition Audio IEEE 1394a USB ASUS special features BIOS features Manageability P o we r Requirement Form Factor Realtek® ALC882 8-channel + 2-channel High Definition Audio (HD Audio) CODEC Supports Multi...one at mid-board) Supports up to 8 USB 2.0 ports ASUS AI NET2 ASUS AI Overclocking (intelligent CPU frequency tuner) ASUS MyLogo2 ASUS Q-Fan2 ASUS Multi-language BIOS ASUS CrashFree BIOS 2 ASUS EZ Flash ASUS C.P.R. (CPU Parameter Recall) ASUS CPU Lock Free AI Quiet ASUS PEG Link (automatic performance tuning for single/dual graphics cards) ...
P5WDG2-WS specifications summary High Definition Audio IEEE 1394a USB ASUS special features BIOS features Manageability P o we r Requirement Form Factor Realtek® ALC882 8-channel + 2-channel High Definition Audio (HD Audio) CODEC Supports Multi...one at mid-board) Supports up to 8 USB 2.0 ports ASUS AI NET2 ASUS AI Overclocking (intelligent CPU frequency tuner) ASUS MyLogo2 ASUS Q-Fan2 ASUS Multi-language BIOS ASUS CrashFree BIOS 2 ASUS EZ Flash ASUS C.P.R. (CPU Parameter Recall) ASUS CPU Lock Free AI Quiet ASUS PEG Link (automatic performance tuning for single/dual graphics cards) ...

P5WDG2-WS User's Manual for English Edition
Page 12
xii P5WDG2-WS specifications summary Rear panel 1 x PS/2 mouse port 1 x PS/2 keyboard port 1 x Parallel port 2 x LAN (RJ-45) ports 1 x Coaxial S/PDIF Out port 1 x Optical S/PDIF Out port 1 x IEEE ... connectors 1 x Power fan connector 1 x Serial port (COM1) connector EATX power connectors (24-pin and 2 x 4-pin) ASUS EZ Plug™ connector System panel connector Support CD contents Device drivers BIOS Flash Utility under DOS ASUS AI Booster ASUS Update ASUS PC Probe 2 Symantec NIS 2005 Microsoft® DirectX 9.0c Adobe® Acrobat Reader® RAID Utility...
xii P5WDG2-WS specifications summary Rear panel 1 x PS/2 mouse port 1 x PS/2 keyboard port 1 x Parallel port 2 x LAN (RJ-45) ports 1 x Coaxial S/PDIF Out port 1 x Optical S/PDIF Out port 1 x IEEE ... connectors 1 x Power fan connector 1 x Serial port (COM1) connector EATX power connectors (24-pin and 2 x 4-pin) ASUS EZ Plug™ connector System panel connector Support CD contents Device drivers BIOS Flash Utility under DOS ASUS AI Booster ASUS Update ASUS PC Probe 2 Symantec NIS 2005 Microsoft® DirectX 9.0c Adobe® Acrobat Reader® RAID Utility...

P5WDG2-WS User's Manual for English Edition
Page 20
...This feature allows convenient overclocking up to set the BIOS items for 3D graphics and other system-intensive applications. Setting the appropriate BIOS setting automatically reduces the CPU multiplier value for details. AI NET2 AI NET2 is a BIOS-based diagnostic tool that detects and reports Ethernet ...cable faults and shorts. See pages 2-16 and 4-20 for more flexibility when increasing external FSB. See page 4-19 to 100 meters at 1 meter accuracy. 1.3.3 Innovative ASUS features Native DDR2-800 memory ...
...This feature allows convenient overclocking up to set the BIOS items for 3D graphics and other system-intensive applications. Setting the appropriate BIOS setting automatically reduces the CPU multiplier value for details. AI NET2 AI NET2 is a BIOS-based diagnostic tool that detects and reports Ethernet ...cable faults and shorts. See pages 2-16 and 4-20 for more flexibility when increasing external FSB. See page 4-19 to 100 meters at 1 meter accuracy. 1.3.3 Innovative ASUS features Native DDR2-800 memory ...

P5WDG2-WS User's Manual for English Edition
Page 21
See page 4-9 for details. ASUS P5WDG2-WS 1-7 See page 4-35 for details. The localized BIOS menus allow easier and faster configuration. ASUS EZ Flash BIOS With the ASUS EZ Flash, you to use a DOS-based utility or boot from a floppy disk. See page 4-5 for details. This... your choice from the support CD in case when the BIOS codes and data are corrupted. ASUS Multi-language BIOS The multi-language BIOS allows you can easily update the system BIOS even before loading the operating system. ASUS CrashFree BIOS 2 This feature allows you to personalize and add style to...
See page 4-9 for details. ASUS P5WDG2-WS 1-7 See page 4-35 for details. The localized BIOS menus allow easier and faster configuration. ASUS EZ Flash BIOS With the ASUS EZ Flash, you to use a DOS-based utility or boot from a floppy disk. See page 4-5 for details. This... your choice from the support CD in case when the BIOS codes and data are corrupted. ASUS Multi-language BIOS The multi-language BIOS allows you can easily update the system BIOS even before loading the operating system. ASUS CrashFree BIOS 2 This feature allows you to personalize and add style to...
P5WDG2-WS User's Manual for English Edition
Page 28
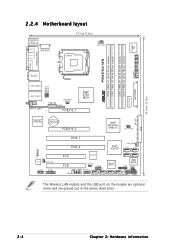
...DDR2 DIMM_B2 (64 bit,184-pin module) DDR2 DIMM_A1 (64 bit,240-pin module) DDR2 DIMM_A2 (64 bit,240-pin module) P5WDG2-WS IE1394_1 PARALLEL PORT AUDIO EZ_PLUG EATXPWR ® LAN2_USB34 LAN1_USB12 WIFI_G_USB78 USBPW34 USBPW12 USBPW78 CHA_FAN1 USB78 PCIEX16_1 Intel® 975X MCH PRI_IDE Marvell&#... PCIX_2 Intel® ICH7R CHA_FAN2 SATA4 SATA3 PCI1 PCI2 COM1 TSB43AB22A SATA2 SATA1 USBPW56 USB56 IE1394_2 Marvell® 88SE6141 8Mb BIOS TPM CLRTC CHASSIS SATA_RAID4 SATA_RAID3 SATA_RAID2 SATA_RAID1 SB_PWR PANEL The Wireless LAN module and the USB port on the module are ...
...DDR2 DIMM_B2 (64 bit,184-pin module) DDR2 DIMM_A1 (64 bit,240-pin module) DDR2 DIMM_A2 (64 bit,240-pin module) P5WDG2-WS IE1394_1 PARALLEL PORT AUDIO EZ_PLUG EATXPWR ® LAN2_USB34 LAN1_USB12 WIFI_G_USB78 USBPW34 USBPW12 USBPW78 CHA_FAN1 USB78 PCIEX16_1 Intel® 975X MCH PRI_IDE Marvell&#... PCIX_2 Intel® ICH7R CHA_FAN2 SATA4 SATA3 PCI1 PCI2 COM1 TSB43AB22A SATA2 SATA1 USBPW56 USB56 IE1394_2 Marvell® 88SE6141 8Mb BIOS TPM CLRTC CHASSIS SATA_RAID4 SATA_RAID3 SATA_RAID2 SATA_RAID1 SB_PWR PANEL The Wireless LAN module and the USB port on the module are ...

P5WDG2-WS User's Manual for English Edition
Page 45
... card To install an expansion card: 1. Keep the screw for details. Refer to the tables on the system and change the necessary BIOS settings, if any. Replace the system cover. 2.5.2 Configuring an expansion card After installing the expansion card, configure the it and make the... read the documentation that they support. Otherwise, conflicts will arise between the two PCI groups, making the system unstable and the card inoperable. ASUS P5WDG2-WS 2-21 See Chapter 4 for the card. 2. Install the software drivers for the expansion card. When using PCI cards on the slot. ...
... card To install an expansion card: 1. Keep the screw for details. Refer to the tables on the system and change the necessary BIOS settings, if any. Replace the system cover. 2.5.2 Configuring an expansion card After installing the expansion card, configure the it and make the... read the documentation that they support. Otherwise, conflicts will arise between the two PCI groups, making the system unstable and the card inoperable. ASUS P5WDG2-WS 2-21 See Chapter 4 for the card. 2. Install the software drivers for the expansion card. When using PCI cards on the slot. ...

P5WDG2-WS User's Manual for English Edition
Page 48
...-100) ASUS EAX800 (BIOS: V554F.9.7.1.AS02) ASUS EAX800PRO Rev. AS01) ASUS EAX600XT Rev. A901) ASUS EAX700-X 128M Rev. V1.00a (BIOS: V009.008.001.004) ASUS EAX700LE 128M (BIOS: V5E4D.9.8.1.4. PN: 109-A47401-10 (BIOS: V009.007.001.004) ASUS EAX850XT PE Rev. AS13) ASUS EAX700PRO Rev. V1.02 (BIOS:V113-AA20306-100-AS) ASUS EAX700 (BIOS: V5E4D.9.7.1.3. V1.00 (BIOS: V5549.9.4.1.10.AS) ASUS EAX800XL...
...-100) ASUS EAX800 (BIOS: V554F.9.7.1.AS02) ASUS EAX800PRO Rev. AS01) ASUS EAX600XT Rev. A901) ASUS EAX700-X 128M Rev. V1.00a (BIOS: V009.008.001.004) ASUS EAX700LE 128M (BIOS: V5E4D.9.8.1.4. PN: 109-A47401-10 (BIOS: V009.007.001.004) ASUS EAX850XT PE Rev. AS13) ASUS EAX700PRO Rev. V1.02 (BIOS:V113-AA20306-100-AS) ASUS EAX700 (BIOS: V5E4D.9.7.1.3. V1.00 (BIOS: V5549.9.4.1.10.AS) ASUS EAX800XL...

P5WDG2-WS User's Manual for English Edition
Page 50
... Version 3Dlabs Wildcat Realizm 500 256M Rev. 08 (BIOS: V3.37 ASUS EN6200TC128/T/16M Rev V1.01 (BIOS: V5.44.02.11) ASUS EN6600 128M Rev V1.00A (BIOS: V5.43.02.61) ASUS EN6600 256M Rev V1.00A (BIOS: V5.43.02.16.AS11) ASUS EN7800GT 256MB Rev: V1.00 (BIOS: V5.70.02.13.AS01) ATI FireMV2200... (BIOS: V113.A25915.100) ELSA Gladiac 620TC 128T DVT Rev. 1A (BIOS...
... Version 3Dlabs Wildcat Realizm 500 256M Rev. 08 (BIOS: V3.37 ASUS EN6200TC128/T/16M Rev V1.01 (BIOS: V5.44.02.11) ASUS EN6600 128M Rev V1.00A (BIOS: V5.43.02.61) ASUS EN6600 256M Rev V1.00A (BIOS: V5.43.02.16.AS11) ASUS EN7800GT 256MB Rev: V1.00 (BIOS: V5.70.02.13.AS01) ATI FireMV2200... (BIOS: V113.A25915.100) ELSA Gladiac 620TC 128T DVT Rev. 1A (BIOS...

P5WDG2-WS User's Manual for English Edition
Page 52
P5WDG2-WS ® CLRTC 12 23 Normal P5WDG2-WS Clear RTC RAM (Default) Clear RTC You do not need to clear the RTC when the system hangs due to overclocking, use the C.P.R. (CPU Parameter Recall) feature. Shut down the key during the boot process and enter BIOS setup to re-enter data. Turn ... to pins 1-2. 4. Keep the cap on CLRTC jumper default position. To erase the RTC RAM: 1. Hold down and reboot the system so the BIOS can clear the CMOS memory of date, time, and system setup parameters by erasing the CMOS RTC RAM data. 2.6 Jumpers 1. Removing the cap will...
P5WDG2-WS ® CLRTC 12 23 Normal P5WDG2-WS Clear RTC RAM (Default) Clear RTC You do not need to clear the RTC when the system hangs due to overclocking, use the C.P.R. (CPU Parameter Recall) feature. Shut down the key during the boot process and enter BIOS setup to re-enter data. Turn ... to pins 1-2. 4. Keep the cap on CLRTC jumper default position. To erase the RTC RAM: 1. Hold down and reboot the system so the BIOS can clear the CMOS memory of date, time, and system setup parameters by erasing the CMOS RTC RAM data. 2.6 Jumpers 1. Removing the cap will...

P5WDG2-WS User's Manual for English Edition
Page 59
... i g u r e S A T A A s item in the BIOS to PIN 1. 3 . P5WDG2-WS GND SATA_TXP2 SATA_TXN2 GND SATA_RXN2 SATA_RXP2 GND GND SATA_TXP3 SATA_TXN3 GND SATA_RXN3 SATA_RXP3 GND ® SATA4 P5WDG2-WS SATA connectors SATA2 ASUS P5WDG2-WS GND SATA_TXP1 SATA_TXN1 GND SATA_RXN1 SATA_RXP1 GND SATA3 SATA1 GND SATA_TXP0 SATA_TXN0 GND SATA_RXN0...I D E mode, you intend to these connectors, set . For RAID 10, use at least four hard disk drives. P5WDG2-WS ® PRI_IDE P5WDG2-WS IDE connector NOTE: Orient the red markings (usually zigzag) on the IDE ribbon cable to [RAID]. Use two to four ...
... i g u r e S A T A A s item in the BIOS to PIN 1. 3 . P5WDG2-WS GND SATA_TXP2 SATA_TXN2 GND SATA_RXN2 SATA_RXP2 GND GND SATA_TXP3 SATA_TXN3 GND SATA_RXN3 SATA_RXP3 GND ® SATA4 P5WDG2-WS SATA connectors SATA2 ASUS P5WDG2-WS GND SATA_TXP1 SATA_TXN1 GND SATA_RXN1 SATA_RXP1 GND SATA3 SATA1 GND SATA_TXP0 SATA_TXN0 GND SATA_RXN0...I D E mode, you intend to these connectors, set . For RAID 10, use at least four hard disk drives. P5WDG2-WS ® PRI_IDE P5WDG2-WS IDE connector NOTE: Orient the red markings (usually zigzag) on the IDE ribbon cable to [RAID]. Use two to four ...

P5WDG2-WS User's Manual for English Edition
Page 60
...using the connectors in the BIOS to [Enabled] to use the connectors to the table below for the recommended SATA hard disk drive connections. P5WDG2-WS ® GND RSATA_TX_0_DP ... GND RSATA_TX_1_DP RSATA_TX_1_DN GND RSATA_RX_1_DN RSATA_RX_1_DP GND GND RSATA_TX_2_DP RSATA_TX_2_DN GND RSATA_RX_2_DN RSATA_RX_2_DP GND GND RSATA_TX_3_DP RSATA_TX_3_DN GND RSATA_RX_3_DN RSATA_RX_3_DP GND SATA_RAID4 SATA_RAID3 SATA_RAID2 SATA_RAID1 P5WDG2-WS SATA RAID connector Before creating a RAID set . Set the M a r v e l l S A T A C o n t r o l l e r and M a r v e l l S A T A B O O T R O M items ...
...using the connectors in the BIOS to [Enabled] to use the connectors to the table below for the recommended SATA hard disk drive connections. P5WDG2-WS ® GND RSATA_TX_0_DP ... GND RSATA_TX_1_DP RSATA_TX_1_DN GND RSATA_RX_1_DN RSATA_RX_1_DP GND GND RSATA_TX_2_DP RSATA_TX_2_DN GND RSATA_RX_2_DN RSATA_RX_2_DP GND GND RSATA_TX_3_DP RSATA_TX_3_DN GND RSATA_RX_3_DN RSATA_RX_3_DP GND SATA_RAID4 SATA_RAID3 SATA_RAID2 SATA_RAID1 P5WDG2-WS SATA RAID connector Before creating a RAID set . Set the M a r v e l l S A T A C o n t r o l l e r and M a r v e l l S A T A B O O T R O M items ...

P5WDG2-WS User's Manual for English Edition
Page 68
... for the HDD Activity LED. PLED+ PLED+5V Ground Ground Speaker P5WDG2-WS ® IDE_LED+ IDE_LED- PLED SPEAKER PANEL IDE_LED RESET PWRSW * Requires an ATX power supply. Pressing the power button turns the system on the BIOS settings. Connect the HDD Activity LED cable to hear system beeps and... description below for details. • System power LED (Green 3-pin PLED) This 3-pin connector is for the system power button. P5WDG2-WS System panel connector The sytem panel connector is for the chassis-mounted reset button for system reboot without turning off mode depending on or ...
... for the HDD Activity LED. PLED+ PLED+5V Ground Ground Speaker P5WDG2-WS ® IDE_LED+ IDE_LED- PLED SPEAKER PANEL IDE_LED RESET PWRSW * Requires an ATX power supply. Pressing the power button turns the system on the BIOS settings. Connect the HDD Activity LED cable to hear system beeps and... description below for details. • System power LED (Green 3-pin PLED) This 3-pin connector is for the system power button. P5WDG2-WS System panel connector The sytem panel connector is for the chassis-mounted reset button for system reboot without turning off mode depending on or ...

P5WDG2-WS User's Manual for English Edition
Page 71
... For systems with a surge protector. 5. The system then runs the power-on the devices in Chapter 4. Connect the power cord to enter the BIOS Setup. External SCSI devices (starting with "green" standards or if it has a "power standby" feature, the monitor LED may have failed a ...see BIOS beep codes table below) or additional messages appear on the chain) c. Connect the power cord to the power connector at the back of the system chassis. 4. If you press the ATX power button. After making all switches are off. 3. 3.1 Starting up for assistance. ASUS P5WDG2-WS 3-1
... For systems with a surge protector. 5. The system then runs the power-on the devices in Chapter 4. Connect the power cord to enter the BIOS Setup. External SCSI devices (starting with "green" standards or if it has a "power standby" feature, the monitor LED may have failed a ...see BIOS beep codes table below) or additional messages appear on the chain) c. Connect the power cord to the power connector at the back of the system chassis. 4. If you press the ATX power button. After making all switches are off. 3. 3.1 Starting up for assistance. ASUS P5WDG2-WS 3-1

P5WDG2-WS User's Manual for English Edition
Page 72
...® shuts down . 3.2.2 Using the dual function power switch While the system is selected, then click the O K button to soft-off mode, depending on the BIOS setting. Click the S t a r t button then select T u r n O f f C o m p u t e r . 2. The power supply should turn off after Windows® shuts down . Pressing the power switch for details. 3-2 Chapter 3: Powering..." in Chapter 4 for more than four seconds puts the system to sleep mode or to shut down the computer. 3. 3.2 Turning off mode regardless of the BIOS setting.
...® shuts down . 3.2.2 Using the dual function power switch While the system is selected, then click the O K button to soft-off mode, depending on the BIOS setting. Click the S t a r t button then select T u r n O f f C o m p u t e r . 2. The power supply should turn off after Windows® shuts down . Pressing the power switch for details. 3-2 Chapter 3: Powering..." in Chapter 4 for more than four seconds puts the system to sleep mode or to shut down the computer. 3. 3.2 Turning off mode regardless of the BIOS setting.

P5WDG2-WS User's Manual for English Edition
Page 73
Detailed descriptions of the BIOS parameters are also provided. 4 BIOS setup This chapter tells how to change the system settings through the BIOS Setup menus.
Detailed descriptions of the BIOS parameters are also provided. 4 BIOS setup This chapter tells how to change the system settings through the BIOS Setup menus.

P5WDG2-WS User's Manual for English Edition
Page 74
Chapter summary 4 4.1 Managing and updating your BIOS 4-1 4.2 BIOS setup program 4-11 4.3 Main menu 4-14 4.4 Advanced menu 4-19 4.5 Power menu 4-32 4.6 Boot menu 4-37 4.7 Exit menu 4-41 ASUS P5WDG2-WS
Chapter summary 4 4.1 Managing and updating your BIOS 4-1 4.2 BIOS setup program 4-11 4.3 Main menu 4-14 4.4 Advanced menu 4-19 4.5 Power menu 4-32 4.6 Boot menu 4-37 4.7 Exit menu 4-41 ASUS P5WDG2-WS

P5WDG2-WS User's Manual for English Edition
Page 75
... and update the motherboard Basic Input/Output System (BIOS) setup. 1. ASUS Update requires an Internet connection either through a network or an Internet Service Provider (ISP). A S U S E Z F l a s h (Updates the BIOS in the future. Installing ASUS Update To install ASUS Update: 1. See page 5-3 for details on these utilities. ASUS P5WDG2-WS 4-1 A S U S A F U D O S (Updates the BIOS in the support CD that allows you to...
... and update the motherboard Basic Input/Output System (BIOS) setup. 1. ASUS Update requires an Internet connection either through a network or an Internet Service Provider (ISP). A S U S E Z F l a s h (Updates the BIOS in the future. Installing ASUS Update To install ASUS Update: 1. See page 5-3 for details on these utilities. ASUS P5WDG2-WS 4-1 A S U S A F U D O S (Updates the BIOS in the support CD that allows you to...

P5WDG2-WS User's Manual for English Edition
Page 76
... ASUS FTP site t h e I O S f r o m 3. The ASUS Update main window appears. 2. Click N e x t. 4-2 Chapter 4: BIOS setup Select U p d a t e B I n t e r n e t option from the Windows® desktop by clicking S t a r t > P r o g r a m s > A S U S > A S U S U p d a t e > A S U S U p d a t e. N e x t. Updating the BIOS through the Internet To update the BIOS through the Internet: 1. Quit all Windows® applications before you to avoid network drop-down menu, then click traffic, or click A u t o S e l e c t. Launch the ASUS...
... ASUS FTP site t h e I O S f r o m 3. The ASUS Update main window appears. 2. Click N e x t. 4-2 Chapter 4: BIOS setup Select U p d a t e B I n t e r n e t option from the Windows® desktop by clicking S t a r t > P r o g r a m s > A S U S > A S U S U p d a t e > A S U S U p d a t e. N e x t. Updating the BIOS through the Internet To update the BIOS through the Internet: 1. Quit all Windows® applications before you to avoid network drop-down menu, then click traffic, or click A u t o S e l e c t. Launch the ASUS...


