Motherboard Installation Guide
Page 4
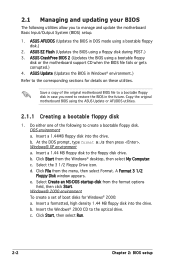
... Connectors 1-24 1.10.1 Rear panel connectors 1-24 1.10.2 Internal connectors 1-25 Chapter 2: BIOS setup 2.1 Managing and updating your BIOS 2-2 2.1.1 Creating a bootable floppy disk 2-2 2.1.2 ASUS EZ Flash utility 2-3 2.1.3 AFUDOS utility 2-4 2.1.4 ASUS CrashFree BIOS 2 utility 2-6 2.1.5 ASUS Update utility 2-8 2.2 BIOS setup program 2-11 2.2.3 Navigation keys 2-12 2.2.1 BIOS menu screen 2-12 2.2.2 Menu bar 2-12 2.2.4 Menu items 2-13 2.2.5 Sub-menu items 2-13...
... Connectors 1-24 1.10.1 Rear panel connectors 1-24 1.10.2 Internal connectors 1-25 Chapter 2: BIOS setup 2.1 Managing and updating your BIOS 2-2 2.1.1 Creating a bootable floppy disk 2-2 2.1.2 ASUS EZ Flash utility 2-3 2.1.3 AFUDOS utility 2-4 2.1.4 ASUS CrashFree BIOS 2 utility 2-6 2.1.5 ASUS Update utility 2-8 2.2 BIOS setup program 2-11 2.2.3 Navigation keys 2-12 2.2.1 BIOS menu screen 2-12 2.2.2 Menu bar 2-12 2.2.4 Menu items 2-13 2.2.5 Sub-menu items 2-13...
Motherboard Installation Guide
Page 8
... warranty flyers, that you need when installing and configuring the motherboard. Where to find more information Refer to the ASUS contact information. 2. Detailed descriptions of the BIOS parameters are not part of the support CD that comes with the motherboard package. It includes description of the jumpers and connectors...
... warranty flyers, that you need when installing and configuring the motherboard. Where to find more information Refer to the ASUS contact information. 2. Detailed descriptions of the BIOS parameters are not part of the support CD that comes with the motherboard package. It includes description of the jumpers and connectors...

Motherboard Installation Guide
Page 10
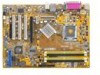
P5SD2-X SE specifications summary CPU Chipset Front Side Bus Memory Expansion slots Storage Audio LAN USB Special features BIOS Features LGA775 socket for Intel® Pentium® D/Intel® Pentium® 4 or Intel® Celeron® ... Realtek RTL 8201CL Phy Supports up to eight USB 2.0 ports AI Overclocking CPU LockFree ASUS Q-Fan ASUS CrashFree BIOS 2 ASUS MyLogo™ ASUS EZ Flash ASUS C.P.R. (CPU Parameter Recall) 4 MB Flash ROM, AMI BIOS, PnP, DMI2.0, SM BIOS 2.3, WfM2.0, SM BIOS 2.3 ASUS EZ Flash, ASUS Crashfree BIOS2, CPU Multiplier (continued on the next page) x
P5SD2-X SE specifications summary CPU Chipset Front Side Bus Memory Expansion slots Storage Audio LAN USB Special features BIOS Features LGA775 socket for Intel® Pentium® D/Intel® Pentium® 4 or Intel® Celeron® ... Realtek RTL 8201CL Phy Supports up to eight USB 2.0 ports AI Overclocking CPU LockFree ASUS Q-Fan ASUS CrashFree BIOS 2 ASUS MyLogo™ ASUS EZ Flash ASUS C.P.R. (CPU Parameter Recall) 4 MB Flash ROM, AMI BIOS, PnP, DMI2.0, SM BIOS 2.3, WfM2.0, SM BIOS 2.3 ASUS EZ Flash, ASUS Crashfree BIOS2, CPU Multiplier (continued on the next page) x
Motherboard Installation Guide
Page 16
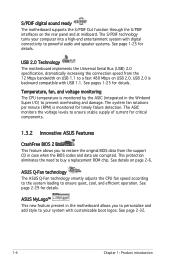
...25 for timely failure detection. The ASIC monitors the voltage levels to ensure stable supply of current for critical components. 1.3.2 Innovative ASUS Features CrashFree BIOS 2 This feature allows you to personalize and add style to powerful audio and speaker systems. See page 1-25 for details.... ASUS MyLogo™ This new feature present in the motherboard allows you to restore the original BIOS data from the 12 Mbps bandwidth on USB 2.0. USB 2.0 Technology The motherboard implements the ...
...25 for timely failure detection. The ASIC monitors the voltage levels to ensure stable supply of current for critical components. 1.3.2 Innovative ASUS Features CrashFree BIOS 2 This feature allows you to personalize and add style to powerful audio and speaker systems. See page 1-25 for details.... ASUS MyLogo™ This new feature present in the motherboard allows you to restore the original BIOS data from the 12 Mbps bandwidth on USB 2.0. USB 2.0 Technology The motherboard implements the ...
Motherboard Installation Guide
Page 31
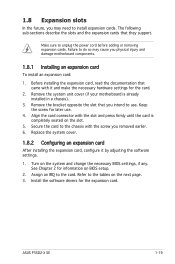
... expansion card: 1. Make sure to the card. Remove the system unit cover (if your motherboard is completely seated on the system and change the necessary BIOS settings, if any. Secure the card to the chassis with the screw you may cause you intend to use . 4. See Chapter 2 for the card. 2. Refer...figure it and make the necessary hardware settings for information on the next page. 3. Failure to do so may need to the tables on BIOS setup. 2. ASUS P5SD2-X SE 1-19
... expansion card: 1. Make sure to the card. Remove the system unit cover (if your motherboard is completely seated on the system and change the necessary BIOS settings, if any. Secure the card to the chassis with the screw you may cause you intend to use . 4. See Chapter 2 for the card. 2. Refer...figure it and make the necessary hardware settings for information on the next page. 3. Failure to do so may need to the tables on BIOS setup. 2. ASUS P5SD2-X SE 1-19
Motherboard Installation Guide
Page 34
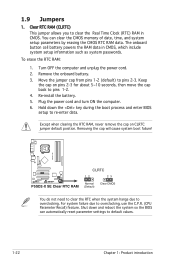
... and enter BIOS setup to clear the Real Time Clock (RTC) RAM in CMOS, which include system setup information such as system passwords. Except when clearing the RTC RAM, never remove the cap on pins 2-3 for about 5~10 seconds, then move the cap back to pins 1-2. 4. P5SD2-X SE ® P5SD2-X SE Clear RTC ...failure due to overclocking. Clear RTC RAM (CLRTC) This jumper allows you to re-enter data. Hold down and reboot the system so the BIOS can clear the CMOS memory of date, time, and system setup parameters by erasing the CMOS RTC RAM data. Removing the cap will cause system...
... and enter BIOS setup to clear the Real Time Clock (RTC) RAM in CMOS, which include system setup information such as system passwords. Except when clearing the RTC RAM, never remove the cap on pins 2-3 for about 5~10 seconds, then move the cap back to pins 1-2. 4. P5SD2-X SE ® P5SD2-X SE Clear RTC ...failure due to overclocking. Clear RTC RAM (CLRTC) This jumper allows you to re-enter data. Hold down and reboot the system so the BIOS can clear the CMOS memory of date, time, and system setup parameters by erasing the CMOS RTC RAM data. Removing the cap will cause system...
Motherboard Installation Guide
Page 43
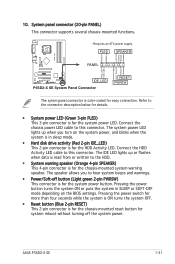
10. PLED SPEAKER PLED+ PLED+5V Ground Ground Speaker P5SD2-X SE PANEL ® IDE_LED P5SD2-X SE System Panel Connector IDE_LED+ IDE_LED- ASUS P5SD2-X SE 1-31 PWR Ground Reset Ground RESET PWRSW The sytem panel connector is for the system power LED. The IDE LED lights up when you ... system power LED lights up or flashes when data is read from or written to this connector. The speaker allows you turn on the BIOS settings. Connect the chassis power LED cable to the HDD. • System warning speaker (Orange 4-pin SPEAKER) This 4-pin connector is for the ...
10. PLED SPEAKER PLED+ PLED+5V Ground Ground Speaker P5SD2-X SE PANEL ® IDE_LED P5SD2-X SE System Panel Connector IDE_LED+ IDE_LED- ASUS P5SD2-X SE 1-31 PWR Ground Reset Ground RESET PWRSW The sytem panel connector is for the system power LED. The IDE LED lights up when you ... system power LED lights up or flashes when data is read from or written to this connector. The speaker allows you turn on the BIOS settings. Connect the chassis power LED cable to the HDD. • System warning speaker (Orange 4-pin SPEAKER) This 4-pin connector is for the ...
Motherboard Installation Guide
Page 45
This chapter tells how to change the system settings through the BIOS Setup menus. Detailed descriptions of the BIOS parameters are also provided. 2 BIOS setup ASUS P5SD2-X SE 2-1
This chapter tells how to change the system settings through the BIOS Setup menus. Detailed descriptions of the BIOS parameters are also provided. 2 BIOS setup ASUS P5SD2-X SE 2-1
Motherboard Installation Guide
Page 46
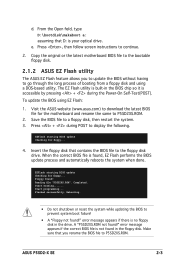
...disk to manage and update the motherboard Basic Input/Output System (BIOS) setup. 1. Insert a formatted, high density 1.44 MB floppy disk into the drive. b. ASUS EZ Flash (Updates the BIOS using the ASUS Update or AFUDOS utilities. 2.1.1 Creating a bootable floppy disk ... Format 3 1/2 Floppy Disk window appears. Click Start, then select Run. 2-2 Chapter 2: BIOS setup Copy the original motherboard BIOS using a floppy disk during POST.) 3. d. ASUS CrashFree BIOS 2 (Updates the BIOS using a bootable floppy disk.) 2. Click File from the format options field,...
...disk to manage and update the motherboard Basic Input/Output System (BIOS) setup. 1. Insert a formatted, high density 1.44 MB floppy disk into the drive. b. ASUS EZ Flash (Updates the BIOS using the ASUS Update or AFUDOS utilities. 2.1.1 Creating a bootable floppy disk ... Format 3 1/2 Floppy Disk window appears. Click Start, then select Run. 2-2 Chapter 2: BIOS setup Copy the original motherboard BIOS using a floppy disk during POST.) 3. d. ASUS CrashFree BIOS 2 (Updates the BIOS using a bootable floppy disk.) 2. Click File from the format options field,...
Motherboard Installation Guide
Page 47
...drive. Flashed successfully. ASUS P5SD2-X SE 2-3 e. Completed. Rebooting. • Do not shutdown or reset the system while updating the BIOS to prevent system boot failure! • A "Floppy not found !" From the Open field, type D:\bootdisk\makeboot a: assuming that contains the BIOS file to display... found in the drive. Visit the ASUS website (www.asus.com) to P5SD2XS.ROM. 2. Save the BIOS file to continue. 2. EZFlash starting BIOS update Checking for the motherboard and rename the same to download the latest BIOS file for floppy... ...
...drive. Flashed successfully. ASUS P5SD2-X SE 2-3 e. Completed. Rebooting. • Do not shutdown or reset the system while updating the BIOS to prevent system boot failure! • A "Floppy not found !" From the Open field, type D:\bootdisk\makeboot a: assuming that contains the BIOS file to display... found in the drive. Visit the ASUS website (www.asus.com) to P5SD2XS.ROM. 2. Save the BIOS file to continue. 2. EZFlash starting BIOS update Checking for the motherboard and rename the same to download the latest BIOS file for floppy... ...

Motherboard Installation Guide
Page 48
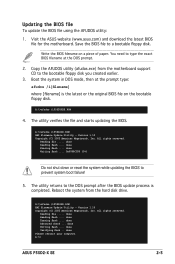
... or gets corrupted during the updating process. Press . All rights reserved. This utility also allows you to copy the current BIOS file that the floppy disk is not write-protected and has at the prompt type: afudos /o[filename] where the [filename] ... Update Utility - Reading flash ..... Copy the AFUDOS utility (afudos.exe) from the motherboard support CD to save the file. • The succeeding BIOS screens are for the extension name. Boot the system in DOS environment using the AFUDOS utility: • Make sure that you to update the...
... or gets corrupted during the updating process. Press . All rights reserved. This utility also allows you to copy the current BIOS file that the floppy disk is not write-protected and has at the prompt type: afudos /o[filename] where the [filename] ... Update Utility - Reading flash ..... Copy the AFUDOS utility (afudos.exe) from the motherboard support CD to save the file. • The succeeding BIOS screens are for the extension name. Boot the system in DOS environment using the AFUDOS utility: • Make sure that you to update the...
Motherboard Installation Guide
Page 49
...- Reading file ..... done Advanced check ... A:\> ASUS P5SD2-X SE 2-5 A:\>afudos /iP5SD2XSE.ROM 4. Reboot the system from the motherboard support CD to the bootable floppy disk you created earlier. 3. Updating the BIOS file To update the BIOS file using the AFUDOS utility: 1. Copy the ...oppy disk. The utility returns to type the exact BIOS filename at the prompt type: afudos /i[filename] where [filename] is completed. Visit the ASUS website (www.asus.com) and download the latest BIOS file for the motherboard. Boot the system ...
...- Reading file ..... done Advanced check ... A:\> ASUS P5SD2-X SE 2-5 A:\>afudos /iP5SD2XSE.ROM 4. Reboot the system from the motherboard support CD to the bootable floppy disk you created earlier. 3. Updating the BIOS file To update the BIOS file using the AFUDOS utility: 1. Copy the ...oppy disk. The utility returns to type the exact BIOS filename at the prompt type: afudos /i[filename] where [filename] is completed. Visit the ASUS website (www.asus.com) and download the latest BIOS file for the motherboard. Boot the system ...
Motherboard Installation Guide
Page 50
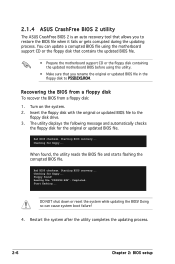
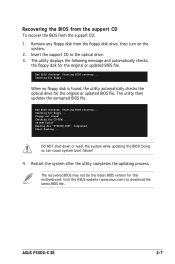
...... Reading file "P5SD2XS.ROM". Turn on the system. 2. 2.1.4 ASUS CrashFree BIOS 2 utility The ASUS CrashFree BIOS 2 is an auto recovery tool that you to the floppy disk drive. 3. Insert the floppy disk with the original or updated BIOS file to restore the BIOS file when it fails or gets corrupted during...
...... Reading file "P5SD2XS.ROM". Turn on the system. 2. 2.1.4 ASUS CrashFree BIOS 2 utility The ASUS CrashFree BIOS 2 is an auto recovery tool that you to the floppy disk drive. 3. Insert the floppy disk with the original or updated BIOS file to restore the BIOS file when it fails or gets corrupted during...
Motherboard Installation Guide
Page 51
...... CD-ROM found! Reading file "P5SD2XS.ROM". DO NOT shut down or reset the system while updating the BIOS! Bad BIOS checksum. Checking for CD-ROM... Checking for floppy... Completed. Start flashing... The utility then updates the corrupted... displays the following message and automatically checks the floppy disk for this motherboard. Checking for the original or updated BIOS file. Starting BIOS recovery... Doing so can cause system boot failure! 4. Visit the ASUS website (www.asus.com) to the optical drive. 3. ASUS P5SD2-X SE 2-7
...... CD-ROM found! Reading file "P5SD2XS.ROM". DO NOT shut down or reset the system while updating the BIOS! Bad BIOS checksum. Checking for CD-ROM... Checking for floppy... Completed. Start flashing... The utility then updates the corrupted... displays the following message and automatically checks the floppy disk for this motherboard. Checking for the original or updated BIOS file. Starting BIOS recovery... Doing so can cause system boot failure! 4. Visit the ASUS website (www.asus.com) to the optical drive. 3. ASUS P5SD2-X SE 2-7

Motherboard Installation Guide
Page 52
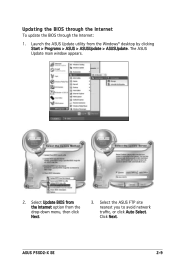
...for the Utilities screen menu. 3. 2.1.5 ASUS Update utility The ASUS Update is available in the support CD that allows you to manage, save, and update the motherboard BIOS in the optical drive. Installing ASUS Update To install ASUS Update: 1. Quit all Windows® ...BIOS file • Download the latest BIOS file from the Internet • Update the BIOS from an updated BIOS file • Update the BIOS directly from the Internet, and • View the BIOS version information. The ASUS Update utility allows you update the BIOS using this utility. 2-8 Chapter 2: BIOS setup ASUS...
...for the Utilities screen menu. 3. 2.1.5 ASUS Update utility The ASUS Update is available in the support CD that allows you to manage, save, and update the motherboard BIOS in the optical drive. Installing ASUS Update To install ASUS Update: 1. Quit all Windows® ...BIOS file • Download the latest BIOS file from the Internet • Update the BIOS from an updated BIOS file • Update the BIOS directly from the Internet, and • View the BIOS version information. The ASUS Update utility allows you update the BIOS using this utility. 2-8 Chapter 2: BIOS setup ASUS...
Motherboard Installation Guide
Page 53
Select Update BIOS from the Internet option from the Windows® desktop by clicking Start > Programs > ASUS > ASUSUpdate > ASUSUpdate. Click Next. Updating the BIOS through the Internet To update the BIOS through the Internet: 1. The ASUS Update main window appears. 2. ASUS P5SD2-X SE 2-9 Select the ASUS FTP site nearest you to avoid network traffic, or click Auto Select. Launch the ASUS Update utility from the drop-down menu, then click Next. 3.
Select Update BIOS from the Internet option from the Windows® desktop by clicking Start > Programs > ASUS > ASUSUpdate > ASUSUpdate. Click Next. Updating the BIOS through the Internet To update the BIOS through the Internet: 1. The ASUS Update main window appears. 2. ASUS P5SD2-X SE 2-9 Select the ASUS FTP site nearest you to avoid network traffic, or click Auto Select. Launch the ASUS Update utility from the drop-down menu, then click Next. 3.
Motherboard Installation Guide
Page 54
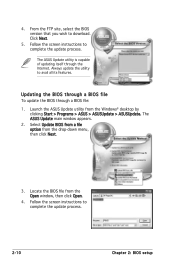
...® desktop by clicking Start > Programs > ASUS > ASUSUpdate > ASUSUpdate. The ASUS Update utility is capable of updating itself through a BIOS file: 1. Locate the BIOS file from the Open window, then click Open. 4. Click Next. 5. The ASUS Update main window appears. 2. Updating the BIOS through a BIOS file To update the BIOS through the Internet. Always update the...
...® desktop by clicking Start > Programs > ASUS > ASUSUpdate > ASUSUpdate. The ASUS Update utility is capable of updating itself through a BIOS file: 1. Locate the BIOS file from the Open window, then click Open. 4. Click Next. 5. The ASUS Update main window appears. 2. Updating the BIOS through a BIOS file To update the BIOS through the Internet. Always update the...
Motherboard Installation Guide
Page 55
...to reconfigure your system using the BIOS Setup program so that you are installing a motherboard, reconfiguring your selections from the available options using this motherboard apply for this utility. Do this motherboard. ASUS P5SD2-X SE 2-11 Press during the Power-On Self...-Test (POST) to download the latest BIOS file for this last option only if the first two failed. Even...
...to reconfigure your system using the BIOS Setup program so that you are installing a motherboard, reconfiguring your selections from the available options using this motherboard apply for this utility. Do this motherboard. ASUS P5SD2-X SE 2-11 Press during the Power-On Self...-Test (POST) to download the latest BIOS file for this last option only if the first two failed. Even...
Motherboard Installation Guide
Page 56
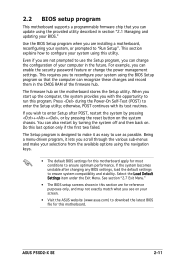
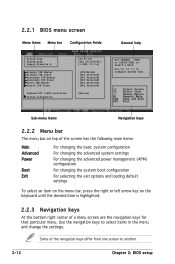
2.2.1 BIOS menu screen Menu items Menu bar Configuration fields General help System Time System Date Legacy Diskette A Primary IDE Master Primary IDE Slave Secondary IDE Master ... At the bottom right corner of the navigation keys differ from one screen to configure System Time. Use [+] or [-] to another. 2-12 Chapter 2: BIOS setup
2.2.1 BIOS menu screen Menu items Menu bar Configuration fields General help System Time System Date Legacy Diskette A Primary IDE Master Primary IDE Slave Secondary IDE Master ... At the bottom right corner of the navigation keys differ from one screen to configure System Time. Use [+] or [-] to another. 2-12 Chapter 2: BIOS setup
Motherboard Installation Guide
Page 58
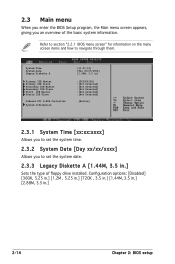
... IDE Slave Third IDE Master Fourth IDE Slave OnBoard PCI S-ATA Controller System Information [11:51:19] [Thu 05/07/2004] [1.44M, 3.5 in .] 2-14 Chapter 2: BIOS setup Configuration options: [Disabled] [360K, 5.25 in.] [1.2M , 5.25 in.] [720K , 3.5 in.] [1.44M, 3.5 in.] [2.88M, 3.5 in ] :[...Not Detected] :[Not Detected] :[Not Detected] [Native] 2.3.1 System Time [xx:xx:xxxx] Allows you to navigate through them. Refer to section "2.2.1 BIOS menu screen" for information on the menu screen items and how to set the system date. 2.3.3 Legacy Diskette A [1.44M, 3.5 in.] Sets the type...
... IDE Slave Third IDE Master Fourth IDE Slave OnBoard PCI S-ATA Controller System Information [11:51:19] [Thu 05/07/2004] [1.44M, 3.5 in .] 2-14 Chapter 2: BIOS setup Configuration options: [Disabled] [360K, 5.25 in.] [1.2M , 5.25 in.] [720K , 3.5 in.] [1.44M, 3.5 in.] [2.88M, 3.5 in ] :[...Not Detected] :[Not Detected] :[Not Detected] [Native] 2.3.1 System Time [xx:xx:xxxx] Allows you to navigate through them. Refer to section "2.2.1 BIOS menu screen" for information on the menu screen items and how to set the system date. 2.3.3 Legacy Diskette A [1.44M, 3.5 in.] Sets the type...


