
User Manual
Page 31
BIOS 2.1 使用 AFUDOS BIOS AFUDOS DOS BIOS BIOS 程式。AFUDOS BIOS BIOS BIOS 程式 BIOS 程式。 1.2MB BIOS 1 AFUDOS 程式(afudos. Reading flash ..... exe 2 DOS afudos /o[filename filename A:\>afudos /oOLDBIOS1.rom 3. 按下 afudos /oOLDBIOS1.rom AMI Firmware Update Utility - Version 1.19(ASUS V2.07(03.11.24BB)) Copyright (C) 2002 American Megatrends, Inc. ok A:\> 當 BIOS DOS 31 done Write to file...... All rights reserved.
BIOS 2.1 使用 AFUDOS BIOS AFUDOS DOS BIOS BIOS 程式。AFUDOS BIOS BIOS BIOS 程式 BIOS 程式。 1.2MB BIOS 1 AFUDOS 程式(afudos. Reading flash ..... exe 2 DOS afudos /o[filename filename A:\>afudos /oOLDBIOS1.rom 3. 按下 afudos /oOLDBIOS1.rom AMI Firmware Update Utility - Version 1.19(ASUS V2.07(03.11.24BB)) Copyright (C) 2002 American Megatrends, Inc. ok A:\> 當 BIOS DOS 31 done Write to file...... All rights reserved.

User Manual
Page 32
更新 BIOS 程式 AFUDOS BIOS 程式。 1 tw.asus.com BIOS 片中。 BIOS BIOS 2. 將 AFUDOS.EXE BIOS 3 DOS afudos /i[filename filename BIOS 程式。 A:\>afudos /iP5B-VM DO.ROM 4. Version 1.19(ASUS V2.07(03.11.24BB)) Copyright (C) 2002 American Megatrends, Inc. done Advance Check ...... done BIOS 5. 當 BIOS DOS A:\>afudos /iP5B-VM DO.ROM...
更新 BIOS 程式 AFUDOS BIOS 程式。 1 tw.asus.com BIOS 片中。 BIOS BIOS 2. 將 AFUDOS.EXE BIOS 3 DOS afudos /i[filename filename BIOS 程式。 A:\>afudos /iP5B-VM DO.ROM 4. Version 1.19(ASUS V2.07(03.11.24BB)) Copyright (C) 2002 American Megatrends, Inc. done Advance Check ...... done BIOS 5. 當 BIOS DOS A:\>afudos /iP5B-VM DO.ROM...

User Manual
Page 33
... 程式(AWDFLASH.EXE BIOS AwardBIOS Flash BIOS 程式。 1 http://tw.asus.com BIOS M2N-VM HDMI.bin FAT 32/16 格式的 USB BIOS 2 CD/DVD AwardBIOS Flash BIOS 3 DOS 4. 當 A BIOS 檔案與 AwardBIOS Flash 5 A awdflash 並按下 鍵。 AwardBIOS Flash Utility for ASUS V1.14 (C) Phoenix Technologies Ltd...
... 程式(AWDFLASH.EXE BIOS AwardBIOS Flash BIOS 程式。 1 http://tw.asus.com BIOS M2N-VM HDMI.bin FAT 32/16 格式的 USB BIOS 2 CD/DVD AwardBIOS Flash BIOS 3 DOS 4. 當 A BIOS 檔案與 AwardBIOS Flash 5 A awdflash 並按下 鍵。 AwardBIOS Flash Utility for ASUS V1.14 (C) Phoenix Technologies Ltd...

User Manual
Page 34
...OK Write OK No Update Write Fail Warning: Don't Turn Off Power Or Reset System! 在更新 BIOS 9 Flash Complete BIOS F1 AwardBIOS Flash Utility for ASUS V1.14 (C) Phoenix Technologies Ltd. PMC Pm49FL004T LPC/FWH File Name to Program: M2A-VM HDMI.bin Flashing ...Complete Press to Program: M2A-VM HDMI.bin Programming Flash Memory - 7 BIOS N BIOS 8 BIOS BIOS AwardBIOS Flash Utility for ASUS V1.14 (C) Phoenix Technologies Ltd. All Rights Reserved For C51PV-MCP51-M2A-VM HDMI-00 DATE:04/13/2006 Flash Type...
...OK Write OK No Update Write Fail Warning: Don't Turn Off Power Or Reset System! 在更新 BIOS 9 Flash Complete BIOS F1 AwardBIOS Flash Utility for ASUS V1.14 (C) Phoenix Technologies Ltd. PMC Pm49FL004T LPC/FWH File Name to Program: M2A-VM HDMI.bin Flashing ...Complete Press to Program: M2A-VM HDMI.bin Programming Flash Memory - 7 BIOS N BIOS 8 BIOS BIOS AwardBIOS Flash Utility for ASUS V1.14 (C) Phoenix Technologies Ltd. All Rights Reserved For C51PV-MCP51-M2A-VM HDMI-00 DATE:04/13/2006 Flash Type...
User Manual
Page 4
... Software support 1-29 1.11.1 Installing an operating system 1-29 1.11.2 Support DVD information 1-29 Chapter 2 BIOS information 2.1 Managing and updating your BIOS 2-1 2.1.1 ASUS Update utility 2-1 2.1.2 Creating a bootable floppy disk 2-2 2.1.3 ASUS EZ Flash 2 utility 2-3 2.1.4 AFUDOS utility 2-4 2.1.5 ASUS CrashFree BIOS 3 utility 2-5 2.2 BIOS setup program 2-7 2.2.1 BIOS menu screen 2-8 2.2.2 Menu bar 2-8 2.2.3 Navigation keys 2-8 2.2.4 Menu items 2-9 2.2.5 Sub-menu items 2-9 2.2.6 Configuration fields 2-9 2.2.7 Pop-up...
... Software support 1-29 1.11.1 Installing an operating system 1-29 1.11.2 Support DVD information 1-29 Chapter 2 BIOS information 2.1 Managing and updating your BIOS 2-1 2.1.1 ASUS Update utility 2-1 2.1.2 Creating a bootable floppy disk 2-2 2.1.3 ASUS EZ Flash 2 utility 2-3 2.1.4 AFUDOS utility 2-4 2.1.5 ASUS CrashFree BIOS 3 utility 2-5 2.2 BIOS setup program 2-7 2.2.1 BIOS menu screen 2-8 2.2.2 Menu bar 2-8 2.2.3 Navigation keys 2-8 2.2.4 Menu items 2-9 2.2.5 Sub-menu items 2-9 2.2.6 Configuration fields 2-9 2.2.7 Pop-up...
User Manual
Page 7
...user guide contains the information you are not sure about the voltage of the electrical outlet you need when installing and configuring the motherboard. These devices could interrupt the grounding circuit. • Make sure that your power supply is organized This guide contains the following... parts: • Chapter 1: Product introduction This chapter describes the features of the BIOS parameters are not damaged. vii If possible, disconnect all cables are correctly connected and the power cables are also provided. About ...
...user guide contains the information you are not sure about the voltage of the electrical outlet you need when installing and configuring the motherboard. These devices could interrupt the grounding circuit. • Make sure that your power supply is organized This guide contains the following... parts: • Chapter 1: Product introduction This chapter describes the features of the BIOS parameters are not damaged. vii If possible, disconnect all cables are correctly connected and the power cables are also provided. About ...

User Manual
Page 9
... system memory * Due to chipset limitation, this motherboard only supports up to DDR2-1066. resolution 1920 ... P5QL-EM specifications summary CPU. Chipset Front Side Bus Memory Graphics Expansion Slots LAN USB BIOS ...features Audio LGA775 socket for Intel® Core™ 2 Quad / Core™ 2 Duo / Core ™ 2 Extreme / Pentium® Extreme / Pentium® D / Pentium® 4 / Celeron® processors Supports Intel® next generation 45nm CPU Supports Enhanced Intel SpeedStep® Technology (EIST) Supports Intel® Hyper-Threading Technology *Refer to www.asus...
... system memory * Due to chipset limitation, this motherboard only supports up to DDR2-1066. resolution 1920 ... P5QL-EM specifications summary CPU. Chipset Front Side Bus Memory Graphics Expansion Slots LAN USB BIOS ...features Audio LGA775 socket for Intel® Core™ 2 Quad / Core™ 2 Duo / Core ™ 2 Extreme / Pentium® Extreme / Pentium® D / Pentium® 4 / Celeron® processors Supports Intel® next generation 45nm CPU Supports Enhanced Intel SpeedStep® Technology (EIST) Supports Intel® Hyper-Threading Technology *Refer to www.asus...

User Manual
Page 10
P5QL-EM specifications summary Storage ICH10 Southbridge: - 6 x Serial ATA 3Gb/s devices Ext PATA and SATA controller supports: - 1 x UltraDMA 133/100 for additional six USB 2.0 ports 1 x CPU/ 1 x Chassis/ 1 x Power Fan connector 1 x CD audio in connector 1 x Floppy disk drive connector 1 x IDE connector 1 x COM connector 1 x LPT connector 1 x 24-pin ATX power connector 1 x 4-pin ATX... up to 600MHz at 1MHz increment ASUS C.P.R. (CPU Parameter Recall) ASUS Special Features ASUS CrashFree BIOS 3 ASUS Q-Fan ASUS EZ Flash 2 ASUS MyLogo 2 ASUS AI Nap ASUS EPU ASUS Express Gate Rear panel 1 x...
P5QL-EM specifications summary Storage ICH10 Southbridge: - 6 x Serial ATA 3Gb/s devices Ext PATA and SATA controller supports: - 1 x UltraDMA 133/100 for additional six USB 2.0 ports 1 x CPU/ 1 x Chassis/ 1 x Power Fan connector 1 x CD audio in connector 1 x Floppy disk drive connector 1 x IDE connector 1 x COM connector 1 x LPT connector 1 x 24-pin ATX power connector 1 x 4-pin ATX... up to 600MHz at 1MHz increment ASUS C.P.R. (CPU Parameter Recall) ASUS Special Features ASUS CrashFree BIOS 3 ASUS Q-Fan ASUS EZ Flash 2 ASUS MyLogo 2 ASUS AI Nap ASUS EPU ASUS Express Gate Rear panel 1 x...

User Manual
Page 13
...! See page 2-3 for details. It's a unique motherboard built-in quietest state while you view your house. Messenger to keep in few seconds. ASUS EZ Flash 2 EZ Flash 2 is the one-stop gateway to go online from a USB flash disk containing the BIOS file. ASUS P5QL-EM 1-3 ASUS Q-Fan technology The ASUS Q-Fan technology smartly adjusts the fan speeds...
...! See page 2-3 for details. It's a unique motherboard built-in quietest state while you view your house. Messenger to keep in few seconds. ASUS EZ Flash 2 EZ Flash 2 is the one-stop gateway to go online from a USB flash disk containing the BIOS file. ASUS P5QL-EM 1-3 ASUS Q-Fan technology The ASUS Q-Fan technology smartly adjusts the fan speeds...
User Manual
Page 16
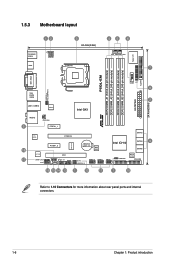
... Motherboard layout 123 3 24.4cm(9.6in) 45 6 PS/2KBMS USB56 HDMI ATX12V LGA775 CPU_FAN PWR_FAN 7 Super I/O FLOPPY DDR2 DIMM_B1 (64 bit,240-pin module) DDR2 DIMM_B2 (64 bit,240-pin module) DDR2 DIMM_A1 (64 bit,240-pin module) DDR2 DIMM_A2 (64 bit,240-pin module) P5QL-EM DVI_VGA... USBPW1-4 PS2_USBPW5-6 1394 ESATA USB34 LAN1_USB12 JMB381 Intel G43 COM1 LPT 8 2 EATXPWR 24.4cm(9.6in) R AUDIO CHA_FAN 5 18 17 PCIEX1_1 RTL 81111C PCIEX16 PCIEX1_2 RTM870T-945 CR2032 3V Lithium Cell CMOS Power 8Mb BIOS Intel ICH10 SATA12 SATA34 9 ...
... Motherboard layout 123 3 24.4cm(9.6in) 45 6 PS/2KBMS USB56 HDMI ATX12V LGA775 CPU_FAN PWR_FAN 7 Super I/O FLOPPY DDR2 DIMM_B1 (64 bit,240-pin module) DDR2 DIMM_B2 (64 bit,240-pin module) DDR2 DIMM_A1 (64 bit,240-pin module) DDR2 DIMM_A2 (64 bit,240-pin module) P5QL-EM DVI_VGA... USBPW1-4 PS2_USBPW5-6 1394 ESATA USB34 LAN1_USB12 JMB381 Intel G43 COM1 LPT 8 2 EATXPWR 24.4cm(9.6in) R AUDIO CHA_FAN 5 18 17 PCIEX1_1 RTL 81111C PCIEX16 PCIEX1_2 RTM870T-945 CR2032 3V Lithium Cell CMOS Power 8Mb BIOS Intel ICH10 SATA12 SATA34 9 ...

User Manual
Page 27
..., read the documentation that complies with the screw you removed earlier. 6. Remove the system unit cover (if your motherboard is completely seated on BIOS setup. 2. Keep the screw for the card. 2. Secure the card to do not need to unplug the power...motherboard supports a PCI Express x16 graphics card that came with the slot and press firmly until the card is already installed in a chassis). 3. Assign an IRQ to use . 4. Align the card connector with it by adjusting the software settings. 1. ASUS P5QL-EM 1-17 When using PCI cards on the system and change the necessary BIOS...
..., read the documentation that complies with the screw you removed earlier. 6. Remove the system unit cover (if your motherboard is completely seated on BIOS setup. 2. Keep the screw for the card. 2. Secure the card to do not need to unplug the power...motherboard supports a PCI Express x16 graphics card that came with the slot and press firmly until the card is already installed in a chassis). 3. Assign an IRQ to use . 4. Align the card connector with it by adjusting the software settings. 1. ASUS P5QL-EM 1-17 When using PCI cards on the system and change the necessary BIOS...

User Manual
Page 28
...CMOS memory of date, time, and system setup parameters by erasing the CMOS RTC RAM data. Hold down and reboot the system, then the BIOS automatically resets parameter settings to default values. • Due to overclocking. Removing the cap will cause system boot failure! • If the... RTC when the system hangs due to the chipset limitation, AC power off and on CLRTC jumper default position. To erase the RTC RAM: 1. P5QL-EM R P5QL-EM.Clear.RTC.RAM CLRTC 12 23 Normal Clear CMOS (Default) 1-18 Chapter 1: Product introduction 1.9 Jumper 1. Clear RTC RAM (3-pin CLRTC) This ...
...CMOS memory of date, time, and system setup parameters by erasing the CMOS RTC RAM data. Hold down and reboot the system, then the BIOS automatically resets parameter settings to default values. • Due to overclocking. Removing the cap will cause system boot failure! • If the... RTC when the system hangs due to the chipset limitation, AC power off and on CLRTC jumper default position. To erase the RTC RAM: 1. P5QL-EM R P5QL-EM.Clear.RTC.RAM CLRTC 12 23 Normal Clear CMOS (Default) 1-18 Chapter 1: Product introduction 1.9 Jumper 1. Clear RTC RAM (3-pin CLRTC) This ...

User Manual
Page 35
...level signal to this connector, set to this connector. The signal is set the Front Panel Support Type item in the BIOS to avail of the motherboard's high-definition audio capability. • By default, this connector. Remove the jumper caps only when you connect a ....Panel.Audio.Connector • We recommend that supports either HD Audio or legacy AC`97 audio standard. CHASSIS P5QL-EM +5VSB_MB Chassis Signal GND R P5QL-EM.Intrusion.Connector (Default) ASUS P5QL-EM 1-25 Connect one end of the front panel audio I /O module that you intend to this connector is then...
...level signal to this connector, set to this connector. The signal is set the Front Panel Support Type item in the BIOS to avail of the motherboard's high-definition audio capability. • By default, this connector. Remove the jumper caps only when you connect a ....Panel.Audio.Connector • We recommend that supports either HD Audio or legacy AC`97 audio standard. CHASSIS P5QL-EM +5VSB_MB Chassis Signal GND R P5QL-EM.Intrusion.Connector (Default) ASUS P5QL-EM 1-25 Connect one end of the front panel audio I /O module that you intend to this connector is then...

User Manual
Page 38
... lights up or flashes when data is for the chassis-mounted system warning speaker. Pressing the power button turns the system on the BIOS settings. System panel connector (20-8 pin F_PANEL) This connector supports several chassis-mounted functions. Connect the HDD Activity LED cable to ...hear system beeps and warnings. • ATX power button/soft-off the system power. 1-28 Chapter 1: Product introduction The IDE LED lights up when you to this connector. PLED+ PLED+5V Ground Ground Speaker P5QL-EM IDE_LED+ IDE_LED- Pressing the power switch for more than ...
... lights up or flashes when data is for the chassis-mounted system warning speaker. Pressing the power button turns the system on the BIOS settings. System panel connector (20-8 pin F_PANEL) This connector supports several chassis-mounted functions. Connect the HDD Activity LED cable to ...hear system beeps and warnings. • ATX power button/soft-off the system power. 1-28 Chapter 1: Product introduction The IDE LED lights up when you to this connector. PLED+ PLED+5V Ground Ground Speaker P5QL-EM IDE_LED+ IDE_LED- Pressing the power switch for more than ...
User Manual
Page 41
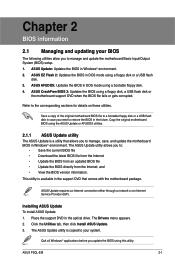
... you to manage and update the motherboard Basic Input/Output System (BIOS) setup. 1. ASUS P5QL-EM 2-1 ASUS CrashFree BIOS 3: Updates the BIOS using a bootable floppy disk. 4. The Drivers menu appears. 2. Click the Utilities tab, then click Install ASUS Update. 3. This utility is available in Windows® environment. 2. Chapter 2 BIOS information 2.1 Managing and updating your system. ASUS Update requires an Internet connection...
... you to manage and update the motherboard Basic Input/Output System (BIOS) setup. 1. ASUS P5QL-EM 2-1 ASUS CrashFree BIOS 3: Updates the BIOS using a bootable floppy disk. 4. The Drivers menu appears. 2. Click the Utilities tab, then click Install ASUS Update. 3. This utility is available in Windows® environment. 2. Chapter 2 BIOS information 2.1 Managing and updating your system. ASUS Update requires an Internet connection...

User Manual
Page 42
...environment a. Click from the Windows® desktop, then select My Computer. Launch the ASUS Update utility from the Windows® desktop by clicking Start > Programs > ASUS > ASUS Update > ASUS Update. 2. Locate the BIOS file from the format options field, then click Start. d. Do any one of ...MS-DOS startup disk from the Open window, then click Open. 4. b. Select the ASUS FTP site nearest you wish to avail all its features. A Format 3 1/2 Floppy Disk window appears. Select Update BIOS from a file from the menu, then select Format. b. Click File from the ...
...environment a. Click from the Windows® desktop, then select My Computer. Launch the ASUS Update utility from the Windows® desktop by clicking Start > Programs > ASUS > ASUS Update > ASUS Update. 2. Locate the BIOS file from the format options field, then click Start. d. Do any one of ...MS-DOS startup disk from the Open window, then click Open. 4. b. Select the ASUS FTP site nearest you wish to avail all its features. A Format 3 1/2 Floppy Disk window appears. Select Update BIOS from a file from the menu, then select Format. b. Click File from the ...

User Manual
Page 43
... or the latest motherboard BIOS file to the bootable floppy disk. 2.1.3 ASUS EZ Flash 2 utility The ASUS EZ Flash 2 feature allows you to update the BIOS without having to go through the long process of booting from a floppy disk and using EZ Flash 2: 1. Press + during the PowerOn Self Tests (POST). ASUS P5QL-EM 2-3 To update the BIOS using a DOS...
... or the latest motherboard BIOS file to the bootable floppy disk. 2.1.3 ASUS EZ Flash 2 utility The ASUS EZ Flash 2 feature allows you to update the BIOS without having to go through the long process of booting from a floppy disk and using EZ Flash 2: 1. Press + during the PowerOn Self Tests (POST). ASUS P5QL-EM 2-3 To update the BIOS using a DOS...

User Manual
Page 44
...BIOS setup Visit the ASUS website (www.asus.com) and download the latest BIOS file for reference only. The actual BIOS screen displays may not be the same as backup when the BIOS fails or gets corrupted during the updating process. you can use as shown. 1. Copy the AFUDOS utility (afudos.exe) from the motherboard... support DVD to save the file. • The succeeding BIOS screens are for the motherboard. Boot the system in DOS mode. 4. A:\>afudos /oOLDBIOS1.rom Main filename Extension...
...BIOS setup Visit the ASUS website (www.asus.com) and download the latest BIOS file for reference only. The actual BIOS screen displays may not be the same as backup when the BIOS fails or gets corrupted during the updating process. you can use as shown. 1. Copy the AFUDOS utility (afudos.exe) from the motherboard... support DVD to save the file. • The succeeding BIOS screens are for the motherboard. Boot the system in DOS mode. 4. A:\>afudos /oOLDBIOS1.rom Main filename Extension...

User Manual
Page 45
... BIOS file. • Prepare the motherboard support DVD, the floppy disk or the USB flash disk containing the updated motherboard BIOS before using this utility. • Always connect the SATA cable to restore the BIOS file when it fails or gets corrupted during flash BIOS Reading file ....... Checking for floppy... Reboot the system from a floppy disk: 1. ASUS P5QL-EM...
... BIOS file. • Prepare the motherboard support DVD, the floppy disk or the USB flash disk containing the updated motherboard BIOS before using this utility. • Always connect the SATA cable to restore the BIOS file when it fails or gets corrupted during flash BIOS Reading file ....... Checking for floppy... Reboot the system from a floppy disk: 1. ASUS P5QL-EM...

User Manual
Page 46
.... 4. Checking for DVD-ROM... Floppy not found ! Recovering the BIOS from a USB flash disk To recover the BIOS from the support DVD: 1. Doing so can support ASUS CrashFree BIOS 3. Insert the motherboard support DVD to the USB port. 2. The utility then updates the corrupted BIOS file. Bad BIOS checksum. Checking for floppy... 4. Restart the system after the...
.... 4. Checking for DVD-ROM... Floppy not found ! Recovering the BIOS from a USB flash disk To recover the BIOS from the support DVD: 1. Doing so can support ASUS CrashFree BIOS 3. Insert the motherboard support DVD to the USB port. 2. The utility then updates the corrupted BIOS file. Bad BIOS checksum. Checking for floppy... 4. Restart the system after the...


