User Manual
Page 4
... setup 3.1 Managing and updating your BIOS 3-1 3.1.1 ASUS Update utility 3-1 3.1.2 ASUS EZ Flash 2 utility 3-4 3.1.3 AFUDOS utility 3-5 3.2 BIOS setup program 3-7 3.2.1 BIOS menu screen 3-8 3.2.2 Menu bar 3-8 3.2.3 Navigation keys 3-8 3.2.4 Menu items 3-9 3.2.5 Sub-menu items 3-9 3.2.6 Configuration fields 3-9 3.2.7 Pop-up window 3-9 3.2.8 Scroll bar 3-9 3.2.9 General help 3-9 3.3 Main menu 3-10 3.3.1 System Time 3-10 3.3.2 System Date 3-10 3.3.3 Legacy Diskette A 3-10 3.3.4 Language 3-10 3.3.5 SATA 1-6 3-11 3.3.6 Storage Configuration 3-12...
... setup 3.1 Managing and updating your BIOS 3-1 3.1.1 ASUS Update utility 3-1 3.1.2 ASUS EZ Flash 2 utility 3-4 3.1.3 AFUDOS utility 3-5 3.2 BIOS setup program 3-7 3.2.1 BIOS menu screen 3-8 3.2.2 Menu bar 3-8 3.2.3 Navigation keys 3-8 3.2.4 Menu items 3-9 3.2.5 Sub-menu items 3-9 3.2.6 Configuration fields 3-9 3.2.7 Pop-up window 3-9 3.2.8 Scroll bar 3-9 3.2.9 General help 3-9 3.3 Main menu 3-10 3.3.1 System Time 3-10 3.3.2 System Date 3-10 3.3.3 Legacy Diskette A 3-10 3.3.4 Language 3-10 3.3.5 SATA 1-6 3-11 3.3.6 Storage Configuration 3-12...
User Manual
Page 39
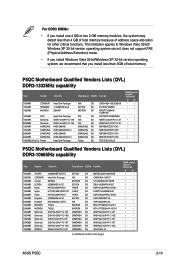
... space allocation for other critical functions. This limitation applies to Windows Vista 32-bit/ Windows XP 32-bit version operating system since it does not support PAE (...10 (continued on the next page) DIMM socket support (Optional) A* B* • • • • • • • • • • • • • • • • • • • • • • • • • • • • • • • • • • ASUS P5QC 2-13 P5QC Motherboard...
... space allocation for other critical functions. This limitation applies to Windows Vista 32-bit/ Windows XP 32-bit version operating system since it does not support PAE (...10 (continued on the next page) DIMM socket support (Optional) A* B* • • • • • • • • • • • • • • • • • • • • • • • • • • • • • • • • • • ASUS P5QC 2-13 P5QC Motherboard...
User Manual
Page 54
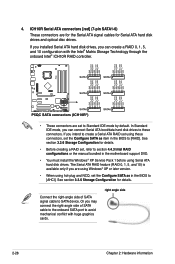
... cables for details. right angle side 2-28 Chapter 2: Hardware information ICH10R Serial ATA connectors [red] (7-pin SATA1-6) These connectors are using Windows® XP or later version. • When using hot-plug and NCQ, set the Configure SATA as in the BIOS to these connectors..., set the Configure SATA as item in the motherboard support DVD. • You must install the Windows® XP Service Pack 1 before using these connectors. Or you can create a RAID 0, 1, 5, and 10 configuration with huge graphics cards. If you can connect Serial ATA ...
... cables for details. right angle side 2-28 Chapter 2: Hardware information ICH10R Serial ATA connectors [red] (7-pin SATA1-6) These connectors are using Windows® XP or later version. • When using hot-plug and NCQ, set the Configure SATA as in the BIOS to these connectors..., set the Configure SATA as item in the motherboard support DVD. • You must install the Windows® XP Service Pack 1 before using these connectors. Or you can create a RAID 0, 1, 5, and 10 configuration with huge graphics cards. If you can connect Serial ATA ...

User Manual
Page 106
... any personal information stored by the web browser (bookmarks, cookies, browsing history, etc.). Configuration options: [Enabled] [Disabled] Enter OS Timer [10 Seconds] Sets countdown duration that the user data will run again when you enter the Express Gate environment after clearing its settings. 3-38 Chapter ... setting this item to [Reset], make sure to save the setting to stay at the Express Gate's first screen before starting Windows or other installed OS. 3.8.4 Express Gate Allows you to section 4.3.12 ASUS Express GATE SSD for user action. Refer to enable or disable the...
... any personal information stored by the web browser (bookmarks, cookies, browsing history, etc.). Configuration options: [Enabled] [Disabled] Enter OS Timer [10 Seconds] Sets countdown duration that the user data will run again when you enter the Express Gate environment after clearing its settings. 3-38 Chapter ... setting this item to [Reset], make sure to save the setting to stay at the Express Gate's first screen before starting Windows or other installed OS. 3.8.4 Express Gate Allows you to section 4.3.12 ASUS Express GATE SSD for user action. Refer to enable or disable the...
User Manual
Page 122
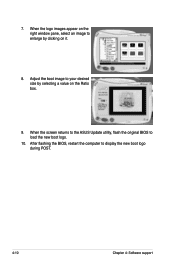
7. When the logo images appear on the right window pane, select an image to your desired size by clicking on the Ratio box. 9. Adjust the boot image to enlarge by selecting a value on it. 8. When the screen returns to the ASUS Update utility, flash the original BIOS to display the new boot logo during POST. 4-10 Chapter 4: Software support After flashing the BIOS, restart the computer to load the new boot logo. 10.
7. When the logo images appear on the right window pane, select an image to your desired size by clicking on the Ratio box. 9. Adjust the boot image to enlarge by selecting a value on it. 8. When the screen returns to the ASUS Update utility, flash the original BIOS to display the new boot logo during POST. 4-10 Chapter 4: Software support After flashing the BIOS, restart the computer to load the new boot logo. 10.

User Manual
Page 140
...ASUS AI Direct Link allows you set your firewall software other than Windows Firewall before launching AI Direct Link. • The transfer rate is recommended that you to form a computer-to-computer network via a network cable to enable the incoming folder. 2. For security's sake, it is limited if you use a 10...disable the incoming folder, select Incoming folder > Disable incoming folder. 4-28 Chapter 4: Software support For Windows XP Home edition users, click Steps of them is ASUS product) using a network cable, and then install the utility to both computers to avail the AI ...
...ASUS AI Direct Link allows you set your firewall software other than Windows Firewall before launching AI Direct Link. • The transfer rate is recommended that you to form a computer-to-computer network via a network cable to enable the incoming folder. 2. For security's sake, it is limited if you use a 10...disable the incoming folder, select Incoming folder > Disable incoming folder. 4-28 Chapter 4: Software support For Windows XP Home edition users, click Steps of them is ASUS product) using a network cable, and then install the utility to both computers to avail the AI ...
User Manual
Page 142
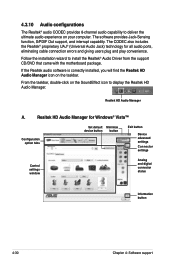
...10 Audio configurations The Realtek® audio CODEC provides 8-channel audio capability to deliver the ultimate audio experience on the taskbar. The CODEC also includes the Realtek® proprietary UAJ® (Universal Audio Jack) technology for Windows&#...tabs Set default Minimize device button button Exit button Device advanced settings Connector settings Control settings window Analog and digital connector status Information button 4-30 Chapter 4: Software support If the Realtek... from the support CD/DVD that came with the motherboard package. Realtek HD Audio Manager A.
...10 Audio configurations The Realtek® audio CODEC provides 8-channel audio capability to deliver the ultimate audio experience on the taskbar. The CODEC also includes the Realtek® proprietary UAJ® (Universal Audio Jack) technology for Windows&#...tabs Set default Minimize device button button Exit button Device advanced settings Connector settings Control settings window Analog and digital connector status Information button 4-30 Chapter 4: Software support If the Realtek... from the support CD/DVD that came with the motherboard package. Realtek HD Audio Manager A.

User Manual
Page 186
A.2.2 Using the EIST To use the EIST feature: 1. When the Display Properties window appears, click the Screen Saver tab. 7. Click Apply, then click OK. 10. Close the Display Properties window. A-2 Appendix: CPU features After the computer restarts, right click on a blank space on the operating system. On the Power schemes section, click , then select... loading is low. Go to save your changes and exit the BIOS setup. 5. Set the Intel(R) SpeedStep Technology item to open the Power Options Properties window. 8.
A.2.2 Using the EIST To use the EIST feature: 1. When the Display Properties window appears, click the Screen Saver tab. 7. Click Apply, then click OK. 10. Close the Display Properties window. A-2 Appendix: CPU features After the computer restarts, right click on a blank space on the operating system. On the Power schemes section, click , then select... loading is low. Go to save your changes and exit the BIOS setup. 5. Set the Intel(R) SpeedStep Technology item to open the Power Options Properties window. 8.

