
User Manual
Page 20
... high quality Japanese-made conductive polymer capacitors all add up to ensure longer component life and lower power loss - ASUS Power Saving Solution ASUS Power Saving solution intelligently and automatically provides balanced computing power and energy consumption. High quality power components such as low... The new EPU - ASUS 3rd Generation 8 Phase Power Design Longer Life, & Higher Efficiency! and optimizes the energy providing system in full detail." The new EPU's user-friendly UI AI Gear 4, also intelligently monitors the PC system status and displays the total power saved ...
... high quality Japanese-made conductive polymer capacitors all add up to ensure longer component life and lower power loss - ASUS Power Saving Solution ASUS Power Saving solution intelligently and automatically provides balanced computing power and energy consumption. High quality power components such as low... The new EPU - ASUS 3rd Generation 8 Phase Power Design Longer Life, & Higher Efficiency! and optimizes the energy providing system in full detail." The new EPU's user-friendly UI AI Gear 4, also intelligently monitors the PC system status and displays the total power saved ...

User Manual
Page 72
Visit the ASUS website (www.asus.com) to a floppy disk or a USB flash disk, then restart the system. 3. ASUSTek EZ Flash 2 BIOS ROM Utility V3.25 FLASH TYPE: WXIC 25L8005 Current ROM BOARD: P5QC VER: 0405 DATE: 05/20/2008 Update ROM BOARD: Unknown VER: Unknown DATE: Unknown PATH: A:\ A:...motherboard. 2. Press + during the Power-On Self Tests (POST). The EZ Flash 2 utility is accessible by two methods. (1) Insert the floppy disk / USB flash disk that contains the BIOS file to the floppy disk drive or the USB port. You can launch the EZ Flash 2 by pressing + during POST to display...
Visit the ASUS website (www.asus.com) to a floppy disk or a USB flash disk, then restart the system. 3. ASUSTek EZ Flash 2 BIOS ROM Utility V3.25 FLASH TYPE: WXIC 25L8005 Current ROM BOARD: P5QC VER: 0405 DATE: 05/20/2008 Update ROM BOARD: Unknown VER: Unknown DATE: Unknown PATH: A:\ A:...motherboard. 2. Press + during the Power-On Self Tests (POST). The EZ Flash 2 utility is accessible by two methods. (1) Insert the floppy disk / USB flash disk that contains the BIOS file to the floppy disk drive or the USB port. You can launch the EZ Flash 2 by pressing + during POST to display...

User Manual
Page 73
...using the AFUDOS utility: 1. A:\>afudos /oOLDBIOS1.rom AMI Firmware Update Utility - ASUS P5QC 3-5 Copying the current BIOS To copy the current BIOS file using the AFUDOS utility.... The utility copies the current BIOS file to file...... Visit the ASUS website (www.asus.com) and download the latest BIOS file for the motherboard. ok A:\> The utility returns to a bootable floppy disk. Copy the...for the main filename and three alphanumeric characters for reference only. The actual BIOS screen displays may not be same as backup when the BIOS fails or gets corrupted during the ...
...using the AFUDOS utility: 1. A:\>afudos /oOLDBIOS1.rom AMI Firmware Update Utility - ASUS P5QC 3-5 Copying the current BIOS To copy the current BIOS file using the AFUDOS utility.... The utility copies the current BIOS file to file...... Visit the ASUS website (www.asus.com) and download the latest BIOS file for the motherboard. ok A:\> The utility returns to a bootable floppy disk. Copy the...for the main filename and three alphanumeric characters for reference only. The actual BIOS screen displays may not be same as backup when the BIOS fails or gets corrupted during the ...

User Manual
Page 77
... can change the value of a field, select it then press to display a list of the selected item. Refer to 3.2.7 Pop-up window. 3.2.7 Pop-up window with the configuration options for the menu items. If an item is highlighted when selected. ASUS P5QC 3-9 A configurable field is enclosed in .] [English] [Not Detected] [Not Detected] [Not...
... can change the value of a field, select it then press to display a list of the selected item. Refer to 3.2.7 Pop-up window. 3.2.7 Pop-up window with the configuration options for the menu items. If an item is highlighted when selected. ASUS P5QC 3-9 A configurable field is enclosed in .] [English] [Not Detected] [Not Detected] [Not...

User Manual
Page 78
...;f�o�r�m�a�t�i�o�n� [11:55:25] [Tue 05/20/2008] [1.44M, 3.5 in .] 3.3.4 Language [English] Allows you to select the display language for information on the menu screen items and how to section 3.2.1 BIOS menu screen for the BIOS setup screen. Refer to navigate through them...
...;f�o�r�m�a�t�i�o�n� [11:55:25] [Tue 05/20/2008] [1.44M, 3.5 in .] 3.3.4 Language [English] Allows you to select the display language for information on the menu screen items and how to section 3.2.1 BIOS menu screen for the BIOS setup screen. Refer to navigate through them...

User Manual
Page 79
... of Serial ATA devices. Setting to display the SATA device information. Select [ARMD] (ATAPI Removable Media Device) if your device is installed in the system. Configuration options: [Not Installed] [Auto] [CDROM] [ARMD] LBA/Large Mode [Auto] Enables or disables the LBA mode. Configuration options: [Auto] [0] [1] [2] [3] [4] ASUS P5QC 3-11 These values are specifically configuring...
... of Serial ATA devices. Setting to display the SATA device information. Select [ARMD] (ATAPI Removable Media Device) if your device is installed in the system. Configuration options: [Not Installed] [Auto] [CDROM] [ARMD] LBA/Large Mode [Auto] Enables or disables the LBA mode. Configuration options: [Auto] [0] [1] [2] [3] [4] ASUS P5QC 3-11 These values are specifically configuring...

User Manual
Page 81
Congifuration options: [0] [5] [10] [15] [20] [25] [30] [35] AHCI Port1~6 [XXXX] Displays the status of auto-detection of devices connected to the system. Configration options: [Disabled] [Enabled] ASUS P5QC 3-13 This will be effective only if the device is the section for AHCI configuration. Main BIOS SETUP UTILITY AHCI Port1 Device :Not Detected SATA...
Congifuration options: [0] [5] [10] [15] [20] [25] [30] [35] AHCI Port1~6 [XXXX] Displays the status of auto-detection of devices connected to the system. Configration options: [Disabled] [Enabled] ASUS P5QC 3-13 This will be effective only if the device is the section for AHCI configuration. Main BIOS SETUP UTILITY AHCI Port1 Device :Not Detected SATA...
User Manual
Page 82
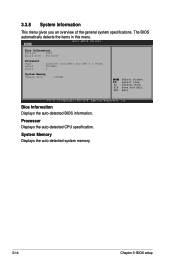
The BIOS automatically detects the items in this menu. Processor Displays the auto-detected CPU specification. Main BIOS SETUP UTILITY Bios Information Version : 0405 Build Date : 05/20/08 Processor Type : Intel(R) Core(TM)2 Duo CPU ...: 1024MB Select Screen Select Item F1 General Help F10 Save and Exit ESC Exit v02.61 (C)Copyright 1985-2008, American Megatrends, Inc. System Memory Displays the auto-detected system memory. 3-14 Chapter 3: BIOS setup 3.3.8 System Information This menu gives you an overview of the general system specifications. Bios Information...
The BIOS automatically detects the items in this menu. Processor Displays the auto-detected CPU specification. Main BIOS SETUP UTILITY Bios Information Version : 0405 Build Date : 05/20/08 Processor Type : Intel(R) Core(TM)2 Duo CPU ...: 1024MB Select Screen Select Item F1 General Help F10 Save and Exit ESC Exit v02.61 (C)Copyright 1985-2008, American Megatrends, Inc. System Memory Displays the auto-detected system memory. 3-14 Chapter 3: BIOS setup 3.3.8 System Information This menu gives you an overview of the general system specifications. Bios Information...

User Manual
Page 83
... [Auto] Ai Transaction Booster [Auto] Options Manual Auto Select Screen Select Item Enter Go to Sub Screen +- Scroll down to display the following items vary depending on the CPU and BIOS SETUP UTILITY Main Ai Tweaker Advanced Power Boot Tools Exit Configure System Performance Settings...frequency. Change Option F1 General Help F10 Save and Exit ESC Exit v02.61 (C)Copyright 1985-2008, American Megatrends, Inc. ASUS P5QC 3-15 Loads the optimal settings for the system. 3.4 Ai Tweaker menu The Ai Tweaker menu items allow you to individually set overclocking ...
... [Auto] Ai Transaction Booster [Auto] Options Manual Auto Select Screen Select Item Enter Go to Sub Screen +- Scroll down to display the following items vary depending on the CPU and BIOS SETUP UTILITY Main Ai Tweaker Advanced Power Boot Tools Exit Configure System Performance Settings...frequency. Change Option F1 General Help F10 Save and Exit ESC Exit v02.61 (C)Copyright 1985-2008, American Megatrends, Inc. ASUS P5QC 3-15 Loads the optimal settings for the system. 3.4 Ai Tweaker menu The Ai Tweaker menu items allow you to individually set overclocking ...
User Manual
Page 84
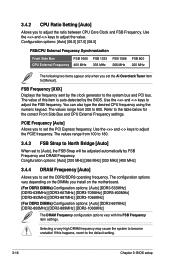
... 1066 CPU External Frequency 400 MHz 333 MHz 266 MHz FSB 800 200 MHz The following two items appear only when you install on the motherboard. (For DDR3 DIMMs) Configuration options: [Auto] [DDR3-533MHz] [DDR3-639MHz] [DDR3-667MHz] [DDR3-709MHz] [DDR3-800MHz] [DDR3-852MHz] [DDR3-887MHz] [DDR3-1066MHz] (For DDR2 DIMMs... to 800. Use the and keys to adjust the PCIE frequency. Use the and keys to the system bus and PCI bus. FSB Frequency [XXX] Displays the frequency sent by the BIOS. If this item is auto-detected by the clock generator to adjust the value.
... 1066 CPU External Frequency 400 MHz 333 MHz 266 MHz FSB 800 200 MHz The following two items appear only when you install on the motherboard. (For DDR3 DIMMs) Configuration options: [Auto] [DDR3-533MHz] [DDR3-639MHz] [DDR3-667MHz] [DDR3-709MHz] [DDR3-800MHz] [DDR3-852MHz] [DDR3-887MHz] [DDR3-1066MHz] (For DDR2 DIMMs... to 800. Use the and keys to adjust the PCIE frequency. Use the and keys to the system bus and PCI bus. FSB Frequency [XXX] Displays the frequency sent by the BIOS. If this item is auto-detected by the clock generator to adjust the value.
User Manual
Page 92
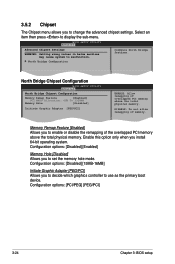
... graphics controller to malfunction. DISABLE: Do not allow remapping of memory. Configure North Bridge features. Configuration options: [Disabled] [Enabled] Memory Hole [Disabled] Allows you to display the sub-menu. Configuration options: [PCI/PEG] [PEG/PCI] 3-24 Chapter 3: BIOS setup Select an item then press to set the memory hole mode. North...
... graphics controller to malfunction. DISABLE: Do not allow remapping of memory. Configure North Bridge features. Configuration options: [Disabled] [Enabled] Memory Hole [Disabled] Allows you to display the sub-menu. Configuration options: [PCI/PEG] [PEG/PCI] 3-24 Chapter 3: BIOS setup Select an item then press to set the memory hole mode. North...

User Manual
Page 94
... USB device is detected, the item shows None. USB 2.0 Controller [Enabled] Allows you to change the USB-related features. Select an item then press to display the configuration options. Change Option F1 General Help F10 Save and Exit ESC Exit v02.61 (C)Copyright 1985-2008, American Megatrends, Inc. Configuration options: [Disabled...
... USB device is detected, the item shows None. USB 2.0 Controller [Enabled] Allows you to change the USB-related features. Select an item then press to display the configuration options. Change Option F1 General Help F10 Save and Exit ESC Exit v02.61 (C)Copyright 1985-2008, American Megatrends, Inc. Configuration options: [Disabled...
User Manual
Page 96
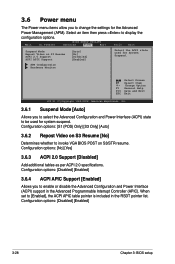
....61 (C)Copyright 1985-2008, American Megatrends, Inc. 3.6.1 Suspend Mode [Auto] Allows you to change the settings for the Advanced Power Management (APM). When set to display the configuration options. Configuration options: [Disabled] [Enabled] 3-28 Chapter 3: BIOS setup 3.6 Power menu The Power menu items allow you to select the Advanced Configuration and...
....61 (C)Copyright 1985-2008, American Megatrends, Inc. 3.6.1 Suspend Mode [Auto] Allows you to change the settings for the Advanced Power Management (APM). When set to display the configuration options. Configuration options: [Disabled] [Enabled] 3-28 Chapter 3: BIOS setup 3.6 Power menu The Power menu items allow you to select the Advanced Configuration and...

User Manual
Page 98
...(C)Copyright 1985-2008, American Megatrends, Inc. When set the appropriate performance level of the ASUS Q-Fan. Set this item to [Silent] to minimize fan speed for quiet CPU fan operation, or [Turbo] to display the detected temperatures. If the fan is not connected to [Standard], the CPU fan ...on the system. CPU Temperature [xxxºC/xxxºF] MB Temperature [xxxºC/xxxºF] The onboard hardware monitor automatically detects and displays the motherboard and CPU temperatures. This feature requires an ATX power supply that provides at least 1A on the +5VSB lead.
...(C)Copyright 1985-2008, American Megatrends, Inc. When set the appropriate performance level of the ASUS Q-Fan. Set this item to [Silent] to minimize fan speed for quiet CPU fan operation, or [Turbo] to display the detected temperatures. If the fan is not connected to [Standard], the CPU fan ...on the system. CPU Temperature [xxxºC/xxxºF] MB Temperature [xxxºC/xxxºF] The onboard hardware monitor automatically detects and displays the motherboard and CPU temperatures. This feature requires an ATX power supply that provides at least 1A on the +5VSB lead.

User Manual
Page 99
...] Allows you to set to the motherboard, the field shows [N/A]. Configuration options: [Standard] [Silent] [Turbo] Power Fan Speed [xxxxRPM] or [Ignored] / [N/A] The onboard hardware monitor automatically detects and displays the power fan speed in rotations per minute (RPM). ASUS P5QC 3-31 CPU Voltage, 3.3V Voltage,...: [Disabled] [Enabled] The following item appears only when you do not want to the motherboard, the field shows [N/A]. When set the appropriate performance level of the ASUS Q-Fan. If the fan is not connected to detect this item to [Silent] to minimize...
...] Allows you to set to the motherboard, the field shows [N/A]. Configuration options: [Standard] [Silent] [Turbo] Power Fan Speed [xxxxRPM] or [Ignored] / [N/A] The onboard hardware monitor automatically detects and displays the power fan speed in rotations per minute (RPM). ASUS P5QC 3-31 CPU Voltage, 3.3V Voltage,...: [Disabled] [Enabled] The following item appears only when you do not want to the motherboard, the field shows [N/A]. When set the appropriate performance level of the ASUS Q-Fan. If the fan is not connected to detect this item to [Silent] to minimize...

User Manual
Page 100
... the number of devices installed in the corresponding type menu. Boot Settings Configuration Security A virtual floppy disk drive (Floppy Drive B: ) may appear when you to display the sub-menu. A device enclosed in parenthesis has been disabled in the system. Select Screen Select Item +- Select an item then press to change the...
... the number of devices installed in the corresponding type menu. Boot Settings Configuration Security A virtual floppy disk drive (Floppy Drive B: ) may appear when you to display the sub-menu. A device enclosed in parenthesis has been disabled in the system. Select Screen Select Item +- Select an item then press to change the...
User Manual
Page 101
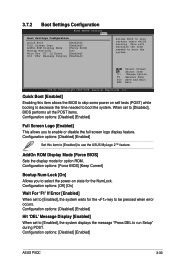
... Screen Select Item +- Configuration options: [Off] [On] Wait For 'F1' If Error [Enabled] When set to [Enabled], the system displays the message "Press DEL to boot the system. Configuration options: [Disabled] [Enabled] ASUS P5QC 3-33 3.7.2 Boot Settings Configuration BIOS SETUP UTILITY Boot Boot Settings Configuration Quick Boot [Enabled] Full Screen Logo [Enabled] AddOn...
... Screen Select Item +- Configuration options: [Off] [On] Wait For 'F1' If Error [Enabled] When set to [Enabled], the system displays the message "Press DEL to boot the system. Configuration options: [Disabled] [Enabled] ASUS P5QC 3-33 3.7.2 Boot Settings Configuration BIOS SETUP UTILITY Boot Boot Settings Configuration Quick Boot [Enabled] Full Screen Logo [Enabled] AddOn...
User Manual
Page 102
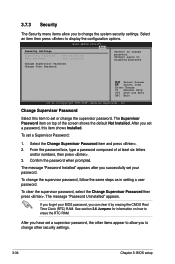
... Password : Not Installed Change Supervisor Password Change User Password to change the supervisor password, follow the same steps as in setting a user password. again to display the configuration options. Change Supervisor Password Select this item shows Installed. Select the Change Supervisor Password item and press . 2. To change password. Select an item...
... Password : Not Installed Change Supervisor Password Change User Password to change the supervisor password, follow the same steps as in setting a user password. again to display the configuration options. Change Supervisor Password Select this item shows Installed. Select the Change Supervisor Password item and press . 2. To change password. Select an item...
User Manual
Page 104
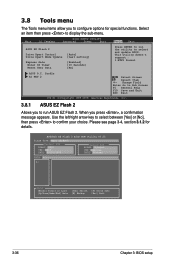
... Screen Select Item +- 3.8 Tools menu The Tools menu items allow you to configure options for details. This utility doesn't support : 1.NTFS format ASUS O.C. Use the left/right arrow key to select between [Yes] or [No], then press to select and update BIOS. Change Field Enter Go to ...2. Select an item then press to run the utility to confirm your choice. When you to display the sub-menu. ASUSTek EZ Flash 2 BIOS ROM Utility V3.25 FLASH TYPE: WXIC 25L8005 Current ROM BOARD: P5QC VER: 0405 DATE: 05/20/2008 Update ROM BOARD: Unknown VER: Unknown DATE: Unknown PATH...
... Screen Select Item +- 3.8 Tools menu The Tools menu items allow you to configure options for details. This utility doesn't support : 1.NTFS format ASUS O.C. Use the left/right arrow key to select between [Yes] or [No], then press to select and update BIOS. Change Field Enter Go to ...2. Select an item then press to run the utility to confirm your choice. When you to display the sub-menu. ASUSTek EZ Flash 2 BIOS ROM Utility V3.25 FLASH TYPE: WXIC 25L8005 Current ROM BOARD: P5QC VER: 0405 DATE: 05/20/2008 Update ROM BOARD: Unknown VER: Unknown DATE: Unknown PATH...
User Manual
Page 113
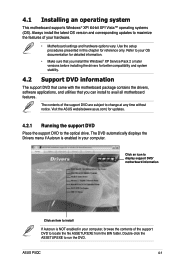
... information The support DVD that came with the motherboard package contains the drivers, software applications, and utilities that you can install to locate the file ASSETUP.EXE from the BIN folder. ASUS P5QC 4-1 Visit the ASUS website(www.asus.com) for reference only. Always install the latest...bit XP/ Vista™ operating systems (OS). Double-click the ASSETUP.EXE to your hardware. • Motherboard settings and hardware options vary. The DVD automatically displays the Drivers menu if Autorun is NOT enabled in this chapter for updates. 4.2.1 Running the support DVD ...
... information The support DVD that came with the motherboard package contains the drivers, software applications, and utilities that you can install to locate the file ASSETUP.EXE from the BIN folder. ASUS P5QC 4-1 Visit the ASUS website(www.asus.com) for reference only. Always install the latest...bit XP/ Vista™ operating systems (OS). Double-click the ASSETUP.EXE to your hardware. • Motherboard settings and hardware options vary. The DVD automatically displays the Drivers menu if Autorun is NOT enabled in this chapter for updates. 4.2.1 Running the support DVD ...


