
User Manual
Page 1
Motherboard
Motherboard

User Manual
Page 1
P5QC Motherboard
P5QC Motherboard
User Manual
Page 3
Contents Contents...iii Notices...viii Safety information ix About this guide x P5QC specifications summary xii Chapter 1: Product introduction 1.1 Welcome 1-1 1.2 Package contents 1-1 1.3 Special features 1-2 1.3.1 Product highlights 1-2 1.3.2 ASUS unique features 1-3 1.3.3 ASUS Intelligent Performance and Overclocking features 1-7 Chapter 2: Hardware information 2.1 Before you proceed 2-1 Onboard LED 2-1 2.2 Motherboard overview 2-2 2.2.1 Motherboard layout 2-2 2.2.2 Layout contents 2-3 2.2.3 Placement direction 2-4 2.2.4 Screw holes 2-4 2.3 Central Processing Unit (CPU...
Contents Contents...iii Notices...viii Safety information ix About this guide x P5QC specifications summary xii Chapter 1: Product introduction 1.1 Welcome 1-1 1.2 Package contents 1-1 1.3 Special features 1-2 1.3.1 Product highlights 1-2 1.3.2 ASUS unique features 1-3 1.3.3 ASUS Intelligent Performance and Overclocking features 1-7 Chapter 2: Hardware information 2.1 Before you proceed 2-1 Onboard LED 2-1 2.2 Motherboard overview 2-2 2.2.1 Motherboard layout 2-2 2.2.2 Layout contents 2-3 2.2.3 Placement direction 2-4 2.2.4 Screw holes 2-4 2.3 Central Processing Unit (CPU...
User Manual
Page 9
.... If you encounter technical problems with the package. • Before using an adpater or extension cord. Operation safety • Before installing the motherboard and adding devices on a stable surface. • If you detect any area where it may become wet. • Place the product on...you are not sure about the voltage of the electrical outlet you add a device. • Before connecting or removing signal cables from the motherboard, ensure that all the manuals that came with the product, contact a qualified service technician or your dealer immediately. • To avoid ...
.... If you encounter technical problems with the package. • Before using an adpater or extension cord. Operation safety • Before installing the motherboard and adding devices on a stable surface. • If you detect any area where it may become wet. • Place the product on...you are not sure about the voltage of the electrical outlet you add a device. • Before connecting or removing signal cables from the motherboard, ensure that all the manuals that came with the product, contact a qualified service technician or your dealer immediately. • To avoid ...
User Manual
Page 10
... it supports. • Chapter 2: Hardware information This chapter lists the hardware setup procedures that you need when installing and configuring the motherboard. ASUS websites The ASUS website provides updated information on the motherboard. • Chapter 3: BIOS setup This chapter tells how to the following parts: • Chapter 1: Product introduction This chapter describes the features...
... it supports. • Chapter 2: Hardware information This chapter lists the hardware setup procedures that you need when installing and configuring the motherboard. ASUS websites The ASUS website provides updated information on the motherboard. • Chapter 3: BIOS setup This chapter tells how to the following parts: • Chapter 1: Product introduction This chapter describes the features...

User Manual
Page 15
This chapter describes the motherboard features and the new technologies it supports. 1Product introduction
This chapter describes the motherboard features and the new technologies it supports. 1Product introduction
User Manual
Page 17
... DVD Documentation User guide If any of the above items is damaged or missing, contact your motherboard package for buying an ASUS® P5QC motherboard! Before you for the following items. Motherboard ASUS P5QC I/O modules 1 x 1-port eSATA and 1-port 1394 (4-pin) module Cables 1 x 2-port Serial ATA power cables 6 x Serial ATA signal cables 1 x Ultra DMA 133/100/66...
... DVD Documentation User guide If any of the above items is damaged or missing, contact your motherboard package for buying an ASUS® P5QC motherboard! Before you for the following items. Motherboard ASUS P5QC I/O modules 1 x 1-port eSATA and 1-port 1394 (4-pin) module Cables 1 x 2-port Serial ATA power cables 6 x Serial ATA signal cables 1 x Ultra DMA 133/100/66...
User Manual
Page 18
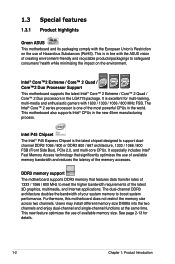
...Access technology that features data transfer rates of 1333 / 1066 / 800 MHz to boost system performance. DDR3 memory support The motherboard supports DDR3 memory that significantly optimizes the use of available memory bandwidth and reduces the latency of the latest 3D graphics, multimedia...' health while minimizing the impact on the use of the most powerful CPUs in the world. 1.3 Special features 1.3.1 Product highlights Green ASUS This motherboard and its packaging comply with the European Union's Restriction on the environment. Intel® Core™2 Extreme / Core™ 2 Quad...
...Access technology that features data transfer rates of 1333 / 1066 / 800 MHz to boost system performance. DDR3 memory support The motherboard supports DDR3 memory that significantly optimizes the use of available memory bandwidth and reduces the latency of the latest 3D graphics, multimedia...' health while minimizing the impact on the use of the most powerful CPUs in the world. 1.3 Special features 1.3.1 Product highlights Green ASUS This motherboard and its packaging comply with the European Union's Restriction on the environment. Intel® Core™2 Extreme / Core™ 2 Quad...
User Manual
Page 19
... for high-speed data retrieval and saves. Serial ATA 3 Gb/s technology and SATA-On-The-Go This motherboard supports hard drives based on the system configuration. • ASUS Express Gate supports file uploading from bootup, Express Gate is the one-stop gateway to instant fun! The ...bandwidth for details. You can utilize the most popular Instant Messengers (IM) like MSN, Skype, Google talk, QQ, and Yahoo! ASUS P5QC 1-3 PCIe 2.0 This motherboard supports the latest PCIe 2.0 device for twice the current speed and bandwidth. Messenger to keep in OS. DDR2 memory support The...
... for high-speed data retrieval and saves. Serial ATA 3 Gb/s technology and SATA-On-The-Go This motherboard supports hard drives based on the system configuration. • ASUS Express Gate supports file uploading from bootup, Express Gate is the one-stop gateway to instant fun! The ...bandwidth for details. You can utilize the most popular Instant Messengers (IM) like MSN, Skype, Google talk, QQ, and Yahoo! ASUS P5QC 1-3 PCIe 2.0 This motherboard supports the latest PCIe 2.0 device for twice the current speed and bandwidth. Messenger to keep in OS. DDR2 memory support The...
User Manual
Page 21
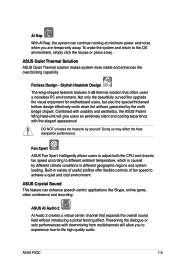
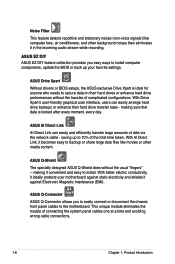
Not only the beautifully curved fins upgrade the visual enjoyment for motherboard users, but also the special thickened bottom design effectively cools down hot airflows generated by yourself. Fan Xpert ASUS Fan Xpert intelligently allows users to adjust both the CPU and chassis fan ... allow you are temporarily away. Doing so may affect the heat dissipation performance. ASUS AI Audio 2 AI Audio 2 creates a virtual center channel that offers users a noiseless PC environment. ASUS P5QC 1-5 ASUS Crystal Sound This feature can continue running at minimum power and noise when you ...
Not only the beautifully curved fins upgrade the visual enjoyment for motherboard users, but also the special thickened bottom design effectively cools down hot airflows generated by yourself. Fan Xpert ASUS Fan Xpert intelligently allows users to adjust both the CPU and chassis fan ... allow you are temporarily away. Doing so may affect the heat dissipation performance. ASUS AI Audio 2 AI Audio 2 creates a virtual center channel that offers users a noiseless PC environment. ASUS P5QC 1-5 ASUS Crystal Sound This feature can continue running at minimum power and noise when you ...
User Manual
Page 22
...eliminates the trouble of data via the network cable - saving up to install computer components, update the BIOS or back up your motherboard against static electricity and shields it against Electronic Magnetic Interference (EMI). With better electric conductivity, it becomes easy to secure data on... their hard drive transfer rates - ASUS Drive Xpert Without drivers or BIOS setups, the ASUS exclusive Drive Xpert is looked after every moment, every day. With AI Direct Link, it ideally protects your ...
...eliminates the trouble of data via the network cable - saving up to install computer components, update the BIOS or back up your motherboard against static electricity and shields it against Electronic Magnetic Interference (EMI). With better electric conductivity, it becomes easy to secure data on... their hard drive transfer rates - ASUS Drive Xpert Without drivers or BIOS setups, the ASUS exclusive Drive Xpert is looked after every moment, every day. With AI Direct Link, it ideally protects your ...
User Manual
Page 23
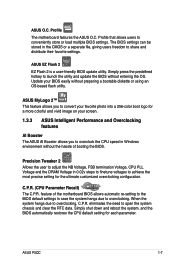
...boot logo for a more colorful and vivid image on your BIOS easily without entering the OS. ASUS P5QC 1-7 Update your screen. 1.3.3 ASUS Intelligent Performance and Overclocking features AI Booster The ASUS AI Booster allows you to launch the utility and update the BIOS without preparing a bootable diskette.... The BIOS settings can be stored in 0.02v steps to finetune voltages to overclocking. Profile The motherboard features the ASUS O.C. ASUS MyLogo 2™ This feature allows you to overclock the CPU speed in Windows environment without the hassle of the...
...boot logo for a more colorful and vivid image on your BIOS easily without entering the OS. ASUS P5QC 1-7 Update your screen. 1.3.3 ASUS Intelligent Performance and Overclocking features AI Booster The ASUS AI Booster allows you to launch the utility and update the BIOS without preparing a bootable diskette.... The BIOS settings can be stored in 0.02v steps to finetune voltages to overclocking. Profile The motherboard features the ASUS O.C. ASUS MyLogo 2™ This feature allows you to overclock the CPU speed in Windows environment without the hassle of the...
User Manual
Page 25
This chapter lists the hardware setup procedures that you have to perform when installing system components. It includes description of the jumpers and connectors on the motherboard. 2 Hardware information
This chapter lists the hardware setup procedures that you have to perform when installing system components. It includes description of the jumpers and connectors on the motherboard. 2 Hardware information
User Manual
Page 26
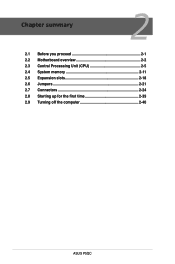
Chapter summary 2 2.1 Before you proceed 2-1 2.2 Motherboard overview 2-2 2.3 Central Processing Unit (CPU 2-5 2.4 System memory 2-11 2.5 Expansion slots 2-18 2.6 Jumpers 2-21 2.7 Connectors 2-24 2.8 Starting up for the first time 2-39 2.9 Turning off the computer 2-40 ASUS P5QC
Chapter summary 2 2.1 Before you proceed 2-1 2.2 Motherboard overview 2-2 2.3 Central Processing Unit (CPU 2-5 2.4 System memory 2-11 2.5 Expansion slots 2-18 2.6 Jumpers 2-21 2.7 Connectors 2-24 2.8 Starting up for the first time 2-39 2.9 Turning off the computer 2-40 ASUS P5QC
User Manual
Page 27
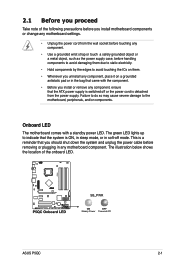
...Whenever you uninstall any component, place it on a grounded antistatic pad or in the bag that the ATX power supply is switched off mode. 2.1 Before you proceed Take note of the onboard LED. ASUS P5QC 2-1 Failure to do so may cause severe damage to indicate that the system is ON, in sleep... mode, or in any component, ensure that came with a standby power LED. The green LED lights up to the motherboard, peripherals, and/or components. Onboard ...
...Whenever you uninstall any component, place it on a grounded antistatic pad or in the bag that the ATX power supply is switched off mode. 2.1 Before you proceed Take note of the onboard LED. ASUS P5QC 2-1 Failure to do so may cause severe damage to indicate that the system is ON, in sleep... mode, or in any component, ensure that came with a standby power LED. The green LED lights up to the motherboard, peripherals, and/or components. Onboard ...
User Manual
Page 28
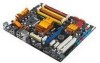
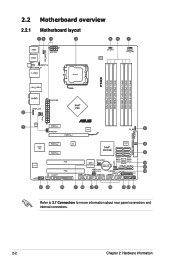
2.2 Motherboard overview 2.2.1 Motherboard layout Refer to 2.7 Connectors for more information about rear panel connectors and internal connectors. 2-2 Chapter 2: Hardware information
2.2 Motherboard overview 2.2.1 Motherboard layout Refer to 2.7 Connectors for more information about rear panel connectors and internal connectors. 2-2 Chapter 2: Hardware information
User Manual
Page 30
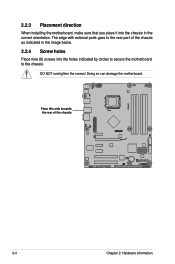
Doing so can damage the motherboard. Place this side towards the rear of the chassis as indicated in the image below. 2.2.4 Screw holes Place nine (9) screws into the chassis in the correct orientation. DO NOT overtighten the screws! The edge with external ports goes to the chassis. 2.2.3 Placement direction When installing the motherboard, make sure that you place it into the holes indicated by circles to secure the motherboard to the rear part of the chassis 2-4 Chapter 2: Hardware information
Doing so can damage the motherboard. Place this side towards the rear of the chassis as indicated in the image below. 2.2.4 Screw holes Place nine (9) screws into the chassis in the correct orientation. DO NOT overtighten the screws! The edge with external ports goes to the chassis. 2.2.3 Placement direction When installing the motherboard, make sure that you place it into the holes indicated by circles to secure the motherboard to the rear part of the chassis 2-4 Chapter 2: Hardware information
User Manual
Page 31
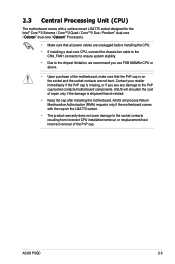
.../removal, or misplacement/loss/ incorrect removal of the PnP cap. ASUS P5QC 2-5 2.3 Central Processing Unit (CPU) The motherboard comes with the cap on the socket and the socket contacts are not bent. ASUS will shoulder the cost of the motherboard, make sure that the PnP cap is shipment/transit-related. &#...8226; Keep the cap after installing the motherboard. Contact your retailer immediately if the PnP cap is missing, or...
.../removal, or misplacement/loss/ incorrect removal of the PnP cap. ASUS P5QC 2-5 2.3 Central Processing Unit (CPU) The motherboard comes with the cap on the socket and the socket contacts are not bent. ASUS will shoulder the cost of the motherboard, make sure that the PnP cap is shipment/transit-related. &#...8226; Keep the cap after installing the motherboard. Contact your retailer immediately if the PnP cap is missing, or...
User Manual
Page 32
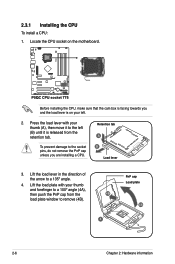
... a 100º angle (4A), then push the PnP cap from the retention tab. Lift the load plate with your left (B) until it is on the motherboard. To prevent damage to the left . 2. 2.3.1 Installing the CPU To install a CPU: 1. Locate the CPU socket on your thumb (A), then move it to the socket...
... a 100º angle (4A), then push the PnP cap from the retention tab. Lift the load plate with your left (B) until it is on the motherboard. To prevent damage to the left . 2. 2.3.1 Installing the CPU To install a CPU: 1. Locate the CPU socket on your thumb (A), then move it to the socket...

User Manual
Page 34
Refer to the Appendix for more information on these CPU features. 2-8 Chapter 2: Hardware information B The motherboard supports Intel® LGA775 processors with the Intel® Enhanced Memory 64 Technology (EM64T), Enhanced Intel SpeedStep® Technology (EIST), and Hyper-Threading Technology. Close the load plate (A), then push the load lever (B) until it snaps into A the retention tab. 7.
Refer to the Appendix for more information on these CPU features. 2-8 Chapter 2: Hardware information B The motherboard supports Intel® LGA775 processors with the Intel® Enhanced Memory 64 Technology (EM64T), Enhanced Intel SpeedStep® Technology (EIST), and Hyper-Threading Technology. Close the load plate (A), then push the load lever (B) until it snaps into A the retention tab. 7.


