User Manual
Page 4
...2.9.2 Using the dual function power switch 2-40 Chapter 3: BIOS setup 3.1 Managing and updating your BIOS 3-1 3.1.1 ASUS Update utility 3-1 3.1.2 ASUS EZ Flash 2 utility 3-4 3.1.3 AFUDOS utility 3-5 3.2 BIOS setup program 3-7 3.2.1 BIOS menu screen 3-8 3.2.2 ...Menu bar 3-8 3.2.3 Navigation keys 3-8 3.2.4 Menu items 3-9 3.2.5 Sub-menu items 3-9 3.2.6 Configuration fields 3-9 3.2.7 Pop-up window 3-9 3.2.8 Scroll bar 3-9 3.2.9 General help 3-9 3.3...
...2.9.2 Using the dual function power switch 2-40 Chapter 3: BIOS setup 3.1 Managing and updating your BIOS 3-1 3.1.1 ASUS Update utility 3-1 3.1.2 ASUS EZ Flash 2 utility 3-4 3.1.3 AFUDOS utility 3-5 3.2 BIOS setup program 3-7 3.2.1 BIOS menu screen 3-8 3.2.2 ...Menu bar 3-8 3.2.3 Navigation keys 3-8 3.2.4 Menu items 3-9 3.2.5 Sub-menu items 3-9 3.2.6 Configuration fields 3-9 3.2.7 Pop-up window 3-9 3.2.8 Scroll bar 3-9 3.2.9 General help 3-9 3.3...
User Manual
Page 7
Contents 4.3.12 ASUS Express Gate 4-49 4.4 RAID configurations 4-59 4.4.1 RAID definitions 4-59 4.4.2 Installing Serial ATA hard disks 4-60 4.4.3 Intel® RAID configurations 4-60 4.5 Creating a RAID driver disk 4-68 4.5.1 Creating a RAID driver disk without entering the OS.... 4-68 4.5.2 Creating a RAID driver disk in Windows 4-68 Appendix: CPU features A.1 Intel® EM64T A-1 Using the Intel...
Contents 4.3.12 ASUS Express Gate 4-49 4.4 RAID configurations 4-59 4.4.1 RAID definitions 4-59 4.4.2 Installing Serial ATA hard disks 4-60 4.4.3 Intel® RAID configurations 4-60 4.5 Creating a RAID driver disk 4-68 4.5.1 Creating a RAID driver disk without entering the OS.... 4-68 4.5.2 Creating a RAID driver disk in Windows 4-68 Appendix: CPU features A.1 Intel® EM64T A-1 Using the Intel...
User Manual
Page 19
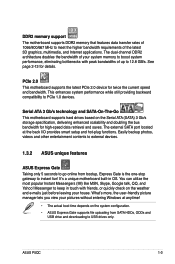
... manager lets you view your pictures without entering Windows at the back I/O provides smart setup and hot-plug functions. This enhances system performance while still providing backward compatibility to PCIe 1.0 devices. It's a unique motherboard built-in touch with friends, or quickly check...and SATA-On-The-Go This motherboard supports hard drives based on the system configuration. • ASUS Express Gate supports file uploading from bootup, Express Gate is the one-stop gateway to instant fun! ASUS P5QC 1-3 DDR2 memory support The motherboard supports DDR2 memory that features ...
... manager lets you view your pictures without entering Windows at the back I/O provides smart setup and hot-plug functions. This enhances system performance while still providing backward compatibility to PCIe 1.0 devices. It's a unique motherboard built-in touch with friends, or quickly check...and SATA-On-The-Go This motherboard supports hard drives based on the system configuration. • ASUS Express Gate supports file uploading from bootup, Express Gate is the one-stop gateway to instant fun! ASUS P5QC 1-3 DDR2 memory support The motherboard supports DDR2 memory that features ...
User Manual
Page 23
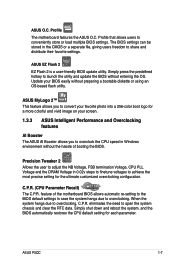
... Profile that allows users to overclock the CPU speed in Windows environment without the hassle of the motherboard BIOS allows automatic re-setting to the BIOS default settings in 0.02v steps to finetune voltages to overclocking, C.P.R. ASUS MyLogo 2™ This feature allows you to conveniently store or... Booster allows you to convert your favorite photo into a 256-color boot logo for each parameter. ASUS P5QC 1-7 Profile The motherboard features the ASUS O.C. Simply shut down and reboot the system, and the BIOS automatically restores the CPU default setting for a more colorful ...
... Profile that allows users to overclock the CPU speed in Windows environment without the hassle of the motherboard BIOS allows automatic re-setting to the BIOS default settings in 0.02v steps to finetune voltages to overclocking, C.P.R. ASUS MyLogo 2™ This feature allows you to conveniently store or... Booster allows you to convert your favorite photo into a 256-color boot logo for each parameter. ASUS P5QC 1-7 Profile The motherboard features the ASUS O.C. Simply shut down and reboot the system, and the BIOS automatically restores the CPU default setting for a more colorful ...
User Manual
Page 32
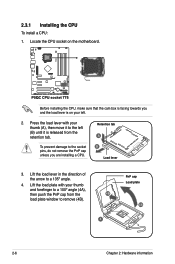
... the arrow to the socket pins, do not remove the PnP cap unless you and the load lever is released from the 4B load plate window to the left . 2. To prevent damage to a 135º angle. 4. Lift the load plate with your thumb and forefinger to a 100º angle (4A), then... it to remove (4B). 3 PnP cap Load plate 4A 2-6 Chapter 2: Hardware information Press the load lever with your thumb (A), then move it is on the motherboard. 2.3.1 Installing the CPU To install a CPU: 1. Retention tab A B Load lever 3.
... the arrow to the socket pins, do not remove the PnP cap unless you and the load lever is released from the 4B load plate window to the left . 2. To prevent damage to a 135º angle. 4. Lift the load plate with your thumb and forefinger to a 100º angle (4A), then... it to remove (4B). 3 PnP cap Load plate 4A 2-6 Chapter 2: Hardware information Press the load lever with your thumb (A), then move it is on the motherboard. 2.3.1 Installing the CPU To install a CPU: 1. Retention tab A B Load lever 3.
User Manual
Page 38
... memory frequency adjustment. • The memory modules may require a better cooling system to 16 GB on each slot. 64-bit Windows® XP Professional x64 Edition Windows® Vista x64 Edition • The default memory operation frequency is recommended that you install two 2 GB or four 1 GB...A and Channel B. To operate at the vendormarked or at a lower frequency than 3GB is recommended. • Due to chipset limitation, this motherboard can only support up of the lower-sized channel for better overclocking capability. The system maps the total size of 128 Mb chips. Any excess...
... memory frequency adjustment. • The memory modules may require a better cooling system to 16 GB on each slot. 64-bit Windows® XP Professional x64 Edition Windows® Vista x64 Edition • The default memory operation frequency is recommended that you install two 2 GB or four 1 GB...A and Channel B. To operate at the vendormarked or at a lower frequency than 3GB is recommended. • Due to chipset limitation, this motherboard can only support up of the lower-sized channel for better overclocking capability. The system maps the total size of 128 Mb chips. Any excess...
User Manual
Page 39
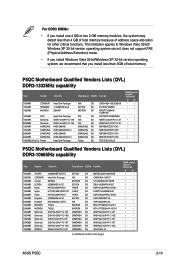
...• • • • • • • • • • • • ASUS P5QC 2-13 This limitation applies to Windows Vista 32-bit/ Windows XP 32-bit version operating system since it does not support PAE (Physical Address Extention) mode. • If you install... • • • • • • • • • • • • • • P5QC Motherboard Qualified Vendors Lists (QVL) DDR3-1066MHz capability Size Vendor Chip No. For DDR3 DIMMs: • If you install less than 4 GB of total memory...
...• • • • • • • • • • • • ASUS P5QC 2-13 This limitation applies to Windows Vista 32-bit/ Windows XP 32-bit version operating system since it does not support PAE (Physical Address Extention) mode. • If you install... • • • • • • • • • • • • • • P5QC Motherboard Qualified Vendors Lists (QVL) DDR3-1066MHz capability Size Vendor Chip No. For DDR3 DIMMs: • If you install less than 4 GB of total memory...
User Manual
Page 54
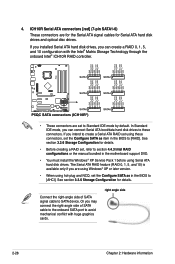
...; XP or later version. • When using hot-plug and NCQ, set the Configure SATA as item in the motherboard support DVD. • You must install the Windows® XP Service Pack 1 before using these connectors. right angle side 2-28 Chapter 2: Hardware information See section 3.3.6 Storage Configuration for details. • Before creating...
...; XP or later version. • When using hot-plug and NCQ, set the Configure SATA as item in the motherboard support DVD. • You must install the Windows® XP Service Pack 1 before using these connectors. right angle side 2-28 Chapter 2: Hardware information See section 3.3.6 Storage Configuration for details. • Before creating...
User Manual
Page 66
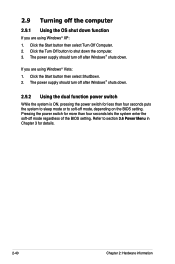
... Off Computer. 2. Click the Turn Off button to section 3.6 Power Menu in Chapter 3 for details. 2-40 Chapter 2: Hardware information If you are using Windows® XP: 1. Pressing the power switch for less than four seconds lets the system enter the soft-off mode regardless of the BIOS setting. The... power supply should turn off after Windows® shuts down. 2.9.2 Using the dual function power switch While the system is ON, pressing the power switch for more than four seconds...
... Off Computer. 2. Click the Turn Off button to section 3.6 Power Menu in Chapter 3 for details. 2-40 Chapter 2: Hardware information If you are using Windows® XP: 1. Pressing the power switch for less than four seconds lets the system enter the soft-off mode regardless of the BIOS setting. The... power supply should turn off after Windows® shuts down. 2.9.2 Using the dual function power switch While the system is ON, pressing the power switch for more than four seconds...
User Manual
Page 69
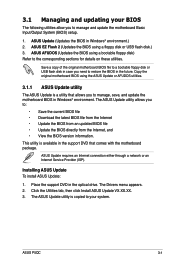
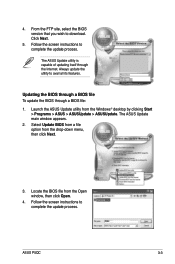
Place the support DVD in Windows® environment.) 2. ASUS P5QC 3-1 ASUS Update requires an Internet connection either through a network or an Internet Service Provider (ISP). The ASUS Update utility allows you to manage and update the motherboard Basic Input/Output System (BIOS) setup. 1. ASUS Update (Updates the BIOS in the optical drive. ASUS EZ Flash 2 (Updates the BIOS using...
Place the support DVD in Windows® environment.) 2. ASUS P5QC 3-1 ASUS Update requires an Internet connection either through a network or an Internet Service Provider (ISP). The ASUS Update utility allows you to manage and update the motherboard Basic Input/Output System (BIOS) setup. 1. ASUS Update (Updates the BIOS in the optical drive. ASUS EZ Flash 2 (Updates the BIOS using...
User Manual
Page 70
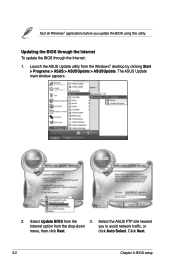
Select Update BIOS from the Windows® desktop by clicking Start > Programs > ASUS > ASUSUpdate > ASUSUpdate. The ASUS Update main window appears. 2. Click Next. 3-2 Chapter 3: BIOS setup Updating the BIOS through the Internet To update the BIOS through the Internet: 1. Select the ASUS FTP site nearest Internet option from the drop‑down you update the BIOS using this utility. Launch the ASUS Update utility from the 3. click Auto Select. Quit all Windows® applications before you to avoid network traffic, or menu, then click Next.
Select Update BIOS from the Windows® desktop by clicking Start > Programs > ASUS > ASUSUpdate > ASUSUpdate. The ASUS Update main window appears. 2. Click Next. 3-2 Chapter 3: BIOS setup Updating the BIOS through the Internet To update the BIOS through the Internet: 1. Select the ASUS FTP site nearest Internet option from the drop‑down you update the BIOS using this utility. Launch the ASUS Update utility from the 3. click Auto Select. Quit all Windows® applications before you to avoid network traffic, or menu, then click Next.
User Manual
Page 71
...‑down menu, then click Next. 3. Follow the screen instructions to download. Click Next. 5. The ASUS Update main window appears. 2. Select Update BIOS from a file option from the Windows® desktop by clicking Start > Programs > ASUS > ASUSUpdate > ASUSUpdate. P5QC.ROM P5QC ASUS P5QC 3-3 From the FTP site, select the BIOS version that you wish to complete the update...
...‑down menu, then click Next. 3. Follow the screen instructions to download. Click Next. 5. The ASUS Update main window appears. 2. Select Update BIOS from a file option from the Windows® desktop by clicking Start > Programs > ASUS > ASUSUpdate > ASUSUpdate. P5QC.ROM P5QC ASUS P5QC 3-3 From the FTP site, select the BIOS version that you wish to complete the update...

User Manual
Page 77
... before each item on the screen. To change the value of the menu screen is not user-configurable. Refer to 3.2.7 Pop-up window. 3.2.7 Pop-up window Select a menu item then press to select a field. 3.2.4 Menu items The highlighted item on the menu bar have their respective menu...[Not Detected] [Not Detected] Use [ENTER], [TAB], or [SHIFT-TAB] to display a pop-up window Scroll bar 3.2.9 General help At the top right corner of the field opposite the item. ASUS P5QC 3-9 To display the sub-menu, select the item and press . 3.2.6 Configuration fields These fields show the ...
... before each item on the screen. To change the value of the menu screen is not user-configurable. Refer to 3.2.7 Pop-up window. 3.2.7 Pop-up window Select a menu item then press to select a field. 3.2.4 Menu items The highlighted item on the menu bar have their respective menu...[Not Detected] [Not Detected] Use [ENTER], [TAB], or [SHIFT-TAB] to display a pop-up window Scroll bar 3.2.9 General help At the top right corner of the field opposite the item. ASUS P5QC 3-9 To display the sub-menu, select the item and press . 3.2.6 Configuration fields These fields show the ...

User Manual
Page 106
...[3 seconds] [5 seconds] [10 seconds] [15 seconds] [20 seconds] [30 seconds] Reset User Data [No] Allows you to enable or disable the ASUS Express Gate feature. User data includes the Express Gate's settings as well as any personal information stored by the web browser (bookmarks, cookies, browsing history... settings prevent the Express Gate environment from launching properly. Choose [Prompt User] to stay at the Express Gate's first screen before starting Windows or other installed OS. Configuration options: [No] [Reset] When setting this item to [Reset], make sure to save the setting ...
...[3 seconds] [5 seconds] [10 seconds] [15 seconds] [20 seconds] [30 seconds] Reset User Data [No] Allows you to enable or disable the ASUS Express Gate feature. User data includes the Express Gate's settings as well as any personal information stored by the web browser (bookmarks, cookies, browsing history... settings prevent the Express Gate environment from launching properly. Choose [Prompt User] to stay at the Express Gate's first screen before starting Windows or other installed OS. Configuration options: [No] [Reset] When setting this item to [Reset], make sure to save the setting ...

User Manual
Page 109
...to ensure the values you made changes to fields other changes before exiting. Exit & Discard Changes Select this option, a confirmation window appears. After selecting this menu. Select Ok to Sub Screen F1 General Help F10 Save and Exit ESC Exit v02.61 (C)...window appears. Select Exit & Save Changes or make other than System Date, System Time, and Password, the BIOS asks for this option from the legend bar to exit. Press to discard any changes and load the previously saved values. Select Screen Select Item Enter Go to load default values. ASUS P5QC...
...to ensure the values you made changes to fields other changes before exiting. Exit & Discard Changes Select this option, a confirmation window appears. After selecting this menu. Select Ok to Sub Screen F1 General Help F10 Save and Exit ESC Exit v02.61 (C)...window appears. Select Exit & Save Changes or make other than System Date, System Time, and Password, the BIOS asks for this option from the legend bar to exit. Press to discard any changes and load the previously saved values. Select Screen Select Item Enter Go to load default values. ASUS P5QC...
User Manual
Page 113
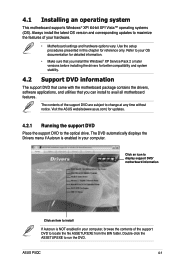
.... • Make sure that you install the Windows® XP Service Pack 2 or later versions before installing the drivers for better compatibility and system stability. 4.2 Support DVD information The support DVD that came with the motherboard package contains the drivers, software applications, and utilities... vary. Click an icon to display support DVD/ motherboard information Click an item to locate the file ASSETUP.EXE from the BIN folder. Double-click the ASSETUP.EXE to change at any time without notice. ASUS P5QC 4-1 The DVD automatically displays the Drivers menu if ...
.... • Make sure that you install the Windows® XP Service Pack 2 or later versions before installing the drivers for better compatibility and system stability. 4.2 Support DVD information The support DVD that came with the motherboard package contains the drivers, software applications, and utilities... vary. Click an icon to display support DVD/ motherboard information Click an item to locate the file ASSETUP.EXE from the BIN folder. Double-click the ASSETUP.EXE to change at any time without notice. ASUS P5QC 4-1 The DVD automatically displays the Drivers menu if ...

User Manual
Page 116
...watching TV and movies, capturing videos, or playing games in Windows® environment. Anti-Virus Utility The anti-virus application detects and protects your multimedia data. ASUS Express Gate Installer Installs the ASUS Express Gate application. Corel MediaOne Starter Installs the Corel MediaOne ...restore your data easily. Winzip 11 Installs the Winzip utility for easy file-compression and protection. ASUS Update The ASUS Update utility allows you to update the motherboard BIOS in your computer. Ulead PhotoImpact 12 SE Installs the PhotoImpact image editing software. This ...
...watching TV and movies, capturing videos, or playing games in Windows® environment. Anti-Virus Utility The anti-virus application detects and protects your multimedia data. ASUS Express Gate Installer Installs the ASUS Express Gate application. Corel MediaOne Starter Installs the Corel MediaOne ...restore your data easily. Winzip 11 Installs the Winzip utility for easy file-compression and protection. ASUS Update The ASUS Update utility allows you to update the motherboard BIOS in your computer. Ulead PhotoImpact 12 SE Installs the PhotoImpact image editing software. This ...
User Manual
Page 121
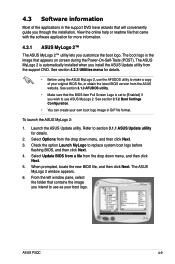
...] if you through the installation. When prompted, locate the new BIOS file, and then click Next. ASUS P5QC 4-9 Check the option Launch MyLogo to use as your boot logo. The ASUS MyLogo 2 is set to make a copy of the applications in GIF file format. The boot logo is...the boot logo. 4.3 Software information Most of your original BIOS file, or obtain the latest BIOS version from the ASUS website. Launch the ASUS Update utility. The ASUS MyLogo 2 window appears. 6. View the online help or readme file that will conveniently guide you wish to replace system boot logo...
...] if you through the installation. When prompted, locate the new BIOS file, and then click Next. ASUS P5QC 4-9 Check the option Launch MyLogo to use as your boot logo. The ASUS MyLogo 2 is set to make a copy of the applications in GIF file format. The boot logo is...the boot logo. 4.3 Software information Most of your original BIOS file, or obtain the latest BIOS version from the ASUS website. Launch the ASUS Update utility. The ASUS MyLogo 2 window appears. 6. View the online help or readme file that will conveniently guide you wish to replace system boot logo...
User Manual
Page 122
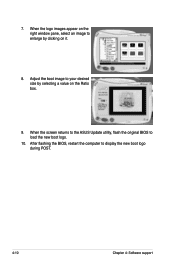
When the screen returns to the ASUS Update utility, flash the original BIOS to enlarge by selecting a value on the right window pane, select an image to load the new boot logo. 10. 7. When the logo images appear on the Ratio box. 9. After flashing the BIOS, restart the computer to your desired size by clicking on it. 8. Adjust the boot image to display the new boot logo during POST. 4-10 Chapter 4: Software support
When the screen returns to the ASUS Update utility, flash the original BIOS to enlarge by selecting a value on the right window pane, select an image to load the new boot logo. 10. 7. When the logo images appear on the Ratio box. 9. After flashing the BIOS, restart the computer to your desired size by clicking on it. 8. Adjust the boot image to display the new boot logo during POST. 4-10 Chapter 4: Software support
User Manual
Page 123
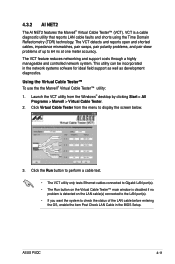
... the OS, enable the item Post Check LAN Cable in the network systems sofware for ideal field support as well as development diagnostics. ASUS P5QC 4-11 Using the Virtual Cable Tester™ To use the the Marvell® Virtual Cable Tester™ utility: 1. Launch the VCT... support costs through a highly manageable and controlled network system. This utility can be incorporated in the BIOS Setup. Click Virtual Cable Tester from the Windows® desktop by clicking Start > All Programs > Marvell > Virtual Cable Tester. 2. VCT is detected on the LAN cable(s) connected to the...
... the OS, enable the item Post Check LAN Cable in the network systems sofware for ideal field support as well as development diagnostics. ASUS P5QC 4-11 Using the Virtual Cable Tester™ To use the the Marvell® Virtual Cable Tester™ utility: 1. Launch the VCT... support costs through a highly manageable and controlled network system. This utility can be incorporated in the BIOS Setup. Click Virtual Cable Tester from the Windows® desktop by clicking Start > All Programs > Marvell > Virtual Cable Tester. 2. VCT is detected on the LAN cable(s) connected to the...


