User Manual
Page 4
... 3: BIOS setup 3.1 Managing and updating your BIOS 3-1 3.1.1 ASUS Update utility 3-1 3.1.2 ASUS EZ Flash 2 utility 3-4 3.1.3 AFUDOS utility 3-5 3.2 BIOS setup... program 3-7 3.2.1 BIOS menu screen 3-8 3.2.2 Menu bar 3-8 3.2.3 Navigation keys 3-8 3.2.4 Menu items 3-9 3.2.5 Sub-menu items 3-9 3.2.6 Configuration fields 3-9 3.2.7 Pop-up window 3-9 3.2.8 Scroll bar 3-9 3.2.9 General help 3-9 3.3 Main menu 3-10 3.3.1 System Time 3-10 3.3.2 System Date 3-10 3.3.3 Legacy Diskette A 3-10 3.3.4 Language 3-10 3.3.5 SATA...
... 3: BIOS setup 3.1 Managing and updating your BIOS 3-1 3.1.1 ASUS Update utility 3-1 3.1.2 ASUS EZ Flash 2 utility 3-4 3.1.3 AFUDOS utility 3-5 3.2 BIOS setup... program 3-7 3.2.1 BIOS menu screen 3-8 3.2.2 Menu bar 3-8 3.2.3 Navigation keys 3-8 3.2.4 Menu items 3-9 3.2.5 Sub-menu items 3-9 3.2.6 Configuration fields 3-9 3.2.7 Pop-up window 3-9 3.2.8 Scroll bar 3-9 3.2.9 General help 3-9 3.3 Main menu 3-10 3.3.1 System Time 3-10 3.3.2 System Date 3-10 3.3.3 Legacy Diskette A 3-10 3.3.4 Language 3-10 3.3.5 SATA...
User Manual
Page 12
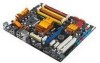
...88SE6111 controller: - 1 x Ultra DMA 133/100/66 for up to 2 PATA devices - 1 x SATA 3.0 Gb/s for one at back panel) 12 x USB 2.0 ports (6 ports at mid-board, 6 ports at back I/O - ASUS Noise-Filtering LSI® L-FW3227 1394a controller supports 2 x IEEE 1394a ports (one at mid-board, one... DIMM per channel. P5QC specifications summary CPU Chipset System Bus Memory Expansion Slots Storage LAN Audio IEEE 1394 USB ...
...88SE6111 controller: - 1 x Ultra DMA 133/100/66 for up to 2 PATA devices - 1 x SATA 3.0 Gb/s for one at back panel) 12 x USB 2.0 ports (6 ports at mid-board, 6 ports at back I/O - ASUS Noise-Filtering LSI® L-FW3227 1394a controller supports 2 x IEEE 1394a ports (one at mid-board, one... DIMM per channel. P5QC specifications summary CPU Chipset System Bus Memory Expansion Slots Storage LAN Audio IEEE 1394 USB ...
User Manual
Page 14
...P5QC specifications summary Back Panel I/O Ports 1 x PS/2 keyboard port (Purple) 1 x PS/2 mouse port (Green) 1 x S/PDIF Out (Coaxial) 1 x IEEE1394a port 1 x RJ45 port 6 x USB 2.0/1.1 ports 8-channel Audio I/O ports Internal I/O Connectors 3 x USB connectors support additional 6 USB ports 1 x Floppy disk drive connector 1 x COM connector 1 x IDE connector 6 x SATA connectors 2 x Drive Xpert SATA...WOR by Ring, PXE, Support DVD Contents Drivers ASUS PC Probe II ASUS Update ASUS AI Suite Image-Editing Suite Anti-virus software (OEM version) Form Factor ATX Form Factor, 12"x 9.6" (30.5cm x 24...
...P5QC specifications summary Back Panel I/O Ports 1 x PS/2 keyboard port (Purple) 1 x PS/2 mouse port (Green) 1 x S/PDIF Out (Coaxial) 1 x IEEE1394a port 1 x RJ45 port 6 x USB 2.0/1.1 ports 8-channel Audio I/O ports Internal I/O Connectors 3 x USB connectors support additional 6 USB ports 1 x Floppy disk drive connector 1 x COM connector 1 x IDE connector 6 x SATA connectors 2 x Drive Xpert SATA...WOR by Ring, PXE, Support DVD Contents Drivers ASUS PC Probe II ASUS Update ASUS AI Suite Image-Editing Suite Anti-virus software (OEM version) Form Factor ATX Form Factor, 12"x 9.6" (30.5cm x 24...
User Manual
Page 19
... applications. Easily backup photos, videos and other entertainment contents to external devices. 1.3.2 ASUS unique features ASUS Express Gate Taking only 5 seconds to go online from SATA HDDs, ODDs and USB drive and downloading to keep in OS. ASUS P5QC 1-3 DDR2 memory support The motherboard supports DDR2 memory that features data transfer rates of 1066/800/667...
... applications. Easily backup photos, videos and other entertainment contents to external devices. 1.3.2 ASUS unique features ASUS Express Gate Taking only 5 seconds to go online from SATA HDDs, ODDs and USB drive and downloading to keep in OS. ASUS P5QC 1-3 DDR2 memory support The motherboard supports DDR2 memory that features data transfer rates of 1066/800/667...

User Manual
Page 45
...motherboard A B C D E F G H PCIE1_1 - - shared - - - - - - shared - - - - - PCI_2 - shared - - - - USB controller 6 - - - - - shared - PCIE1_2 - - - Marvell 6121 shared - - - - - - - USB controller 1 - - - - - - - shared USB 2.0 controller 2 - - ASUS P5QC... 2-19 LAN (8001) - - shared - - - - - PCIE1_3 PCIE16_1 shared - - - - - - - PCI_1 shared - - - - - - - shared - - - - - IRQ assignments for PCI devices. SATA controller 1 - - shared ...
...motherboard A B C D E F G H PCIE1_1 - - shared - - - - - - shared - - - - - PCI_2 - shared - - - - USB controller 6 - - - - - shared - PCIE1_2 - - - Marvell 6121 shared - - - - - - - USB controller 1 - - - - - - - shared USB 2.0 controller 2 - - ASUS P5QC... 2-19 LAN (8001) - - shared - - - - - PCIE1_3 PCIE16_1 shared - - - - - - - PCI_1 shared - - - - - - - shared - - - - - IRQ assignments for PCI devices. SATA controller 1 - - shared ...
User Manual
Page 54
.../data hard disk drives to these connectors, set the Configure SATA as in the motherboard support DVD. • You must install the Windows® XP Service Pack 1 before using hot-plug and NCQ, set the Configure SATA as item in the BIOS to [AHCI]. If you are...connectors. right angle side 2-28 Chapter 2: Hardware information See section 3.3.6 Storage Configuration for details. Connect the right-angle side of SATA cable to the onboard SATA port to Standard IDE mode by default. See section 3.3.6 Storage Configuration for details. • Before creating a RAID set to avoid...
.../data hard disk drives to these connectors, set the Configure SATA as in the motherboard support DVD. • You must install the Windows® XP Service Pack 1 before using hot-plug and NCQ, set the Configure SATA as item in the BIOS to [AHCI]. If you are...connectors. right angle side 2-28 Chapter 2: Hardware information See section 3.3.6 Storage Configuration for details. Connect the right-angle side of SATA cable to the onboard SATA port to Standard IDE mode by default. See section 3.3.6 Storage Configuration for details. • Before creating a RAID set to avoid...
User Manual
Page 55
.... • The SATA_E1 (orange) and SATA_E2 (white) ports are for the Serial ATA signal cables for SATA hard drives only. Silicon Image® Sil5723 Serial ATA connectors (7-pin SATA_E1 [orange]; If you installed Serial ...ATA hard disk drives, you have connected the SATA signal cables and installed SATA hard disk drives. SATA_E2 [white]) These connectors are for Serial ATA hard disk drives. Before ...will be erased for detailed application instructions. Refer to 4.3.11 ASUS Drive Xpert for EZ Backup setup. ASUS P5QC 2-29
.... • The SATA_E1 (orange) and SATA_E2 (white) ports are for the Serial ATA signal cables for SATA hard drives only. Silicon Image® Sil5723 Serial ATA connectors (7-pin SATA_E1 [orange]; If you installed Serial ...ATA hard disk drives, you have connected the SATA signal cables and installed SATA hard disk drives. SATA_E2 [white]) These connectors are for Serial ATA hard disk drives. Before ...will be erased for detailed application instructions. Refer to 4.3.11 ASUS Drive Xpert for EZ Backup setup. ASUS P5QC 2-29

User Manual
Page 79
...your device is installed in the system. Setting to [Auto] allows automatic selection of device connected to display the SATA device information. Configuration options: [Auto] [0] [1] [2] [3] [4] ASUS P5QC 3-11 The BIOS automatically detects the values opposite the dimmed items (Device, Vendor, Size, LBA Mode, Block Mode...N/A if no IDE device is either a ZIP, LS-120, or MO drive. There is a separate sub-menu for each SATA device. 3.3.5 SATA 1-6 While entering Setup, the BIOS automatically detects the presence of IDE drive. When set to [Auto], the data transfer from ...
...your device is installed in the system. Setting to [Auto] allows automatic selection of device connected to display the SATA device information. Configuration options: [Auto] [0] [1] [2] [3] [4] ASUS P5QC 3-11 The BIOS automatically detects the values opposite the dimmed items (Device, Vendor, Size, LBA Mode, Block Mode...N/A if no IDE device is either a ZIP, LS-120, or MO drive. There is a separate sub-menu for each SATA device. 3.3.5 SATA 1-6 While entering Setup, the BIOS automatically detects the presence of IDE drive. When set to [Auto], the data transfer from ...

User Manual
Page 80
...] [IDE] Hard Disk Write Protect IDE Detect Time Out (Sec) [Disabled] [35] Options Disabled Compatible Enhanced SATA Configuration [Enhanced] Configuration options: [Disabled] [Compatible] [Enhanced] Configure SATA as Parallel ATA physical storage devices, keep the default setting [IDE]. • If you want the Serial ATA ...the Serial ATA hard disk drives, set this item to use the Serial ATA hard disk drives as [IDE] Sets the configuration for the SATA devices installed in this menu allow you want to [RAID]. 3-12 Chapter 3: BIOS setup Configuration options: [IDE] [RAID] [AHCI]...
...] [IDE] Hard Disk Write Protect IDE Detect Time Out (Sec) [Disabled] [35] Options Disabled Compatible Enhanced SATA Configuration [Enhanced] Configuration options: [Disabled] [Compatible] [Enhanced] Configure SATA as Parallel ATA physical storage devices, keep the default setting [IDE]. • If you want the Serial ATA ...the Serial ATA hard disk drives, set this item to use the Serial ATA hard disk drives as [IDE] Sets the configuration for the SATA devices installed in this menu allow you want to [RAID]. 3-12 Chapter 3: BIOS setup Configuration options: [IDE] [RAID] [AHCI]...

User Manual
Page 81
... Technology. Configuration options: [Auto] [Not Installed] SMART Monitoring [Enabled] Allows you to set the item Configure SATA as from the sub-menu of SATA devices. Configration options: [Disabled] [Enabled] ASUS P5QC 3-13 Main BIOS SETUP UTILITY AHCI Settings AHCI CD/DVD Boot Time out [15] Some... SATA CD/DVD in AHCI mode need to the system. This will be effective only if the ...
... Technology. Configuration options: [Auto] [Not Installed] SMART Monitoring [Enabled] Allows you to set the item Configure SATA as from the sub-menu of SATA devices. Configration options: [Disabled] [Enabled] ASUS P5QC 3-13 Main BIOS SETUP UTILITY AHCI Settings AHCI CD/DVD Boot Time out [15] Some... SATA CD/DVD in AHCI mode need to the system. This will be effective only if the ...

User Manual
Page 83
...caution when changing the settings of the Ai Tweaker menu items. Incorrect field values can cause the system to malfunction. ASUS P5QC 3-15 The default values of CPU overclocking options to achieve desired CPU internal frequency. Change Option F1 General Help F10...Voltage [Auto] CPU PLL Voltage [Auto] FSB Termination Voltage [Auto] DRAM Voltage [Auto] NB Voltage [Auto] SB Voltage [Auto] PCIE SATA Voltage [Auto] Load-Line Calibration [Auto] CPU Spread Spectrum [Auto] PCIE Spread Spectrum [Auto] v02.61 (C)Copyright 1985-2008, American Megatrends,...
...caution when changing the settings of the Ai Tweaker menu items. Incorrect field values can cause the system to malfunction. ASUS P5QC 3-15 The default values of CPU overclocking options to achieve desired CPU internal frequency. Change Option F1 General Help F10...Voltage [Auto] CPU PLL Voltage [Auto] FSB Termination Voltage [Auto] DRAM Voltage [Auto] NB Voltage [Auto] SB Voltage [Auto] PCIE SATA Voltage [Auto] Load-Line Calibration [Auto] CPU Spread Spectrum [Auto] PCIE Spread Spectrum [Auto] v02.61 (C)Copyright 1985-2008, American Megatrends,...

User Manual
Page 89
... to set the South Bridge voltage. The values range from 1.50V to 1.80V with a 0.10V interval. 3.4.19 PCIE SATA Voltage [Auto] Allows you to improve CPU VDroop directly. The values range from 1.10V to 1.40V with a 0.10V interval...options: [Auto] [Disabled] [Enabled] 3.4.21 CPU Spread Spectrum [Auto] Set to [Disabled] to set the PCI Express SATA voltage. Blue CPU PLL Voltage 1.50V~1.78V FSB Termination Voltage 1.20V~1.38V DRAM Voltage (DDR3) 1.50V~1.68V DRAM Voltage (... overclocking ability or [Auto] for EMI control. Configuration options: [Auto] [Disabled] ASUS P5QC 3-21
... to set the South Bridge voltage. The values range from 1.50V to 1.80V with a 0.10V interval. 3.4.19 PCIE SATA Voltage [Auto] Allows you to improve CPU VDroop directly. The values range from 1.10V to 1.40V with a 0.10V interval...options: [Auto] [Disabled] [Enabled] 3.4.21 CPU Spread Spectrum [Auto] Set to [Disabled] to set the PCI Express SATA voltage. Blue CPU PLL Voltage 1.50V~1.78V FSB Termination Voltage 1.20V~1.38V DRAM Voltage (DDR3) 1.50V~1.68V DRAM Voltage (... overclocking ability or [Auto] for EMI control. Configuration options: [Auto] [Disabled] ASUS P5QC 3-21

User Manual
Page 105
... setup. • Refer to 4.3.11 ASUS Drive Xpert for EZ Backup setup. Update To Normal mode [Press Enter] This item appears only when you to use EZ Backup function. ASUS P5QC 3-37 Plug two identical SATA hard drives in the orange SATA port labeled SATA_E1 (orange, port 0) ...and the white SATA port labeled SATA_E2 (white, port 1) and press the key. Plug two identical SATA hard drives in the orange SATA port labeled SATA_E1 (orange, port...
... setup. • Refer to 4.3.11 ASUS Drive Xpert for EZ Backup setup. Update To Normal mode [Press Enter] This item appears only when you to use EZ Backup function. ASUS P5QC 3-37 Plug two identical SATA hard drives in the orange SATA port labeled SATA_E1 (orange, port 0) ...and the white SATA port labeled SATA_E2 (white, port 1) and press the key. Plug two identical SATA hard drives in the orange SATA port labeled SATA_E1 (orange, port...
User Manual
Page 114
... device drivers if the system detects installed devices. Marvell 61xx SATA Controller Driver Installs the Marvell® 61xx SATA controller driver. Atheros L1 Gigabit Ethernet Driver Installs the Atheros® L1 Gigabit Ethernet driver. USB 2.0 Driver Installs the USB 2.0 driver. 4-2 Chapter 4: Software support ASUS InstAll - Install the necessary drivers to activate the devices...
... device drivers if the system detects installed devices. Marvell 61xx SATA Controller Driver Installs the Marvell® 61xx SATA controller driver. Atheros L1 Gigabit Ethernet Driver Installs the Atheros® L1 Gigabit Ethernet driver. USB 2.0 Driver Installs the USB 2.0 driver. 4-2 Chapter 4: Software support ASUS InstAll - Install the necessary drivers to activate the devices...
User Manual
Page 150
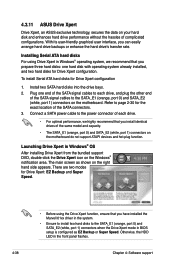
... disks into the drive bays. 2. Connect a SATA power cable to the power connector of each drive, and plug the other end of the same model and capacity. • The SATA_E1 (orange, port 0) and SATA_E2 (white, port 1) connectors on the motherboard do not support ATAPI devices and hot-plug function. Otherwise, the... area. To install Serial ATA hard disks for Drive Xpert configuration. Launching Drive Xpert in the front panel flashes. 4-38 Chapter 4: Software support 4.3.11 ASUS Drive Xpert Drive Xpert, an ASUS exclusive technology, secures the data on the motherboard.
... disks into the drive bays. 2. Connect a SATA power cable to the power connector of each drive, and plug the other end of the same model and capacity. • The SATA_E1 (orange, port 0) and SATA_E2 (white, port 1) connectors on the motherboard do not support ATAPI devices and hot-plug function. Otherwise, the... area. To install Serial ATA hard disks for Drive Xpert configuration. Launching Drive Xpert in the front panel flashes. 4-38 Chapter 4: Software support 4.3.11 ASUS Drive Xpert Drive Xpert, an ASUS exclusive technology, secures the data on the motherboard.
User Manual
Page 153
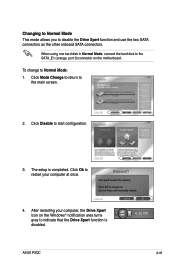
..., the Drive Xpert icon on the motherboard. Click Mode Change to return to the SATA_E1 (orange, port 0) connector on the Windows® notification area turns gray to disable the Drive Xpert function and use the two SATA connectors as the other onboard SATA connectors. The setup is disabled. ASUS P5QC 4-41 After restarting your computer...
..., the Drive Xpert icon on the motherboard. Click Mode Change to return to the SATA_E1 (orange, port 0) connector on the Windows® notification area turns gray to disable the Drive Xpert function and use the two SATA connectors as the other onboard SATA connectors. The setup is disabled. ASUS P5QC 4-41 After restarting your computer...
User Manual
Page 158
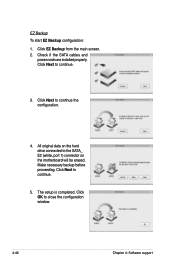
Check if the SATA cables and power cords are installed properly. Make necessary backup before proceeding. The setup is completed. Click Next to continue the configuration. 4. Click Next to continue. 5. EZ Backup To start EZ Backup configuration: 1. All original data on the hard drive connected to continue. 3. Click EZ Backup from the main screen. 2. Click Next to the SATA_ E2 (white, port 1) connector on the motherboard will be erased. Click OK to close the configuration window. 4-46 Chapter 4: Software support
Check if the SATA cables and power cords are installed properly. Make necessary backup before proceeding. The setup is completed. Click Next to continue the configuration. 4. Click Next to continue. 5. EZ Backup To start EZ Backup configuration: 1. All original data on the hard drive connected to continue. 3. Click EZ Backup from the main screen. 2. Click Next to the SATA_ E2 (white, port 1) connector on the motherboard will be erased. Click OK to close the configuration window. 4-46 Chapter 4: Software support

User Manual
Page 159
Click Next to continue the configuration. 4. Click Next to continue. 3. Otherwise, the system erases all original data in both hard disks. Click OK to continue. 5. Check if the SATA cables and power cords are installed properly. Click Super Speed from the main screen. 2. Click Next to close the configuration window. The setup is completed. ASUS P5QC 4-47 Super Speed To start Super Speed configuration: 1. Before proceeding, ensure to back up all data in the two hard disks.
Click Next to continue the configuration. 4. Click Next to continue. 3. Otherwise, the system erases all original data in both hard disks. Click OK to continue. 5. Check if the SATA cables and power cords are installed properly. Click Super Speed from the main screen. 2. Click Next to close the configuration window. The setup is completed. ASUS P5QC 4-47 Super Speed To start Super Speed configuration: 1. Before proceeding, ensure to back up all data in the two hard disks.

User Manual
Page 160
...To EZ Backup Update To Normal Mode Express Gate Enter OS Timer Reset User Data ASUS O.C. Drive Xpert configuration options are under Tools menu. Plug two identical SATA hard drives in BIOS setup environment. Update To EZ Backup [Press Enter] This ...65533;n����e��c��t�o���r�s���o�n� the motherboard �a�n�d��p�r�e�s�s��th�e E�n�t�e�r�>�...
...To EZ Backup Update To Normal Mode Express Gate Enter OS Timer Reset User Data ASUS O.C. Drive Xpert configuration options are under Tools menu. Plug two identical SATA hard drives in BIOS setup environment. Update To EZ Backup [Press Enter] This ...65533;n����e��c��t�o���r�s���o�n� the motherboard �a�n�d��p�r�e�s�s��th�e E�n�t�e�r�>�...
User Manual
Page 161
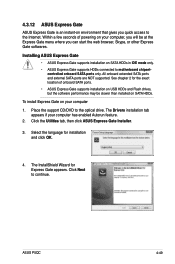
...ASUS Express Gate Installer. 3. ASUS P5QC 4-49 All onboard extended SATA ports and external SATA ports are NOT supported. To install Express Gate on SATA HDDs in IDE mode only. • ASUS Express Gate supports HDDs connected to continue. Select the language for Express Gate appears. 4.3.12 ASUS Express Gate ASUS...and click OK. 4. Within a few seconds of onboard SATA ports. • ASUS Express Gate supports installation on SATA HDDs. The Drivers installation tab appears if your computer 1. Click Next to motherboard chipset- See chapter 2 for the exact location of ...
...ASUS Express Gate Installer. 3. ASUS P5QC 4-49 All onboard extended SATA ports and external SATA ports are NOT supported. To install Express Gate on SATA HDDs in IDE mode only. • ASUS Express Gate supports HDDs connected to continue. Select the language for Express Gate appears. 4.3.12 ASUS Express Gate ASUS...and click OK. 4. Within a few seconds of onboard SATA ports. • ASUS Express Gate supports installation on SATA HDDs. The Drivers installation tab appears if your computer 1. Click Next to motherboard chipset- See chapter 2 for the exact location of ...


