
User Manual
Page 6
... 4.2.1 Running the support DVD 4-1 4.2.2 Drivers menu 4-2 4.2.3 Utilities menu 4-3 4.2.4 Make disk menu 4-5 4.2.5 Manual menu 4-6 4.2.6 ASUS Contact information 4-6 4.2.7 Other information 4-7 4.3 Software information 4-9 4.3.1 ASUS MyLogo2 4-9 4.3.2 AI NET2 4-11 4.3.3 ASUS PC Probe II 4-12 4.3.4 ASUS AI Suite 4-18 4.3.5 ASUS AI Nap 4-20 4.3.6 ASUS Fan Xpert 4-21 4.3.7 ASUS AI Booster 4-23 4.3.8 ASUS EPU-6 Engine 4-24 vi Contents 3.6.4 ACPI APIC Support [Enabled 3-31 3.6.5 APM Configuration 3-32 3.6.6 Hardware Monitor 3-33 3.7 Boot menu 3-35 3.7.1 Boot Device Priority 3-35...
... 4.2.1 Running the support DVD 4-1 4.2.2 Drivers menu 4-2 4.2.3 Utilities menu 4-3 4.2.4 Make disk menu 4-5 4.2.5 Manual menu 4-6 4.2.6 ASUS Contact information 4-6 4.2.7 Other information 4-7 4.3 Software information 4-9 4.3.1 ASUS MyLogo2 4-9 4.3.2 AI NET2 4-11 4.3.3 ASUS PC Probe II 4-12 4.3.4 ASUS AI Suite 4-18 4.3.5 ASUS AI Nap 4-20 4.3.6 ASUS Fan Xpert 4-21 4.3.7 ASUS AI Booster 4-23 4.3.8 ASUS EPU-6 Engine 4-24 vi Contents 3.6.4 ACPI APIC Support [Enabled 3-31 3.6.5 APM Configuration 3-32 3.6.6 Hardware Monitor 3-33 3.7 Boot menu 3-35 3.7.1 Boot Device Priority 3-35...

User Manual
Page 14
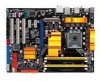
...P5Q specifications summary Internal I/O Connectors BIOS Features Manageability Support DVD contents Form Factor 3 x USB connectors support additional 6 USB ports 1 x Floppy disk drive connector 1 x IDE connector 1 x TPM connector 1 x COM connector 6 x SATA connectors (red) 2 x Drive Xpert SATA connectors (orange and white) 1 x CPU Fan connector 2 x Chassis Fan connector 1 x Power Fan connector 1 x IEEE1394a connector 1 x Front panel audio connector 1 x S/PDIF Out header 1 x Chassis Intrusion connector 1 x CD audio in connector 1 x 24-pin ATX Power connector 1 x 8-pin ATX 12V Power connector...
...P5Q specifications summary Internal I/O Connectors BIOS Features Manageability Support DVD contents Form Factor 3 x USB connectors support additional 6 USB ports 1 x Floppy disk drive connector 1 x IDE connector 1 x TPM connector 1 x COM connector 6 x SATA connectors (red) 2 x Drive Xpert SATA connectors (orange and white) 1 x CPU Fan connector 2 x Chassis Fan connector 1 x Power Fan connector 1 x IEEE1394a connector 1 x Front panel audio connector 1 x S/PDIF Out header 1 x Chassis Intrusion connector 1 x CD audio in connector 1 x 24-pin ATX Power connector 1 x 8-pin ATX 12V Power connector...
User Manual
Page 43
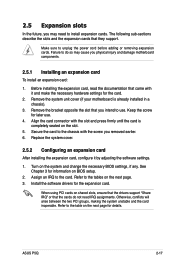
... tables on BIOS setup. 2. Refer to use . 4. Align the card connector with the screw you intend to the table on shared slots, ensure that the drivers support "Share IRQ" or that they support. Remove the system unit cover (if your motherboard is completely seated on the system and change the necessary BIOS settings, if any. Replace the system cover. 2.5.2 Configuring an expansion card After installing the expansion card, configure it...
... tables on BIOS setup. 2. Refer to use . 4. Align the card connector with the screw you intend to the table on shared slots, ensure that the drivers support "Share IRQ" or that they support. Remove the system unit cover (if your motherboard is completely seated on the system and change the necessary BIOS settings, if any. Replace the system cover. 2.5.2 Configuring an expansion card After installing the expansion card, configure it...
User Manual
Page 47
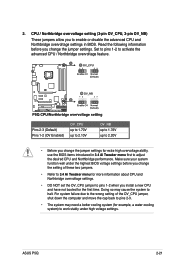
... to pins 1-2 when you change the jumper settings for extra-high overvoltage ability, use the BIOS items introduced in BIOS. Doing so may need a better cooling system (for the first time. CPU / Northbridge overvoltage setting (3-pin OV_CPU, 3-pin OV_NB) These jumpers allow you to enable or disable the advanced CPU and Northbridge overvoltage settings in 3.4 Ai Tweaker menu first to work stably under the highest BIOS voltage settings before you change the jumper settings. Read...
... to pins 1-2 when you change the jumper settings for extra-high overvoltage ability, use the BIOS items introduced in BIOS. Doing so may need a better cooling system (for the first time. CPU / Northbridge overvoltage setting (3-pin OV_CPU, 3-pin OV_NB) These jumpers allow you to enable or disable the advanced CPU and Northbridge overvoltage settings in 3.4 Ai Tweaker menu first to work stably under the highest BIOS voltage settings before you change the jumper settings. Read...
User Manual
Page 54
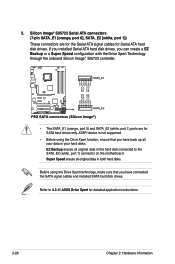
... detailed application instructions. 2-28 Chapter 2: Hardware information Silicon Image® Sil5723 Serial ATA connectors (7-pin SATA_E1 [orange, port 0], SATA_E2 [white, port 1]) These connectors are for Serial ATA hard disk drives. If you installed Serial ATA hard disk drives, you have connected the SATA signal cables and installed SATA hard disk drives. ATAPI device is not supported. • Before using the Drive Xpert technology, make sure that you can create a EZ Backup or a Super Speed configuration with the Drive Xpert Technology through the onboard Silicon...
... detailed application instructions. 2-28 Chapter 2: Hardware information Silicon Image® Sil5723 Serial ATA connectors (7-pin SATA_E1 [orange, port 0], SATA_E2 [white, port 1]) These connectors are for Serial ATA hard disk drives. If you installed Serial ATA hard disk drives, you have connected the SATA signal cables and installed SATA hard disk drives. ATAPI device is not supported. • Before using the Drive Xpert technology, make sure that you can create a EZ Backup or a Super Speed configuration with the Drive Xpert Technology through the onboard Silicon...

User Manual
Page 67
... using a bootable floppy disk) 4. ASUS Update requires an Internet connection either through a network or an Internet Service Provider (ISP). Click the Utilities tab, then click Install ASUS Update VX.XX.XX. 3. ASUS P5Q 3-1 ASUS Update (Updates the BIOS in the optical drive. ASUS CrashFree BIOS 3 (Updates the BIOS using a floppy disk or USB flash disk.) 3. Save a copy of the original motherboard BIOS file to a bootable floppy disk or USB flash disk in the support CD that allows you to manage and update the motherboard Basic Input/Output System (BIOS) setup. 1. The Drivers menu...
... using a bootable floppy disk) 4. ASUS Update requires an Internet connection either through a network or an Internet Service Provider (ISP). Click the Utilities tab, then click Install ASUS Update VX.XX.XX. 3. ASUS P5Q 3-1 ASUS Update (Updates the BIOS in the optical drive. ASUS CrashFree BIOS 3 (Updates the BIOS using a floppy disk or USB flash disk.) 3. Save a copy of the original motherboard BIOS file to a bootable floppy disk or USB flash disk in the support CD that allows you to manage and update the motherboard Basic Input/Output System (BIOS) setup. 1. The Drivers menu...

User Manual
Page 74
... motherboard support CD, the floppy disk or the USB flash disk containing the updated motherboard BIOS before using this utility. • If you to the USB port. 2. Recovering the BIOS from the USB flash disk To recover the BIOS from the support CD: 1. Turn on the system. 3. Bad BIOS checksum. Bad BIOS checksum. otherwise, the utility will automatically checks the devices for the BIOS file. 3.1.5 ASUS CrashFree BIOS 3 utility The ASUS CrashFree BIOS 3 is an auto recovery tool that allows you use a SATA optical drive, always connect the SATA cable...
... motherboard support CD, the floppy disk or the USB flash disk containing the updated motherboard BIOS before using this utility. • If you to the USB port. 2. Recovering the BIOS from the USB flash disk To recover the BIOS from the support CD: 1. Turn on the system. 3. Bad BIOS checksum. Bad BIOS checksum. otherwise, the utility will automatically checks the devices for the BIOS file. 3.1.5 ASUS CrashFree BIOS 3 utility The ASUS CrashFree BIOS 3 is an auto recovery tool that allows you use a SATA optical drive, always connect the SATA cable...
User Manual
Page 79
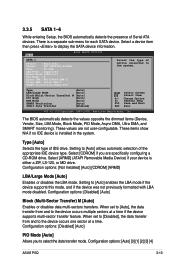
...-ROM drive. Setting to [Auto] allows automatic selection of device connected to the device occurs multiple sectors at a time. Configuration options: [Auto] [0] [1] [2] [3] [4] ASUS P5Q 3-13 The BIOS automatically detects the values opposite the dimmed items (Device, Vendor, Size, LBA Mode, Block Mode, PIO Mode, Async DMA, Ultra DMA, and SMART monitoring). When set to [Auto], the data transfer from and to select the data transfer mode. Main BIOS SETUP UTILITY SATA 1 Device :Hard Disk Vendor :WDC WD800JD-00LSA0 Size :80.0GB LBA Mode :Supported...
...-ROM drive. Setting to [Auto] allows automatic selection of device connected to the device occurs multiple sectors at a time. Configuration options: [Auto] [0] [1] [2] [3] [4] ASUS P5Q 3-13 The BIOS automatically detects the values opposite the dimmed items (Device, Vendor, Size, LBA Mode, Block Mode, PIO Mode, Async DMA, Ultra DMA, and SMART monitoring). When set to [Auto], the data transfer from and to select the data transfer mode. Main BIOS SETUP UTILITY SATA 1 Device :Hard Disk Vendor :WDC WD800JD-00LSA0 Size :80.0GB LBA Mode :Supported...

User Manual
Page 80
... the Serial ATA hard disk drives to use the Advanced Host Controller Interface (AHCI), set or change the configurations for the Serial ATA connectors supported by allowing the drive to [AHCI]. 3-14 Chapter 3: BIOS setup DMA Mode [Auto] Selects the DMA mode. Configuration options: [Auto] [SWDMA0] [SWDMA1] [SWDMA2] [MWDMA0] [MWDMA1] [MWDMA2] [UDMA0] [UDMA1] [UDMA2] [UDMA3] [UDMA4] [UDMA5] SMART Monitoring [Auto] Sets the Smart Monitoring, Analysis, and Reporting Technology. Configuration options: [Auto] [Disabled] [Enabled] 32Bit Data Transfer [Enabled] Enables or disables 32-bit data...
... the Serial ATA hard disk drives to use the Advanced Host Controller Interface (AHCI), set or change the configurations for the Serial ATA connectors supported by allowing the drive to [AHCI]. 3-14 Chapter 3: BIOS setup DMA Mode [Auto] Selects the DMA mode. Configuration options: [Auto] [SWDMA0] [SWDMA1] [SWDMA2] [MWDMA0] [MWDMA1] [MWDMA2] [UDMA0] [UDMA1] [UDMA2] [UDMA3] [UDMA4] [UDMA5] SMART Monitoring [Auto] Sets the Smart Monitoring, Analysis, and Reporting Technology. Configuration options: [Auto] [Disabled] [Enabled] 32Bit Data Transfer [Enabled] Enables or disables 32-bit data...

User Manual
Page 83
..., Inc. Main Ai Tweaker BIOS SETUP UTILITY Advanced Power Boot Configure System Performance Settings Ai Overclock Tuner [Auto] CPU Ratio Setting [Auto] FSB Strap to display the following items vary depending on the motherboard. Loads the optimal settings for the system. Change Option F1 General Help F10 Save and Exit ESC Exit v02.61 (C)Copyright 1985-2008, American Megatrends, Inc. 3.4.1 Ai Overclock Tuner [Auto] Allows selection of the Ai Tweaker menu items...
..., Inc. Main Ai Tweaker BIOS SETUP UTILITY Advanced Power Boot Configure System Performance Settings Ai Overclock Tuner [Auto] CPU Ratio Setting [Auto] FSB Strap to display the following items vary depending on the motherboard. Loads the optimal settings for the system. Change Option F1 General Help F10 Save and Exit ESC Exit v02.61 (C)Copyright 1985-2008, American Megatrends, Inc. 3.4.1 Ai Overclock Tuner [Auto] Allows selection of the Ai Tweaker menu items...

User Manual
Page 90
... display the configuration options. Select Screen Select Item Enter Go to Sub Screen F1 General Help F10 Save and Exit ESC Exit v02.61 (C)Copyright 1985-2008, American Megatrends, Inc. 3.5.1 TPM Configuration The items in this menu allow you to enable or disalbe TCG/TPM setting. Configuration options: [Last setting] [Disabled] [Enabled] 3-24 Chapter 3: BIOS setup Main Ai Tweaker BIOS SETUP UTILITY Advanced Power Boot TPM Configuration CPU Configuration Chipset Onboard Devices Configuration USB Configuration PCIPnP Tools Exit Configure CPU. 3.5 Advanced menu The Advanced menu...
... display the configuration options. Select Screen Select Item Enter Go to Sub Screen F1 General Help F10 Save and Exit ESC Exit v02.61 (C)Copyright 1985-2008, American Megatrends, Inc. 3.5.1 TPM Configuration The items in this menu allow you to enable or disalbe TCG/TPM setting. Configuration options: [Last setting] [Disabled] [Enabled] 3-24 Chapter 3: BIOS setup Main Ai Tweaker BIOS SETUP UTILITY Advanced Power Boot TPM Configuration CPU Configuration Chipset Onboard Devices Configuration USB Configuration PCIPnP Tools Exit Configure CPU. 3.5 Advanced menu The Advanced menu...
User Manual
Page 94
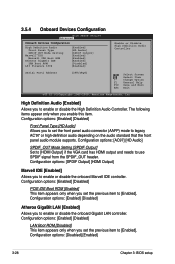
...Configuration options: [Enabled] [Disabled] PCIE IDE Boot ROM [Enabled] This item appears only when you enable this item. The following items appear only when you set the front panel audio connector (AAFP) mode to [Enabled]. Configuration options: [Enabled] [Disabled] Atheros GigaBit LAN [Enabled] Allows you to use SPDIF signal from the SPDIF_OUT header. 3.5.4 Onboard Devices Configuration BIOS SETUP UTILITY Advanced Onboard Devices Configuration High Definition Audio Front Panel Type SPDIF_OUT Mode Setting Marvell IDE Marvell IDE Boot ROM Atheros GigaBit LAN LAN Boot...
...Configuration options: [Enabled] [Disabled] PCIE IDE Boot ROM [Enabled] This item appears only when you enable this item. The following items appear only when you set the front panel audio connector (AAFP) mode to [Enabled]. Configuration options: [Enabled] [Disabled] Atheros GigaBit LAN [Enabled] Allows you to use SPDIF signal from the SPDIF_OUT header. 3.5.4 Onboard Devices Configuration BIOS SETUP UTILITY Advanced Onboard Devices Configuration High Definition Audio Front Panel Type SPDIF_OUT Mode Setting Marvell IDE Marvell IDE Boot ROM Atheros GigaBit LAN LAN Boot...
User Manual
Page 97
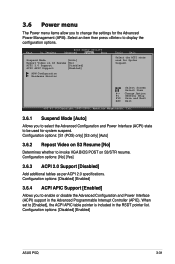
...[No] ACPI 2.0 Support [Disabled] ACPI APIC Support [Enabled] APM Configuration Hardware Monitor Tools Exit Select the ACPI state used for system suspend. Configuration options: [Disabled] [Enabled] 3.6.4 ACPI APIC Support [Enabled] Allows you to display the configuration options. Select Screen Select Item +- Select an item then press to enable or disable the Advanced Configuration and Power Interface (ACPI) support in the RSDT pointer list. Configuration options: [Disabled] [Enabled] ASUS P5Q 3-31 Main Ai Tweaker BIOS SETUP UTILITY Advanced Power Boot Suspend Mode [Auto...
...[No] ACPI 2.0 Support [Disabled] ACPI APIC Support [Enabled] APM Configuration Hardware Monitor Tools Exit Select the ACPI state used for system suspend. Configuration options: [Disabled] [Enabled] 3.6.4 ACPI APIC Support [Enabled] Allows you to display the configuration options. Select Screen Select Item +- Select an item then press to enable or disable the Advanced Configuration and Power Interface (ACPI) support in the RSDT pointer list. Configuration options: [Disabled] [Enabled] ASUS P5Q 3-31 Main Ai Tweaker BIOS SETUP UTILITY Advanced Power Boot Suspend Mode [Auto...

User Manual
Page 103
... set a password, this item to disabled password. The message "Password Uninstalled" appears. The Supervisor Password item on how to display the configuration options. 3.7.3 Security The Security menu items allow you to change password. Change Supervisor Password Select this item shows Installed. The message "Password Installed" appears after you can clear it by erasing the CMOS Real Time Clock (RTC) RAM. again to set your BIOS password, you successfully set or change the supervisor password. Select Screen Select Item Enter Change...
... set a password, this item to disabled password. The message "Password Uninstalled" appears. The Supervisor Password item on how to display the configuration options. 3.7.3 Security The Security menu items allow you to change password. Change Supervisor Password Select this item shows Installed. The message "Password Installed" appears after you can clear it by erasing the CMOS Real Time Clock (RTC) RAM. again to set your BIOS password, you successfully set or change the supervisor password. Select Screen Select Item Enter Change...

User Manual
Page 105
... Flash 2. Change Field Enter Go to configure options for details. This utility doesn't support : 1.NTFS format Express Gate Enter OS Timer Reset User Data ASUS O.C. ASUSTek EZ Flash 2 BIOS ROM Utility V3.25 FLASH TYPE: WINBOND W25P/X80 Current ROM BOARD: P5Q VER: 0204 DATE: 05/06/2008 Update ROM BOARD: Unknown VER: Unknown DATE: Unknown PATH: A:\ A: Note [Enter] Select or Load [Tab] Switch [V] Drive Info [Up/Down/Home/End] Move [B] Backup [ESC] Exit ASUS P5Q 3-39 3.8 Tools menu The Tools menu...
... Flash 2. Change Field Enter Go to configure options for details. This utility doesn't support : 1.NTFS format Express Gate Enter OS Timer Reset User Data ASUS O.C. ASUSTek EZ Flash 2 BIOS ROM Utility V3.25 FLASH TYPE: WINBOND W25P/X80 Current ROM BOARD: P5Q VER: 0204 DATE: 05/06/2008 Update ROM BOARD: Unknown VER: Unknown DATE: Unknown PATH: A:\ A: Note [Enter] Select or Load [Tab] Switch [V] Drive Info [Up/Down/Home/End] Move [B] Backup [ESC] Exit ASUS P5Q 3-39 3.8 Tools menu The Tools menu...
User Manual
Page 113
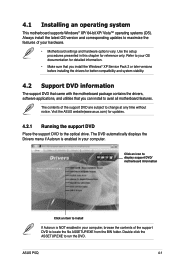
... updates. 4.2.1 Running the support DVD Place the support DVD to run the DVD. Use the setup procedures presented in your hardware. • Motherboard settings and hardware options vary. ASUS P5Q 4-1 Click an icon to display support DVD/ motherboard information Click an item to install If Autorun is enabled in your OS documentation for detailed information. • Make sure that you install the Windows® XP Service Pack 2 or later versions before installing the drivers for...
... updates. 4.2.1 Running the support DVD Place the support DVD to run the DVD. Use the setup procedures presented in your hardware. • Motherboard settings and hardware options vary. ASUS P5Q 4-1 Click an icon to display support DVD/ motherboard information Click an item to install If Autorun is enabled in your OS documentation for detailed information. • Make sure that you install the Windows® XP Service Pack 2 or later versions before installing the drivers for...

User Manual
Page 116
... 9.0c driver. ASUS PC Probe II This smart utility monitors the fan speed, CPU temperature, and system voltages, and alerts you of any detected problems. This utility helps you to open, view, and print documents in Portable Document Format (PDF). Ulead Burn.Now Installs the Ulead Burn.Now application for users to enjoy large-sized data exchange of files such as movies, music, etc ASUS Express Gate Installer Allows you...
... 9.0c driver. ASUS PC Probe II This smart utility monitors the fan speed, CPU temperature, and system voltages, and alerts you of any detected problems. This utility helps you to open, view, and print documents in Portable Document Format (PDF). Ulead Burn.Now Installs the Ulead Burn.Now application for users to enjoy large-sized data exchange of files such as movies, music, etc ASUS Express Gate Installer Allows you...

User Manual
Page 156
... key. Plug two identical SATA hard drives in the SATA_E1 (orange, port 0) and SATA_E2 (white, port 1) connectors on the motherboard. • Super Speed erases all original data in the hard disk connected to the SATA_E1 (orange, port 0) connector on the motherboard. 4-44 Chapter 4: Software support Main Ai Tweaker BIOS SETUP UTILITY Advanced Power Boot ASUS EZ Flash 2 Drive Xpert Control Drive Xpert Mode Update Update To Super Speed Update To EZ Backup Update To Normal Mode [Auto] [Mode Change] [Press Enter] [Press Enter] [Press Enter] Express Gate Enter OS Timer Reset...
... key. Plug two identical SATA hard drives in the SATA_E1 (orange, port 0) and SATA_E2 (white, port 1) connectors on the motherboard. • Super Speed erases all original data in the hard disk connected to the SATA_E1 (orange, port 0) connector on the motherboard. 4-44 Chapter 4: Software support Main Ai Tweaker BIOS SETUP UTILITY Advanced Power Boot ASUS EZ Flash 2 Drive Xpert Control Drive Xpert Mode Update Update To Super Speed Update To EZ Backup Update To Normal Mode [Auto] [Mode Change] [Press Enter] [Press Enter] [Press Enter] Express Gate Enter OS Timer Reset...

User Manual
Page 166
... > Express Gate > Express Gate Installer > Repair this software. Main Ai Tweaker BIOS SETUP UTILITY Advanced Power Boot Tools Exit ASUS EZ Flash 2 Express Gate Enter OS Timer Reset User Data [Enabled] [10 Seconds] [No] Press ENTER to run the utility to continue. 4. This utility doesn't support : 1.NTFS format Updating Express Gate You may update your existing Express Gate software to complete installation. New versions of the software on the support DVD or download new versions from the ASUS support website. Follow the screen instructions to new versions. Click...
... > Express Gate > Express Gate Installer > Repair this software. Main Ai Tweaker BIOS SETUP UTILITY Advanced Power Boot Tools Exit ASUS EZ Flash 2 Express Gate Enter OS Timer Reset User Data [Enabled] [10 Seconds] [No] Press ENTER to run the utility to continue. 4. This utility doesn't support : 1.NTFS format Updating Express Gate You may update your existing Express Gate software to complete installation. New versions of the software on the support DVD or download new versions from the ASUS support website. Follow the screen instructions to new versions. Click...

User Manual
Page 168
...a SATA power cable to the system or the motherboard user guide for details on each drive. 4.4.3 Intel® RAID configurations This motherboard supports RAID 0, RAID 1, RAID 5, RAID 10 and Intel® Matrix Storage configurations for a RAID configuration: 1. Go to display the configuration options. 4. To do this: 1. Select the item Configure SATA as item options, then press . 5. For optimal performance, install identical drives of the same model and capacity when creating a disk array. To install the SATA hard disks for Serial ATA hard disks drives through the BIOS Setup...
...a SATA power cable to the system or the motherboard user guide for details on each drive. 4.4.3 Intel® RAID configurations This motherboard supports RAID 0, RAID 1, RAID 5, RAID 10 and Intel® Matrix Storage configurations for a RAID configuration: 1. Go to display the configuration options. 4. To do this: 1. Select the item Configure SATA as item options, then press . 5. For optimal performance, install identical drives of the same model and capacity when creating a disk array. To install the SATA hard disks for Serial ATA hard disks drives through the BIOS Setup...


