
P5P800 User's manual English Edition E1906
Page 4
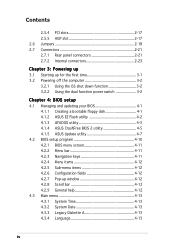
... BIOS setup 4.1 Managing and updating your BIOS 4-1 4.1.1 Creating a bootable floppy disk 4-1 4.1.2 ASUS EZ Flash utility 4-2 4.1.3 AFUDOS utility 4-3 4.1.4 ASUS CrashFree BIOS 2 utility 4-5 4.1.5 ASUS Update utility 4-7 4.2 BIOS setup program 4-10 4.2.1 BIOS menu screen 4-11 4.2.2 Menu bar 4-...11 4.2.3 Navigation keys 4-11 4.2.4 Menu items 4-12 4.2.5 Sub-menu items 4-12 4.2.6 Configuration fields 4-12 4.2.7 Pop-up window 4-12 4.2.8...
... BIOS setup 4.1 Managing and updating your BIOS 4-1 4.1.1 Creating a bootable floppy disk 4-1 4.1.2 ASUS EZ Flash utility 4-2 4.1.3 AFUDOS utility 4-3 4.1.4 ASUS CrashFree BIOS 2 utility 4-5 4.1.5 ASUS Update utility 4-7 4.2 BIOS setup program 4-10 4.2.1 BIOS menu screen 4-11 4.2.2 Menu bar 4-...11 4.2.3 Navigation keys 4-11 4.2.4 Menu items 4-12 4.2.5 Sub-menu items 4-12 4.2.6 Configuration fields 4-12 4.2.7 Pop-up window 4-12 4.2.8...
P5P800 User's manual English Edition E1906
Page 27
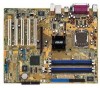
... the socket, making sure that the gold triangle is released from the load plate window to the left corner of the arrow to the socket pins, do not remove the PnP cap unless you . Gold triangle mark ASUS P5P800 A 2-7 2. Lift the load plate with your thumb and forefinger to a 100º angle (A), then...
... the socket, making sure that the gold triangle is released from the load plate window to the left corner of the arrow to the socket pins, do not remove the PnP cap unless you . Gold triangle mark ASUS P5P800 A 2-7 2. Lift the load plate with your thumb and forefinger to a 100º angle (A), then...
P5P800 User's manual English Edition E1906
Page 28
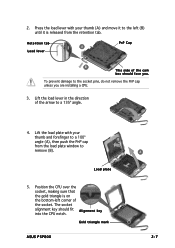
...on the socket and damaging the CPU! Install an Intel® Pentium® 4 CPU that the item Hyper-Threading Technology is supported under Windows® XP/2003 Server and Linux 2.4.x (kernel) and later versions only. DO NOT force the CPU into the retention tab. Under Linux... are using any other operating systems, disable the Hyper-Threading Technology item in the BIOS to ensure system stability and performance. • Installing Windows® XP Service Pack 1 is recommended. • Make sure to compile the code. Reboot the computer. 2-8 Chapter 2: Hardware information ...
...on the socket and damaging the CPU! Install an Intel® Pentium® 4 CPU that the item Hyper-Threading Technology is supported under Windows® XP/2003 Server and Linux 2.4.x (kernel) and later versions only. DO NOT force the CPU into the retention tab. Under Linux... are using any other operating systems, disable the Hyper-Threading Technology item in the BIOS to ensure system stability and performance. • Installing Windows® XP Service Pack 1 is recommended. • Make sure to compile the code. Reboot the computer. 2-8 Chapter 2: Hardware information ...
P5P800 User's manual English Edition E1906
Page 46
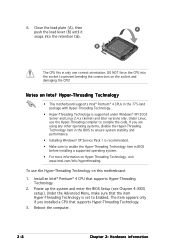
...support to one of the IDE channels (either primary or secondary channel) is disabled in a legacy operating system (DOS, Windows® 98/ME) when you use the SATA connectors. 2-26 Chapter 2: Hardware information 3 . SATA2 GND RSATA_TXP2 RSATA_TXN2 GND RSATA_RXP2 RSATA_RXN2... GND ® P5P800 SATA1 GND RSATA_TXP1 RSATA_TXN1 GND RSATA_RXP1 RSATA_RXN1 GND P5P800 SATA connectors Important notes on Serial ATA • Install the Windows® 2000 Service Pack 4 or the Windows® XP Service Pack1 or later versions before using the ...
...support to one of the IDE channels (either primary or secondary channel) is disabled in a legacy operating system (DOS, Windows® 98/ME) when you use the SATA connectors. 2-26 Chapter 2: Hardware information 3 . SATA2 GND RSATA_TXP2 RSATA_TXN2 GND RSATA_RXP2 RSATA_RXN2... GND ® P5P800 SATA1 GND RSATA_TXP1 RSATA_TXN1 GND RSATA_RXP1 RSATA_RXN1 GND P5P800 SATA connectors Important notes on Serial ATA • Install the Windows® 2000 Service Pack 4 or the Windows® XP Service Pack1 or later versions before using the ...
P5P800 User's manual English Edition E1906
Page 47
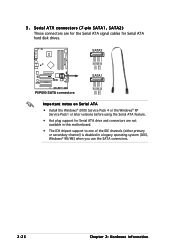
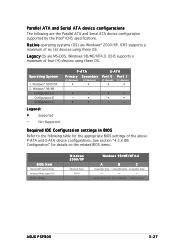
... See section "4.3.6 IDE Configuration" for the appropriate BIOS settings of six (6) devices using these OS. L e g a c y OS are Windows® 2000/XP. ICH5 supports a maximum of four (4) devices using these OS. Required IDE Configuration settings in BIOS Refer to the following are... Mode Compatible Mode Compatible Mode - - - P-ATA+S-ATA P-ATA Ports Only ASUS P5P800 2-27 Primary P-ATA+S-ATA Sec. Operating System 1. Windows® 2000/XP 2. N a t i v e operating systems (OS) are MS-DOS, Windows 98/ME/NT4.0. ICH5 supports a maximum of the above P-ATA and S-ATA...
... See section "4.3.6 IDE Configuration" for the appropriate BIOS settings of six (6) devices using these OS. L e g a c y OS are Windows® 2000/XP. ICH5 supports a maximum of four (4) devices using these OS. Required IDE Configuration settings in BIOS Refer to the following are... Mode Compatible Mode Compatible Mode - - - P-ATA+S-ATA P-ATA Ports Only ASUS P5P800 2-27 Primary P-ATA+S-ATA Sec. Operating System 1. Windows® 2000/XP 2. N a t i v e operating systems (OS) are MS-DOS, Windows 98/ME/NT4.0. ICH5 supports a maximum of the above P-ATA and S-ATA...

P5P800 User's manual English Edition E1906
Page 58
...; shuts down the computer. 3. If you are using Windows® 98SE/ME/2000: 1. 3.2 Powering off the computer 3.2.1 Using the OS shut down the computer. 3. Make sure that the S h u t D o w n option button is ON, pressing the .... Pressing the power switch for details. 3-2 Chapter 3: Powering up Click the T u r n O f f button to shut down function If you are using Windows® XP: 1. The power supply should turn off after Windows® shuts down. 3.2.2 Using the dual function power switch While the system is selected, then click the O K button to shut down...
...; shuts down the computer. 3. If you are using Windows® 98SE/ME/2000: 1. 3.2 Powering off the computer 3.2.1 Using the OS shut down the computer. 3. Make sure that the S h u t D o w n option button is ON, pressing the .... Pressing the power switch for details. 3-2 Chapter 3: Powering up Click the T u r n O f f button to shut down function If you are using Windows® XP: 1. The power supply should turn off after Windows® shuts down. 3.2.2 Using the dual function power switch While the system is selected, then click the O K button to shut down...
P5P800 User's manual English Edition E1906
Page 61
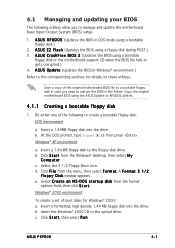
... corrupted.) 4. Insert a 1.44MB floppy disk into the drive. Insert a 1.44 MB floppy disk to the optical drive. Click F i l e from the format options field, then click S t a r t. b. ASUS P5P800 4-1 Windows® XP environment a. c. D O S s t a r t u p d i s k from the menu, then select F o r m a t. c. Click S t a r t, then select R u n. 4.1 Managing and updating your BIOS The following to create a bootable floppy disk. Do either...
... corrupted.) 4. Insert a 1.44MB floppy disk into the drive. Insert a 1.44 MB floppy disk to the optical drive. Click F i l e from the format options field, then click S t a r t. b. ASUS P5P800 4-1 Windows® XP environment a. c. D O S s t a r t u p d i s k from the menu, then select F o r m a t. c. Click S t a r t, then select R u n. 4.1 Managing and updating your BIOS The following to create a bootable floppy disk. Do either...

P5P800 User's manual English Edition E1906
Page 67
... directly from the Internet, and • View the BIOS version information. The D r i v e r s menu appears. 2. X X. ASUS P5P800 4-7 4.1.5 ASUS Update utility The ASUS Update is a utility that comes with the motherboard package. Quit all Windows® applications before you to your system. The ASUS Update utility allows you update the BIOS using this utility. Place the support CD...
... directly from the Internet, and • View the BIOS version information. The D r i v e r s menu appears. 2. X X. ASUS P5P800 4-7 4.1.5 ASUS Update utility The ASUS Update is a utility that comes with the motherboard package. Quit all Windows® applications before you to your system. The ASUS Update utility allows you update the BIOS using this utility. Place the support CD...
P5P800 User's manual English Edition E1906
Page 68
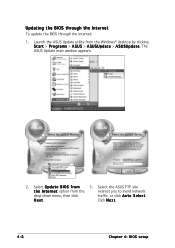
Select the ASUS FTP site t h e I O S f r o m 3. Updating the BIOS through the Internet To update the BIOS through the Internet: 1. Select U p d a t e B I n t e r n e t option from the Windows® desktop by clicking S t a r t > P r o g r a m s > A S U S > A S U S U p d a t e > A S U S U p d a t e. Launch the ASUS Update utility from the nearest you to avoid network drop-down menu, then click traffic, or click A u t o S e l e c t. The ASUS Update main window appears. 2. N e x t. Click N e x t. 4-8 Chapter 4: BIOS setup
Select the ASUS FTP site t h e I O S f r o m 3. Updating the BIOS through the Internet To update the BIOS through the Internet: 1. Select U p d a t e B I n t e r n e t option from the Windows® desktop by clicking S t a r t > P r o g r a m s > A S U S > A S U S U p d a t e > A S U S U p d a t e. Launch the ASUS Update utility from the nearest you to avoid network drop-down menu, then click traffic, or click A u t o S e l e c t. The ASUS Update main window appears. 2. N e x t. Click N e x t. 4-8 Chapter 4: BIOS setup
P5P800 User's manual English Edition E1906
Page 69
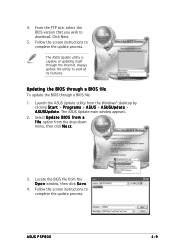
... update the BIOS through the Internet. Launch the ASUS Update utility from the drop-down menu, then click N e x t. 3. The ASUS Update utility is capable of updating itself through a BIOS file: 1. Locate the BIOS file from the O p e n window, then click S a v e. 4. Always update the utility to download. 4. ASUS P5P800 4-9 Follow the screen instructions to complete the update...
... update the BIOS through the Internet. Launch the ASUS Update utility from the drop-down menu, then click N e x t. 3. The ASUS Update utility is capable of updating itself through a BIOS file: 1. Locate the BIOS file from the O p e n window, then click S a v e. 4. Always update the utility to download. 4. ASUS P5P800 4-9 Follow the screen instructions to complete the update...
P5P800 User's manual English Edition E1906
Page 72
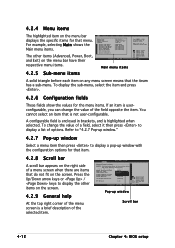
... iteam has a sub-menu. A configurable field is not user-configurable. Refer to "4.2.7 Pop-up window." 4.2.7 Pop-up window Select a menu item then press to display a pop-up window Scroll bar 4-12 Chapter 4: BIOS setup Configure DRAM Timing by SPD Memory Acceleration Mode DRAM Idle Timer...F1 General Help F10 Save and Exit ESC Exit A solid triangle before each item on any menu screen means that is enclosed in ] [English] :[ST320413A] :[ASUS CD-S340] :[Not Detected] :[Not Detected] :[Not Detected] :[Not Detected] Main menu items Use [ENTER], [TAB] or [SHIFT-TAB] to malfunction. ...
... iteam has a sub-menu. A configurable field is not user-configurable. Refer to "4.2.7 Pop-up window." 4.2.7 Pop-up window Select a menu item then press to display a pop-up window Scroll bar 4-12 Chapter 4: BIOS setup Configure DRAM Timing by SPD Memory Acceleration Mode DRAM Idle Timer...F1 General Help F10 Save and Exit ESC Exit A solid triangle before each item on any menu screen means that is enclosed in ] [English] :[ST320413A] :[ASUS CD-S340] :[Not Detected] :[Not Detected] :[Not Detected] :[Not Detected] Main menu items Use [ENTER], [TAB] or [SHIFT-TAB] to malfunction. ...
P5P800 User's manual English Edition E1906
Page 75
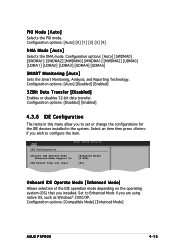
... devices installed in this menu allow you wish to Enhanced Mode if you installed. Set to configure the item. Configuration options: [Compatible Mode] [Enhanced Mode] ASUS P5P800 4-15 Configuration options: [Auto] [SWDMA0] [SWDMA1] [SWDMA2] [MWDMA0] [MWDMA1] [MWDMA2] [UDMA0] [UDMA1] [UDMA2] [UDMA3] [UDMA4] [UDMA5] SMART Monitoring [... of the IDE operation mode depending on the operating system (OS) that you are using native OS, such as Windows® 2000/XP. PIO Mode [Auto] Selects the PIO mode. Configuration options: [Auto] [0] [1] [2] [3] [4] DMA Mode [Auto] Selects the ...
... devices installed in this menu allow you wish to Enhanced Mode if you installed. Set to configure the item. Configuration options: [Compatible Mode] [Enhanced Mode] ASUS P5P800 4-15 Configuration options: [Auto] [SWDMA0] [SWDMA1] [SWDMA2] [MWDMA0] [MWDMA1] [MWDMA2] [UDMA0] [UDMA1] [UDMA2] [UDMA3] [UDMA4] [UDMA5] SMART Monitoring [... of the IDE operation mode depending on the operating system (OS) that you are using native OS, such as Windows® 2000/XP. PIO Mode [Auto] Selects the PIO mode. Configuration options: [Auto] [0] [1] [2] [3] [4] DMA Mode [Auto] Selects the ...
P5P800 User's manual English Edition E1906
Page 100
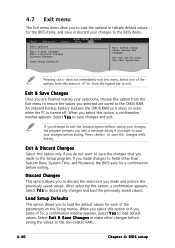
... and restore the previously saved values. Select Y e s to save changes and exit. Exit & Discard Changes Select this operation. After selecting this option, a confirmation window appears. Load Setup Defaults This option allows you to load the default values for each of the options from this option from the legend bar... the non-volatile RAM. 4-40 Chapter 4: BIOS setup Select Y e s to save the changes while exiting. Discard Changes This option allows you press , a confirmation window appears. Pressing does not immediately exit this option or if you to the CMOS RAM.
... and restore the previously saved values. Select Y e s to save changes and exit. Exit & Discard Changes Select this operation. After selecting this option, a confirmation window appears. Load Setup Defaults This option allows you to load the default values for each of the options from this option from the legend bar... the non-volatile RAM. 4-40 Chapter 4: BIOS setup Select Y e s to save the changes while exiting. Discard Changes This option allows you press , a confirmation window appears. Pressing does not immediately exit this option or if you to the CMOS RAM.
P5P800 User's manual English Edition E1906
Page 103
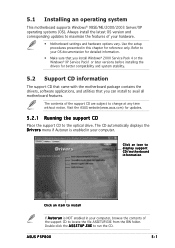
... setup procedures presented in your OS documentation for detailed information. • Make sure that you install Windows® 2000 Service Pack 4 or the Windows® XP Service Pack1 or later versions before installing the drivers for better compatibility and system stability.... an icon to display support CD/motherboard information Click an item to locate the file ASSETUP.EXE from the BIN folder. Refer to your computer. ASUS P5P800 5-1 The CD automatically displays the D r i v e r s menu if Autorun is NOT enabled in your computer, browse the contents of the support CD ...
... setup procedures presented in your OS documentation for detailed information. • Make sure that you install Windows® 2000 Service Pack 4 or the Windows® XP Service Pack1 or later versions before installing the drivers for better compatibility and system stability.... an icon to display support CD/motherboard information Click an item to locate the file ASSETUP.EXE from the BIN folder. Refer to your computer. ASUS P5P800 5-1 The CD automatically displays the D r i v e r s menu if Autorun is NOT enabled in your computer, browse the contents of the support CD ...
P5P800 User's manual English Edition E1906
Page 105
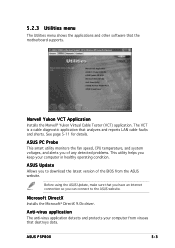
... the motherboard supports. See page 5-11 for Windows XP Home/Professional Marvell VCT Application ASUS PC Probe V2.23.03 ASUS Update V5.30.01 Microsoft DirectX 9.0b Anti-Virus Utility ADOBE Acrobat Reader V5.0 ASUS Screen Saver Marvell Yukon VCT Application Installs the Marvell...® Yukon Virtual Cable Tester (VCT) application. ASUS Update Allows you to the ASUS website. Before using the ASUS Update, make sure that destroys data. Microsoft DirectX Installs the Microsoft® DirectX 9.0b driver. ASUS P5P800 5-3 Anti-virus application The anti-virus application detects ...
... the motherboard supports. See page 5-11 for Windows XP Home/Professional Marvell VCT Application ASUS PC Probe V2.23.03 ASUS Update V5.30.01 Microsoft DirectX 9.0b Anti-Virus Utility ADOBE Acrobat Reader V5.0 ASUS Screen Saver Marvell Yukon VCT Application Installs the Marvell...® Yukon Virtual Cable Tester (VCT) application. ASUS Update Allows you to the ASUS website. Before using the ASUS Update, make sure that destroys data. Microsoft DirectX Installs the Microsoft® DirectX 9.0b driver. ASUS P5P800 5-3 Anti-virus application The anti-virus application detects ...
P5P800 User's manual English Edition E1906
Page 109
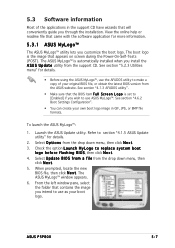
... help or readme file that will conveniently guide you customize the boot logo. The ASUS MyLogo™ is the image that contains the image you install the A S U S U p d a t e utility from the drop down menu, then click N e x t. 3. ASUS P5P800 5-7 From the left window pane, select the folder that appears on screen during the Power-On-Self...
... help or readme file that will conveniently guide you customize the boot logo. The ASUS MyLogo™ is the image that contains the image you install the A S U S U p d a t e utility from the drop down menu, then click N e x t. 3. ASUS P5P800 5-7 From the left window pane, select the folder that appears on screen during the Power-On-Self...
P5P800 User's manual English Edition E1906
Page 110
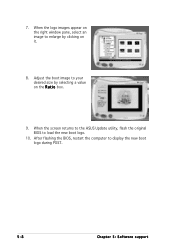
Adjust the boot image to enlarge by selecting a value on it. 8. When the screen returns to the ASUS Update utility, flash the original BIOS to display the new boot logo during POST. 5-8 Chapter 5: Software support After flashing the BIOS, restart the computer to load the new boot logo. 10. When the logo images appear on the right window pane, select an image to your desired size by clicking on the R a t i o box. 9. 7.
Adjust the boot image to enlarge by selecting a value on it. 8. When the screen returns to the ASUS Update utility, flash the original BIOS to display the new boot logo during POST. 5-8 Chapter 5: Software support After flashing the BIOS, restart the computer to load the new boot logo. 10. When the logo images appear on the right window pane, select an image to your desired size by clicking on the R a t i o box. 9. 7.
P5P800 User's manual English Edition E1906
Page 113
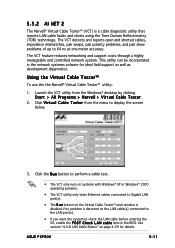
ASUS P5P800 5-11 5.3.2 AI NET 2 The Marvell® Virtual Cable Tester™ (VCT) is detected on the LAN cable(s) connected to the LAN port(s). • ... disabled if no problem is a cable diagnostic utility that reports LAN cable faults and shorts using the Time Domain Reflectometry (TDR) technology. Click V i r t u a l C a b l e T e s t e r from the Windows® desktop by clicking S t a r t > A l l P r o g r a m s > M a r v e l l > V i r t u a l C a b l e T e s t e r. 2. Click the R u n button to perform a cable test. • The VCT only runs on page 4-29 for ideal field ...
ASUS P5P800 5-11 5.3.2 AI NET 2 The Marvell® Virtual Cable Tester™ (VCT) is detected on the LAN cable(s) connected to the LAN port(s). • ... disabled if no problem is a cable diagnostic utility that reports LAN cable faults and shorts using the Time Domain Reflectometry (TDR) technology. Click V i r t u a l C a b l e T e s t e r from the Windows® desktop by clicking S t a r t > A l l P r o g r a m s > M a r v e l l > V i r t u a l C a b l e T e s t e r. 2. Click the R u n button to perform a cable test. • The VCT only runs on page 4-29 for ideal field ...
P5P800 User's manual English Edition E1906
Page 114
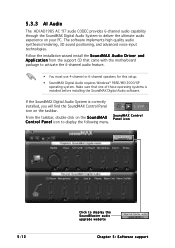
... on the S o u n d M A X C o n t r o l P a n e l icon to activate the 6-channel audio feature. • You must use 4-channel or 6-channel speakers for this setup. • SoundMAX Digital Audio requires Windows® 98SE/ME/2000/XP operating system.
... on the S o u n d M A X C o n t r o l P a n e l icon to activate the 6-channel audio feature. • You must use 4-channel or 6-channel speakers for this setup. • SoundMAX Digital Audio requires Windows® 98SE/ME/2000/XP operating system.
P5P800 User's manual English Edition E1726
Page 4
... BIOS setup 4.1 Managing and updating your BIOS 4-1 4.1.1 Creating a bootable floppy disk 4-1 4.1.2 ASUS EZ Flash utility 4-2 4.1.3 AFUDOS utility 4-3 4.1.4 ASUS CrashFree BIOS 2 utility 4-5 4.1.5 ASUS Update utility 4-7 4.2 BIOS setup program 4-10 4.2.1 BIOS menu screen 4-11 4.2.2 Menu bar 4-...11 4.2.3 Navigation keys 4-11 4.2.4 Menu items 4-12 4.2.5 Sub-menu items 4-12 4.2.6 Configuration fields 4-12 4.2.7 Pop-up window 4-12 4.2.8...
... BIOS setup 4.1 Managing and updating your BIOS 4-1 4.1.1 Creating a bootable floppy disk 4-1 4.1.2 ASUS EZ Flash utility 4-2 4.1.3 AFUDOS utility 4-3 4.1.4 ASUS CrashFree BIOS 2 utility 4-5 4.1.5 ASUS Update utility 4-7 4.2 BIOS setup program 4-10 4.2.1 BIOS menu screen 4-11 4.2.2 Menu bar 4-...11 4.2.3 Navigation keys 4-11 4.2.4 Menu items 4-12 4.2.5 Sub-menu items 4-12 4.2.6 Configuration fields 4-12 4.2.7 Pop-up window 4-12 4.2.8...


