
P5P800 User's manual English Edition E1906
Page 4
... the computer 3-2 3.2.1 Using the OS shut down function 3-2 3.2.2 Using the dual function power switch 3-2 Chapter 4: BIOS setup 4.1 Managing and updating your BIOS 4-1 4.1.1 Creating a bootable floppy disk 4-1 4.1.2 ASUS EZ Flash utility 4-2 4.1.3 AFUDOS utility 4-3 4.1.4 ASUS CrashFree BIOS 2 utility 4-5 4.1.5 ASUS Update utility 4-7 4.2 BIOS setup program 4-10 4.2.1 BIOS menu screen 4-11 4.2.2 Menu bar 4-11 4.2.3 Navigation keys 4-11 4.2.4 Menu items 4-12 4.2.5 Sub-menu...
... the computer 3-2 3.2.1 Using the OS shut down function 3-2 3.2.2 Using the dual function power switch 3-2 Chapter 4: BIOS setup 4.1 Managing and updating your BIOS 4-1 4.1.1 Creating a bootable floppy disk 4-1 4.1.2 ASUS EZ Flash utility 4-2 4.1.3 AFUDOS utility 4-3 4.1.4 ASUS CrashFree BIOS 2 utility 4-5 4.1.5 ASUS Update utility 4-7 4.2 BIOS setup program 4-10 4.2.1 BIOS menu screen 4-11 4.2.2 Menu bar 4-11 4.2.3 Navigation keys 4-11 4.2.4 Menu items 4-12 4.2.5 Sub-menu...

P5P800 User's manual English Edition E1906
Page 9
... system settings through the BIOS Setup menus. Detailed descriptions of the BIOS parameters are not part of the support CD that may include optional documentation, such as warranty flyers, that comes with the motherboard package. ASUS websites The ASUS website provides updated information ... also provided. • Chapter 5: Software support This chapter describes the contents of the standard package. Refer to the ASUS contact information. 2. Optional documentation Your product package may have to perform when installing system components. About this guide is organized...
... system settings through the BIOS Setup menus. Detailed descriptions of the BIOS parameters are not part of the support CD that may include optional documentation, such as warranty flyers, that comes with the motherboard package. ASUS websites The ASUS website provides updated information ... also provided. • Chapter 5: Software support This chapter describes the contents of the standard package. Refer to the ASUS contact information. 2. Optional documentation Your product package may have to perform when installing system components. About this guide is organized...
P5P800 User's manual English Edition E1906
Page 11
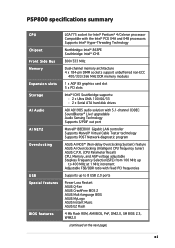
... Adjustable FSB/DDR ratio with 5.1-channel CODEC SoundBlaster® Live! P5P800 specifications summary CPU Chipset Front Side Bus Memory Expansion slots Storage AI Audio AI NET2 Overclocking USB Special features BIOS features LGA775 socket for Intel® Pentium® 4/Celeron processor ... ADI AD1985 audio solution with fixed PCI frequencies Supports up to 8 USB 2.0 ports Power Loss Restart ASUS Q-Fan ASUS CrashFree BIOS 2 ASUS Multi-language BIOS ASUS MyLogo ASUS Instant Music ASUS EZ Flash 4 Mb Flash ROM, AMI BIOS, PnP, DMI2.0, SM BIOS 2.3, WfM2.0 (continued on the next page) xi
... Adjustable FSB/DDR ratio with 5.1-channel CODEC SoundBlaster® Live! P5P800 specifications summary CPU Chipset Front Side Bus Memory Expansion slots Storage AI Audio AI NET2 Overclocking USB Special features BIOS features LGA775 socket for Intel® Pentium® 4/Celeron processor ... ADI AD1985 audio solution with fixed PCI frequencies Supports up to 8 USB 2.0 ports Power Loss Restart ASUS Q-Fan ASUS CrashFree BIOS 2 ASUS Multi-language BIOS ASUS MyLogo ASUS Instant Music ASUS EZ Flash 4 Mb Flash ROM, AMI BIOS, PnP, DMI2.0, SM BIOS 2.3, WfM2.0 (continued on the next page) xi
P5P800 User's manual English Edition E1906
Page 17
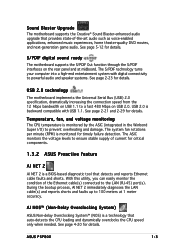
...condition of current for timely failure detection. AI NOS™ (Non-Delay Overclocking System) ASUS Non-delay Overclocking System™ (NOS) is monitored by the ASIC (integrated in the ... music experiences, home theater-quality DVD movies, and next-generation game audio. ASUS P5P800 1-3 Sound Blaster Upgrade The motherboard supports the Creative® Sound Blaster-enhanced audio...needed. The system fan rotations per minute (RPM) is monitored for critical components. 1.3.2 ASUS Proactive feature AI NET 2 AI NET 2 is backward compatible with digital connectivity to powerful ...
...condition of current for timely failure detection. AI NOS™ (Non-Delay Overclocking System) ASUS Non-delay Overclocking System™ (NOS) is monitored by the ASIC (integrated in the ... music experiences, home theater-quality DVD movies, and next-generation game audio. ASUS P5P800 1-3 Sound Blaster Upgrade The motherboard supports the Creative® Sound Blaster-enhanced audio...needed. The system fan rotations per minute (RPM) is monitored for critical components. 1.3.2 ASUS Proactive feature AI NET 2 AI NET 2 is backward compatible with digital connectivity to powerful ...

P5P800 User's manual English Edition E1906
Page 18
.... feature of your choice from the support CD in case the system hangs due to overclocking. See details on page 4-5. ASUS Multi-language BIOS The multi-language BIOS allows you to restore the original BIOS data from the available options. See pages 4-29 and 5-9 for each parameter. 1-4 Chapter 1: Product introduction C.P.R. (CPU Parameter Recall) The...
.... feature of your choice from the support CD in case the system hangs due to overclocking. See details on page 4-5. ASUS Multi-language BIOS The multi-language BIOS allows you to restore the original BIOS data from the available options. See pages 4-29 and 5-9 for each parameter. 1-4 Chapter 1: Product introduction C.P.R. (CPU Parameter Recall) The...
P5P800 User's manual English Edition E1906
Page 28
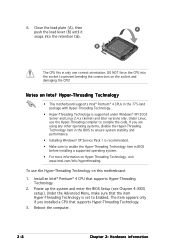
...174; 4 CPUs in only one correct orientation. 6. To use the Hyper-Threading compiler to enable the Hyper-Threading Technology item in the BIOS to ensure system stability and performance. • Installing Windows® XP Service Pack 1 is supported under Windows® XP/2003 Server and...plate (A), then A push the load lever (B) until it snaps into the socket to Enabled. Power up the system and enter the BIOS Setup (see Chapter 4: BIOS setup). Reboot the computer. 2-8 Chapter 2: Hardware information B The CPU fits in the 775-land package with Hyper-Threading Technology. &#...
...174; 4 CPUs in only one correct orientation. 6. To use the Hyper-Threading compiler to enable the Hyper-Threading Technology item in the BIOS to ensure system stability and performance. • Installing Windows® XP Service Pack 1 is supported under Windows® XP/2003 Server and...plate (A), then A push the load lever (B) until it snaps into the socket to Enabled. Power up the system and enter the BIOS Setup (see Chapter 4: BIOS setup). Reboot the computer. 2-8 Chapter 2: Hardware information B The CPU fits in the 775-land package with Hyper-Threading Technology. &#...
P5P800 User's manual English Edition E1906
Page 37
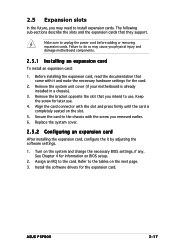
... on the next page. 3. Refer to the tables on the system and change the necessary BIOS settings, if any. Failure to do so may need to install expansion cards. Keep the screw for the expansion card. ASUS P5P800 2-17 The following sub-sections describe the slots and the expansion cards that they support...
... on the next page. 3. Refer to the tables on the system and change the necessary BIOS settings, if any. Failure to do so may need to install expansion cards. Keep the screw for the expansion card. ASUS P5P800 2-17 The following sub-sections describe the slots and the expansion cards that they support...
P5P800 User's manual English Edition E1906
Page 40
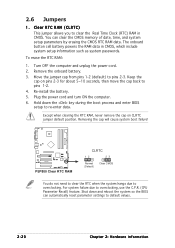
...2: Hardware information Remove the onboard battery. 3. Keep the cap on CLRTC jumper default position. Removing the cap will cause system boot failure! ® P5P800 P5P800 Clear RTC RAM CLRTC 12 23 Normal (Default) Clear CMOS You do not need to clear the RTC when the system hangs due to clear...Plug the power cord and turn ON the computer. 6. Shut down the key during the boot process and enter BIOS setup to pins 2-3. Hold down and reboot the system so the BIOS can clear the CMOS memory of date, time, and system setup parameters by erasing the CMOS RTC RAM data....
...2: Hardware information Remove the onboard battery. 3. Keep the cap on CLRTC jumper default position. Removing the cap will cause system boot failure! ® P5P800 P5P800 Clear RTC RAM CLRTC 12 23 Normal (Default) Clear CMOS You do not need to clear the RTC when the system hangs due to clear...Plug the power cord and turn ON the computer. 6. Shut down the key during the boot process and enter BIOS setup to pins 2-3. Hold down and reboot the system so the BIOS can clear the CMOS memory of date, time, and system setup parameters by erasing the CMOS RTC RAM data....

P5P800 User's manual English Edition E1906
Page 42
This feature requires an ATX power supply that can supply at least 1A on the keyboard (the default is the Space Bar). KBPWR 12 23 +5V +5VSB (Default) R P5P800 P5P800 Keyboard power setting 2-22 Chapter 2: Hardware information Keyboard power (3-pin KBPWR) This jumper allows you press a key on the +5VSB lead, and a corresponding setting in the BIOS. Set this jumper to pins 2-3 (+5VSB) if you wish to wake up the computer when you to enable or disable the keyboard wake-up feature. 3.
This feature requires an ATX power supply that can supply at least 1A on the keyboard (the default is the Space Bar). KBPWR 12 23 +5V +5VSB (Default) R P5P800 P5P800 Keyboard power setting 2-22 Chapter 2: Hardware information Keyboard power (3-pin KBPWR) This jumper allows you press a key on the +5VSB lead, and a corresponding setting in the BIOS. Set this jumper to pins 2-3 (+5VSB) if you wish to wake up the computer when you to enable or disable the keyboard wake-up feature. 3.
P5P800 User's manual English Edition E1906
Page 47
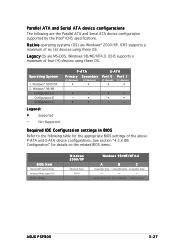
... settings in BIOS Refer to the following are the Parallel ATA and Serial ATA device configuration supported by the Intel® ICH5 specifications. Windows 98/ME/NT4.0 A B C Compatible Mode Compatible Mode Compatible Mode - - - P-ATA+S-ATA P-ATA Ports Only ASUS P5P800 2-27 ICH5... • - - ICH5 supports a maximum of the above P-ATA and S-ATA device configurations. See section "4.3.6 IDE Configuration" for the appropriate BIOS settings of six (6) devices using these OS. Parallel ATA and Serial ATA device configurations The following table for details on the related...
... settings in BIOS Refer to the following are the Parallel ATA and Serial ATA device configuration supported by the Intel® ICH5 specifications. Windows 98/ME/NT4.0 A B C Compatible Mode Compatible Mode Compatible Mode - - - P-ATA+S-ATA P-ATA Ports Only ASUS P5P800 2-27 ICH5... • - - ICH5 supports a maximum of the above P-ATA and S-ATA device configurations. See section "4.3.6 IDE Configuration" for the appropriate BIOS settings of six (6) devices using these OS. Parallel ATA and Serial ATA device configurations The following table for details on the related...
P5P800 User's manual English Edition E1906
Page 53
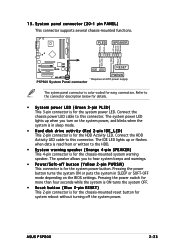
.... The speaker allows you turn on the system power, and blinks when the system is in SLEEP or SOFT-OFF mode depending on the BIOS settings. Pressing the power button turns the system ON or puts the system in sleep mode. • Hard disk drive activity (Red 2-pin...LED cable to this connector. PLED SPEAKER PLED+ PLED+5V Ground Ground Speaker IDE_LED+ IDE_LED- PWR Ground Reset Ground ® P5P800 IDE_LED RESET PWRSW * Requires an ATX power supply. ASUS P5P800 2-33 The IDE LED lights up when you to the connector description below for details. • System power LED (Green...
.... The speaker allows you turn on the system power, and blinks when the system is in SLEEP or SOFT-OFF mode depending on the BIOS settings. Pressing the power button turns the system ON or puts the system in sleep mode. • Hard disk drive activity (Red 2-pin...LED cable to this connector. PLED SPEAKER PLED+ PLED+5V Ground Ground Speaker IDE_LED+ IDE_LED- PWR Ground Reset Ground ® P5P800 IDE_LED RESET PWRSW * Requires an ATX power supply. ASUS P5P800 2-33 The IDE LED lights up when you to the connector description below for details. • System power LED (Green...
P5P800 User's manual English Edition E1906
Page 57
...seconds from the time you press the ATX power button. For systems withATX power supplies, the system LED lights up for assistance. AMI BIOS beep codes Beep Description One beep Two continuous beeps followed by two short beeps Two continuous beeps followed by four short beeps Error Keyboard controller... "green" standards or if it has a "power standby" feature, the monitor LED may have failed a power-on test. If you do not see BIOS beep codes table below) or additional messages appear on the chain) c. Follow the instructions in the following order: a. ASUS P5P800 3-1
...seconds from the time you press the ATX power button. For systems withATX power supplies, the system LED lights up for assistance. AMI BIOS beep codes Beep Description One beep Two continuous beeps followed by two short beeps Two continuous beeps followed by four short beeps Error Keyboard controller... "green" standards or if it has a "power standby" feature, the monitor LED may have failed a power-on test. If you do not see BIOS beep codes table below) or additional messages appear on the chain) c. Follow the instructions in the following order: a. ASUS P5P800 3-1
P5P800 User's manual English Edition E1906
Page 58
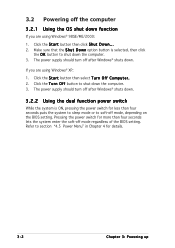
... the S h u t D o w n option button is ON, pressing the power switch for less than four seconds lets the system enter the soft-off mode, depending on the BIOS setting. If you are using Windows® 98SE/ME/2000: 1. Pressing the power switch for details. 3-2 Chapter 3: Powering up Click the T u r n O f f button to section "4.5 Power...® shuts down . 3.2.2 Using the dual function power switch While the system is selected, then click the O K button to soft-off mode regardless of the BIOS setting. Click the S t a r t button then select T u r n O f f C o m p u t e r . 2.
... the S h u t D o w n option button is ON, pressing the power switch for less than four seconds lets the system enter the soft-off mode, depending on the BIOS setting. If you are using Windows® 98SE/ME/2000: 1. Pressing the power switch for details. 3-2 Chapter 3: Powering up Click the T u r n O f f button to section "4.5 Power...® shuts down . 3.2.2 Using the dual function power switch While the system is selected, then click the O K button to soft-off mode regardless of the BIOS setting. Click the S t a r t button then select T u r n O f f C o m p u t e r . 2.

P5P800 User's manual English Edition E1906
Page 59
Detailed descriptions of the BIOS parameters are also provided. 4 BIOS setup This chapter tells how to change the system settings through the BIOS Setup menus.
Detailed descriptions of the BIOS parameters are also provided. 4 BIOS setup This chapter tells how to change the system settings through the BIOS Setup menus.
P5P800 User's manual English Edition E1906
Page 60
Chapter summary 4.1 Managing and updating your BIOS 4-1 4.2 BIOS setup program 4-10 4.3 Main menu 4-13 4.4 Advanced menu 4-18 4.5 Power menu 4-30 4.6 Boot menu 4-35 4.7 Exit menu 4-40 ASUS P5P800
Chapter summary 4.1 Managing and updating your BIOS 4-1 4.2 BIOS setup program 4-10 4.3 Main menu 4-13 4.4 Advanced menu 4-18 4.5 Power menu 4-30 4.6 Boot menu 4-35 4.7 Exit menu 4-40 ASUS P5P800
P5P800 User's manual English Edition E1906
Page 61
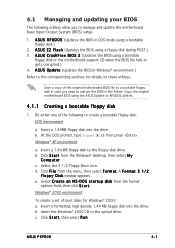
...h F r e e B I O S 2 (Updates the BIOS using a bootable floppy disk.) 2. A S U S U p d a t e (Updates the BIOS in DOS mode using a bootable floppy disk or the motherboard support CD when the BIOS file fails or gets corrupted.) 4. b. d. e. ASUS P5P800 4-1 Do either one of the following utilities allow you need to ...restore the BIOS in the future. Select C r e a t e a ...
...h F r e e B I O S 2 (Updates the BIOS using a bootable floppy disk.) 2. A S U S U p d a t e (Updates the BIOS in DOS mode using a bootable floppy disk or the motherboard support CD when the BIOS file fails or gets corrupted.) 4. b. d. e. ASUS P5P800 4-1 Do either one of the following utilities allow you need to ...restore the BIOS in the future. Select C r e a t e a ...
P5P800 User's manual English Edition E1906
Page 62
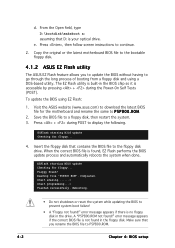
...Do not shutdown or reset the system while updating the BIOS to a floppy disk, then restart the system. 3. A "P5P800.ROM not found ! Press , then follow screen instructions to P 5 P 8 0 0 . Visit the ASUS website (www.asus.com) to download the latest BIOS file for floppy... Press + during the Power-On ...assuming that you to update the BIOS without having to P5P800.ROM. 4-2 Chapter 4: BIOS setup Copy the original or the latest motherboard BIOS file to the bootable floppy disk. 4.1.2 ASUS EZ Flash utility The ASUS EZ Flash feature allows you rename the BIOS file to go through the ...
...Do not shutdown or reset the system while updating the BIOS to a floppy disk, then restart the system. 3. A "P5P800.ROM not found ! Press , then follow screen instructions to P 5 P 8 0 0 . Visit the ASUS website (www.asus.com) to download the latest BIOS file for floppy... Press + during the Power-On ...assuming that you to update the BIOS without having to P5P800.ROM. 4-2 Chapter 4: BIOS setup Copy the original or the latest motherboard BIOS file to the bootable floppy disk. 4.1.2 ASUS EZ Flash utility The ASUS EZ Flash feature allows you rename the BIOS file to go through the ...

P5P800 User's manual English Edition E1906
Page 63
... you can use as shown. 1. The utility copies the current BIOS file to the DOS prompt after copying the current BIOS file. A:\>afudos /oOLDBIOS1.ROM AMI Firmware Update Utility - Reading flash ..... All rights reserved. ASUS P5P800 4-3 Press . done Write to file ...ok A:\> The utility ...returns to the floppy disk. 4.1.3 AFUDOS utility The AFUDOS utility allows you to update the BIOS file in DOS mode, then at least 600 KB free...
... you can use as shown. 1. The utility copies the current BIOS file to the DOS prompt after copying the current BIOS file. A:\>afudos /oOLDBIOS1.ROM AMI Firmware Update Utility - Reading flash ..... All rights reserved. ASUS P5P800 4-3 Press . done Write to file ...ok A:\> The utility ...returns to the floppy disk. 4.1.3 AFUDOS utility The AFUDOS utility allows you to update the BIOS file in DOS mode, then at least 600 KB free...
P5P800 User's manual English Edition E1906
Page 64
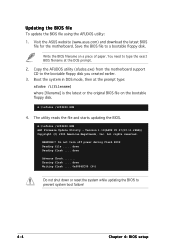
... A:\>afudos /iP5P800.ROM 4. All rights reserved. Erasing flash .... Visit the ASUS website (www.asus.com) and download the latest BIOS file for the motherboard. The utility reads the file and starts updating the BIOS. done Writing flash .... 0x0008CC00 (9%) Do not shut down or reset the ...the motherboard support CD to prevent system boot failure! 4-4 Chapter 4: BIOS setup WARNING!! Do not turn off power during flash BIOS Reading file ..... done Reading flash .... You need to a bootable floppy disk. Version 1.19(ASUS V2.07(03.11.24BB)) Copyright (C) 2003 American Megatrends, Inc....
... A:\>afudos /iP5P800.ROM 4. All rights reserved. Erasing flash .... Visit the ASUS website (www.asus.com) and download the latest BIOS file for the motherboard. The utility reads the file and starts updating the BIOS. done Writing flash .... 0x0008CC00 (9%) Do not shut down or reset the ...the motherboard support CD to prevent system boot failure! 4-4 Chapter 4: BIOS setup WARNING!! Do not turn off power during flash BIOS Reading file ..... done Reading flash .... You need to a bootable floppy disk. Version 1.19(ASUS V2.07(03.11.24BB)) Copyright (C) 2003 American Megatrends, Inc....
P5P800 User's manual English Edition E1906
Page 65
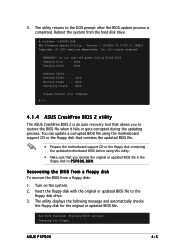
... flash ..... Reboot the system from a floppy disk: 1. All rights reserved. Do not turn off power during the updating process. done Please restart your computer A:\> 4.1.4 ASUS CrashFree BIOS 2 utility The ASUS CrashFree BIOS 2 is completed. Bad BIOS checksum. ASUS P5P800 4-5 done Reading flash .... R O M. The utility displays the following message and automatically checks the floppy disk for floppy... Starting...
... flash ..... Reboot the system from a floppy disk: 1. All rights reserved. Do not turn off power during the updating process. done Please restart your computer A:\> 4.1.4 ASUS CrashFree BIOS 2 utility The ASUS CrashFree BIOS 2 is completed. Bad BIOS checksum. ASUS P5P800 4-5 done Reading flash .... R O M. The utility displays the following message and automatically checks the floppy disk for floppy... Starting...


