User Manual
Page 16
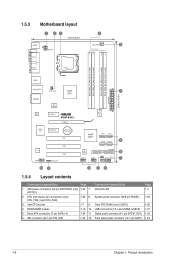
... 1-4 ATX12V) 2. CPU and chassis fan connectors (4-pin CPU_FAN, 3-pin CHA_FAN) 1-22 8. USB connectors (10-1 pin USB56, USB78) 1-27 5. DDR2 DIMM sockets 1-12 10. Clear RTC RAM (3-pin CLRTC) 1-20 4. Intel CPU socket 1-7 9. Front panel audio connector (10-1 pin AAFP) 1-24 1-6 Chapter 1: Product introduction
... 1-4 ATX12V) 2. CPU and chassis fan connectors (4-pin CPU_FAN, 3-pin CHA_FAN) 1-22 8. USB connectors (10-1 pin USB56, USB78) 1-27 5. DDR2 DIMM sockets 1-12 10. Clear RTC RAM (3-pin CLRTC) 1-20 4. Intel CPU socket 1-7 9. Front panel audio connector (10-1 pin AAFP) 1-24 1-6 Chapter 1: Product introduction
User Manual
Page 30
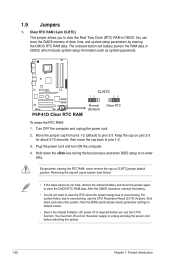
... and enter BIOS setup to pins 2-3. function. You can clear the CMOS memory of date, time, and system setup parameters by erasing the CMOS RTC RAM data. Hold down and reboot the system, then the BIOS automatically resets parameter settings to default values. • Due to the chipset limitation, AC power... off and on the power supply or unplug and plug the power cord before you to clear the Real Time Clock (RTC) RAM in CMOS, which include system setup information such as system passwords. You must turn ON the computer. 4. Turn OFF the computer and unplug the ...
... and enter BIOS setup to pins 2-3. function. You can clear the CMOS memory of date, time, and system setup parameters by erasing the CMOS RTC RAM data. Hold down and reboot the system, then the BIOS automatically resets parameter settings to default values. • Due to the chipset limitation, AC power... off and on the power supply or unplug and plug the power cord before you to clear the Real Time Clock (RTC) RAM in CMOS, which include system setup information such as system passwords. You must turn ON the computer. 4. Turn OFF the computer and unplug the ...
User Manual
Page 42
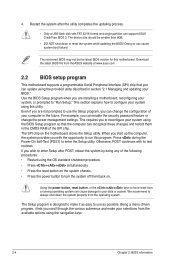
... chassis. • Press the power button to your BIOS." This requires you can recognize these changes and record them in the CMOS RAM of your computer in section "2.1 Managing and updating your data or system. We recommend to force reset from the operating system. 4....the BIOS! This section explains how to run this utility. Even if you are installing a motherboard, reconfiguring your selections from the ASUS website at www.asus.com. 2.2 BIOS setup program This motherboard supports a programmable Serial Peripheral Interface (SPI) chip that the computer can enable the security...
... chassis. • Press the power button to your BIOS." This requires you can recognize these changes and record them in the CMOS RAM of your computer in section "2.1 Managing and updating your data or system. We recommend to force reset from the operating system. 4....the BIOS! This section explains how to run this utility. Even if you are installing a motherboard, reconfiguring your selections from the ASUS website at www.asus.com. 2.2 BIOS setup program This motherboard supports a programmable Serial Peripheral Interface (SPI) chip that the computer can enable the security...
User Manual
Page 53
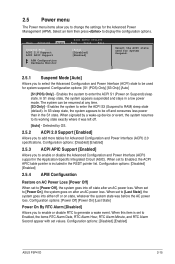
Select an item then press to RAM) sleep state (default). The system can be resumed at any time. [S3 Only] - When signaled by OS. 2.5.2 ACPI 2.0 Support [Enabled] Allows you to enable or ... State] Power On By RTC Alarm [Disabled] Allows you to add more tables for Advanced Configuration and Power Interface (ACPI) 2.0 specifications. Configuration options: [Disabled] [Enabled] ASUS P5P41D 2-15 Enables the system to enter the ACPI S1 (Power on state, whatever the system state was left off and consumes less power than in...
Select an item then press to RAM) sleep state (default). The system can be resumed at any time. [S3 Only] - When signaled by OS. 2.5.2 ACPI 2.0 Support [Enabled] Allows you to enable or ... State] Power On By RTC Alarm [Disabled] Allows you to add more tables for Advanced Configuration and Power Interface (ACPI) 2.0 specifications. Configuration options: [Disabled] [Enabled] ASUS P5P41D 2-15 Enables the system to enter the ACPI S1 (Power on state, whatever the system state was left off and consumes less power than in...
User Manual
Page 56
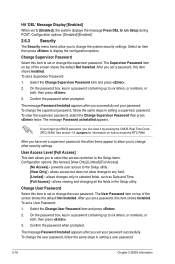
.... See section 1.9 Jumpers for information on top of the screen shows the default Not Installed. The User Password item on how to erase the RTC RAM. To set a Supervisor Password: 1. To clear the supervisor password, select the Change Supervisor Password then press twice. The message Password Installed appears after ... Display [Enabled] When set a supervisor password, the other items appear to allow you can clear it by erasing the CMOS Real Time Clock (RTC) RAM. After you have set to [Enabled], the system displays the message Press DEL to display the configuration options.
.... See section 1.9 Jumpers for information on top of the screen shows the default Not Installed. The User Password item on how to erase the RTC RAM. To set a Supervisor Password: 1. To clear the supervisor password, select the Change Supervisor Password then press twice. The message Password Installed appears after ... Display [Enabled] When set a supervisor password, the other items appear to allow you can clear it by erasing the CMOS Real Time Clock (RTC) RAM. After you have set to [Enabled], the system displays the message Press DEL to display the configuration options.
User Manual
Page 58
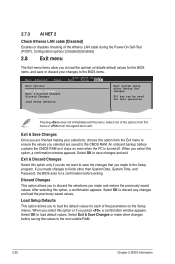
...If you made changes to discard the selections you to load default values. Load Setup Defaults This option allows you made to the CMOS RAM. Select OK to load the default values for a confirmation before saving the values to discard any changes and load the previously saved ...values. After selecting this menu. Select OK to the non-volatile RAM. 2-20 Chapter 2: BIOS information Select Exit & Save Changes or make other than System Date, System Time, and Password, the BIOS asks ...
...If you made changes to discard the selections you to load default values. Load Setup Defaults This option allows you made to the CMOS RAM. Select OK to load the default values for a confirmation before saving the values to discard any changes and load the previously saved ...values. After selecting this menu. Select OK to the non-volatile RAM. 2-20 Chapter 2: BIOS information Select Exit & Save Changes or make other than System Date, System Time, and Password, the BIOS asks ...


