User Manual
Page 2
... SPECIFICATIONS AND INFORMATION CONTAINED IN THIS MANUAL ARE FURNISHED FOR INFORMATIONAL USE ONLY, AND ARE SUBJECT TO CHANGE AT ANY TIME WITHOUT NOTICE, AND SHOULD NOT BE CONSTRUED AS A COMMITMENT BY ASUS. ASUS ASSUMES NO RESPONSIBILITY OR LIABILITY FOR ANY ERRORS OR INACCURACIES THAT MAY APPEAR IN THIS MANUAL, INCLUDING THE PRODUCTS AND SOFTWARE DESCRIBED IN IT. The source code...
... SPECIFICATIONS AND INFORMATION CONTAINED IN THIS MANUAL ARE FURNISHED FOR INFORMATIONAL USE ONLY, AND ARE SUBJECT TO CHANGE AT ANY TIME WITHOUT NOTICE, AND SHOULD NOT BE CONSTRUED AS A COMMITMENT BY ASUS. ASUS ASSUMES NO RESPONSIBILITY OR LIABILITY FOR ANY ERRORS OR INACCURACIES THAT MAY APPEAR IN THIS MANUAL, INCLUDING THE PRODUCTS AND SOFTWARE DESCRIBED IN IT. The source code...
User Manual
Page 4
... items 2-6 2.2.6 Configuration fields 2-6 2.2.7 Pop-up window 2-6 2.2.8 Scroll bar 2-6 2.2.9 General help 2-6 2.3 Main menu 2-7 2.3.1 System Time 2-7 2.3.2 System Date 2-7 2.3.3 Primary IDE Master/Slave, SATA1~4 2-7 2.3.4 Storage Configuration 2-8 2.3.5 System Information 2-9 2.4 Advanced menu 2-9 2.4.1 JumperFree Configuration 2-9 2.4.2 CPU Configuration 2-11 2.4.3 Chipset 2-12 2.4.4 Onboard Devices Configuration 2-13 2.4.5 USB Configuration 2-14 2.4.6 PCI PnP 2-15 2.5 Power menu 2-15 2.5.1 Suspend Mode 2-15 2.5.2 ACPI 2.0 Support 2-15 2.5.3 ACPI APIC Support 2-15 iv
... items 2-6 2.2.6 Configuration fields 2-6 2.2.7 Pop-up window 2-6 2.2.8 Scroll bar 2-6 2.2.9 General help 2-6 2.3 Main menu 2-7 2.3.1 System Time 2-7 2.3.2 System Date 2-7 2.3.3 Primary IDE Master/Slave, SATA1~4 2-7 2.3.4 Storage Configuration 2-8 2.3.5 System Information 2-9 2.4 Advanced menu 2-9 2.4.1 JumperFree Configuration 2-9 2.4.2 CPU Configuration 2-11 2.4.3 Chipset 2-12 2.4.4 Onboard Devices Configuration 2-13 2.4.5 USB Configuration 2-14 2.4.6 PCI PnP 2-15 2.5 Power menu 2-15 2.5.1 Suspend Mode 2-15 2.5.2 ACPI 2.0 Support 2-15 2.5.3 ACPI APIC Support 2-15 iv
User Manual
Page 10
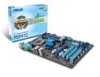
... IDE connector 4 x Serial ATA connectors 1 x Front panel audio connector 1 x System panel connector 1 x S/PDIF Out connector 1 x Internal speaker connector 1 x CPU fan connector 1 x Chassis fan connector 1 x 24-pin EATX power connector 1 x 4-pin ATX 12V power connector 8Mb Flash ROM, AMI BIOS, PnP, DMI 2.0, WfM 2.0, ACPI 2.0a, SM BIOS 2.5 WOL, PXE, WOR by Ring, PME Wake up 1 x Ultra DMA 133/100/66 cable 2 x Serial ATA cables 1 x I/O shield 1 x User Manual Drivers ASUS PC Probe II ASUS Update Anti-Virus software (OEM version) ATX form factor: 12 in x 8.2 in (30.5 cm x 20.8 cm) * Specifications...
... IDE connector 4 x Serial ATA connectors 1 x Front panel audio connector 1 x System panel connector 1 x S/PDIF Out connector 1 x Internal speaker connector 1 x CPU fan connector 1 x Chassis fan connector 1 x 24-pin EATX power connector 1 x 4-pin ATX 12V power connector 8Mb Flash ROM, AMI BIOS, PnP, DMI 2.0, WfM 2.0, ACPI 2.0a, SM BIOS 2.5 WOL, PXE, WOR by Ring, PME Wake up 1 x Ultra DMA 133/100/66 cable 2 x Serial ATA cables 1 x I/O shield 1 x User Manual Drivers ASUS PC Probe II ASUS Update Anti-Virus software (OEM version) ATX form factor: 12 in x 8.2 in (30.5 cm x 20.8 cm) * Specifications...
User Manual
Page 12
It is a highly integrated Gb LAN controller. ASUS Q-FAN ASUS Q-FAN technology intelligently and automatically adjusts CPU fan speed according to system load and temperature, enabling users to work or games, simply through pressing the button. Gigabit LAN solution The onboard LAN controller is enhanced with minimal noise. It especially includes Intel® Fast memory bandwidth and reduces the latency of the memory accesses. Serial ATA 3Gb/s technology This motherboard supports hard drives based on the Serial ATA (SATA) 3Gb/s storage specifications, delivering enhanced scalability...
It is a highly integrated Gb LAN controller. ASUS Q-FAN ASUS Q-FAN technology intelligently and automatically adjusts CPU fan speed according to system load and temperature, enabling users to work or games, simply through pressing the button. Gigabit LAN solution The onboard LAN controller is enhanced with minimal noise. It especially includes Intel® Fast memory bandwidth and reduces the latency of the memory accesses. Serial ATA 3Gb/s technology This motherboard supports hard drives based on the Serial ATA (SATA) 3Gb/s storage specifications, delivering enhanced scalability...
User Manual
Page 13
... configuration. • ASUS Express Gate supports file uploading from SATA HDDs, ODDs and USB drives. ASUS Express Gate Express Gate is an auto-recovery tool that allows you to restore a corrupted BIOS file using the bundled support DVD or USB flash disk that allows you to update the BIOS without using an OS-based utility. C.P.R. (CPU Parameter Recall) The BIOS C.P.R. When installing it on USB HDDs or flash drives, connect the drives to convert your screen. ASUS MyLogo2™ This feature allows you to the motherboard USB port before entering the Windows...
... configuration. • ASUS Express Gate supports file uploading from SATA HDDs, ODDs and USB drives. ASUS Express Gate Express Gate is an auto-recovery tool that allows you to restore a corrupted BIOS file using the bundled support DVD or USB flash disk that allows you to update the BIOS without using an OS-based utility. C.P.R. (CPU Parameter Recall) The BIOS C.P.R. When installing it on USB HDDs or flash drives, connect the drives to convert your screen. ASUS MyLogo2™ This feature allows you to the motherboard USB port before entering the Windows...
User Manual
Page 30
... BIOS setup. 2. Unplug the power cord before adding or removing expansion cards. Replace the system cover. 1.8.2 Configuring an expansion card After installing the expansion card, configure it and make the necessary hardware settings for later use . Otherwise, conflicts will arise between the two PCI groups, making the system unstable and the card inoperable. 1.8.3 PCI slots The PCI slots support cards such as a LAN card, SCSI card, USB card, and other cards that comply with PCI specifications. 1.8.4 PCI Express x1 slots This motherboard supports PCI Express x1 network cards...
... BIOS setup. 2. Unplug the power cord before adding or removing expansion cards. Replace the system cover. 1.8.2 Configuring an expansion card After installing the expansion card, configure it and make the necessary hardware settings for later use . Otherwise, conflicts will arise between the two PCI groups, making the system unstable and the card inoperable. 1.8.3 PCI slots The PCI slots support cards such as a LAN card, SCSI card, USB card, and other cards that comply with PCI specifications. 1.8.4 PCI Express x1 slots This motherboard supports PCI Express x1 network cards...
User Manual
Page 39
... utilities that you can install to your hardware. • Motherboard settings and hardware options vary. To run the DVD. 1.11 Software support 1.11.1 Installing an operating system This motherboard supports Windows® XP/Vista/7 Operating Systems (OS). Visit the ASUS website at any time without notice. The DVD automatically displays the Drivers menu if Autorun is enabled in your computer. ASUS P5P41C 1-29 Always install the latest OS version and corresponding updates to...
... utilities that you can install to your hardware. • Motherboard settings and hardware options vary. To run the DVD. 1.11 Software support 1.11.1 Installing an operating system This motherboard supports Windows® XP/Vista/7 Operating Systems (OS). Visit the ASUS website at any time without notice. The DVD automatically displays the Drivers menu if Autorun is enabled in your computer. ASUS P5P41C 1-29 Always install the latest OS version and corresponding updates to...
User Manual
Page 41
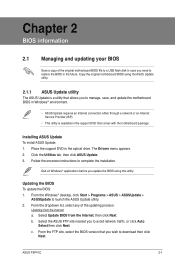
... a. Installing ASUS Update To install ASUS Update: 1. Follow the onscreen instructions to launch the ASUS Update utility. 2. From the dropdown list, select any of the original motherboard BIOS file to a USB flash disk in the future. b. Click the Utilities tab, then click ASUS Update. 3. c. From the Windows® desktop, click Start > Programs > ASUS > ASUSUpdate > ASUSUpdate to complete the installation. Select the ASUS FTP site nearest you update the BIOS using the ASUS Update utility. 2.1.1 ASUS Update utility The ASUS Update is available in the support DVD that...
... a. Installing ASUS Update To install ASUS Update: 1. Follow the onscreen instructions to launch the ASUS Update utility. 2. From the dropdown list, select any of the original motherboard BIOS file to a USB flash disk in the future. b. Click the Utilities tab, then click ASUS Update. 3. c. From the Windows® desktop, click Start > Programs > ASUS > ASUSUpdate > ASUSUpdate to complete the installation. Select the ASUS FTP site nearest you update the BIOS using the ASUS Update utility. 2.1.1 ASUS Update utility The ASUS Update is available in the support DVD that...
User Manual
Page 42
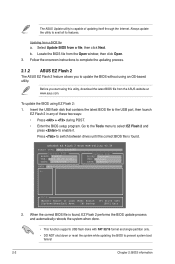
... Flash 2 BIOS ROM Utility V3.36 FLASH TYPE: MXIC 25L8005 Current ROM BOARD: P5P41C VER: 0302 (H:00 B:01) DATE: 12/29/2009 Update ROM BOARD: Unknown VER: Unknown DATE: Unknown PATH: A:\ A: Note [Enter] Select or Load [Tab] Switch [Up/Down/Home/End] Move [B] Backup [V] Drive Info [ESC] Exit 2. b. Before you to prevent system boot failure! 2-2 Chapter 2: BIOS information Insert the USB flash disk that contains the latest BIOS file to the USB port, then launch EZ Flash...
... Flash 2 BIOS ROM Utility V3.36 FLASH TYPE: MXIC 25L8005 Current ROM BOARD: P5P41C VER: 0302 (H:00 B:01) DATE: 12/29/2009 Update ROM BOARD: Unknown VER: Unknown DATE: Unknown PATH: A:\ A: Note [Enter] Select or Load [Tab] Switch [Up/Down/Home/End] Move [B] Backup [V] Drive Info [ESC] Exit 2. b. Before you to prevent system boot failure! 2-2 Chapter 2: BIOS information Insert the USB flash disk that contains the latest BIOS file to the USB port, then launch EZ Flash...
User Manual
Page 43
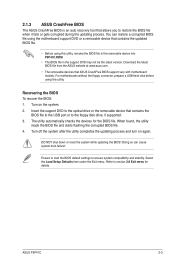
For motherboards without the floppy connector, prepare a USB flash disk before using this utility, rename the BIOS file in the removable device into P5P41C.ROM. • The BIOS file in the support DVD may not be the latest version. Turn on again. When found, the utility reads the BIOS file and starts flashing the corrupted BIOS file. 4. Ensure to load the BIOS default settings to section 2.8 Exit menu for the BIOS file. ASUS P5P41C 2-3 2.1.3 ASUS CrashFree BIOS The ASUS CrashFree BIOS is an auto recovery tool that contains the BIOS file to the USB port or to...
For motherboards without the floppy connector, prepare a USB flash disk before using this utility, rename the BIOS file in the removable device into P5P41C.ROM. • The BIOS file in the support DVD may not be the latest version. Turn on again. When found, the utility reads the BIOS file and starts flashing the corrupted BIOS file. 4. Ensure to load the BIOS default settings to section 2.8 Exit menu for the BIOS file. ASUS P5P41C 2-3 2.1.3 ASUS CrashFree BIOS The ASUS CrashFree BIOS is an auto recovery tool that contains the BIOS file to the USB port or to...
User Manual
Page 46
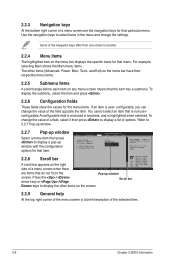
... of a menu screen when there Select Screen Select Item +- Use the navigation keys to select a field. Main Advanced BIOS SETUP UTILITY Power Boot Tools Exit Suspend Mode ACPI 2.0 Support ACPI APIC support APM Configuration Hardware Monitor [Auto] [Disabled] [EDniOsapabtbilloendesd] Enabled Use [ENTER], [TAB] or [SHIFT-TAB] to select items in brackets, and is enclosed in the menu and change the value of the navigation keys differ from one screen to display a pop-up window screen. configurable, you can change the settings. Change Field Tab...
... of a menu screen when there Select Screen Select Item +- Use the navigation keys to select a field. Main Advanced BIOS SETUP UTILITY Power Boot Tools Exit Suspend Mode ACPI 2.0 Support ACPI APIC support APM Configuration Hardware Monitor [Auto] [Disabled] [EDniOsapabtbilloendesd] Enabled Use [ENTER], [TAB] or [SHIFT-TAB] to select items in brackets, and is enclosed in the menu and change the value of the navigation keys differ from one screen to display a pop-up window screen. configurable, you can change the settings. Change Field Tab...

User Manual
Page 47
... to section 2.2.1 BIOS menu screen for each IDE/SATA device. Setting to set the system time. 2.3.2 System Date [Day xx/xx/xxxx] Allows you select the SATA 1/2/3/4 devices. ASUS P5P41C 2-7 Use [+] or [-] to select a field. Configuration options: [Not Installed] [Auto] [CDROM] [ARMD] This item does not appear when you to Auto allows automatic selection of IDE drive. Main Advanced BIOS SETUP UTILITY Power Boot Tools Exit System Time System Date Primary IDE Master Primary IDE Slave SATA 1 SATA 2 SATA 3 SATA 4 [12:56...
... to section 2.2.1 BIOS menu screen for each IDE/SATA device. Setting to set the system time. 2.3.2 System Date [Day xx/xx/xxxx] Allows you select the SATA 1/2/3/4 devices. ASUS P5P41C 2-7 Use [+] or [-] to select a field. Configuration options: [Not Installed] [Auto] [CDROM] [ARMD] This item does not appear when you to Auto allows automatic selection of IDE drive. Main Advanced BIOS SETUP UTILITY Power Boot Tools Exit System Time System Date Primary IDE Master Primary IDE Slave SATA 1 SATA 2 SATA 3 SATA 4 [12:56...

User Manual
Page 48
... LBA mode disabled. Configuration options: [Auto] SMART Monitoring [Auto] Sets the Smart Monitoring, Analysis, and Reporting Technology. IDE Detect Time Out (Sec) [35] Selects the time out value for the SATA devices installed in the system. When set to [Auto], the data transfer from and to set the ATA/IDE configuration. ATA/IDE Configuration [Enhanced] Allows you to the device occurs one sector at a time if the device supports multi-sector transfer feature. Setting to [Auto] enables the LBA mode...
... LBA mode disabled. Configuration options: [Auto] SMART Monitoring [Auto] Sets the Smart Monitoring, Analysis, and Reporting Technology. IDE Detect Time Out (Sec) [35] Selects the time out value for the SATA devices installed in the system. When set to [Auto], the data transfer from and to set the ATA/IDE configuration. ATA/IDE Configuration [Enhanced] Allows you to the device occurs one sector at a time if the device supports multi-sector transfer feature. Setting to [Auto] enables the LBA mode...
User Manual
Page 49
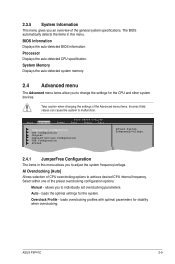
... of CPU overclocking options to achieve desired CPU internal frequency. 2.3.5 System Information This menu gives you to individually set overclocking parameters. Main Advanced Power BIOS SETUP UTILITY Boot Tools Exit JumperFree Configuration CPU Configuration Chipset Onboard Devices Configuration USB Configuration PCIPnP Adjust System frequency/voltage. 2.4.1 JumperFree Configuration The items in this menu allows you to change the settings for the CPU and other system devices. System Memory Displays the auto-detected system memory. 2.4 Advanced menu The Advanced menu items...
... of CPU overclocking options to achieve desired CPU internal frequency. 2.3.5 System Information This menu gives you to individually set overclocking parameters. Main Advanced Power BIOS SETUP UTILITY Boot Tools Exit JumperFree Configuration CPU Configuration Chipset Onboard Devices Configuration USB Configuration PCIPnP Adjust System frequency/voltage. 2.4.1 JumperFree Configuration The items in this menu allows you to change the settings for the CPU and other system devices. System Memory Displays the auto-detected system memory. 2.4 Advanced menu The Advanced menu items...
User Manual
Page 52
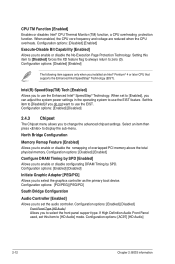
... Audio Front Panel used, set the audio controller. Set this item to use the Enhanced Intel® SpeedStep® Technology. Setting this item to [Disabled] forces the XD feature flag to always return to display the sub-menu. Configuration options: [Enabled] [Disabled] Initiate Graphic Adapter [PEG/PCI] Allows you to select the graphics controller as the primary boot device. Configuration options: [Enabled] [Disabled] Front Panel Type [HD Audio] Allows you to select the front panel support type. CPU TM Function [Enabled] Enables or disables Intel® CPU Thermal Monitor...
... Audio Front Panel used, set the audio controller. Set this item to use the Enhanced Intel® SpeedStep® Technology. Setting this item to [Disabled] forces the XD feature flag to always return to display the sub-menu. Configuration options: [Enabled] [Disabled] Initiate Graphic Adapter [PEG/PCI] Allows you to select the graphics controller as the primary boot device. Configuration options: [Enabled] [Disabled] Front Panel Type [HD Audio] Allows you to select the front panel support type. CPU TM Function [Enabled] Enables or disables Intel® CPU Thermal Monitor...
User Manual
Page 54
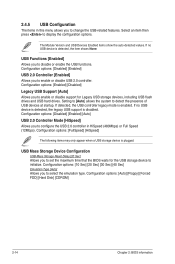
... and USB Devices Enabled items show the auto-detected values. Setting to [Auto] allows the system to display the configuration options. If no USB device is disabled. Configuration options: [Auto] [Floppy] [Forced FDD] [Hard Disk] [CDROM] 2-14 Chapter 2: BIOS information 2.4.5 USB Configuration The items in HiSpeed (480Mbps) or Full Speed (12Mbps). If no USB device is detected, the legacy USB support is detected, the item shows None. Configuration options: [Enabled] [Disabled] Legacy USB Support [Auto] Allows you to initialize. USB Mass Storage Device Configuration USB...
... and USB Devices Enabled items show the auto-detected values. Setting to [Auto] allows the system to display the configuration options. If no USB device is disabled. Configuration options: [Auto] [Floppy] [Forced FDD] [Hard Disk] [CDROM] 2-14 Chapter 2: BIOS information 2.4.5 USB Configuration The items in HiSpeed (480Mbps) or Full Speed (12Mbps). If no USB device is detected, the legacy USB support is detected, the item shows None. Configuration options: [Enabled] [Disabled] Legacy USB Support [Auto] Allows you to initialize. USB Mass Storage Device Configuration USB...
User Manual
Page 55
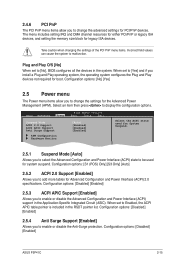
... be used for the Advanced Power Management (APM). Main Advanced Power BIOS SETUP UTILITY Boot Tools Exit Suspend Mode ACPI 2.0 Support ACPI APIC Support Anti Surge Support [Auto] [Enabled] [Enabled] [Enabled] APM Configuration Hardware Monitor Select the ACPI state used for system suspend. Select an item then press to change the advanced settings for boot. Configuration options: [No] [Yes] 2.5 Power menu The Power menu items allow you to [No], BIOS configures all the devices in the system. When set to [Yes] and if you install a Plug and...
... be used for the Advanced Power Management (APM). Main Advanced Power BIOS SETUP UTILITY Boot Tools Exit Suspend Mode ACPI 2.0 Support ACPI APIC Support Anti Surge Support [Auto] [Enabled] [Enabled] [Enabled] APM Configuration Hardware Monitor Select the ACPI state used for system suspend. Select an item then press to change the advanced settings for boot. Configuration options: [No] [Yes] 2.5 Power menu The Power menu items allow you to [No], BIOS configures all the devices in the system. When set to [Yes] and if you install a Plug and...
User Manual
Page 57
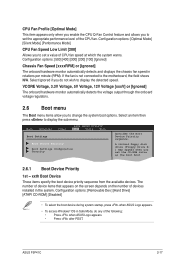
...and displays the chassis fan speed in the system. VCORE Voltage, 3.3V Voltage, 5V Voltage, 12V Voltage [xxxV] or [Ignored] The onboard hardware monitor automatically detects the voltage output through the onboard voltage regulators. 2.6 Boot menu The Boot menu items allow you set the appropriate performance level of devices installed in rotations per minute (RPM). Main Advanced Power BIOS SETUP UTILITY Boot Tools Exit Boot Settings Boot Device Priority Boot Settings Configuration Security Specifies the Boot Device Priority sequence. ASUS P5P41C 2-17 A virtual floppy disk...
...and displays the chassis fan speed in the system. VCORE Voltage, 3.3V Voltage, 5V Voltage, 12V Voltage [xxxV] or [Ignored] The onboard hardware monitor automatically detects the voltage output through the onboard voltage regulators. 2.6 Boot menu The Boot menu items allow you set the appropriate performance level of devices installed in rotations per minute (RPM). Main Advanced Power BIOS SETUP UTILITY Boot Tools Exit Boot Settings Boot Device Priority Boot Settings Configuration Security Specifies the Boot Device Priority sequence. ASUS P5P41C 2-17 A virtual floppy disk...

User Manual
Page 58
... (POST) while booting to decrease the time needed to select the power-on top of the screen shows the default Not Installed. Configuration options: [Force BIOS] [Keep Current] Bootup Num-Lock [On] Allows you to use the ASUS MyLogo2™ feature. In the password box, key in setting a supervisor password. Confirm the password when prompted. The message Password uninstalled appears. 2-18 Chapter 2: BIOS information Configuration options: [Disabled] [Enabled] Hit 'DEL' Message Display [Enabled] When set...
... (POST) while booting to decrease the time needed to select the power-on top of the screen shows the default Not Installed. Configuration options: [Force BIOS] [Keep Current] Bootup Num-Lock [On] Allows you to use the ASUS MyLogo2™ feature. In the password box, key in setting a supervisor password. Confirm the password when prompted. The message Password uninstalled appears. 2-18 Chapter 2: BIOS information Configuration options: [Disabled] [Enabled] Hit 'DEL' Message Display [Enabled] When set...
User Manual
Page 60
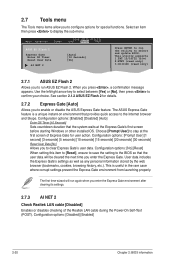
... time you enter the Express Gate. When you press , a confirmation message appears. Configuration options: [Disabled] [Enabled] 2-20 Chapter 2: BIOS information This utility supports 1.FAT 12/16/32 (r/w) 2.NTFS (read only) 3.CD-DISC (read only) 2.7.1 ASUS EZ Flash 2 Allows you to stay at the Express Gate's first screen before starting Windows or other installed OS. Configuration options: [No] [Reset] When setting this item to [Reset], ensure to save the setting to clear Express Gate's user data...
... time you enter the Express Gate. When you press , a confirmation message appears. Configuration options: [Disabled] [Enabled] 2-20 Chapter 2: BIOS information This utility supports 1.FAT 12/16/32 (r/w) 2.NTFS (read only) 3.CD-DISC (read only) 2.7.1 ASUS EZ Flash 2 Allows you to stay at the Express Gate's first screen before starting Windows or other installed OS. Configuration options: [No] [Reset] When setting this item to [Reset], ensure to save the setting to clear Express Gate's user data...


