User Manual
Page 20
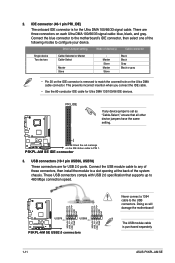
...Connect the USB module cable to any device jumper is removed to 480 Mbps connection speed. Doing so will damage the motherboard! PIN1 P5KPL-AM SE NOTE:Orient the red markings on the Ultra DMA cable connector. USB connectors (10-1 pin USB56, USB78) These connectors ... 1. Driver Jumper setting Mode of these connectors, then install the module to configure your device. USB+5V P5KPL-AM SE USB78 PIN 1 USB56 PIN 1 P5KPL-AM SE USB2.0 connectors USB+5V USB_P8- IDE connector (40-1 pin PRI_IDE) The onboard IDE connector is purchased separately. 1-11 ASUS P5KPL-AM SE These...
...Connect the USB module cable to any device jumper is removed to 480 Mbps connection speed. Doing so will damage the motherboard! PIN1 P5KPL-AM SE NOTE:Orient the red markings on the Ultra DMA cable connector. USB connectors (10-1 pin USB56, USB78) These connectors ... 1. Driver Jumper setting Mode of these connectors, then install the module to configure your device. USB+5V P5KPL-AM SE USB78 PIN 1 USB56 PIN 1 P5KPL-AM SE USB2.0 connectors USB+5V USB_P8- IDE connector (40-1 pin PRI_IDE) The onboard IDE connector is purchased separately. 1-11 ASUS P5KPL-AM SE These...
User Manual
Page 24
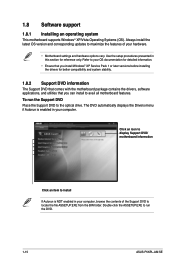
... ASUS P5KPL-AM SE Always install the latest OS version and corresponding updates to locate the file ASSETUP.EXE from the BIN folder. Refer to your OS documentation for detailed information. • Ensure that you install Windows® XP Service Pack 1 or later versions before installing the drivers... for reference only. Click an icon to display Support DVD/ motherboard information Click an item to the optical drive. Use the setup procedures presented in this section for better...
... ASUS P5KPL-AM SE Always install the latest OS version and corresponding updates to locate the file ASSETUP.EXE from the BIN folder. Refer to your OS documentation for detailed information. • Ensure that you install Windows® XP Service Pack 1 or later versions before installing the drivers... for reference only. Click an icon to display Support DVD/ motherboard information Click an item to the optical drive. Use the setup procedures presented in this section for better...


