User Manual
Page 4
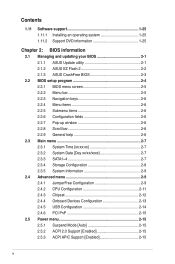
Contents 1.11 Software support 1-25 1.11.1 Installing an operating system 1-25 1.11.2 Support DVD information 1-25 Chapter 2: BIOS information 2.1 Managing and updating your BIOS 2-1 2.1.1 ASUS Update utility 2-1 2.1.2 ASUS EZ Flash 2 2-2 2.1.3 ASUS CrashFree BIOS 2-3 2.2 BIOS setup program 2-4 2.2.1 BIOS menu screen 2-5 2.2.2 Menu bar 2-5 2.2.3 Navigation keys 2-6 2.2.4 Menu items 2-6 2.2.5 Submenu items 2-6 2.2.6 Configuration fields 2-6 2.2.7 Pop-up window 2-6 2.2.8 Scroll bar 2-6 2.2.9 General help 2-6 2.3 Main menu 2-7 2.3.1 System Time...
Contents 1.11 Software support 1-25 1.11.1 Installing an operating system 1-25 1.11.2 Support DVD information 1-25 Chapter 2: BIOS information 2.1 Managing and updating your BIOS 2-1 2.1.1 ASUS Update utility 2-1 2.1.2 ASUS EZ Flash 2 2-2 2.1.3 ASUS CrashFree BIOS 2-3 2.2 BIOS setup program 2-4 2.2.1 BIOS menu screen 2-5 2.2.2 Menu bar 2-5 2.2.3 Navigation keys 2-6 2.2.4 Menu items 2-6 2.2.5 Submenu items 2-6 2.2.6 Configuration fields 2-6 2.2.7 Pop-up window 2-6 2.2.8 Scroll bar 2-6 2.2.9 General help 2-6 2.3 Main menu 2-7 2.3.1 System Time...

User Manual
Page 8
... trying to emphasize a word or a phrase. NOTE: Tips and additional information to complete a task. ASUS websites The ASUS website provides updated information on ASUS hardware and software products. Example: means that you perform certain tasks properly, take note of the motherboard and... package. Refer to change system settings through the BIOS Setup menus. About this guide This user guide contains the information you complete a task. These documents are not part of the BIOS parameters are linked with a plus sign (+). Keys enclosed in this guide To ensure...
... trying to emphasize a word or a phrase. NOTE: Tips and additional information to complete a task. ASUS websites The ASUS website provides updated information on ASUS hardware and software products. Example: means that you perform certain tasks properly, take note of the motherboard and... package. Refer to change system settings through the BIOS Setup menus. About this guide This user guide contains the information you complete a task. These documents are not part of the BIOS parameters are linked with a plus sign (+). Keys enclosed in this guide To ensure...
User Manual
Page 26
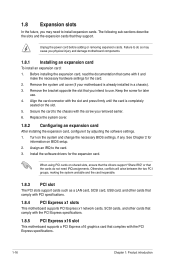
...installed in a chassis). 3. Install the software drivers for the card. 2. When using PCI cards on the system and change the necessary BIOS settings, if any. 1.8 Expansion slots In the future, you may cause you physical injury and damage motherboard components. 1.8.1 Installing an ...other cards that comply with it by adjusting the software settings. 1. Remove the system unit cover (if your motherboard is completely seated on BIOS setup. 2. See Chapter 2 for later use . Replace the system cover. 1.8.2 Configuring an expansion card After installing the expansion card, configure ...
...installed in a chassis). 3. Install the software drivers for the card. 2. When using PCI cards on the system and change the necessary BIOS settings, if any. 1.8 Expansion slots In the future, you may cause you physical injury and damage motherboard components. 1.8.1 Installing an ...other cards that comply with it by adjusting the software settings. 1. Remove the system unit cover (if your motherboard is completely seated on BIOS setup. 2. See Chapter 2 for later use . Replace the system cover. 1.8.2 Configuring an expansion card After installing the expansion card, configure ...
User Manual
Page 27
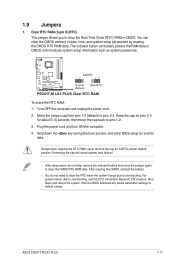
...memory of date, time, and system setup parameters by erasing the CMOS RTC RAM data. Removing the cap will cause system boot failure! • If the steps above do not need to clear the RTC when the system hangs due to pins 1-2. 3. ASUS P5G41T-M LX3 PLUS 1-17 Turn OFF the computer and ...pin CLRTC) This jumper allows you to re-enter data. CLRTC 12 23 P5G41T-M LX3 PLUS Normal (Default) Clear RTC P5G41T-M LX3 PLUS Clear RTC RAM To erase the RTC RAM: 1. Shut down the key during the boot process and enter BIOS setup to clear the Real Time Clock (RTC) RAM in CMOS, which include ...
...memory of date, time, and system setup parameters by erasing the CMOS RTC RAM data. Removing the cap will cause system boot failure! • If the steps above do not need to clear the RTC when the system hangs due to pins 1-2. 3. ASUS P5G41T-M LX3 PLUS 1-17 Turn OFF the computer and ...pin CLRTC) This jumper allows you to re-enter data. CLRTC 12 23 P5G41T-M LX3 PLUS Normal (Default) Clear RTC P5G41T-M LX3 PLUS Clear RTC RAM To erase the RTC RAM: 1. Shut down the key during the boot process and enter BIOS setup to clear the Real Time Clock (RTC) RAM in CMOS, which include ...

User Manual
Page 30
...AAFP PIN 1 PIN 1 MIC2 MICPWR Line out_R NC Line out_L PORT1 L PORT1 R PORT2 R SENSE_SEND PORT2 L P5G41T-M LX3 PLUS HD-audio-compliant Legacy AC'97 pin definition compliant definition P5G41T-M LX3 PLUS Front panel audio connector • We recommend that supports either HD Audio or legacy AC`97 audio standard. These ... devices. 9. If you want to connect an AC'97 front panel audio module to this connector, set the Front Panel Type item in the BIOS setup to this connector, set the item to [HD Audio]. USB 2.0 ports 3 and 4. These two 4-pin Universal Serial Bus (USB) ports are...
...AAFP PIN 1 PIN 1 MIC2 MICPWR Line out_R NC Line out_L PORT1 L PORT1 R PORT2 R SENSE_SEND PORT2 L P5G41T-M LX3 PLUS HD-audio-compliant Legacy AC'97 pin definition compliant definition P5G41T-M LX3 PLUS Front panel audio connector • We recommend that supports either HD Audio or legacy AC`97 audio standard. These ... devices. 9. If you want to connect an AC'97 front panel audio module to this connector, set the Front Panel Type item in the BIOS setup to this connector, set the item to [HD Audio]. USB 2.0 ports 3 and 4. These two 4-pin Universal Serial Bus (USB) ports are...

User Manual
Page 38
...Internet. Locate the BIOS file from a BIOS file a. Press to switch between drives until the correct BIOS file is capable of these two ways: • Press + during POST. • Enter the BIOS setup program. The ASUS Update utility is found , EZ Flash 2 performs the BIOS update process and ...8226; DO NOT shut down or reset the system while updating the BIOS to prevent system boot failure! 2-2 Chapter 2: BIOS information ASUSTek EZ Flash 2 BIOS ROM Utility V3.44 FLASH TYPE: WINBOND W25X/Q80 Current ROM BOARD: P5G41T-M LX3 PLUS VER: 0204 (H:00 B:01) DATE: 11/30/2010 Update ROM...
...Internet. Locate the BIOS file from a BIOS file a. Press to switch between drives until the correct BIOS file is capable of these two ways: • Press + during POST. • Enter the BIOS setup program. The ASUS Update utility is found , EZ Flash 2 performs the BIOS update process and ...8226; DO NOT shut down or reset the system while updating the BIOS to prevent system boot failure! 2-2 Chapter 2: BIOS information ASUSTek EZ Flash 2 BIOS ROM Utility V3.44 FLASH TYPE: WINBOND W25X/Q80 Current ROM BOARD: P5G41T-M LX3 PLUS VER: 0204 (H:00 B:01) DATE: 11/30/2010 Update ROM...
User Manual
Page 39
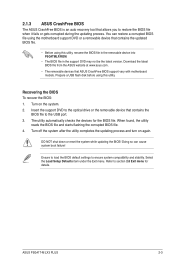
...DO NOT shut down or reset the system while updating the BIOS! Ensure to load the BIOS default settings to section 2.8 Exit menu for the BIOS file. ASUS P5G41T-M LX3 PLUS 2-3 Download the latest BIOS file from the ASUS website at www.asus.com. • The removable devices that allows you to... system compatibility and stability. The utility automatically checks the devices for details. Select the Load Setup Defaults item under the Exit menu. When found, the utility reads the BIOS file and starts flashing the corrupted BIOS file. 4. You can cause system boot failure!
...DO NOT shut down or reset the system while updating the BIOS! Ensure to load the BIOS default settings to section 2.8 Exit menu for the BIOS file. ASUS P5G41T-M LX3 PLUS 2-3 Download the latest BIOS file from the ASUS website at www.asus.com. • The removable devices that allows you to... system compatibility and stability. The utility automatically checks the devices for details. Select the Load Setup Defaults item under the Exit menu. When found, the utility reads the BIOS file and starts flashing the corrupted BIOS file. 4. You can cause system boot failure!

User Manual
Page 40
...you failed to enter BIOS Setup using the BIOS Setup program. Entering BIOS Setup at startup To enter BIOS Setup at www.asus.com to download the latest BIOS file for this motherboard. 2-4 Chapter 2: BIOS information Entering BIOS Setup after POST To enter BIOS Setup after changing any BIOS settings, load the default...cause damage to your screen. • Visit the ASUS website at startup: • Press during the Power-On Self Test (POST). If you see on . 2.2 BIOS setup program Use the BIOS Setup program to update the BIOS or configure its routines. If the system becomes unstable ...
...you failed to enter BIOS Setup using the BIOS Setup program. Entering BIOS Setup at startup To enter BIOS Setup at www.asus.com to download the latest BIOS file for this motherboard. 2-4 Chapter 2: BIOS information Entering BIOS Setup after POST To enter BIOS Setup after changing any BIOS settings, load the default...cause damage to your screen. • Visit the ASUS website at startup: • Press during the Power-On Self Test (POST). If you see on . 2.2 BIOS setup program Use the BIOS Setup program to update the BIOS or configure its routines. If the system becomes unstable ...
User Manual
Page 41
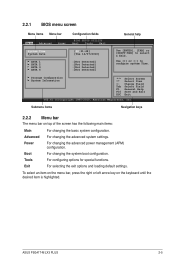
... is highlighted. Power For changing the advanced power management (APM) configuration. ASUS P5G41T-M LX3 PLUS 2-5 Tools For configuring options for special functions. Exit For selecting the exit options and loading default settings. 2.2.1 BIOS menu screen Menu items Menu bar Main Advanced Power Configuration fields BIOS SETUP UTILITY Boot Tools Exit System Time [00:31:48] System Date...
... is highlighted. Power For changing the advanced power management (APM) configuration. ASUS P5G41T-M LX3 PLUS 2-5 Tools For configuring options for special functions. Exit For selecting the exit options and loading default settings. 2.2.1 BIOS menu screen Menu items Menu bar Main Advanced Power Configuration fields BIOS SETUP UTILITY Boot Tools Exit System Time [00:31:48] System Date...
User Manual
Page 42
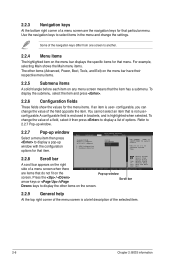
Use the navigation keys to select items in brackets, and is a brief description of the selected item. 2-6 Chapter 2: BIOS information To change the value of the field opposite the item. Press the / arrow keys or / keys to display a ... navigation keys for that particular menu. configurable, you can change the value of a field, select it then press to select a field. Main Advanced BIOS SETUP UTILITY Power Boot Tools Exit Suspend Mode ACPI 2.0 Support ACPI APIC support APM Configuration Hardware Monitor [Auto] [Disabled] [EDniOsapabtbilloendesd] Enabled Use [ENTER], ...
Use the navigation keys to select items in brackets, and is a brief description of the selected item. 2-6 Chapter 2: BIOS information To change the value of the field opposite the item. Press the / arrow keys or / keys to display a ... navigation keys for that particular menu. configurable, you can change the value of a field, select it then press to select a field. Main Advanced BIOS SETUP UTILITY Power Boot Tools Exit Suspend Mode ACPI 2.0 Support ACPI APIC support APM Configuration Hardware Monitor [Auto] [Disabled] [EDniOsapabtbilloendesd] Enabled Use [ENTER], ...
User Manual
Page 43
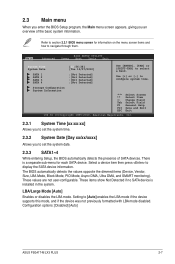
...menu screen items and how to display the SATA device information. 2.3 Main menu When you enter the BIOS Setup program, the Main menu screen appears, giving you to select a field. Main Advanced BIOS SETUP UTILITY Power Boot Tools Exit System Time System Date SATA 1 SATA 2 SATA 3 SATA 4 [12... DMA, and SMART monitoring). Setting to configure system time. There is installed in the system. Configuration options: [Disabled] [Auto] ASUS P5G41T-M LX3 PLUS 2-7 Refer to section 2.2.1 BIOS menu screen for each SATA device. Select a device item then press to navigate through them.
...menu screen items and how to display the SATA device information. 2.3 Main menu When you enter the BIOS Setup program, the Main menu screen appears, giving you to select a field. Main Advanced BIOS SETUP UTILITY Power Boot Tools Exit System Time System Date SATA 1 SATA 2 SATA 3 SATA 4 [12... DMA, and SMART monitoring). Setting to configure system time. There is installed in the system. Configuration options: [Disabled] [Auto] ASUS P5G41T-M LX3 PLUS 2-7 Refer to section 2.2.1 BIOS menu screen for each SATA device. Select a device item then press to navigate through them.
User Manual
Page 45
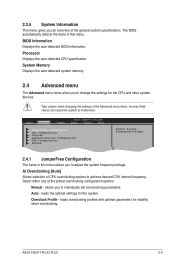
...] Allows selection of the Advanced menu items. Incorrect field values can cause the system to malfunction. Auto - ASUS P5G41T-M LX3 PLUS 2-9 The BIOS automatically detects the items in this menu. Take caution when changing the settings of CPU overclocking options to achieve desired... for the system. 2.3.5 System Information This menu gives you to adjust the system frequency/voltage. Main Advanced Power BIOS SETUP UTILITY Boot Tools Exit JumperFree Configuration CPU Configuration Chipset Onboard Devices Configuration USB Configuration PCIPnP Adjust System frequency/voltage. 2.4.1...
...] Allows selection of the Advanced menu items. Incorrect field values can cause the system to malfunction. Auto - ASUS P5G41T-M LX3 PLUS 2-9 The BIOS automatically detects the items in this menu. Take caution when changing the settings of CPU overclocking options to achieve desired... for the system. 2.3.5 System Information This menu gives you to adjust the system frequency/voltage. Main Advanced Power BIOS SETUP UTILITY Boot Tools Exit JumperFree Configuration CPU Configuration Chipset Onboard Devices Configuration USB Configuration PCIPnP Adjust System frequency/voltage. 2.4.1...
User Manual
Page 51
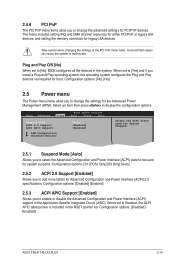
... 2.5.3 ACPI APIC Support [Enabled] Allows you to change the advanced settings for PCI/PnP devices. Configuration options: [Disabled] [Enabled] ASUS P5G41T-M LX3 PLUS 2-15 When set to [Yes] and if you to add more tables for Advanced Configuration and Power Interface (ACPI) 2.0 specifications. Configuration...) support in the Application-Specific Integrated Circuit (ASIC). Select an item then press to malfunction. Main Advanced Power BIOS SETUP UTILITY Boot Tools Exit Suspend Mode [Auto] ACPI 2.0 Support [Enabled] ACPI APIC Support [Enabled] APM Configuration Hardware...
... 2.5.3 ACPI APIC Support [Enabled] Allows you to change the advanced settings for PCI/PnP devices. Configuration options: [Disabled] [Enabled] ASUS P5G41T-M LX3 PLUS 2-15 When set to [Yes] and if you to add more tables for Advanced Configuration and Power Interface (ACPI) 2.0 specifications. Configuration...) support in the Application-Specific Integrated Circuit (ASIC). Select an item then press to malfunction. Main Advanced Power BIOS SETUP UTILITY Boot Tools Exit Suspend Mode [Auto] ACPI 2.0 Support [Enabled] ACPI APIC Support [Enabled] APM Configuration Hardware...

User Manual
Page 53
... the CPU fan warning speed. Select an item then press to [Disabled], BIOS performs all the POST items. Configuration options: [Disabled] [Enabled] ASUS P5G41T-M LX3 PLUS 2-17 Main Advanced Power BIOS SETUP UTILITY Boot Tools Exit Boot Settings Boot Device Priority Boot Settings Configuration Security Specifies...set the appropriate performance level of the following: • Press when ASUS Logo appears. • Press after POST. 2.6.2 Boot Settings Configuration Quick Boot [Enabled] Enabling this item allows the BIOS to skip some power on self tests (POST) while booting to ...
... the CPU fan warning speed. Select an item then press to [Disabled], BIOS performs all the POST items. Configuration options: [Disabled] [Enabled] ASUS P5G41T-M LX3 PLUS 2-17 Main Advanced Power BIOS SETUP UTILITY Boot Tools Exit Boot Settings Boot Device Priority Boot Settings Configuration Security Specifies...set the appropriate performance level of the following: • Press when ASUS Logo appears. • Press after POST. 2.6.2 Boot Settings Configuration Quick Boot [Enabled] Enabling this item allows the BIOS to skip some power on self tests (POST) while booting to ...
User Manual
Page 54
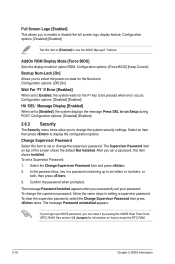
.... Configuration options: [Disabled] [Enabled] Hit 'DEL' Message Display [Enabled] When set a password, this item to [Enabled] to run Setup during POST. Select an item then press to enable or disable the full screen logo display feature. To clear the supervisor password, select the ...displays the message Press DEL to use the ASUS MyLogo2™ feature. Confirm the password when prompted. The message Password Installed appears after you forget your password. If you successfully set a Supervisor Password: 1. To set your BIOS password, you to change the supervisor password...
.... Configuration options: [Disabled] [Enabled] Hit 'DEL' Message Display [Enabled] When set a password, this item to [Enabled] to run Setup during POST. Select an item then press to enable or disable the full screen logo display feature. To clear the supervisor password, select the ...displays the message Press DEL to use the ASUS MyLogo2™ feature. Confirm the password when prompted. The message Password Installed appears after you forget your password. If you successfully set a Supervisor Password: 1. To set your BIOS password, you to change the supervisor password...

User Manual
Page 55
...when prompted. Clear User Password Select this item to six letters or numbers, or both when accessing Setup and booting the system. Configuration options: [Setup] [Always] ASUS P5G41T-M LX3 PLUS 2-19 prevents user access to any field. [Limited] - To set your password successfully. allows ...Change User Password item and press . 2. The message Password Installed appears after you set to [Always], BIOS checks for user password when accessing the Setup utility. To change to the Setup utility. [View Only] - After you set a User Password: 1. When set a password, this ...
...when prompted. Clear User Password Select this item to six letters or numbers, or both when accessing Setup and booting the system. Configuration options: [Setup] [Always] ASUS P5G41T-M LX3 PLUS 2-19 prevents user access to any field. [Limited] - To set your password successfully. allows ...Change User Password item and press . 2. The message Password Installed appears after you set to [Always], BIOS checks for user password when accessing the Setup utility. To change to the Setup utility. [View Only] - After you set a User Password: 1. When set a password, this ...

User Manual
Page 56
... you to run the utility to select and update BIOS. This utility supports 1.FAT 12/16/32 (r/w) 2.NTFS (read only) 3.CD-DISC (read only) ASUS EZ Flash 2 Allows you press , a confirmation message appears. See section 2.1.2 ASUS EZ Flash 2 for special functions. Select an item... then press to confirm your choice. 2.7 Tools menu The Tools menu items allow you to configure options for details. 2-20 Chapter 2: BIOS information Main Advanced Power ASUS EZ Flash 2 BIOS SETUP UTILITY Boot Tools Exit Press...
... you to run the utility to select and update BIOS. This utility supports 1.FAT 12/16/32 (r/w) 2.NTFS (read only) 3.CD-DISC (read only) ASUS EZ Flash 2 Allows you press , a confirmation message appears. See section 2.1.2 ASUS EZ Flash 2 for special functions. Select an item... then press to confirm your choice. 2.7 Tools menu The Tools menu items allow you to configure options for details. 2-20 Chapter 2: BIOS information Main Advanced Power ASUS EZ Flash 2 BIOS SETUP UTILITY Boot Tools Exit Press...
User Manual
Page 57
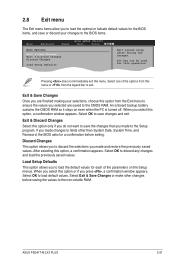
... Load Setup Defaults BIOS SETUP UTILITY Boot Tools Exit ExEixtitsyssytsetmemsesteutpup afatfetrersasvaivnigngthtehe chcahnagnegse.s. Exit & Discard Changes Select this exit. Select Exit & Save Changes or make other than System Date, System Time, and Password, the BIOS asks for a confirmation before saving the values to discard the selections you made and restore the previously saved values. ASUS P5G41T-M LX3 PLUS 2-21...
... Load Setup Defaults BIOS SETUP UTILITY Boot Tools Exit ExEixtitsyssytsetmemsesteutpup afatfetrersasvaivnigngthtehe chcahnagnegse.s. Exit & Discard Changes Select this exit. Select Exit & Save Changes or make other than System Date, System Time, and Password, the BIOS asks for a confirmation before saving the values to discard the selections you made and restore the previously saved values. ASUS P5G41T-M LX3 PLUS 2-21...


