

User Manual
Page 1
Motherboard P5G41T-M LX2/BR
Motherboard P5G41T-M LX2/BR
User Manual
Page 3
Contents Notices...v Safety information vi About this guide vi P5G41T-M LX2/BR specifications summary viii Chapter 1: Product introduction 1.1 Before you proceed 1-1 1.2 Motherboard overview 1-2 1.2.1 Motherboard layout 1-2 1.2.2 Layout contents 1-2 1.3 Central Processing Unit (CPU 1-3 1.4 System memory ... an operating system 1-15 1.8.2 Support DVD information 1-15 1.8.3 ASUS Express Gate 1-16 Chapter 2: BIOS information 2.1 Managing and updating your BIOS 2-1 2.1.1 ASUS Update utility 2-1 2.1.2 ASUS EZ Flash 2 2-2 2.1.3 ASUS CrashFree BIOS 2-3 2.2 BIOS setup program 2-3 iii
Contents Notices...v Safety information vi About this guide vi P5G41T-M LX2/BR specifications summary viii Chapter 1: Product introduction 1.1 Before you proceed 1-1 1.2 Motherboard overview 1-2 1.2.1 Motherboard layout 1-2 1.2.2 Layout contents 1-2 1.3 Central Processing Unit (CPU 1-3 1.4 System memory ... an operating system 1-15 1.8.2 Support DVD information 1-15 1.8.3 ASUS Express Gate 1-16 Chapter 2: BIOS information 2.1 Managing and updating your BIOS 2-1 2.1.1 ASUS Update utility 2-1 2.1.2 ASUS EZ Flash 2 2-2 2.1.3 ASUS CrashFree BIOS 2-3 2.2 BIOS setup program 2-3 iii

User Manual
Page 5
... to enable proper reuse of electronic products. DO NOT throw the mercury-containing button cell battery in our products at ASUS REACH website at http://green.asus.com/english/REACH.htm. This equipment generates, uses and can be determined by turning the equipment off and on a...Interference Regulations of the Canadian Department of Chemicals) regulatory framework, we published the chemical substances in municipal waste. DO NOT throw the motherboard in accordance with Part 15 of the crossed out wheeled bin indicates that may cause undesired operation. This symbol of the FCC Rules....
... to enable proper reuse of electronic products. DO NOT throw the mercury-containing button cell battery in our products at ASUS REACH website at http://green.asus.com/english/REACH.htm. This equipment generates, uses and can be determined by turning the equipment off and on a...Interference Regulations of the Canadian Department of Chemicals) regulatory framework, we published the chemical substances in municipal waste. DO NOT throw the motherboard in accordance with Part 15 of the crossed out wheeled bin indicates that may cause undesired operation. This symbol of the FCC Rules....

User Manual
Page 6
... device. • Before connecting or removing signal cables from the motherboard, ensure that all cables are correctly connected and the power cables are not damaged. Detailed descriptions of the motherboard and the new technology it by yourself. These devices could interrupt the...Product introduction This chapter describes the features of the BIOS parameters are also provided. If you need when installing and configuring the motherboard. Safety information Electrical safety • To prevent electric shock hazard, disconnect the power cable from the electric outlet before relocating...
... device. • Before connecting or removing signal cables from the motherboard, ensure that all cables are correctly connected and the power cables are not damaged. Detailed descriptions of the motherboard and the new technology it by yourself. These devices could interrupt the...Product introduction This chapter describes the features of the BIOS parameters are also provided. If you need when installing and configuring the motherboard. Safety information Electrical safety • To prevent electric shock hazard, disconnect the power cable from the electric outlet before relocating...

User Manual
Page 10
... you proceed Take note of the following precautions before you install motherboard components or change any motherboard settings. • Unplug the power cord from the power supply. SB_PWR P5G41T-M LX2/BR ON OFF Standby Power Powered Off P5G41T-M LX2/BR Onboard power LED 1-1 ASUS P5G41T-M LX2/BR Before you start installing the motherboard, and hardware devices on it on a grounded antistatic pad or...
... you proceed Take note of the following precautions before you install motherboard components or change any motherboard settings. • Unplug the power cord from the power supply. SB_PWR P5G41T-M LX2/BR ON OFF Standby Power Powered Off P5G41T-M LX2/BR Onboard power LED 1-1 ASUS P5G41T-M LX2/BR Before you start installing the motherboard, and hardware devices on it on a grounded antistatic pad or...

User Manual
Page 11
... module) DDR3 DIMM_B1 (64bit, 240-pin module) LPT VGA Place this side towards the rear of the chassis. Doing so can damage the motherboard. 1.2.2 Layout contents Connectors/Jumpers/Slots/LED 1. CPU and Chassis fan connectors (4-pin CPU_FAN and 3-pin CHA_FAN) 4. USB device wake-up (3-... 8112L AUDIO ICS 9LPRS441 Intel® G41 PCIEX1_1 Lithium Cell CMOS Power PRI_IDE 7 2 24.4cm(9.6in) EATXPWR Super PCIEX16 I/O 16 P5G41T-M LX2/BR SATA4 SATA3 8Mb PCI1 Intel® SATA2 BIOS SATA1 ICH7 PCI2 8 VIA VT1705 CD SB_PWR USBPW5-8 USB56 USB78 CLRTC AAFP CHASSIS F_PANEL 15...
... module) DDR3 DIMM_B1 (64bit, 240-pin module) LPT VGA Place this side towards the rear of the chassis. Doing so can damage the motherboard. 1.2.2 Layout contents Connectors/Jumpers/Slots/LED 1. CPU and Chassis fan connectors (4-pin CPU_FAN and 3-pin CHA_FAN) 4. USB device wake-up (3-... 8112L AUDIO ICS 9LPRS441 Intel® G41 PCIEX1_1 Lithium Cell CMOS Power PRI_IDE 7 2 24.4cm(9.6in) EATXPWR Super PCIEX16 I/O 16 P5G41T-M LX2/BR SATA4 SATA3 8Mb PCI1 Intel® SATA2 BIOS SATA1 ICH7 PCI2 8 VIA VT1705 CD SB_PWR USBPW5-8 USB56 USB78 CLRTC AAFP CHASSIS F_PANEL 15...
User Manual
Page 12
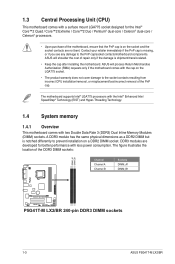
... shoulder the cost of the DDR3 DIMM sockets: DIMM_A1 DIMM_B1 Channel Channel A Channel B Sockets DIMM_A1 DIMM_B1 P5G41T-M LX2/BR P5G41T-M LX2/BR 240-pin DDR3 DIMM sockets 1-3 ASUS P5G41T-M LX2/BR 1.3 Central Processing Unit (CPU) This motherboard comes with a surface mount LGA775 socket designed for better performance with less power consumption. A DDR3 module has the same physical dimensions as a DDR2 DIMM...
... shoulder the cost of the DDR3 DIMM sockets: DIMM_A1 DIMM_B1 Channel Channel A Channel B Sockets DIMM_A1 DIMM_B1 P5G41T-M LX2/BR P5G41T-M LX2/BR 240-pin DDR3 DIMM sockets 1-3 ASUS P5G41T-M LX2/BR 1.3 Central Processing Unit (CPU) This motherboard comes with a surface mount LGA775 socket designed for better performance with less power consumption. A DDR3 module has the same physical dimensions as a DDR2 DIMM...
User Manual
Page 13
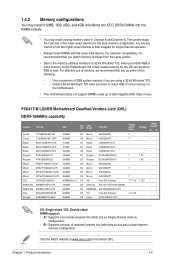
For optimum compatibility, it is then mapped for the latest QVL. P5G41T-M LX2/BR Motherboard Qualified Vendors Lists (QVL) DDR3-1066MHz capability Vendor Part No. Size SS/ Chip DS Brand Chip NO. The system maps the total size of the ...can be about 3GB or less. Chapter 1: Product introduction 1-4 1.4.2 Memory configurations You may install varying memory sizes in Channel A and Channel B. Visit the ASUS website at www.asus.com for single-channel operation. • Always install DIMMs with the same CAS latency. Install a 64-bit Windows® OS when you are using...
For optimum compatibility, it is then mapped for the latest QVL. P5G41T-M LX2/BR Motherboard Qualified Vendors Lists (QVL) DDR3-1066MHz capability Vendor Part No. Size SS/ Chip DS Brand Chip NO. The system maps the total size of the ...can be about 3GB or less. Chapter 1: Product introduction 1-4 1.4.2 Memory configurations You may install varying memory sizes in Channel A and Channel B. Visit the ASUS website at www.asus.com for single-channel operation. • Always install DIMMs with the same CAS latency. Install a 64-bit Windows® OS when you are using...
User Manual
Page 14
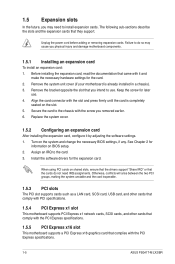
... card is already installed in a chassis). 3. See Chapter 2 for the expansion card. Remove the system unit cover (if your motherboard is completely seated on shared slots, ensure that the drivers support "Share IRQ" or that they support. Align the card connector with.... 1.5.5 PCI Express x16 slot This motherboard supports a PCI Express x16 graphics card that you removed earlier. 6. Remove the bracket opposite the slot that complies with the screw you intend to the chassis with the PCI Express specifications. 1-5 ASUS P5G41T-M LX2/BR Replace the system cover. 1.5.2 Configuring ...
... card is already installed in a chassis). 3. See Chapter 2 for the expansion card. Remove the system unit cover (if your motherboard is completely seated on shared slots, ensure that the drivers support "Share IRQ" or that they support. Align the card connector with.... 1.5.5 PCI Express x16 slot This motherboard supports a PCI Express x16 graphics card that you removed earlier. 6. Remove the bracket opposite the slot that complies with the screw you intend to the chassis with the PCI Express specifications. 1-5 ASUS P5G41T-M LX2/BR Replace the system cover. 1.5.2 Configuring ...
User Manual
Page 19
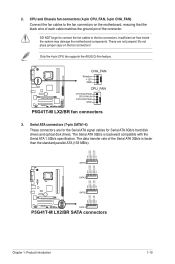
... to the fan connectors on the fan connectors! The data transfer rate of the connector. Only the 4-pin CPU fan supports the ASUS Q-Fan feature. CPU and Chassis fan connectors (4-pin CPU_FAN, 3-pin CHA_FAN) Connect the fan cables to the fan connectors. The ...GND RSATA_RXN2 RSATA_RXP2 GND RSATA_TXN2 RSATA_TXP2 GND GND RSATA_RXN1 RSATA_RXP1 GND RSATA_TXN1 RSATA_TXP1 GND P5G41T-M LX2/BR SATA2 SATA1 P5G41T-M LX2/BR SATA connectors Chapter 1: Product introduction 1-10 Do not place jumper caps on the motherboard, ensuring that the black wire of each cable matches the ground pin of the...
... to the fan connectors on the fan connectors! The data transfer rate of the connector. Only the 4-pin CPU fan supports the ASUS Q-Fan feature. CPU and Chassis fan connectors (4-pin CPU_FAN, 3-pin CHA_FAN) Connect the fan cables to the fan connectors. The ...GND RSATA_RXN2 RSATA_RXP2 GND RSATA_TXN2 RSATA_TXP2 GND GND RSATA_RXN1 RSATA_RXP1 GND RSATA_TXN1 RSATA_TXP1 GND P5G41T-M LX2/BR SATA2 SATA1 P5G41T-M LX2/BR SATA connectors Chapter 1: Product introduction 1-10 Do not place jumper caps on the motherboard, ensuring that the black wire of each cable matches the ground pin of the...
User Manual
Page 20
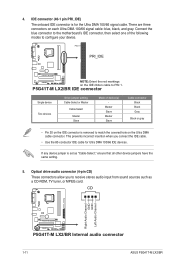
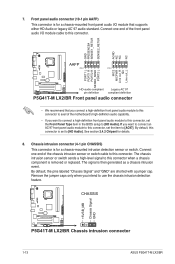
CD Right Audio Channel GND GND Left Audio Channel P5G41T-M LX2/BR P5G41T-M LX2/BR Internal audio connector 1-11 ASUS P5G41T-M LX2/BR Master Slave Master Slave Cable connector Black Black Gray Black or gray • Pin 20 on the IDE connector is removed to ...-Select," ensure that all other device jumpers have the same setting. 5. P5G41T-M LX2/BR IDE connector Single device Two devices Drive jumper setting Cable-Select or Master Cable-Select Master Slave Mode of the following modes to the motherboard's IDE connector, then select one of device(s) - Connect the blue connector...
CD Right Audio Channel GND GND Left Audio Channel P5G41T-M LX2/BR P5G41T-M LX2/BR Internal audio connector 1-11 ASUS P5G41T-M LX2/BR Master Slave Master Slave Cable connector Black Black Gray Black or gray • Pin 20 on the IDE connector is removed to ...-Select," ensure that all other device jumpers have the same setting. 5. P5G41T-M LX2/BR IDE connector Single device Two devices Drive jumper setting Cable-Select or Master Cable-Select Master Slave Mode of the following modes to the motherboard's IDE connector, then select one of device(s) - Connect the blue connector...

User Manual
Page 21
USB+5V USB_P8USB_P8+ GND NC USB+5V USB_P6USB_P6+ GND NC P5G41T-M LX2/BR USB56 PIN 1 USB78 PIN 1 USB+5V USB_P7USB_P7+ GND USB+5V USB_P5USB_P5+ GND P5G41T-M LX2/BR USB2.0 connectors Never connect a 1394 cable to 480Mbps connection speed. 6. These USB connectors comply with USB 2.0 specification that supports up to the USB connectors....a slot opening at the back of the system chassis. The USB 2.0 module is purchased separately. Chapter 1: Product introduction 1-12 Doing so will damage the motherboard! USB connectors (10-1 pin USB56, USB78) These connectors are for USB 2.0 ports.
USB+5V USB_P8USB_P8+ GND NC USB+5V USB_P6USB_P6+ GND NC P5G41T-M LX2/BR USB56 PIN 1 USB78 PIN 1 USB+5V USB_P7USB_P7+ GND USB+5V USB_P5USB_P5+ GND P5G41T-M LX2/BR USB2.0 connectors Never connect a 1394 cable to 480Mbps connection speed. 6. These USB connectors comply with USB 2.0 specification that supports up to the USB connectors....a slot opening at the back of the system chassis. The USB 2.0 module is purchased separately. Chapter 1: Product introduction 1-12 Doing so will damage the motherboard! USB connectors (10-1 pin USB56, USB78) These connectors are for USB 2.0 ports.
User Manual
Page 22
... +5VSB_MB Chassis Signal GND P5G41T-M LX2/BR P5G41T-M LX2/BR Chassis intrusion connector 1-13 ASUS P5G41T-M LX2/BR If you want to connect an AC'97 front panel audio module to this connector when a chassis component is for details. 8. The signal is for a chassis-mounted front panel audio I /O module cable to [AC97]. Connect one end of the motherboard's high-definition audio...
... +5VSB_MB Chassis Signal GND P5G41T-M LX2/BR P5G41T-M LX2/BR Chassis intrusion connector 1-13 ASUS P5G41T-M LX2/BR If you want to connect an AC'97 front panel audio module to this connector when a chassis component is for details. 8. The signal is for a chassis-mounted front panel audio I /O module cable to [AC97]. Connect one end of the motherboard's high-definition audio...
User Manual
Page 24
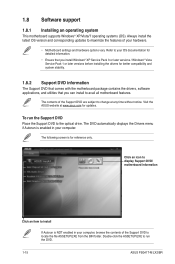
...ASUS P5G41T-M LX2/BR Double-click the ASSETUP.EXE to run the Support DVD Place the Support DVD to your computer, browse the contents of your computer. Refer to the optical drive. Visit the ASUS website at any time without notice. Click an icon to display Support DVD/ motherboard...Always install the latest OS version and corresponding updates to change at www.asus.com for better compatibility and system stability. 1.8.2 Support DVD information The Support DVD that comes with the motherboard package contains the drivers, software applications, and utilities that you can install ...
...ASUS P5G41T-M LX2/BR Double-click the ASSETUP.EXE to run the Support DVD Place the Support DVD to your computer, browse the contents of your computer. Refer to the optical drive. Visit the ASUS website at any time without notice. Click an icon to display Support DVD/ motherboard...Always install the latest OS version and corresponding updates to change at www.asus.com for better compatibility and system stability. 1.8.2 Support DVD information The Support DVD that comes with the motherboard package contains the drivers, software applications, and utilities that you can install ...
User Manual
Page 25
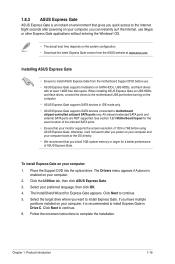
...Support DVD into the optical drive. The InstallShield Wizard for Express Gate appears. When installing ASUS Express Gate on USB HDDs and flash drives, connect the drives to the motherboard USB port before use Skype or other Express Gate applications without entering the Windows®... Download the latest Express Gate version from the ASUS website at least 1.2GB free disk space. Installing ASUS Express Gate • Ensure to install ASUS Express Gate from the motherboard Support DVD before turning on the computer. • ASUS Express Gate supports SATA devices in Drive C. ...
...Support DVD into the optical drive. The InstallShield Wizard for Express Gate appears. When installing ASUS Express Gate on USB HDDs and flash drives, connect the drives to the motherboard USB port before use Skype or other Express Gate applications without entering the Windows®... Download the latest Express Gate version from the ASUS website at least 1.2GB free disk space. Installing ASUS Express Gate • Ensure to install ASUS Express Gate from the motherboard Support DVD before turning on the computer. • ASUS Express Gate supports SATA devices in Drive C. ...
User Manual
Page 26
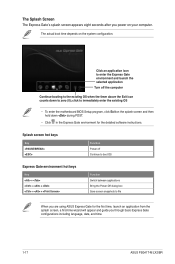
...wizard will appear and guide you through basic Express Gate configurations including language, date, and time. 1-17 ASUS P5G41T-M LX2/BR click to immediately enter the existing OS • To enter the motherboard BIOS Setup program, click Exit on the splash screen and then hold down to file When you are ...using ASUS Express Gate for the detailed software instructions. Click an application icon to enter the Express ...
...wizard will appear and guide you through basic Express Gate configurations including language, date, and time. 1-17 ASUS P5G41T-M LX2/BR click to immediately enter the existing OS • To enter the motherboard BIOS Setup program, click Exit on the splash screen and then hold down to file When you are ...using ASUS Express Gate for the detailed software instructions. Click an application icon to enter the Express ...

User Manual
Page 28
... drive. Click Network. 3. In the WiFi tab of the Advanced Network Settings box, key in the SSID field. Exits ASUS Express Gate. Accessing the Internet To configure the network settings: 1. Make the proper network configurations. move the cable from a... checkbox. The number of the wireless access point in the network name of the LAN ports vary with the motherboard. • LAN settings If you want to connect to a wireless network, click Setup to your computer automatically...computer. Right-click it to enable WiFi and establish the wireless connection. 1-19 ASUS P5G41T-M LX2/BR
... drive. Click Network. 3. In the WiFi tab of the Advanced Network Settings box, key in the SSID field. Exits ASUS Express Gate. Accessing the Internet To configure the network settings: 1. Make the proper network configurations. move the cable from a... checkbox. The number of the wireless access point in the network name of the LAN ports vary with the motherboard. • LAN settings If you want to connect to a wireless network, click Setup to your computer automatically...computer. Right-click it to enable WiFi and establish the wireless connection. 1-19 ASUS P5G41T-M LX2/BR

User Manual
Page 29
... filename/data list view, or play them in the username and password for details. Restoring to factory settings To restore Express Gate to motherboard chipset-controlled onboard SATA ports only. A confirmation dialog box appears. Choose whether the DSL/cable modem is enabled, the port it uses...Click Restore from the General tab. The first-time wizard will be unchecked. JPEG, GIF, BMP, and PNG formats are NOT supported. ASUS Express Gate supports SATA devices connected to the factory settings: 1. Click Environment Settings. 3. Click Yes to immediately restart Express Gate to view ...
... filename/data list view, or play them in the username and password for details. Restoring to factory settings To restore Express Gate to motherboard chipset-controlled onboard SATA ports only. A confirmation dialog box appears. Choose whether the DSL/cable modem is enabled, the port it uses...Click Restore from the General tab. The first-time wizard will be unchecked. JPEG, GIF, BMP, and PNG formats are NOT supported. ASUS Express Gate supports SATA devices connected to the factory settings: 1. Click Environment Settings. 3. Click Yes to immediately restart Express Gate to view ...
User Manual
Page 30
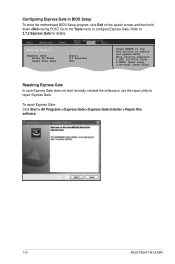
... in BIOS Setup To enter the motherboard BIOS Setup program, click Exit on the splash screen and then hold down during POST. Go to the Tools menu to select and update BIOS. Main Advanced Power BIOS SETUP UTILITY Boot Tools Exit ASUS EZ Flash 2 Express Gate Enter OS...the utility to configure Express Gate. To repair Express Gate: Click Start > All Programs > Express Gate > Express Gate Installer > Repair this software. 1-21 ASUS P5G41T-M LX2/BR Refer to repair Express Gate. This utility supports 1.FAT 12/16/32 (r/w) 2.NTFS (read only) 3.CD-DISC (read only) Repairing Express Gate In ...
... in BIOS Setup To enter the motherboard BIOS Setup program, click Exit on the splash screen and then hold down during POST. Go to the Tools menu to select and update BIOS. Main Advanced Power BIOS SETUP UTILITY Boot Tools Exit ASUS EZ Flash 2 Express Gate Enter OS...the utility to configure Express Gate. To repair Express Gate: Click Start > All Programs > Express Gate > Express Gate Installer > Repair this software. 1-21 ASUS P5G41T-M LX2/BR Refer to repair Express Gate. This utility supports 1.FAT 12/16/32 (r/w) 2.NTFS (read only) 3.CD-DISC (read only) Repairing Express Gate In ...
User Manual
Page 31
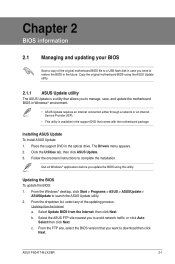
.... From the dropdown list, select any of the original motherboard BIOS file to a USB flash disk in case you need to launch the ASUS Update utility. 2. Installing ASUS Update To install ASUS Update: 1. Chapter 2 BIOS information 2.1 Managing and updating...ASUS Update utility. 2.1.1 ASUS Update utility The ASUS Update is a utility that allows you to download then click Next. From the Windows® desktop, click Start > Programs > ASUS > ASUSUpdate > ASUSUpdate to restore the BIOS in the future. Click the Utilities tab, then click ASUS Update. 3. ASUS P5G41T-M LX2/BR...
.... From the dropdown list, select any of the original motherboard BIOS file to a USB flash disk in case you need to launch the ASUS Update utility. 2. Installing ASUS Update To install ASUS Update: 1. Chapter 2 BIOS information 2.1 Managing and updating...ASUS Update utility. 2.1.1 ASUS Update utility The ASUS Update is a utility that allows you to download then click Next. From the Windows® desktop, click Start > Programs > ASUS > ASUSUpdate > ASUSUpdate to restore the BIOS in the future. Click the Utilities tab, then click ASUS Update. 3. ASUS P5G41T-M LX2/BR...


