User Manual
Page 7
.... If possible, disconnect all power cables from the existing system before you detect any area where it , carefully read all the manuals that your power supply is defined as a CLASS 1 LASER PRODUCT. Operation safety • Before installing the motherboard and adding devices on a stable... surface. • If you are using, contact your local power company. • If the power supply is broken, do not try ...
.... If possible, disconnect all power cables from the existing system before you detect any area where it , carefully read all the manuals that your power supply is defined as a CLASS 1 LASER PRODUCT. Operation safety • Before installing the motherboard and adding devices on a stable... surface. • If you are using, contact your local power company. • If the power supply is broken, do not try ...
User Manual
Page 13
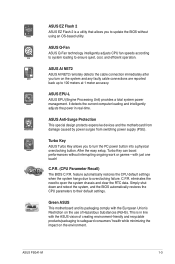
... without interrupting ongoing work or games-with the ASUS vision of Hazardous Substances (RoHS). C.P.R. (CPU Parameter Recall) The BIOS C.P.R. ASUS P5G41-M 1-3 It detects the current computer loading and intelligently adjusts the power in line with just one touch! This is... ASUS AI NET2 ASUS AI NET2 remotely detects the cable connection immediately after you turn the PC power button into a physical overclocking button. ASUS Anti-Surge Protection This special design protects expensive devices and the motherboard from damage caused by power surges from switching power supply (...
... without interrupting ongoing work or games-with the ASUS vision of Hazardous Substances (RoHS). C.P.R. (CPU Parameter Recall) The BIOS C.P.R. ASUS P5G41-M 1-3 It detects the current computer loading and intelligently adjusts the power in line with just one touch! This is... ASUS AI NET2 ASUS AI NET2 remotely detects the cable connection immediately after you turn the PC power button into a physical overclocking button. ASUS Anti-Surge Protection This special design protects expensive devices and the motherboard from damage caused by power surges from switching power supply (...
User Manual
Page 14
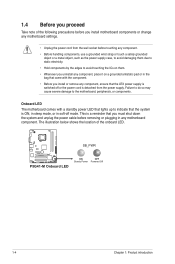
... before you install motherboard components or change any motherboard settings. • Unplug the power cord from the power supply. Onboard LED The motherboard comes with the component. • Before you install or remove any component, ensure that the ATX power supply is switched off or the power cord is detached ... cause severe damage to indicate that the system is ON, in sleep mode, or in any motherboard component. 1.4 Before you proceed Take note of the onboard LED. SB_PWR P5G41-M P5G41-M Onboard LED ON OFF Standy Power Powered Off 1-4 Chapter 1: Product introduction
... before you install motherboard components or change any motherboard settings. • Unplug the power cord from the power supply. Onboard LED The motherboard comes with the component. • Before you install or remove any component, ensure that the ATX power supply is switched off or the power cord is detached ... cause severe damage to indicate that the system is ON, in sleep mode, or in any motherboard component. 1.4 Before you proceed Take note of the onboard LED. SB_PWR P5G41-M P5G41-M Onboard LED ON OFF Standy Power Powered Off 1-4 Chapter 1: Product introduction

User Manual
Page 30
...: 1. Firmly insert the DIMM into a socket to unlock a DDR2 DIMM socket. 2. Simultaneously press the retaining clips outward to both the motherboard and the components. Remove the DIMM from the socket. 1-20 Chapter 1: Product introduction The DIMM might get damaged when it fits in place...2 DDR2 DIMM notch 1 Unlocked retaining clip A DDR2 DIMM is properly seated. To install a DIMM: 1. 1.7.3 Installing a DIMM Unplug the power supply before adding or removing DIMMs or other system components. Press the retaining clips outward to avoid damaging the DIMM. 3. DO NOT force a DIMM ...
...: 1. Firmly insert the DIMM into a socket to unlock a DDR2 DIMM socket. 2. Simultaneously press the retaining clips outward to both the motherboard and the components. Remove the DIMM from the socket. 1-20 Chapter 1: Product introduction The DIMM might get damaged when it fits in place...2 DDR2 DIMM notch 1 Unlocked retaining clip A DDR2 DIMM is properly seated. To install a DIMM: 1. 1.7.3 Installing a DIMM Unplug the power supply before adding or removing DIMMs or other system components. Press the retaining clips outward to avoid damaging the DIMM. 3. DO NOT force a DIMM ...
User Manual
Page 32
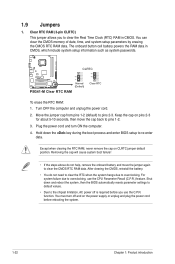
... settings to default values. • Due to pins 1-2. 3. Except when clearing the RTC RAM, never remove the cap on the power supply or unplug and plug the power cord before you to overclocking. function. You can clear the CMOS memory of date, time, and system setup parameters by erasing the ... help, remove the onboard battery and move the cap back to the chipset limitation, AC power off and on CLRTC jumper default position. You must turn ON the computer. 4. CLRTC 12 23 P5G41-M Normal (Default) P5G41-M Clear RTC RAM Clear RTC To erase the RTC RAM: 1. Turn OFF the computer ...
... settings to default values. • Due to pins 1-2. 3. Except when clearing the RTC RAM, never remove the cap on the power supply or unplug and plug the power cord before you to overclocking. function. You can clear the CMOS memory of date, time, and system setup parameters by erasing the ... help, remove the onboard battery and move the cap back to the chipset limitation, AC power off and on CLRTC jumper default position. You must turn ON the computer. 4. CLRTC 12 23 P5G41-M Normal (Default) P5G41-M Clear RTC RAM Clear RTC To erase the RTC RAM: 1. Turn OFF the computer ...
User Manual
Page 33
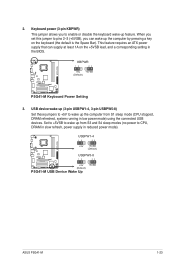
...slow refresh, power supply in reduced power mode). This feature requires an ATX power supply that can wake up feature. USB device wake-up (3-pin USBPW1-4, 3-pin USBPW5-8) Set these jumpers to +5V to wake up the computer from S3 and S4 sleep modes (no power to wake ... you can supply at least 1A on the keyboard (the default is the Space Bar). USBPW1-4 12 23 +5V +5VSB (Default) USBPW5-8 P5G41-M 12 23 +5V +5VSB (Default) P5G41-M USB Device Wake Up ASUS P5G41-M 1-23 2. KBPWR 12 23 +5V +5VSB (Default) P5G41-M P5G41-M Keyboard Power Setting 3. Keyboard power (3-pin KBPWR...
...slow refresh, power supply in reduced power mode). This feature requires an ATX power supply that can wake up feature. USB device wake-up (3-pin USBPW1-4, 3-pin USBPW5-8) Set these jumpers to +5V to wake up the computer from S3 and S4 sleep modes (no power to wake ... you can supply at least 1A on the keyboard (the default is the Space Bar). USBPW1-4 12 23 +5V +5VSB (Default) USBPW5-8 P5G41-M 12 23 +5V +5VSB (Default) P5G41-M USB Device Wake Up ASUS P5G41-M 1-23 2. KBPWR 12 23 +5V +5VSB (Default) P5G41-M P5G41-M Keyboard Power Setting 3. Keyboard power (3-pin KBPWR...
User Manual
Page 37
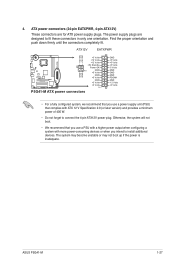
... fit these connectors in only one orientation. The system may become unstable or may not boot up if the power is inadequate. 4. ASUS P5G41-M 1-27 The power supply plugs are for ATX power supply plugs. Otherwise, the system will not boot. • We recommend that complies with more power-consuming devices or when you intend to install additional devices.
... fit these connectors in only one orientation. The system may become unstable or may not boot up if the power is inadequate. 4. ASUS P5G41-M 1-27 The power supply plugs are for ATX power supply plugs. Otherwise, the system will not boot. • We recommend that complies with more power-consuming devices or when you intend to install additional devices.
User Manual
Page 58
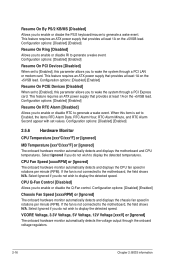
... a wake event. Select Ignored if you do not wish to display the detected speed. If the fan is not connected to the motherboard, the field shows N/A. This feature requires an ATX power supply that provides at least 1A on the +5VSB lead. Configuration options: [Disabled] [Enabled] 2.5.6 Hardware Monitor CPU Temperature [xxxºC/xxxº...
... a wake event. Select Ignored if you do not wish to display the detected speed. If the fan is not connected to the motherboard, the field shows N/A. This feature requires an ATX power supply that provides at least 1A on the +5VSB lead. Configuration options: [Disabled] [Enabled] 2.5.6 Hardware Monitor CPU Temperature [xxxºC/xxxº...


