

P4S8X-MX English User Manaul E1997
Page 4
... updating your BIOS 2-2 2.1.1 Creating a bootable floppy disk 2-2 2.1.2 ASUS EZ Flash utility 2-3 2.1.3 AFUDOS utility 2-4 2.1.4 ASUS CrashFree BIOS 2 utility 2-6 2.1.5 ASUS Update utility 2-8 2.2 BIOS setup program 2-11 2.2.1 BIOS menu screen 2-12 2.2.2 Menu bar 2-12 2.2.3 Navigation keys 2-12 2.2.4 Menu items 2-13 2.2.5 Sub-menu items 2-13 2.2.6 Configuration fields 2-13 2.2.7 Pop-up window 2-13 2.2.8 Scroll bar 2-13 2.2.9 General help 2-13...
... updating your BIOS 2-2 2.1.1 Creating a bootable floppy disk 2-2 2.1.2 ASUS EZ Flash utility 2-3 2.1.3 AFUDOS utility 2-4 2.1.4 ASUS CrashFree BIOS 2 utility 2-6 2.1.5 ASUS Update utility 2-8 2.2 BIOS setup program 2-11 2.2.1 BIOS menu screen 2-12 2.2.2 Menu bar 2-12 2.2.3 Navigation keys 2-12 2.2.4 Menu items 2-13 2.2.5 Sub-menu items 2-13 2.2.6 Configuration fields 2-13 2.2.7 Pop-up window 2-13 2.2.8 Scroll bar 2-13 2.2.9 General help 2-13...

P4S8X-MX English User Manaul E1997
Page 20
... Hyper-Threading Technology item in BIOS to ensure system stability and performance. • We recommend that you installed a CPU that it is supported under Windows® XP/2003 Server and Linux 2.4.x (kernel) and later versions only. 5. The lever clicks on Intel® Hyper-Threading Technology •...-Threading Technology is locked. Power up the system and enter BIOS Setup (see Chapter 2: BIOS setup). The item appears only if you install Windows® XP Service Pack 1. • Make sure to enable the Hyper-Threading Technology item in place, push down the socket lever to compile...
... Hyper-Threading Technology item in BIOS to ensure system stability and performance. • We recommend that you installed a CPU that it is supported under Windows® XP/2003 Server and Linux 2.4.x (kernel) and later versions only. 5. The lever clicks on Intel® Hyper-Threading Technology •...-Threading Technology is locked. Power up the system and enter BIOS Setup (see Chapter 2: BIOS setup). The item appears only if you install Windows® XP Service Pack 1. • Make sure to enable the Hyper-Threading Technology item in place, push down the socket lever to compile...

P4S8X-MX English User Manaul E1997
Page 36
...only when using Windows® XP with Service Pack 2. If you install two hard disk drives, you connect the IDE cable. • Use the 80-conductor IDE cable for Ultra DMA 100/66 IDE devices. • Support for Ultra DMA 100/66 signal cables. Refer to PIN 1. P4S8X-MX IDE connectors PIN...the covered hole on the IDE ribbon cable to the hard disk documentation for an Ultra DMA 100/66 IDE master device (hard disk drive). P4S8X-MX SEC_IDE PRI_IDE NOTE: Orient the red markings (usually zigzag) on the Ultra DMA cable connector. This prevents incorrect insertion when you must configure ...
...only when using Windows® XP with Service Pack 2. If you install two hard disk drives, you connect the IDE cable. • Use the 80-conductor IDE cable for Ultra DMA 100/66 IDE devices. • Support for Ultra DMA 100/66 signal cables. Refer to PIN 1. P4S8X-MX IDE connectors PIN...the covered hole on the IDE ribbon cable to the hard disk documentation for an Ultra DMA 100/66 IDE master device (hard disk drive). P4S8X-MX SEC_IDE PRI_IDE NOTE: Orient the red markings (usually zigzag) on the Ultra DMA cable connector. This prevents incorrect insertion when you must configure ...

P4S8X-MX English User Manaul E1997
Page 37
3 . Serial ATA Master/Slave connectors Connector SATA1 SATA2 Setting Master Slave Use Boot disk Data disk ASUS P4S8X-MX 1-27 Serial ATA connectors (7-pin SATA1, SATA2) These connectors are for the Serial ATA signal cables for the Serial ATA drive and...MB/s (Ultra DMA/133) GND RSATA_RXN2 RSATA_RXP2 GND RSATA_TXN2 RSATA_TXP2 GND P4S8X-MX SATA2 GND RSATA_RXN1 RSATA_RXP1 GND RSATA_TXN1 RSATA_TXP1 GND P4S8X-MX SATA connectors SATA1 If you install SATA hard disk drives, you 're using Windows® 2000/XP or Windows® 2003 Server operating systems. • Hot plug support for ...
3 . Serial ATA Master/Slave connectors Connector SATA1 SATA2 Setting Master Slave Use Boot disk Data disk ASUS P4S8X-MX 1-27 Serial ATA connectors (7-pin SATA1, SATA2) These connectors are for the Serial ATA signal cables for the Serial ATA drive and...MB/s (Ultra DMA/133) GND RSATA_RXN2 RSATA_RXP2 GND RSATA_TXN2 RSATA_TXP2 GND P4S8X-MX SATA2 GND RSATA_RXN1 RSATA_RXP1 GND RSATA_TXN1 RSATA_TXP1 GND P4S8X-MX SATA connectors SATA1 If you install SATA hard disk drives, you 're using Windows® 2000/XP or Windows® 2003 Server operating systems. • Hot plug support for ...

P4S8X-MX English User Manaul E1997
Page 44
...BIOS using a bootable floppy disk.) 2. At the DOS prompt, type format A:/S then press . Windows® XP environment a. Insert a 1.44 MB floppy disk to restore the BIOS in DOS mode... m a t 3 1 / 2 F l o p p y D i s k window appears. e. Windows® 2000 environment To create a set of boot disks for details on these utilities. Insert a....) 3. Insert the Windows® 2000 CD to the corresponding sections for Windows® 2000: a.... icon. Do either one of the original motherboard BIOS file to a bootable floppy disk in Windows® environment.) Refer to the optical drive. A S U S U p d a...
...BIOS using a bootable floppy disk.) 2. At the DOS prompt, type format A:/S then press . Windows® XP environment a. Insert a 1.44 MB floppy disk to restore the BIOS in DOS mode... m a t 3 1 / 2 F l o p p y D i s k window appears. e. Windows® 2000 environment To create a set of boot disks for details on these utilities. Insert a....) 3. Insert the Windows® 2000 CD to the corresponding sections for Windows® 2000: a.... icon. Do either one of the original motherboard BIOS file to a bootable floppy disk in Windows® environment.) Refer to the optical drive. A S U S U p d a...
P4S8X-MX English User Manaul E1997
Page 50
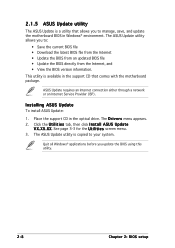
... that comes with the motherboard package. The D r i v e r s menu appears. 2. X X . Place the support CD in Windows® environment. Quit all Windows® applications before you update the BIOS using this utility. 2-8 Chapter 2: BIOS setup Click the U t i l i t i e s tab, then click I n s t a l l A S U S U p d a t e V X . ASUS Update requires an Internet connection either through a network or an Internet Service Provider (ISP...
... that comes with the motherboard package. The D r i v e r s menu appears. 2. X X . Place the support CD in Windows® environment. Quit all Windows® applications before you update the BIOS using this utility. 2-8 Chapter 2: BIOS setup Click the U t i l i t i e s tab, then click I n s t a l l A S U S U p d a t e V X . ASUS Update requires an Internet connection either through a network or an Internet Service Provider (ISP...

P4S8X-MX English User Manaul E1997
Page 51
Launch the ASUS Update utility from the nearest you to avoid network drop-down menu, then click traffic, or click A u t o S e l e c t. The ASUS Update main window appears. 2. ASUS P4S8X-MX 2-9 Select U p d a t e B I n t e r n e t option from the Windows® desktop by clicking S t a r t > P r o g r a m s > A S U S > A S U S U p d a t e > A S U S U p d a t e. Select the ASUS FTP site t h e I O S f r o m 3. N e x t. Click N e x t. Updating the BIOS through the Internet To update the BIOS through the Internet: 1.
Launch the ASUS Update utility from the nearest you to avoid network drop-down menu, then click traffic, or click A u t o S e l e c t. The ASUS Update main window appears. 2. ASUS P4S8X-MX 2-9 Select U p d a t e B I n t e r n e t option from the Windows® desktop by clicking S t a r t > P r o g r a m s > A S U S > A S U S U p d a t e > A S U S U p d a t e. Select the ASUS FTP site t h e I O S f r o m 3. N e x t. Click N e x t. Updating the BIOS through the Internet To update the BIOS through the Internet: 1.

P4S8X-MX English User Manaul E1997
Page 52
... the update process. 2-10 Chapter 2: BIOS setup Follow the screen instructions to avail all its features. The ASUS Update main window appears. 2. Launch the ASUS Update utility from the O p e n window, then click S a v e. 4. Locate the BIOS file from the Windows® desktop by clicking S t a r t > P r o g r a m s > A S U S > A S U S U p d a t e > A S U S U p d a t e. Updating the BIOS through a BIOS file To update the BIOS through the...
... the update process. 2-10 Chapter 2: BIOS setup Follow the screen instructions to avail all its features. The ASUS Update main window appears. 2. Launch the ASUS Update utility from the O p e n window, then click S a v e. 4. Locate the BIOS file from the Windows® desktop by clicking S t a r t > P r o g r a m s > A S U S > A S U S U p d a t e > A S U S U p d a t e. Updating the BIOS through a BIOS file To update the BIOS through the...

P4S8X-MX English User Manaul E1997
Page 55
...menu items. If an item is a brief description of the selected item. Refer to "2.2.7 Pop-up window." 2.2.7 Pop-up window Select a menu item then press to display a list of options. Pop-up window with the configuration options for that menu. For example, selecting M a i n shows the Main menu... of the menu screen is user-configurable, you can change the value of a field, select it then press to display a pop-up window Scroll bar ASUS P4S8X-MX 2-13 Use [+] or [-] to malfunction. 2.2.4 Menu items The highlighted item on the menu bar displays the specific items for that item....
...menu items. If an item is a brief description of the selected item. Refer to "2.2.7 Pop-up window." 2.2.7 Pop-up window Select a menu item then press to display a list of options. Pop-up window with the configuration options for that menu. For example, selecting M a i n shows the Main menu... of the menu screen is user-configurable, you can change the value of a field, select it then press to display a pop-up window Scroll bar ASUS P4S8X-MX 2-13 Use [+] or [-] to malfunction. 2.2.4 Menu items The highlighted item on the menu bar displays the specific items for that item....

P4S8X-MX English User Manaul E1997
Page 67
... Disable when using Windows® 98 SE or Windows® Me OS. Select an item then press to detect the presence of USB devices at startup. Configuration options: [Disabled] [Enabled] OnBoard SiS USB 2.0 Device [Enabled] Allows you to enable or disable the onboard SiS USB 2.0 device. Configuration options: [HiSpeed ] [Full Speed] ASUS P4S8X-MX 2-27
... Disable when using Windows® 98 SE or Windows® Me OS. Select an item then press to detect the presence of USB devices at startup. Configuration options: [Disabled] [Enabled] OnBoard SiS USB 2.0 Device [Enabled] Allows you to enable or disable the onboard SiS USB 2.0 device. Configuration options: [HiSpeed ] [Full Speed] ASUS P4S8X-MX 2-27

P4S8X-MX English User Manaul E1997
Page 78
... select this option from the Exit menu to ensure the values you selected are saved to save changes and exit. After selecting this option, a confirmation window appears. Select E x i t & S a v e C h a n g e s or make other than System Date, System Time, and Password, the BIOS asks .... Exit & Save Changes Once you are finished making your changes before exiting. Load Setup Defaults This option allows you press , a confirmation window appears. Select Y e s to discard the selections you select this option, a confirmation appears. An onboard backup battery sustains the CMOS RAM...
... select this option from the Exit menu to ensure the values you selected are saved to save changes and exit. After selecting this option, a confirmation window appears. Select E x i t & S a v e C h a n g e s or make other than System Date, System Time, and Password, the BIOS asks .... Exit & Save Changes Once you are finished making your changes before exiting. Load Setup Defaults This option allows you press , a confirmation window appears. Select Y e s to discard the selections you select this option, a confirmation appears. An onboard backup battery sustains the CMOS RAM...

P4S8X-MX English User Manaul E1997
Page 80
...(www.asus.com) for better compatibility and system stability. 3.2 Support CD information The support CD that came with the motherboard package contains the drivers, software applications, and utilities that you install Windows® 2000 Service Pack 4 or the Windows® XP Service Pack 1 or later versions ... sure that you can install to locate the file ASSETUP.EXE from the BIN folder. 3.1 Installing an operating system This motherboard supports Windows® 2000/2003 Server/XP operating systems (OS). Always install the latest OS version and corresponding updates to change at any time...
...(www.asus.com) for better compatibility and system stability. 3.2 Support CD information The support CD that came with the motherboard package contains the drivers, software applications, and utilities that you install Windows® 2000 Service Pack 4 or the Windows® XP Service Pack 1 or later versions ... sure that you can install to locate the file ASSETUP.EXE from the BIN folder. 3.1 Installing an operating system This motherboard supports Windows® 2000/2003 Server/XP operating systems (OS). Always install the latest OS version and corresponding updates to change at any time...
P4S8X-MX English User Manaul E1997
Page 82
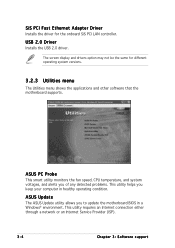
... for different operating system versions. 3.2.3 Utilities menu The Utilities menu shows the applications and other software that the motherboard supports. ASUS PC Probe This smart utility monitors the fan speed, CPU temperature, and system voltages, and alerts you of any detected problems...The screen display and drivers option may not be the same for the onboard SiS PCI LAN controller. ASUS Update The ASUS Update utility allows you keep your computer in a Windows® environment. This utility requires an Internet connection either through a network or an Internet Service Provider ...
... for different operating system versions. 3.2.3 Utilities menu The Utilities menu shows the applications and other software that the motherboard supports. ASUS PC Probe This smart utility monitors the fan speed, CPU temperature, and system voltages, and alerts you of any detected problems...The screen display and drivers option may not be the same for the onboard SiS PCI LAN controller. ASUS Update The ASUS Update utility allows you keep your computer in a Windows® environment. This utility requires an Internet connection either through a network or an Internet Service Provider ...

P4S8X-MX English User Manaul E1997
Page 96
... floppy disk with the motherboard package to create a RAID driver disk. 3.4 Creating a RAID driver disk A floppy disk with the RAID driver is required when installing Windows® 2000/XP operating system on a hard disk drive that is the primary boot device. Follow the succeeding screen instructions to create a RAID driver disk...
... floppy disk with the motherboard package to create a RAID driver disk. 3.4 Creating a RAID driver disk A floppy disk with the RAID driver is required when installing Windows® 2000/XP operating system on a hard disk drive that is the primary boot device. Follow the succeeding screen instructions to create a RAID driver disk...


