NCCH-DLE User's Manual English version 1.0
Page 5
... 4-41 4.6.2 Hard Disk Boot Priority 4-42 4.6.3 Removable Device Priority 4-42 4.6.4 Boot Settings Configuration 4-43 4.6.5 Security 4-45 4.7 Exit menu 4-47 Chapter 5: Driver installation 5.1 RAID 5-1 5.1.1 RAID configurations 5-1 5.1.2 Installing hard disk drives 5-2 5.1.3 Setting the RAID item in BIOS 5-2 5.1.4 Adaptec® RAID configuration utility 5-3 5.1.4.1 Creating a RAID 0 set (Striped 5-4 5.1.4.2 Creating a RAID 1 set (Mirrored 5-10 5.1.5 Creating an Intel® 6300ESB RAID driver disk ....... 5-21 5.1.5.1 Windows® 2000/2003 Server 5-21 5.1.5.2 Red Hat® Linux...
... 4-41 4.6.2 Hard Disk Boot Priority 4-42 4.6.3 Removable Device Priority 4-42 4.6.4 Boot Settings Configuration 4-43 4.6.5 Security 4-45 4.7 Exit menu 4-47 Chapter 5: Driver installation 5.1 RAID 5-1 5.1.1 RAID configurations 5-1 5.1.2 Installing hard disk drives 5-2 5.1.3 Setting the RAID item in BIOS 5-2 5.1.4 Adaptec® RAID configuration utility 5-3 5.1.4.1 Creating a RAID 0 set (Striped 5-4 5.1.4.2 Creating a RAID 1 set (Mirrored 5-10 5.1.5 Creating an Intel® 6300ESB RAID driver disk ....... 5-21 5.1.5.1 Windows® 2000/2003 Server 5-21 5.1.5.2 Red Hat® Linux...
NCCH-DLE User's Manual English version 1.0
Page 9
... of the switches, jumpers, and connectors on ASUS hardware and software products. ix Detailed descriptions of the BIOS parameters are not part of the motherboard and the new technologies it supports. • Chapter 2: Hardware information This chapter lists the hardware setup procedures that you need when installing and configuring the motherboard. ASUS websites The ASUS website provides updated information on the motherboard. • Chapter 3: Powering up This chapter describes the power up sequence...
... of the switches, jumpers, and connectors on ASUS hardware and software products. ix Detailed descriptions of the BIOS parameters are not part of the motherboard and the new technologies it supports. • Chapter 2: Hardware information This chapter lists the hardware setup procedures that you need when installing and configuring the motherboard. ASUS websites The ASUS website provides updated information on the motherboard. • Chapter 3: Powering up This chapter describes the power up sequence...

NCCH-DLE User's Manual English version 1.0
Page 15
... your NCCH-DLE package for buying the ASUS® NCCH-DLE motherboard! 1.1 Welcome! ASUS NCCH-DLE 1-1 Before you for the following items. Motherboard ASUS NCCH-DLE motherboard I/O modules Cables Accessories Application CDs Documentation USB 2.0 + GAME port module S/PDIF Out module with the list below. 1.2 Package contents Check your retailer. Thank you start installing the motherboard, and hardware devices on it another standout in -1 floppy/Ultra ATA cable 6 x SATA cables 3 x SATA power cables I/O shield CPU heatsink support kit ASUS motherboard support CD User guide If...
... your NCCH-DLE package for buying the ASUS® NCCH-DLE motherboard! 1.1 Welcome! ASUS NCCH-DLE 1-1 Before you for the following items. Motherboard ASUS NCCH-DLE motherboard I/O modules Cables Accessories Application CDs Documentation USB 2.0 + GAME port module S/PDIF Out module with the list below. 1.2 Package contents Check your retailer. Thank you start installing the motherboard, and hardware devices on it another standout in -1 floppy/Ultra ATA cable 6 x SATA cables 3 x SATA power cables I/O shield CPU heatsink support kit ASUS motherboard support CD User guide If...

NCCH-DLE User's Manual English version 1.0
Page 17
... that allows intelligent detection of the peripherals plugged into the audio ports and identifies the incompatible devices, if any . The IEEE 1394 allows up to provide friendly voice messages and alerts during the PowerOn Self-Tests (POST) informing you customize the voice messages in the supported languages. ASUS NCCH-DLE 1-3 ASUS POST Reporter™ The motherboard offers a new exciting feature called the ASUS POST Reporter™...
... that allows intelligent detection of the peripherals plugged into the audio ports and identifies the incompatible devices, if any . The IEEE 1394 allows up to provide friendly voice messages and alerts during the PowerOn Self-Tests (POST) informing you customize the voice messages in the supported languages. ASUS NCCH-DLE 1-3 ASUS POST Reporter™ The motherboard offers a new exciting feature called the ASUS POST Reporter™...
NCCH-DLE User's Manual English version 1.0
Page 18
... CPU temperature is monitored for your system with customizable boot logos. No need to update the motherboard BIOS through the Winbond ASIC. Chassis intrusion detection The motherboard supports chassis intrusion monitoring through a userfriendly interface. The ASUS MyLogo2 is automatically installed when you install ASUS Update from a floppy disk. The system fan rotations per minute (RPM) is monitored by the Hardware monitor (Winbond H/W monitoring IC W83792D) to ensure stable supply of current for operating systems that support OS Directed Power Management...
... CPU temperature is monitored for your system with customizable boot logos. No need to update the motherboard BIOS through the Winbond ASIC. Chassis intrusion detection The motherboard supports chassis intrusion monitoring through a userfriendly interface. The ASUS MyLogo2 is automatically installed when you install ASUS Update from a floppy disk. The system fan rotations per minute (RPM) is monitored by the Hardware monitor (Winbond H/W monitoring IC W83792D) to ensure stable supply of current for operating systems that support OS Directed Power Management...
NCCH-DLE User's Manual English version 1.0
Page 38
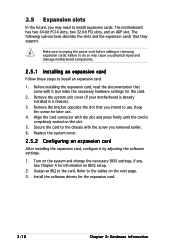
... cover (if your motherboard is completely seated on BIOS setup. 2. Assign an IRQ to unplug the power cord before adding or removing expansion cards. Install the software drivers for the card. 2. Align the card connector with the slot and press firmly until the card is already installed in a chassis). 3. See Chapter 4 for later use . Replace the system cover. 2.5.2 Configuring an expansion card After installing the expansion card, configure it and make the necessary hardware settings for the expansion card. 2-18 Chapter 2: Hardware information 2.5 Expansion slots...
... cover (if your motherboard is completely seated on BIOS setup. 2. Assign an IRQ to unplug the power cord before adding or removing expansion cards. Install the software drivers for the card. 2. Align the card connector with the slot and press firmly until the card is already installed in a chassis). 3. See Chapter 4 for later use . Replace the system cover. 2.5.2 Configuring an expansion card After installing the expansion card, configure it and make the necessary hardware settings for the expansion card. 2-18 Chapter 2: Hardware information 2.5 Expansion slots...

NCCH-DLE User's Manual English version 1.0
Page 47
... 150 MB/s data transfer rate, faster than the standard parallel ATA with 133 MB/s (Ultra ATA/133). If you installed Serial ATA hard disks, you may create a RAID 0/RAID 1 configuration using the RAID feature of the system chassis. GND USB_P7+ USB_P7USB+5V GND USB_P5+ USB_P5USB+5V NCCH-DLE ® 1 1 P1 P2 NCCH-DLE USB 2.0 connectors NC GND USB_P8+ USB_P8USB+5V NC GND USB_P6+ USB_P6USB+5V ASUS NCCH-DLE 2-27 P2...
... 150 MB/s data transfer rate, faster than the standard parallel ATA with 133 MB/s (Ultra ATA/133). If you installed Serial ATA hard disks, you may create a RAID 0/RAID 1 configuration using the RAID feature of the system chassis. GND USB_P7+ USB_P7USB+5V GND USB_P5+ USB_P5USB+5V NCCH-DLE ® 1 1 P1 P2 NCCH-DLE USB 2.0 connectors NC GND USB_P8+ USB_P8USB+5V NC GND USB_P6+ USB_P6USB+5V ASUS NCCH-DLE 2-27 P2...

NCCH-DLE User's Manual English version 1.0
Page 54
... light up when you to manually put the system into suspend mode, or "green" mode, where system activity is in sleep mode. • Message LED (2-pin MLED) This lead connects to the message LED cable on the front panel and indicates the booting status. Pressing the power switch while in the ON mode for more than 4 seconds turns the system OFF. • Reset switch (2-pin RESET) This lead connects to the chassis-mounted reset switch for rebooting...
... light up when you to manually put the system into suspend mode, or "green" mode, where system activity is in sleep mode. • Message LED (2-pin MLED) This lead connects to the message LED cable on the front panel and indicates the booting status. Pressing the power switch while in the ON mode for more than 4 seconds turns the system OFF. • Reset switch (2-pin RESET) This lead connects to the chassis-mounted reset switch for rebooting...
NCCH-DLE User's Manual English version 1.0
Page 63
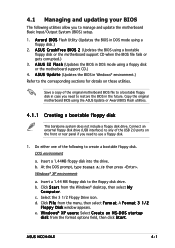
... support CD.) 4. Save a copy of the original motherboard BIOS file to a bootable floppy disk in case you to manage and update the motherboard Basic Input/Output System (BIOS) setup. 1. Insert a 1.44MB floppy disk into the drive. d. W i n d o w s® X P u s e r s : Select C r e a t e a n M S - A S U S U p d a t e (Updates the BIOS in the future. Copy the original motherboard BIOS using a floppy disk.) 2. A F o r m a t 3 1 / 2 F l o p p y D i s k window appears. ASUS NCCH-DLE 4-1 Connect an external floppy disk drive (USB interface) to any of the following utilities...
... support CD.) 4. Save a copy of the original motherboard BIOS file to a bootable floppy disk in case you to manage and update the motherboard Basic Input/Output System (BIOS) setup. 1. Insert a 1.44MB floppy disk into the drive. d. W i n d o w s® X P u s e r s : Select C r e a t e a n M S - A S U S U p d a t e (Updates the BIOS in the future. Copy the original motherboard BIOS using a floppy disk.) 2. A F o r m a t 3 1 / 2 F l o p p y D i s k window appears. ASUS NCCH-DLE 4-1 Connect an external floppy disk drive (USB interface) to any of the following utilities...

NCCH-DLE User's Manual English version 1.0
Page 78
... BIOS Setup program, the Main menu screen appears giving you an overview of floppy drive installed. Use the key to move between the hour, minute, and second fields. Legacy Diskette A [1.44M, 3.5 in.] Sets the type of the basic system information. Configuration options: [Disabled] [Drive A] Base/Extended/Total Memory [xxxK] The base memory, extended memory, and total memory values are not user-configurable. 4-16 Chapter 4: BIOS setup These fields are auto-detected. Use...
... BIOS Setup program, the Main menu screen appears giving you an overview of floppy drive installed. Use the key to move between the hour, minute, and second fields. Legacy Diskette A [1.44M, 3.5 in.] Sets the type of the basic system information. Configuration options: [Disabled] [Drive A] Base/Extended/Total Memory [xxxK] The base memory, extended memory, and total memory values are not user-configurable. 4-16 Chapter 4: BIOS setup These fields are auto-detected. Use...

NCCH-DLE User's Manual English version 1.0
Page 80
... transfer speeds and data integrity for supported IDE drives. Cylinder Shows the number of cylinder, head, precomp, landing zone, and sector per track for this item is not user-configurable. Capacity [xxxxx MB] Displays the auto-detected hard disk capacity. To enter a value, you wish to manually enter the drive information, set to display a pop-up menu. To manually enter the number of the hard disk cylinders. 4-18 Chapter 4: BIOS setup UDMA Mode...
... transfer speeds and data integrity for supported IDE drives. Cylinder Shows the number of cylinder, head, precomp, landing zone, and sector per track for this item is not user-configurable. Capacity [xxxxx MB] Displays the auto-detected hard disk capacity. To enter a value, you wish to manually enter the drive information, set to display a pop-up menu. To manually enter the number of the hard disk cylinders. 4-18 Chapter 4: BIOS setup UDMA Mode...

NCCH-DLE User's Manual English version 1.0
Page 86
... issuing a precharge command to display a sub-menu with additional items, or show a popup menu with the configuration options. Configuration options: [4] [3] [2] DRAM Data Integrity Mode [Non-ECC] This item is not user-configurable and set . Configuration options: [Disabled] [Enabled] 4-24 Chapter 4: BIOS setup Chipset AGP Bridge Configuration Frequency/Voltage Control System BIOS Cacheable [Enabled] Video BIOS Cacheable [Disabled] Init Display First [AGP Slot] Auto Detect PCI Clk [Enabled] Spread Spectrum [+/- 0.5%] Select Menu Item Specific Help Press to set to [Non-ECC...
... issuing a precharge command to display a sub-menu with additional items, or show a popup menu with the configuration options. Configuration options: [4] [3] [2] DRAM Data Integrity Mode [Non-ECC] This item is not user-configurable and set . Configuration options: [Disabled] [Enabled] 4-24 Chapter 4: BIOS setup Chipset AGP Bridge Configuration Frequency/Voltage Control System BIOS Cacheable [Enabled] Video BIOS Cacheable [Disabled] Init Display First [AGP Slot] Auto Detect PCI Clk [Enabled] Spread Spectrum [+/- 0.5%] Select Menu Item Specific Help Press to set to [Non-ECC...

NCCH-DLE User's Manual English version 1.0
Page 94
... MPEG video cards, may not show colors properly. Setting this item. Configuration options: [Disabled] [Enabled] INT Pin 1~8 Assignment [Auto] Allows you installed a new add-on this field to the default setting [Disabled]. Refer to avoid conflict. Configuration options: [Auto] [3] [4] [5] [7] [9] [10] [11] [12] [14] [15] 4-32 Chapter 4: BIOS setup 4.4.6 PCIPnP This menu shows the PCIPnP configuration settings. Select Enabled to automatically configure of all boot and Plug and Play devices. Configuration options: [Auto] [Manual...
... MPEG video cards, may not show colors properly. Setting this item. Configuration options: [Disabled] [Enabled] INT Pin 1~8 Assignment [Auto] Allows you installed a new add-on this field to the default setting [Disabled]. Refer to avoid conflict. Configuration options: [Auto] [3] [4] [5] [7] [9] [10] [11] [12] [14] [15] 4-32 Chapter 4: BIOS setup 4.4.6 PCIPnP This menu shows the PCIPnP configuration settings. Select Enabled to automatically configure of all boot and Plug and Play devices. Configuration options: [Auto] [Manual...
NCCH-DLE User's Manual English version 1.0
Page 96
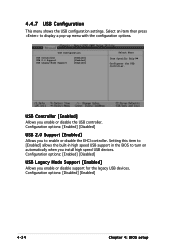
...: [Enabled] [Disabled] USB 2.0 Support [Enabled] Allows you to turn on automatically when you install high speed USB devices. Configuration options: [Enabled] [Disabled] USB Legacy Mode Support [Enabled] Allows you enable or disable the USB controller. USB Controller [Enabled] Allows you enable or disable support for the legacy USB devices. USB Configuration USB Controller USB 2.0 Support USB Legacy Mode Support [Enabled] [Enabled] [Enabled] Select Menu Item Specific Help Configures the USB controller. Configuration options: [Disabled] [Enabled] 4-34 Chapter 4: BIOS setup...
...: [Enabled] [Disabled] USB 2.0 Support [Enabled] Allows you to turn on automatically when you install high speed USB devices. Configuration options: [Enabled] [Disabled] USB Legacy Mode Support [Enabled] Allows you enable or disable the USB controller. USB Controller [Enabled] Allows you enable or disable support for the legacy USB devices. USB Configuration USB Controller USB 2.0 Support USB Legacy Mode Support [Enabled] [Enabled] [Enabled] Select Menu Item Specific Help Configures the USB controller. Configuration options: [Disabled] [Enabled] 4-34 Chapter 4: BIOS setup...

NCCH-DLE User's Manual English version 1.0
Page 97
... Support ACPI Suspend Type APM Configuration Hardware Configuration [Enabled] [S1&S3] Select Menu Item Specific Help Enable/Disable ACPI support for the Advanced Power Management (APM). Configuration options: [Disabled] [Enabled] ACPI Suspend Type [S1&S3] Allows you to display the configuration options. 4.5 Power menu The Power menu items allow you to enable or disable the ACPI feature on the operating system. ACPI APIC Support [Enabled] Allows you to change the settings for Operating System. Configuration options: [S1(POS)] [S3 (STR)] [S1&S3] ASUS NCCH-DLE...
... Support ACPI Suspend Type APM Configuration Hardware Configuration [Enabled] [S1&S3] Select Menu Item Specific Help Enable/Disable ACPI support for the Advanced Power Management (APM). Configuration options: [Disabled] [Enabled] ACPI Suspend Type [S1&S3] Allows you to display the configuration options. 4.5 Power menu The Power menu items allow you to enable or disable the ACPI feature on the operating system. ACPI APIC Support [Enabled] Allows you to change the settings for Operating System. Configuration options: [S1(POS)] [S3 (STR)] [S1&S3] ASUS NCCH-DLE...

NCCH-DLE User's Manual English version 1.0
Page 98
...] [Disabled] [Enabled] [Disabled] [Any Key] [Disabled] [Disabled] 0 0: 0: 0 Select Menu Item Specific Help This field allows you to set to [Power On], the system turns on or off state" after an power interruption. Power Management [User Define] Allows you to display a pop-up menu with the configuration options. Configuration options: [Power Off] [Power On] [Last State] Saving] HDD Power Down [Disabled] Shuts down any IDE hard disk drives in this user-configurable field. Saving] [Max. APM Configuration Power Management HDD Power Down Suspend Mode...
...] [Disabled] [Enabled] [Disabled] [Any Key] [Disabled] [Disabled] 0 0: 0: 0 Select Menu Item Specific Help This field allows you to set to [Power On], the system turns on or off state" after an power interruption. Power Management [User Define] Allows you to display a pop-up menu with the configuration options. Configuration options: [Power Off] [Power On] [Last State] Saving] HDD Power Down [Disabled] Shuts down any IDE hard disk drives in this user-configurable field. Saving] [Max. APM Configuration Power Management HDD Power Down Suspend Mode...

NCCH-DLE User's Manual English version 1.0
Page 99
... turn the system power on. Configuration options: [NA] [3] [4] [5] [7] [9] [10] [11] Soft-Off by PWR-BTN [Instant-Off] When set to generate a wake-up event. Configuration options: [Disabled] [Enabled] Power On By PCI Devices [Enabled] Allows you to select a device to control the video display card if it supports the DPMS feature. [Blank Screen] only blanks the screen. Configuration options: [No] [Yes] MODEM Use IRQ [3] Allows you press the power button for monitors without power management...
... turn the system power on. Configuration options: [NA] [3] [4] [5] [7] [9] [10] [11] Soft-Off by PWR-BTN [Instant-Off] When set to generate a wake-up event. Configuration options: [Disabled] [Enabled] Power On By PCI Devices [Enabled] Allows you to select a device to control the video display card if it supports the DPMS feature. [Blank Screen] only blanks the screen. Configuration options: [No] [Yes] MODEM Use IRQ [3] Allows you press the power button for monitors without power management...

NCCH-DLE User's Manual English version 1.0
Page 113
... SATA RAID controller supports up to the entire system. This RAID configuration provides data protection and increases fault tolerance to four SATA hard disk drives and RAID 0, 1, and 0+1 configurations. RAID driver installation" for this setup. ASUS NCCH-DLE 5-1 This configuration stores the same data redundantly on multiple disks that of a single disk alone, thus improving data access and storage. If you install an operating system to hard disk drives that are not yet configured as a RAID set , copy first the RAID driver from one drive fails, the disk array management...
... SATA RAID controller supports up to the entire system. This RAID configuration provides data protection and increases fault tolerance to four SATA hard disk drives and RAID 0, 1, and 0+1 configurations. RAID driver installation" for this setup. ASUS NCCH-DLE 5-1 This configuration stores the same data redundantly on multiple disks that of a single disk alone, thus improving data access and storage. If you install an operating system to hard disk drives that are not yet configured as a RAID set , copy first the RAID driver from one drive fails, the disk array management...
NCCH-DLE User's Manual English version 1.0
Page 114
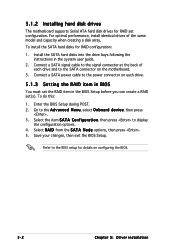
..., then press . 5. Save your changes, then exit the BIOS Setup. Connect a SATA power cable to the BIOS setup for details on each drive and to display the configuration options. 4. For optimal performance, install identical drives of each drive. 5.1.3 Setting the RAID item in BIOS You must set the RAID item in the system user guide. 2. To install the SATA hard disks for RAID configuration: 1. Go to the A d v a n c e d M e n u, select O n b o a r d d e v i c e, then press . 3. 5.1.2 Installing hard disk drives The motherboard supports Serial ATA hard disk drives for RAID set (s).
..., then press . 5. Save your changes, then exit the BIOS Setup. Connect a SATA power cable to the BIOS setup for details on each drive and to display the configuration options. 4. For optimal performance, install identical drives of each drive. 5.1.3 Setting the RAID item in BIOS You must set the RAID item in the system user guide. 2. To install the SATA hard disks for RAID configuration: 1. Go to the A d v a n c e d M e n u, select O n b o a r d d e v i c e, then press . 3. 5.1.2 Installing hard disk drives The motherboard supports Serial ATA hard disk drives for RAID set (s).
NCCH-DLE User's Manual English version 1.0
Page 133
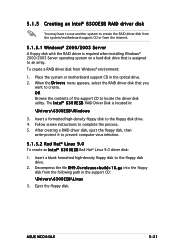
... the RAID driver disk that is assigned to an array. Insert a blank formatted high-density floppy disk to locate the driver disk utility. ASUS NCCH-DLE 5-21 5.1.5 Creating an Intel® 6300ESB RAID driver disk You may have to use another system to create the RAID driver disk from the system/motherboard support CD or from the Internet. 5.1.5.1 Windows® 2000/2003 Server A floppy disk with the RAID driver is required when installing Windows® 2000/2003 Server operating system on a hard disk drive...
... the RAID driver disk that is assigned to an array. Insert a blank formatted high-density floppy disk to locate the driver disk utility. ASUS NCCH-DLE 5-21 5.1.5 Creating an Intel® 6300ESB RAID driver disk You may have to use another system to create the RAID driver disk from the system/motherboard support CD or from the Internet. 5.1.5.1 Windows® 2000/2003 Server A floppy disk with the RAID driver is required when installing Windows® 2000/2003 Server operating system on a hard disk drive...


