User Manual
Page 4
... Chapter 3: BIOS setup 3.1 Managing and updating your BIOS 3-1 3.1.1 ASUS Update utility 3-1 3.1.2 ASUS EZ Flash 2 utility 3-4 3.1.3 AFUDOS utility 3-5 3.1.4 ASUS CrashFree BIOS 3 utility 3-7 3.2 BIOS setup program 3-8 3.2.1 BIOS menu screen 3-9 3.2.2 Menu bar 3-9 3.2.3 Navigation keys 3-9 3.2.4 Menu items 3-10 3.2.5 Sub-menu items 3-10 3.2.6 Configuration fields 3-10 3.2.7 Pop-up window 3-10 3.2.8 Scroll bar 3-10 3.2.9 General help 3-10 3.3 Extreme Tweaker menu 3-11 3.3.1 Configure System Performance Settings 3-12...
... Chapter 3: BIOS setup 3.1 Managing and updating your BIOS 3-1 3.1.1 ASUS Update utility 3-1 3.1.2 ASUS EZ Flash 2 utility 3-4 3.1.3 AFUDOS utility 3-5 3.1.4 ASUS CrashFree BIOS 3 utility 3-7 3.2 BIOS setup program 3-8 3.2.1 BIOS menu screen 3-9 3.2.2 Menu bar 3-9 3.2.3 Navigation keys 3-9 3.2.4 Menu items 3-10 3.2.5 Sub-menu items 3-10 3.2.6 Configuration fields 3-10 3.2.7 Pop-up window 3-10 3.2.8 Scroll bar 3-10 3.2.9 General help 3-10 3.3 Extreme Tweaker menu 3-11 3.3.1 Configure System Performance Settings 3-12...
User Manual
Page 6
... 4-3 4.2.4 Make disk menu 4-5 4.2.5 Manual menu 4-6 4.2.6 Video menu 4-6 4.2.7 ASUS Contact information 4-7 4.2.8 Other information 4-7 4.3 Software information 4-9 4.3.1 ASUS MyLogo3 4-9 4.3.2 AI NET 2 4-11 4.3.3 Sound Blaster X-Fi audio utility 4-12 4.3.4 ASUS PC Probe II 4-16 4.3.5 ASUS EPU-Six Engine 4-22 4.3.6 ASUS AI Suite 4-26 4.3.7 ASUS AI Nap 4-28 4.3.8 ASUS Fan Xpert 4-29 4.3.9 ASUS AI Booster 4-31 4.3.10 CPU Level Up 4-32 4.3.11 ROG Speeding HDD...
... 4-3 4.2.4 Make disk menu 4-5 4.2.5 Manual menu 4-6 4.2.6 Video menu 4-6 4.2.7 ASUS Contact information 4-7 4.2.8 Other information 4-7 4.3 Software information 4-9 4.3.1 ASUS MyLogo3 4-9 4.3.2 AI NET 2 4-11 4.3.3 Sound Blaster X-Fi audio utility 4-12 4.3.4 ASUS PC Probe II 4-16 4.3.5 ASUS EPU-Six Engine 4-22 4.3.6 ASUS AI Suite 4-26 4.3.7 ASUS AI Nap 4-28 4.3.8 ASUS Fan Xpert 4-29 4.3.9 ASUS AI Booster 4-31 4.3.10 CPU Level Up 4-32 4.3.11 ROG Speeding HDD...
User Manual
Page 12
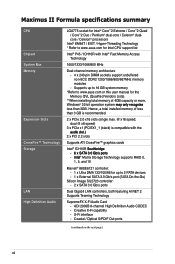
... Hence, a total installed memory of 4GB capacity or more, Windows® 32-bit operation system �m�a��y�o&#...asus.com or this user manual for up to 16 GB system memory *Refer to 2 PATA devices - 1 x External SATA 3.0 Gb/s port (SATA On-the-Go) Silicon Image SIL5723 controller: - 2 x SATA 3.0 Gb/s ports Dual Gigabit LAN controllers, both featuring AI NET 2 Supports Teaming Technology SupremeFX X-Fi Audio Card - Maximus II Formula...65533;l® Matrix Storage Technology supports RAID 0, 1, 5, and 10 Marvell® 88SE6121 controller: - 1 x Ultra DMA 133/100...
... Hence, a total installed memory of 4GB capacity or more, Windows® 32-bit operation system �m�a��y�o&#...asus.com or this user manual for up to 16 GB system memory *Refer to 2 PATA devices - 1 x External SATA 3.0 Gb/s port (SATA On-the-Go) Silicon Image SIL5723 controller: - 2 x SATA 3.0 Gb/s ports Dual Gigabit LAN controllers, both featuring AI NET 2 Supports Teaming Technology SupremeFX X-Fi Audio Card - Maximus II Formula...65533;l® Matrix Storage Technology supports RAID 0, 1, 5, and 10 Marvell® 88SE6121 controller: - 1 x Ultra DMA 133/100...
User Manual
Page 51
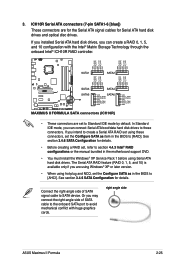
... in the BIOS to section 4.4.3 Intel® RAID configurations or the manual bundled in the motherboard support DVD. • You must install the Windows® XP Service Pack 1 before using these connectors. right angle side ASUS Maximus II Formula 2-25 The Serial ATA RAID feature (RAID 0, 1, 5, and 10) is available only if you can create a RAID 0, 1, 5, and...
... in the BIOS to section 4.4.3 Intel® RAID configurations or the manual bundled in the motherboard support DVD. • You must install the Windows® XP Service Pack 1 before using these connectors. right angle side ASUS Maximus II Formula 2-25 The Serial ATA RAID feature (RAID 0, 1, 5, and 10) is available only if you can create a RAID 0, 1, 5, and...
User Manual
Page 66
...; Vista: 1. The power supply should turn off after Windows® shuts down. 2.10.2 Using the dual function power switch While the system is ON, pressing the power switch for details. 2-40 Chapter 2: Hardware information Click the Start button ... the system enter the soft-off mode regardless of the BIOS setting. Refer to shut down the computer. 3. The power supply should turn off after Windows® shuts down. 2.10 Turning off the computer 2.10.1 Using the OS shut down function If you are using...
...; Vista: 1. The power supply should turn off after Windows® shuts down. 2.10.2 Using the dual function power switch While the system is ON, pressing the power switch for details. 2-40 Chapter 2: Hardware information Click the Start button ... the system enter the soft-off mode regardless of the BIOS setting. Refer to shut down the computer. 3. The power supply should turn off after Windows® shuts down. 2.10 Turning off the computer 2.10.1 Using the OS shut down function If you are using...
User Manual
Page 78
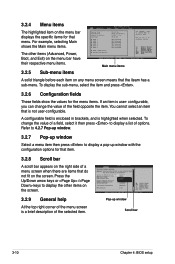
...a list of the field opposite the item. Press the Up/Down arrow keys or / keys to display a pop-up window Scroll bar 3-10 Chapter 4: BIOS setup Refer to 4.2.7 Pop-up window. 3.2.7 Pop-up window Select a menu item then press to display the other items (Advanced, Power, Boot, and Exit) on the screen. ...3.2.5 Sub-menu items System Time System Date Legacy Diskette A Language SATA 1 SATA 2 SATA 3 SATA 4 SATA 5 SATA 6 SATA Configuration System Information [06:22:54] [Thur 10/04/2007] [1.44M, 3.5 in brackets, and is a brief description of the menu screen is highlighted when selected.
...a list of the field opposite the item. Press the Up/Down arrow keys or / keys to display a pop-up window Scroll bar 3-10 Chapter 4: BIOS setup Refer to 4.2.7 Pop-up window. 3.2.7 Pop-up window Select a menu item then press to display the other items (Advanced, Power, Boot, and Exit) on the screen. ...3.2.5 Sub-menu items System Time System Date Legacy Diskette A Language SATA 1 SATA 2 SATA 3 SATA 4 SATA 5 SATA 6 SATA Configuration System Information [06:22:54] [Thur 10/04/2007] [1.44M, 3.5 in brackets, and is a brief description of the menu screen is highlighted when selected.
User Manual
Page 126
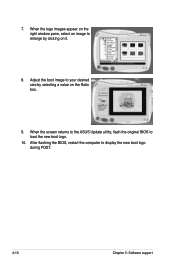
Adjust the boot image to enlarge by selecting a value on it. 8. After flashing the BIOS, restart the computer to load the new boot logo. 10. 7. When the logo images appear on the right window pane, select an image to your desired size by clicking on the Ratio box. 9. When the screen returns to the ASUS Update utility, flash the original BIOS to display the new boot logo during POST. 4-10 Chapter 5: Software support
Adjust the boot image to enlarge by selecting a value on it. 8. After flashing the BIOS, restart the computer to load the new boot logo. 10. 7. When the logo images appear on the right window pane, select an image to your desired size by clicking on the Ratio box. 9. When the screen returns to the ASUS Update utility, flash the original BIOS to display the new boot logo during POST. 4-10 Chapter 5: Software support

User Manual
Page 148
... Suite from the bundled Support DVD, launch the utility by doubleclicking the AI Suite icon on the Windows® OS taskbar and click the CPU Level Up button on your motherboard features. 4-32 Chapter 4: Software support 4.3.10 CPU Level Up The CPU Level Up application allows you to create a real professional level of...
... Suite from the bundled Support DVD, launch the utility by doubleclicking the AI Suite icon on the Windows® OS taskbar and click the CPU Level Up button on your motherboard features. 4-32 Chapter 4: Software support 4.3.10 CPU Level Up The CPU Level Up application allows you to create a real professional level of...

User Manual
Page 170
.... The screen displays and procedures may vary depending on the computer, then enter the BIOS Setup. 2. Close the Display Properties window. item to open the Power Options Properties window. 8. When the Display Properties window appears, click the Screen Saver tab. 7. Turn on the operating system. Set the Enhanced Intel SpeedStep (tm) Tech. A-2 Appendix... . Go to save your changes and exit the BIOS setup. 5. Press to the Advanced Menu, highlight CPU Configuration, then press . 3. Click Apply, then click OK. 10.
.... The screen displays and procedures may vary depending on the computer, then enter the BIOS Setup. 2. Close the Display Properties window. item to open the Power Options Properties window. 8. When the Display Properties window appears, click the Screen Saver tab. 7. Turn on the operating system. Set the Enhanced Intel SpeedStep (tm) Tech. A-2 Appendix... . Go to save your changes and exit the BIOS setup. 5. Press to the Advanced Menu, highlight CPU Configuration, then press . 3. Click Apply, then click OK. 10.


