User Manual
Page 4
... the OS shut down function 2-40 2.10.2 Using the dual function power switch 2-40 Chapter 3: BIOS setup 3.1 Managing and updating your BIOS 3-1 3.1.1 ASUS Update utility 3-1 3.1.2 ASUS EZ Flash 2 utility 3-4 3.1.3 AFUDOS utility 3-5 3.1.4 ASUS CrashFree BIOS 3 utility 3-7 3.2 BIOS setup program 3-8 3.2.1 BIOS menu screen 3-9 3.2.2 Menu bar 3-9 3.2.3 Navigation keys 3-9 3.2.4 Menu items 3-10 3.2.5 Sub-menu items 3-10 3.2.6 Configuration...
... the OS shut down function 2-40 2.10.2 Using the dual function power switch 2-40 Chapter 3: BIOS setup 3.1 Managing and updating your BIOS 3-1 3.1.1 ASUS Update utility 3-1 3.1.2 ASUS EZ Flash 2 utility 3-4 3.1.3 AFUDOS utility 3-5 3.1.4 ASUS CrashFree BIOS 3 utility 3-7 3.2 BIOS setup program 3-8 3.2.1 BIOS menu screen 3-9 3.2.2 Menu bar 3-9 3.2.3 Navigation keys 3-9 3.2.4 Menu items 3-10 3.2.5 Sub-menu items 3-10 3.2.6 Configuration...
User Manual
Page 6
... 4-2 4.2.3 Utilities menu 4-3 4.2.4 Make disk menu 4-5 4.2.5 Manual menu 4-6 4.2.6 Video menu 4-6 4.2.7 ASUS Contact information 4-7 4.2.8 Other information 4-7 4.3 Software information 4-9 4.3.1 ASUS MyLogo3 4-9 4.3.2 AI NET 2 4-11 4.3.3 Sound Blaster X-Fi audio utility 4-12 4.3.4 ASUS PC Probe II 4-16 4.3.5 ASUS EPU-Six Engine 4-22 4.3.6 ASUS AI Suite 4-26 4.3.7 ASUS AI Nap 4-28 4.3.8 ASUS Fan Xpert 4-29 4.3.9 ASUS AI Booster 4-31 4.3.10 CPU Level Up 4-32 4.3.11...
... 4-2 4.2.3 Utilities menu 4-3 4.2.4 Make disk menu 4-5 4.2.5 Manual menu 4-6 4.2.6 Video menu 4-6 4.2.7 ASUS Contact information 4-7 4.2.8 Other information 4-7 4.3 Software information 4-9 4.3.1 ASUS MyLogo3 4-9 4.3.2 AI NET 2 4-11 4.3.3 Sound Blaster X-Fi audio utility 4-12 4.3.4 ASUS PC Probe II 4-16 4.3.5 ASUS EPU-Six Engine 4-22 4.3.6 ASUS AI Suite 4-26 4.3.7 ASUS AI Nap 4-28 4.3.8 ASUS Fan Xpert 4-29 4.3.9 ASUS AI Booster 4-31 4.3.10 CPU Level Up 4-32 4.3.11...
User Manual
Page 12
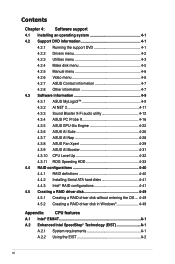
...Windows® 32-bit operation system �m�a��y�o��n�ly��r�e�c�o�g�n��iz�e� less than 3GB. X-Fi interface - ADI 2000B 8-channel High Definition Audio CODEC - Coaxial / Optical S/PDIF Out ports (continued on the next page) xii Maximus II Formula...174; dualcore / Celeron® processors Intel® EM64T / EIST / Hyper-Threading Technology * Refer to www.asus.com or this user manual for Intel CPU support list Intel® P45 / ICH10R with Intel® Fast ...
...Windows® 32-bit operation system �m�a��y�o��n�ly��r�e�c�o�g�n��iz�e� less than 3GB. X-Fi interface - ADI 2000B 8-channel High Definition Audio CODEC - Coaxial / Optical S/PDIF Out ports (continued on the next page) xii Maximus II Formula...174; dualcore / Celeron® processors Intel® EM64T / EIST / Hyper-Threading Technology * Refer to www.asus.com or this user manual for Intel CPU support list Intel® P45 / ICH10R with Intel® Fast ...
User Manual
Page 22
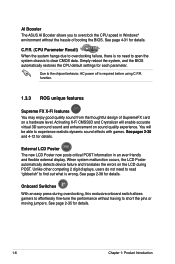
Due to the chipset behavior, AC power off is wrong. External LCD Poster The new LCD Poster now posts critical POST information in Windows® environment without having to short the pins or moving jumpers. See page 2-35 for details. See page 4-31 for details. 1-6 Chapter...65533;S�e�e��p�a�g�e��s�2�-�3�0� and 4-12 for details. AI Booster The ASUS AI Booster allows you to overclock the CPU speed in an ever friendly and flexible external display. You will enable accurate virtual 3D...
Due to the chipset behavior, AC power off is wrong. External LCD Poster The new LCD Poster now posts critical POST information in Windows® environment without having to short the pins or moving jumpers. See page 2-35 for details. See page 4-31 for details. 1-6 Chapter...65533;S�e�e��p�a�g�e��s�2�-�3�0� and 4-12 for details. AI Booster The ASUS AI Booster allows you to overclock the CPU speed in an ever friendly and flexible external display. You will enable accurate virtual 3D...

User Manual
Page 34
... not remove the PnP cap unless you and the load lever is released from the load plate window to the left . 2. Lift the load plate with your thumb (A), then move it is on the motherboard. 2.3.1 Installing the CPU To install a CPU: 1. Locate the CPU socket on your thumb and forefinger to a 100...
... not remove the PnP cap unless you and the load lever is released from the load plate window to the left . 2. Lift the load plate with your thumb (A), then move it is on the motherboard. 2.3.1 Installing the CPU To install a CPU: 1. Locate the CPU socket on your thumb and forefinger to a 100...
User Manual
Page 40
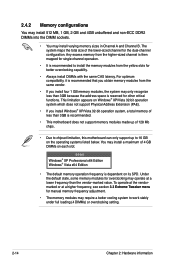
... may install a maximum of 4 GB DIMMs on each slot. 64-bit Windows® XP Professional x64 Edition Windows® Vista x64 Edition • The default memory operation frequency is recommended. • This motherboard does not support memory modules made up to 16 GB on its SPD. Under...configuration. To operate at the vendormarked or at a lower frequency than 3GB because the address space is recommended to chipset limitation, this motherboard can only support up of the lower-sized channel for manual memory frequency adjustment. • The memory modules may install varying memory...
... may install a maximum of 4 GB DIMMs on each slot. 64-bit Windows® XP Professional x64 Edition Windows® Vista x64 Edition • The default memory operation frequency is recommended. • This motherboard does not support memory modules made up to 16 GB on its SPD. Under...configuration. To operate at the vendormarked or at a lower frequency than 3GB because the address space is recommended to chipset limitation, this motherboard can only support up of the lower-sized channel for manual memory frequency adjustment. • The memory modules may install varying memory...
User Manual
Page 51
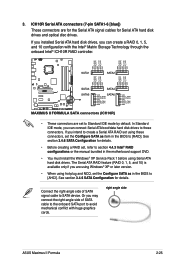
... is available only if you are using Windows® XP or later version. • When using these connectors, set to these connectors. See section 3.4.6 SATA Configuration for Serial ATA hard disk drives and optical disc drives. right angle side ASUS Maximus II Formula 2-25 See section 3.4.6 SATA Configuration for ... side of SATA signal cable to section 4.4.3 Intel® RAID configurations or the manual bundled in the motherboard support DVD. • You must install the Windows® XP Service Pack 1 before using Serial ATA hard disk drives. ICH10R Serial ATA connectors (7-pin ...
... is available only if you are using Windows® XP or later version. • When using these connectors, set to these connectors. See section 3.4.6 SATA Configuration for Serial ATA hard disk drives and optical disc drives. right angle side ASUS Maximus II Formula 2-25 See section 3.4.6 SATA Configuration for ... side of SATA signal cable to section 4.4.3 Intel® RAID configurations or the manual bundled in the motherboard support DVD. • You must install the Windows® XP Service Pack 1 before using Serial ATA hard disk drives. ICH10R Serial ATA connectors (7-pin ...

User Manual
Page 66
...Turn Off button to section 3.6 Power Menu for details. 2-40 Chapter 2: Hardware information Refer to shut down the computer. 3. If you are using Windows® Vista: 1. Click the Start button and then select Turn Off Computer. 2. Pressing the power switch for less than four seconds lets the system...the BIOS setting. 2.10 Turning off the computer 2.10.1 Using the OS shut down function If you are using Windows® XP: 1. The power supply should turn off after Windows® shuts down . 2.10.2 Using the dual function power switch While the system is ON, pressing the power...
...Turn Off button to section 3.6 Power Menu for details. 2-40 Chapter 2: Hardware information Refer to shut down the computer. 3. If you are using Windows® Vista: 1. Click the Start button and then select Turn Off Computer. 2. Pressing the power switch for less than four seconds lets the system...the BIOS setting. 2.10 Turning off the computer 2.10.1 Using the OS shut down function If you are using Windows® XP: 1. The power supply should turn off after Windows® shuts down . 2.10.2 Using the dual function power switch While the system is ON, pressing the power...
User Manual
Page 69
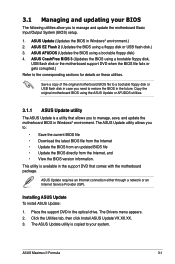
... Service Provider (ISP). Place the support DVD in Windows® environment.) 2. ASUS EZ Flash 2 (Updates the BIOS using a bootable floppy disk) 4. ASUS Maximus II Formula 3-1 The ASUS Update utility allows you need to manage and update the motherboard Basic Input/Output System (BIOS) setup. 1. Installing ASUS Update To install ASUS Update: 1. The ASUS Update utility is a utility that comes with the...
... Service Provider (ISP). Place the support DVD in Windows® environment.) 2. ASUS EZ Flash 2 (Updates the BIOS using a bootable floppy disk) 4. ASUS Maximus II Formula 3-1 The ASUS Update utility allows you need to manage and update the motherboard Basic Input/Output System (BIOS) setup. 1. Installing ASUS Update To install ASUS Update: 1. The ASUS Update utility is a utility that comes with the...
User Manual
Page 70
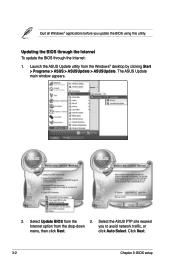
Select Update BIOS from the drop‑down you update the BIOS using this utility. click Auto Select. Click Next. 3-2 Chapter 3: BIOS setup Quit all Windows® applications before you to avoid network traffic, or menu, then click Next. The ASUS Update main window appears. 2. Select the ASUS FTP site nearest Internet option from the 3. Launch the ASUS Update utility from the Windows® desktop by clicking Start > Programs > ASUS > ASUSUpdate > ASUSUpdate. Updating the BIOS through the Internet To update the BIOS through the Internet: 1.
Select Update BIOS from the drop‑down you update the BIOS using this utility. click Auto Select. Click Next. 3-2 Chapter 3: BIOS setup Quit all Windows® applications before you to avoid network traffic, or menu, then click Next. The ASUS Update main window appears. 2. Select the ASUS FTP site nearest Internet option from the 3. Launch the ASUS Update utility from the Windows® desktop by clicking Start > Programs > ASUS > ASUSUpdate > ASUSUpdate. Updating the BIOS through the Internet To update the BIOS through the Internet: 1.
User Manual
Page 71
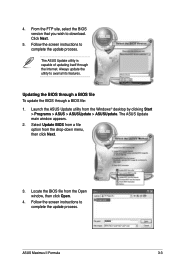
... BIOS through a BIOS file To update the BIOS through the Internet. Launch the ASUS Update utility from the Open window, then click Open. 4. Locate the BIOS file from the Windows® desktop by clicking Start > Programs > ASUS > ASUSUpdate > ASUSUpdate. P5QWS.ROM P5QWS ASUS Maximus II Formula 3-3 Follow the screen instructions to download. Always update the utility to complete...
... BIOS through a BIOS file To update the BIOS through the Internet. Launch the ASUS Update utility from the Open window, then click Open. 4. Locate the BIOS file from the Windows® desktop by clicking Start > Programs > ASUS > ASUSUpdate > ASUSUpdate. P5QWS.ROM P5QWS ASUS Maximus II Formula 3-3 Follow the screen instructions to download. Always update the utility to complete...
User Manual
Page 78
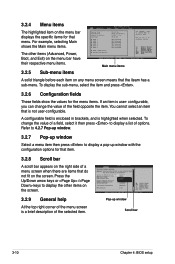
.... 3.2.9 General help At the top right corner of the menu screen is a brief description of the field opposite the item. Refer to 4.2.7 Pop-up window. 3.2.7 Pop-up window Select a menu item then press to display a pop-up window Scroll bar 3-10 Chapter 4: BIOS setup Use [+] or [-] to display a list of options. Pop-up... window with the configuration options for that item. 3.2.8 Scroll bar A scroll bar appears on the right side of a field, select it then press to configure system. ...
.... 3.2.9 General help At the top right corner of the menu screen is a brief description of the field opposite the item. Refer to 4.2.7 Pop-up window. 3.2.7 Pop-up window Select a menu item then press to display a pop-up window Scroll bar 3-10 Chapter 4: BIOS setup Use [+] or [-] to display a list of options. Pop-up... window with the configuration options for that item. 3.2.8 Scroll bar A scroll bar appears on the right side of a field, select it then press to configure system. ...
User Manual
Page 114
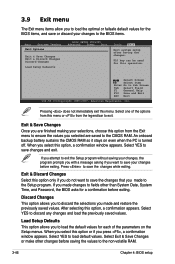
... to the non-volatile RAM. 3-46 Chapter 4: BIOS setup Discard Changes This option allows you to discard the selections you select this option, a confirmation window appears. When you select this option or if you selected are saved to the CMOS RAM. If you made to the Setup program. Select YES...and Password, the BIOS asks for each of the options from this menu or from the Exit menu to ensure the values you press , a confirmation window appears. 3.9 Exit menu The Exit menu items allow you to load the optimal or failsafe default values for this operation. F10 key can be used...
... to the non-volatile RAM. 3-46 Chapter 4: BIOS setup Discard Changes This option allows you to discard the selections you select this option, a confirmation window appears. When you select this option or if you selected are saved to the CMOS RAM. If you made to the Setup program. Select YES...and Password, the BIOS asks for each of the options from this menu or from the Exit menu to ensure the values you press , a confirmation window appears. 3.9 Exit menu The Exit menu items allow you to load the optimal or failsafe default values for this operation. F10 key can be used...
User Manual
Page 117
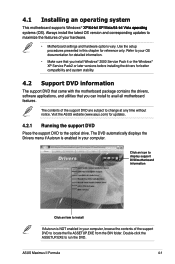
... Place the support DVD to change at any time without notice. Use the setup procedures presented in this chapter for reference only. ASUS Maximus II Formula 4-1 4.1 Installing an operating system This motherboard supports Windows® X��P��/6��4�-�b�it��X�P��/�V�i�s�ta�...
... Place the support DVD to change at any time without notice. Use the setup procedures presented in this chapter for reference only. ASUS Maximus II Formula 4-1 4.1 Installing an operating system This motherboard supports Windows® X��P��/6��4�-�b�it��X�P��/�V�i�s�ta�...

User Manual
Page 119
... through a network or an Internet Service Provider (ISP). ASUS Update The ASUS Update utility allows you keep your computer in Windows® environment. ASUS Maximus II Formula 4-3 This utility requires an Internet connection either through the Installation Wizard. Click to display the next screen Click to update the motherboard BIOS in healthy operating condition. 4.2.3 Utilities menu The Utilities...
... through a network or an Internet Service Provider (ISP). ASUS Update The ASUS Update utility allows you keep your computer in Windows® environment. ASUS Maximus II Formula 4-3 This utility requires an Internet connection either through the Installation Wizard. Click to display the next screen Click to update the motherboard BIOS in healthy operating condition. 4.2.3 Utilities menu The Utilities...
User Manual
Page 125
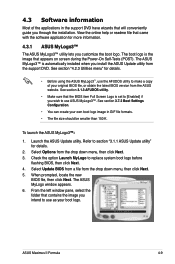
...Select Update BIOS from a file from the drop down menu, then click Next. 3. The ASUS MyLogo window appears. 6. Check the option Launch MyLogo to use ASUS MyLogo3™. From the left window pane, select the folder that contains the image you customize the boot logo. The boot logo...the Power‑On Self-Tests (POST). To launch the ASUS MyLogo3 1. ASUS Maximus II Formula 4-9 4.3 Software information Most of your own boot logo image in the support DVD have wizards that will conveniently guide you install the ASUS Update utility from the support DVD. Select Options from the drop...
...Select Update BIOS from a file from the drop down menu, then click Next. 3. The ASUS MyLogo window appears. 6. Check the option Launch MyLogo to use ASUS MyLogo3™. From the left window pane, select the folder that contains the image you customize the boot logo. The boot logo...the Power‑On Self-Tests (POST). To launch the ASUS MyLogo3 1. ASUS Maximus II Formula 4-9 4.3 Software information Most of your own boot logo image in the support DVD have wizards that will conveniently guide you install the ASUS Update utility from the support DVD. Select Options from the drop...
User Manual
Page 126
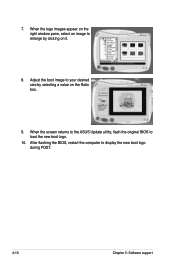
Adjust the boot image to enlarge by selecting a value on it. 8. When the logo images appear on the right window pane, select an image to your desired size by clicking on the Ratio box. 9. When the screen returns to the ASUS Update utility, flash the original BIOS to display the new boot logo during POST. 4-10 Chapter 5: Software support After flashing the BIOS, restart the computer to load the new boot logo. 10. 7.
Adjust the boot image to enlarge by selecting a value on it. 8. When the logo images appear on the right window pane, select an image to your desired size by clicking on the Ratio box. 9. When the screen returns to the ASUS Update utility, flash the original BIOS to display the new boot logo during POST. 4-10 Chapter 5: Software support After flashing the BIOS, restart the computer to load the new boot logo. 10. 7.
User Manual
Page 127
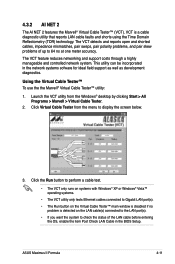
This utility can be incorporated in the BIOS Setup. Click Virtual Cable Tester from the Windows® desktop by clicking Start > All Programs > Marvell > Virtual Cable Tester. 2. ASUS Maximus II Formula 4-11 The VCT feature reduces networking and support costs through a highly manageable and controlled network system. Click the Run button to perform a cable test. •...
This utility can be incorporated in the BIOS Setup. Click Virtual Cable Tester from the Windows® desktop by clicking Start > All Programs > Marvell > Virtual Cable Tester. 2. ASUS Maximus II Formula 4-11 The VCT feature reduces networking and support costs through a highly manageable and controlled network system. Click the Run button to perform a cable test. •...
User Manual
Page 132
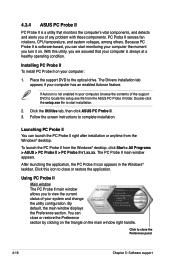
...the support DVD to locate the setup.exe file from the ASUS PC Probe II folder. By default, the main window displays the Preference section. You can start installation. 2. If Autorun is not enabled in the Windows® taskbar. Click this utility, you are assured that monitors...on the triangle on your computer: 1. The PC Probe II main window appears. 4.3.4 ASUS PC Probe II PC Probe II is a utility that your computer is always at a healthy operating condition. To launch the PC Probe II from the Windows® desktop. The Drivers installation tab appears if your ...
...the support DVD to locate the setup.exe file from the ASUS PC Probe II folder. By default, the main window displays the Preference section. You can start installation. 2. If Autorun is not enabled in the Windows® taskbar. Click this utility, you are assured that monitors...on the triangle on your computer: 1. The PC Probe II main window appears. 4.3.4 ASUS PC Probe II PC Probe II is a utility that your computer is always at a healthy operating condition. To launch the PC Probe II from the Windows® desktop. The Drivers installation tab appears if your ...
User Manual
Page 133
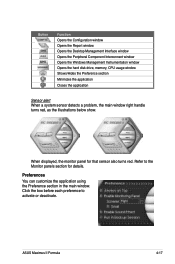
ASUS Maximus II Formula 4-17 Preferences You can customize the application using the Preference section in the main window. Click the box before each preference to the Monitor panels section for that sensor also turns red. Button Function Opens the Configuration window Opens the Report window Opens the Desktop Management Interface window Opens the Peripheral Component Interconnect window Opens the...
ASUS Maximus II Formula 4-17 Preferences You can customize the application using the Preference section in the main window. Click the box before each preference to the Monitor panels section for that sensor also turns red. Button Function Opens the Configuration window Opens the Report window Opens the Desktop Management Interface window Opens the Peripheral Component Interconnect window Opens the...


