User Guide
Page 6
...Setting the RAID item in BIOS 4-25 4.4.4 Intel® Rapid Storage Technology Option ROM utility..... 4-26 4.5 Creating a RAID driver disk 4-32 4.5.1 Creating a RAID driver disk without entering the OS.... 4-32 4.5.2 Creating a RAID driver disk in Windows 4-32 4.5.3 Installing the RAID driver during Windows® OS installation 4-33 4.5.4 Using a USB floppy disk drive 4-34 Chapter 5: Multiple GPU technology support 5.1 ATI® CrossFireX™ technology 5-1 5.1.1 Requirements 5-1 5.1.2 Before you begin 5-1 5.1.3 Installing CrossFireX graphics cards 5-2 5.1.4 Installing the device...
...Setting the RAID item in BIOS 4-25 4.4.4 Intel® Rapid Storage Technology Option ROM utility..... 4-26 4.5 Creating a RAID driver disk 4-32 4.5.1 Creating a RAID driver disk without entering the OS.... 4-32 4.5.2 Creating a RAID driver disk in Windows 4-32 4.5.3 Installing the RAID driver during Windows® OS installation 4-33 4.5.4 Using a USB floppy disk drive 4-34 Chapter 5: Multiple GPU technology support 5.1 ATI® CrossFireX™ technology 5-1 5.1.1 Requirements 5-1 5.1.2 Before you begin 5-1 5.1.3 Installing CrossFireX graphics cards 5-2 5.1.4 Installing the device...

User Guide
Page 17
... 4 USB 2.0 ports 6 x SATA connectors: 2 x SATA 6Gb/s connectors (Red) & 4 x SATA 3Gb/s connectors (Gray) 5 x Fan connectors: 2 x CPU / 3 x Chassis 6 x ProbeIt measurement points 1 x SPDIF_out connector 1 x En/Dis-able Clr CMOS header 1 x 24-pin ATX power connector 1 x 8-pin ATX 12V power connector 1 x ROG Connect switch 1 x Power on switch 1 x Reset switch 1 x Go Button 1 x Audio front panel connector System panel connector WfM2.0, DMI2.0, WOL by PME, WOR by PME, PXE 64Mb Flash ROM, EFI AMI BIOS, PnP, DMI2.0, WfM2.0, SM BIOS 2.5, ACPI2.0a Multi-Language BIOS Support DVD: - xvii Drivers and...
... 4 USB 2.0 ports 6 x SATA connectors: 2 x SATA 6Gb/s connectors (Red) & 4 x SATA 3Gb/s connectors (Gray) 5 x Fan connectors: 2 x CPU / 3 x Chassis 6 x ProbeIt measurement points 1 x SPDIF_out connector 1 x En/Dis-able Clr CMOS header 1 x 24-pin ATX power connector 1 x 8-pin ATX 12V power connector 1 x ROG Connect switch 1 x Power on switch 1 x Reset switch 1 x Go Button 1 x Audio front panel connector System panel connector WfM2.0, DMI2.0, WOL by PME, WOR by PME, PXE 64Mb Flash ROM, EFI AMI BIOS, PnP, DMI2.0, WfM2.0, SM BIOS 2.5, ACPI2.0a Multi-Language BIOS Support DVD: - xvii Drivers and...

User Guide
Page 24
Diagram, power, reset button, flash BIOS through a USB cable, allowing you to view realtime POST code and hardware status readouts on your notebook, as well as make on-the-fly parameter adjustments at a purely hardware level. Maximus IV GENE-Z features ROG BIOS Print which allows users to easily share their BIOS settings to bring the ultimate user experience. 1-4 Chapter 1: Product Introduction Now you can do DRAM tuning in BIOS, it...
Diagram, power, reset button, flash BIOS through a USB cable, allowing you to view realtime POST code and hardware status readouts on your notebook, as well as make on-the-fly parameter adjustments at a purely hardware level. Maximus IV GENE-Z features ROG BIOS Print which allows users to easily share their BIOS settings to bring the ultimate user experience. 1-4 Chapter 1: Product Introduction Now you can do DRAM tuning in BIOS, it...

User Guide
Page 27
... used to monitor and save an overheating CPU. It can therefore be used with a optional fans, you to chipsets and CPU! Onboard Switches No more devices The Q-Fan function automatically detects temperature and adjusts fan speed accordingly to its users like never before. This unique adapter eliminates the trouble of plugging in one easy step with burn proof protection to connect or disconnect chassis front panel cables in one complete module. ROG Maximus IV...
... used to monitor and save an overheating CPU. It can therefore be used with a optional fans, you to chipsets and CPU! Onboard Switches No more devices The Q-Fan function automatically detects temperature and adjusts fan speed accordingly to its users like never before. This unique adapter eliminates the trouble of plugging in one easy step with burn proof protection to connect or disconnect chassis front panel cables in one complete module. ROG Maximus IV...
User Guide
Page 57
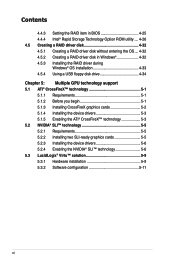
... Enable Setup Verifying Password Start of Setup Reserved for ASL (see ASL Status Codes section below)* Setup Input Wait Reserved for ASL (see ASL Status Codes section below) Ready To Boot event Legacy Boot event Exit Boot Services event Runtime Set Virtual Address MAP Begin Runtime Set Virtual Address MAP End Legacy Option ROM Initialization System Reset USB hot plug PCI bus hot plug Clean-up of NVRAM Configuration Reset (reset of NVRAM settings) Reserved for future AMI codes ASUS Maximus IV GENE-Z 2-25 Code...
... Enable Setup Verifying Password Start of Setup Reserved for ASL (see ASL Status Codes section below)* Setup Input Wait Reserved for ASL (see ASL Status Codes section below) Ready To Boot event Legacy Boot event Exit Boot Services event Runtime Set Virtual Address MAP Begin Runtime Set Virtual Address MAP End Legacy Option ROM Initialization System Reset USB hot plug PCI bus hot plug Clean-up of NVRAM Configuration Reset (reset of NVRAM settings) Reserved for future AMI codes ASUS Maximus IV GENE-Z 2-25 Code...

User Guide
Page 59
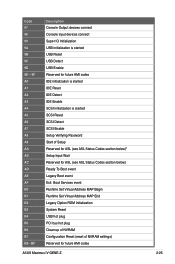
... system passwords. You can automatically reset parameter settings to default values. • Due to enable C.P.R. Plug the power cord and turn off is required to the chipset behavior, AC power off and on the power supply or unplug and plug the power cord before rebooting the system. ASUS Maximus IV GENE-Z 2-27 Move the jumper cap from pins 1-2 (default) to overclocking. Shut down the key during the boot process and enter BIOS setup to clear the CMOS RTC RAM...
... system passwords. You can automatically reset parameter settings to default values. • Due to enable C.P.R. Plug the power cord and turn off is required to the chipset behavior, AC power off and on the power supply or unplug and plug the power cord before rebooting the system. ASUS Maximus IV GENE-Z 2-27 Move the jumper cap from pins 1-2 (default) to overclocking. Shut down the key during the boot process and enter BIOS setup to clear the CMOS RTC RAM...

User Guide
Page 61
... hard disk drives, you intend to [RAID Mode]. ASUS Maximus IV GENE-Z 2-29 Refer to section 3.5.4 SATA Configuration for details. • You must install Windows® XP Service Pack 3 or later versions before using these connectors, set the SATA Mode item in the BIOS to create a Serial ATA RAID set using Serial ATA hard disk drives. Intel® Z68 Serial ATA 3.0 Gb/s connectors (7-pin SATA3G_3-6 [gray]) These connectors connect to [AHCI Mode]. If you can create a RAID 0, 1, 5, and 10 configuration with the Intel® Rapid Storage Technology through the onboard...
... hard disk drives, you intend to [RAID Mode]. ASUS Maximus IV GENE-Z 2-29 Refer to section 3.5.4 SATA Configuration for details. • You must install Windows® XP Service Pack 3 or later versions before using these connectors, set the SATA Mode item in the BIOS to create a Serial ATA RAID set using Serial ATA hard disk drives. Intel® Z68 Serial ATA 3.0 Gb/s connectors (7-pin SATA3G_3-6 [gray]) These connectors connect to [AHCI Mode]. If you can create a RAID 0, 1, 5, and 10 configuration with the Intel® Rapid Storage Technology through the onboard...
User Guide
Page 89
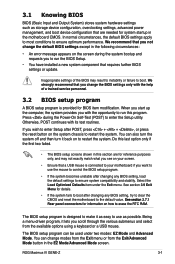
... system chassis to ensure system compatibility and stability. We recommend that you to enter the Setup utility. We strongly recommend that you not change modes from the Exit menu or from the available options using a keyboard or a USB mouse. Do this last option only if the first two failed. • The BIOS setup screens shown in this program. If you want to use as storage device configuration, overclocking settings, advanced power management, and boot device configuration...
... system chassis to ensure system compatibility and stability. We recommend that you to enter the Setup utility. We strongly recommend that you not change modes from the Exit menu or from the available options using a keyboard or a USB mouse. Do this last option only if the first two failed. • The BIOS setup screens shown in this program. If you want to use as storage device configuration, overclocking settings, advanced power management, and boot device configuration...

User Guide
Page 96
... value. 3-8 Chapter 3: BIOS setup Long Duration Power Limit [Auto] Use the and keys to adjust the value. To restore the default setting, type [auto] using the keyboard and press the key. The valid value ranges vary according to adjust the value. The following four items appear only when you to manually adjust the maximum non-turbo CPU ratio. Turbo Mode [Enabled] [Disabled] Disables this happens, revert to the default settings. The field...
... value. 3-8 Chapter 3: BIOS setup Long Duration Power Limit [Auto] Use the and keys to adjust the value. To restore the default setting, type [auto] using the keyboard and press the key. The valid value ranges vary according to adjust the value. The following four items appear only when you to manually adjust the maximum non-turbo CPU ratio. Turbo Mode [Enabled] [Disabled] Disables this happens, revert to the default settings. The field...

User Guide
Page 109
...Memory [64M] Allows you to enable or disable the High Precision Event Timer. Configuration options: [Enabled] [Disabled] ROG Maximus IV GENE-Z 3-21 Ensure to set Initial Graphic Adapter to select the graphics controller as the primary output. Configuration options: [32M] [64M] [96M] [128M] Initial Graphic Adapter [PCIE] Allows you to enable or disable iGPU multi-monitor. Configuration options: [iGPU] [PCIE] Render Standby [Enabled] Configuration options: [Disabled] [Enabled] iGPU Multi-Monitor [Enabled] Allows you to [iGPU] when using the onboard GPU as the primary boot device...
...Memory [64M] Allows you to enable or disable the High Precision Event Timer. Configuration options: [Enabled] [Disabled] ROG Maximus IV GENE-Z 3-21 Ensure to set Initial Graphic Adapter to select the graphics controller as the primary output. Configuration options: [32M] [64M] [96M] [128M] Initial Graphic Adapter [PCIE] Allows you to enable or disable iGPU multi-monitor. Configuration options: [iGPU] [PCIE] Render Standby [Enabled] Configuration options: [Disabled] [Enabled] iGPU Multi-Monitor [Enabled] Allows you to [iGPU] when using the onboard GPU as the primary boot device...

User Guide
Page 111
Configuration options: [Disabled] [Enabled] ROG Maximus IV GENE-Z 3-23 When read/write of your hard disk errors occur, this feature allows the hard disk to enable or disable the hot plug support of the SATA ports. S.M.A.R.T. Status Check [Enabled] S.M.A.R.T. (Self-Monitoring, Analysis and Reporting Technology) is a monitor system. Configuration options: [Enabled] [Disabled] Hot Plug [Enabled] Allows you to report warning messages during the POST.
Configuration options: [Disabled] [Enabled] ROG Maximus IV GENE-Z 3-23 When read/write of your hard disk errors occur, this feature allows the hard disk to enable or disable the hot plug support of the SATA ports. S.M.A.R.T. Status Check [Enabled] S.M.A.R.T. (Self-Monitoring, Analysis and Reporting Technology) is a monitor system. Configuration options: [Enabled] [Disabled] Hot Plug [Enabled] Allows you to report warning messages during the POST.

User Guide
Page 129
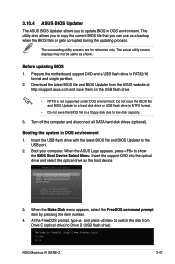
...and update the motherboard BIOS setup program. 1. The following utilities allow you need to boot. ASUS Update: Updates the BIOS in the system's failure to restore the BIOS in DOS environment using a USB flash drive. 3. ASUS CrashFree BIOS 3: Restores the BIOS using the ASUS Update or BIOS Updater utilities. Copy the original motherboard BIOS using the motherboard support DVD or a USB flash drive when the BIOS file fails or gets corrupted. 4. Inappropriate BIOS updating may result in Windows® environment. 2. Refer to update your BIOS if necessary. ROG Maximus IV GENE...
...and update the motherboard BIOS setup program. 1. The following utilities allow you need to boot. ASUS Update: Updates the BIOS in the system's failure to restore the BIOS in DOS environment using a USB flash drive. 3. ASUS CrashFree BIOS 3: Restores the BIOS using the ASUS Update or BIOS Updater utilities. Copy the original motherboard BIOS using the motherboard support DVD or a USB flash drive when the BIOS file fails or gets corrupted. 4. Inappropriate BIOS updating may result in Windows® environment. 2. Refer to update your BIOS if necessary. ROG Maximus IV GENE...

User Guide
Page 134
... BIOS file using the motherboard support DVD or a USB flash drive that allows you to enter BIOS Setup to load default BIOS values. If you press to recover BIOS setting. Turn on the ASUS official website. The utility automatically checks the devices for details. 3.10.3 ASUS CrashFree BIOS 3 utility The ASUS CrashFree BIOS 3 utility is an auto recovery tool that contains the BIOS file. The system requires you to restore the BIOS file when it to prevent system boot failure! Ensure to load the BIOS default settings to the USB port...
... BIOS file using the motherboard support DVD or a USB flash drive that allows you to enter BIOS Setup to load default BIOS values. If you press to recover BIOS setting. Turn on the ASUS official website. The utility automatically checks the devices for details. 3.10.3 ASUS CrashFree BIOS 3 utility The ASUS CrashFree BIOS 3 utility is an auto recovery tool that contains the BIOS file. The system requires you to restore the BIOS file when it to prevent system boot failure! Ensure to load the BIOS default settings to the USB port...
User Guide
Page 135
... SATA hard disk drives (optional). When the ASUS Logo appears, press to the USB port. 2. C:\>d: D:\> ROG Maximus IV GENE-Z 3-47 Insert the USB flash drive with the latest BIOS file and BIOS Updater to show the BIOS Boot Device Select Menu. Boot your computer. At the FreeDOS prompt, type d: and press to switch the disk from the ASUS website at http://support.asus.com and save them on the USB flash drive. • NTFS is not supported under DOS environment. Download the latest BIOS file...
... SATA hard disk drives (optional). When the ASUS Logo appears, press to the USB port. 2. C:\>d: D:\> ROG Maximus IV GENE-Z 3-47 Insert the USB flash drive with the latest BIOS file and BIOS Updater to show the BIOS Boot Device Select Menu. Boot your computer. At the FreeDOS prompt, type d: and press to switch the disk from the ASUS website at http://support.asus.com and save them on the USB flash drive. • NTFS is not supported under DOS environment. Download the latest BIOS file...
User Guide
Page 141
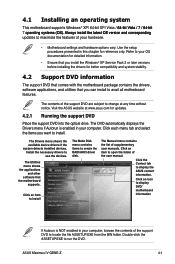
... to use the devices. ASUS Maximus IV GENE-Z 4-1 Visit the ASUS website at any time without notice. The DVD automatically displays the Drivers menu if Autorun is NOT enabled in this chapter for better compatibility and system stability. 4.2 Support DVD information The support DVD that comes with the motherboard package contains the drivers, software applications, and utilities that the motherboard supports. Install the necessary drivers to create the RAID/AHCI driver disk. The Manual menu contains the list of supplementary user manuals. The Utilities menu...
... to use the devices. ASUS Maximus IV GENE-Z 4-1 Visit the ASUS website at any time without notice. The DVD automatically displays the Drivers menu if Autorun is NOT enabled in this chapter for better compatibility and system stability. 4.2 Support DVD information The support DVD that comes with the motherboard package contains the drivers, software applications, and utilities that the motherboard supports. Install the necessary drivers to create the RAID/AHCI driver disk. The Manual menu contains the list of supplementary user manuals. The Utilities menu...
User Guide
Page 162
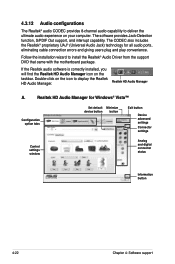
... on the taskbar. Realtek HD Audio Manager for all audio ports, eliminating cable connection errors and giving users plug and play convenience. The CODEC also includes the Realtek® proprietary UAJ® (Universal Audio Jack) technology for Windows® Vista™ Configuration option tabs Set default Minimize device button button Exit button Device advanced settings Connector settings Control settings window Analog and digital connector status Information button 4-22 Chapter 4: Software support If the Realtek audio software is correctly installed, you will find the...
... on the taskbar. Realtek HD Audio Manager for all audio ports, eliminating cable connection errors and giving users plug and play convenience. The CODEC also includes the Realtek® proprietary UAJ® (Universal Audio Jack) technology for Windows® Vista™ Configuration option tabs Set default Minimize device button button Exit button Device advanced settings Connector settings Control settings window Analog and digital connector status Information button 4-22 Chapter 4: Software support If the Realtek audio software is correctly installed, you will find the...
User Guide
Page 165
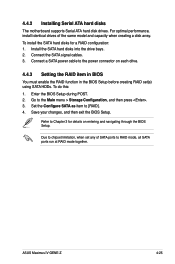
... ATA hard disks The motherboard supports Serial ATA hard disk drives. Install the SATA hard disks into the drive bays. 2. Connect a SATA power cable to the power connector on each drive. 4.4.3 Setting the RAID item in BIOS You must enable the RAID function in the BIOS Setup before creating RAID set any of the same model and capacity when creating a disk array. Enter the BIOS Setup during POST. 2. Refer to RAID mode, all SATA ports run at RAID mode together. For optimal performance, install identical drives of SATA ports to Chapter 3 for a RAID configuration: 1. ASUS Maximus IV GENE...
... ATA hard disks The motherboard supports Serial ATA hard disk drives. Install the SATA hard disks into the drive bays. 2. Connect a SATA power cable to the power connector on each drive. 4.4.3 Setting the RAID item in BIOS You must enable the RAID function in the BIOS Setup before creating RAID set any of the same model and capacity when creating a disk array. Enter the BIOS Setup during POST. 2. Refer to RAID mode, all SATA ports run at RAID mode together. For optimal performance, install identical drives of SATA ports to Chapter 3 for a RAID configuration: 1. ASUS Maximus IV GENE...
User Guide
Page 172
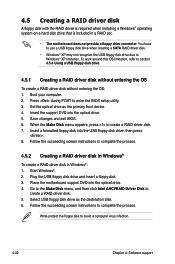
... enter the BIOS setup utility. 3. Place the motherboard support DVD into the optical drive. 5. Follow the succeeding screen instructions to Windows® XP limitation. Insert a formatted floppy disk into the USB floppy disk drive, then press . 8. Select USB floppy disk drive as the primary boot device. 4. 4.5 Creating a RAID driver disk A floppy disk with the RAID driver is required when installing a Windows® operating system on a hard disk drive that is included in Windows®: 1. You have to use a USB floppy disk drive when creating a SATA RAID driver disk...
... enter the BIOS setup utility. 3. Place the motherboard support DVD into the optical drive. 5. Follow the succeeding screen instructions to Windows® XP limitation. Insert a formatted floppy disk into the USB floppy disk drive, then press . 8. Select USB floppy disk drive as the primary boot device. 4. 4.5 Creating a RAID driver disk A floppy disk with the RAID driver is required when installing a Windows® operating system on a hard disk drive that is included in Windows®: 1. You have to use a USB floppy disk drive when creating a SATA RAID driver disk...
User Guide
Page 173
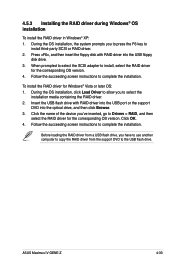
... key to install, select the RAID driver for Windows® Vista or later OS: 1. Insert the USB flash drive with RAID driver into the optical drive, and then click Browse. 3. Before loading the RAID driver from a USB flash drive, you 've inserted, go to the USB flash drive. Follow the succeeding screen instructions to complete the installation. Click the name of the device you have to use another computer to copy the RAID driver from the support DVD to Drivers > RAID...
... key to install, select the RAID driver for Windows® Vista or later OS: 1. Insert the USB flash drive with RAID driver into the optical drive, and then click Browse. 3. Before loading the RAID driver from a USB flash drive, you 've inserted, go to the USB flash drive. Follow the succeeding screen instructions to complete the installation. Click the name of the device you have to use another computer to copy the RAID driver from the support DVD to Drivers > RAID...
User Guide
Page 174
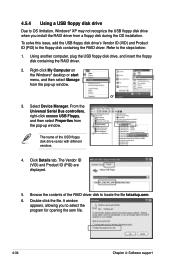
... 4: Software support or 3. The name of the RAID driver disk to locate the file txtsetup.oem. 6. Right-click My Computer on the Windows® desktop or start menu, and then select Manage from a floppy disk during the OS installation. Double-click the file. 4.5.4 Using a USB floppy disk drive Due to OS limitation, Windows® XP may not recognize the USB floppy disk drive when you to the steps below: 1. Using another computer, plug the USB floppy disk drive, and insert the floppy disk...
... 4: Software support or 3. The name of the RAID driver disk to locate the file txtsetup.oem. 6. Right-click My Computer on the Windows® desktop or start menu, and then select Manage from a floppy disk during the OS installation. Double-click the file. 4.5.4 Using a USB floppy disk drive Due to OS limitation, Windows® XP may not recognize the USB floppy disk drive when you to the steps below: 1. Using another computer, plug the USB floppy disk drive, and insert the floppy disk...


