User Manual
Page 41
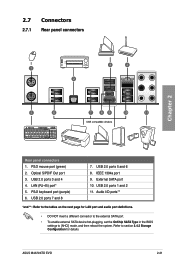
USB 2.0 ports 3 and 4 4. IEEE 1394a port 9. Audio I/O ports** *and **: Refer to [AHCI] mode, and then reboot the system. PS/2 keyboard port (purple) 6. USB 2.0 ports 7 and 8 7. Refer to section 3.4.2 Storage Configuration for LAN port and audio port definitions. &#... Out port 3. LAN (RJ-45) port* 5. External SATA port 10. USB 2.0 ports 5 and 6 8. USB 2.0 ports 1 and 2 11. 2.7 Connectors 2.7.1 Rear panel connectors Chapter 2 Rear panel connectors 1. ASUS M4A79XTD EVO 2-21
USB 2.0 ports 3 and 4 4. IEEE 1394a port 9. Audio I/O ports** *and **: Refer to [AHCI] mode, and then reboot the system. PS/2 keyboard port (purple) 6. USB 2.0 ports 7 and 8 7. Refer to section 3.4.2 Storage Configuration for LAN port and audio port definitions. &#... Out port 3. LAN (RJ-45) port* 5. External SATA port 10. USB 2.0 ports 5 and 6 8. USB 2.0 ports 1 and 2 11. 2.7 Connectors 2.7.1 Rear panel connectors Chapter 2 Rear panel connectors 1. ASUS M4A79XTD EVO 2-21
User Manual
Page 89
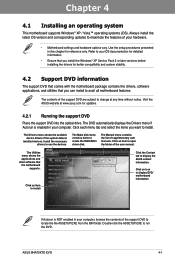
.... 4.2 Support DVD information The support DVD that comes with the motherboard package contains the drivers, software applications, and utilities that the motherboard supports. Install the necessary drivers to create the RAID/AHCI driver disk. The Make disk menu contains items to use the ...your hardware. • Motherboard settings and hardware options vary. The DVD automatically displays the Drivers menu if Autorun is NOT enabled in this chapter for updates. 4.2.1 Running the support DVD Place the support DVD into the optical drive. ASUS M4A79XTD EVO 4-1 Click each menu ...
.... 4.2 Support DVD information The support DVD that comes with the motherboard package contains the drivers, software applications, and utilities that the motherboard supports. Install the necessary drivers to create the RAID/AHCI driver disk. The Make disk menu contains items to use the ...your hardware. • Motherboard settings and hardware options vary. The DVD automatically displays the Drivers menu if Autorun is NOT enabled in this chapter for updates. 4.2.1 Running the support DVD Place the support DVD into the optical drive. ASUS M4A79XTD EVO 4-1 Click each menu ...
User Manual
Page 105
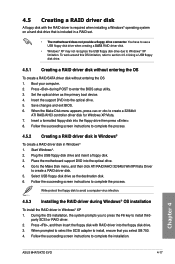
...process. When the Make Disk menu appears, press or to complete the installation. Place the motherboard support DVD into the optical drive. 5. Plug the USB floppy disk drive and insert ...a floppy disk. 3. Follow the succeeding screen instructions to create a 32/64bit ATI RAID/AHCI controller driver disk for Windows XP/Vista. 7. Boot your computer. 2. Write-protect the floppy...hard disk drive that you to press the F6 key to Windows® XP limitation. Chapter 4 ASUS M4A79XTD EVO 4-17 Insert a formatted floppy disk into the floppy drive then press . 8. During the OS ...
...process. When the Make Disk menu appears, press or to complete the installation. Place the motherboard support DVD into the optical drive. 5. Plug the USB floppy disk drive and insert ...a floppy disk. 3. Follow the succeeding screen instructions to create a 32/64bit ATI RAID/AHCI controller driver disk for Windows XP/Vista. 7. Boot your computer. 2. Write-protect the floppy...hard disk drive that you to press the F6 key to Windows® XP limitation. Chapter 4 ASUS M4A79XTD EVO 4-17 Insert a formatted floppy disk into the floppy drive then press . 8. During the OS ...


