User Manual
Page 6
4.4 RAID configurations 4-13 4.4.1 RAID definitions 4-13 4.4.2 Installing Serial ATA hard disks 4-14 4.4.3 AMD® RAID configurations 4-14 4.5 Creating a RAID driver disk 4-20 4.5.1 Creating a RAID driver disk without entering the OS 4-20 4.5.2 Creating a RAID/SATA driver disk in Windows 4-20 Chapter 5: ATI® CrossFireX™ technology support 5.1 ATI® CrossFireX™ technology 5-1 5.1.1 Requirements 5-1 5.1.2 Before you begin 5-1 5.2 Installing CrossFireX™ graphics cards 5-2 5.2.1 Dual CrossFireX installation 5-2 5.2.2 Triple CrossFireX...
4.4 RAID configurations 4-13 4.4.1 RAID definitions 4-13 4.4.2 Installing Serial ATA hard disks 4-14 4.4.3 AMD® RAID configurations 4-14 4.5 Creating a RAID driver disk 4-20 4.5.1 Creating a RAID driver disk without entering the OS 4-20 4.5.2 Creating a RAID/SATA driver disk in Windows 4-20 Chapter 5: ATI® CrossFireX™ technology support 5.1 ATI® CrossFireX™ technology 5-1 5.1.1 Requirements 5-1 5.1.2 Before you begin 5-1 5.2 Installing CrossFireX™ graphics cards 5-2 5.2.1 Dual CrossFireX installation 5-2 5.2.2 Triple CrossFireX...
User Manual
Page 18
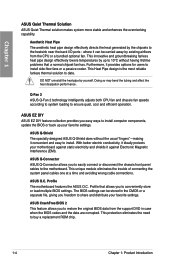
... CPU fan and chassis fan speeds according to system loading to install. ASUS Q-Shield The specially designed ASUS Q-Shield does without having lifetime problems that allows you to the motherboard. The BIOS settings can be stored in case when the BIOS codes and the data are corrupted. This protection eliminates the need to share and distribute your favorite settings. This unique module eliminates the trouble of connecting the system panel cables...
... CPU fan and chassis fan speeds according to system loading to install. ASUS Q-Shield The specially designed ASUS Q-Shield does without having lifetime problems that allows you to the motherboard. The BIOS settings can be stored in case when the BIOS codes and the data are corrupted. This protection eliminates the need to share and distribute your favorite settings. This unique module eliminates the trouble of connecting the system panel cables...

User Manual
Page 41
... the desired CPU performance. Pins 2-3 (Default) Pins 1-2 (OV Enabled) OV_CPU up to 1.70V up to pins 1-2 when you change the jumper setting. Ensure that your system functions well under high voltage settings. ASUS M4A79T Deluxe 2-21 Set to pins 1-2 to work stably under the highest BIOS voltage setting before you to enable or disable the advanced CPU overvoltage setting in 3.5 Ai Tweaker menu first to halt. For system failure due to the wrong setting of this jumper. • Refer...
... the desired CPU performance. Pins 2-3 (Default) Pins 1-2 (OV Enabled) OV_CPU up to 1.70V up to pins 1-2 when you change the jumper setting. Ensure that your system functions well under high voltage settings. ASUS M4A79T Deluxe 2-21 Set to pins 1-2 to work stably under the highest BIOS voltage setting before you to enable or disable the advanced CPU overvoltage setting in 3.5 Ai Tweaker menu first to halt. For system failure due to the wrong setting of this jumper. • Refer...
User Manual
Page 59
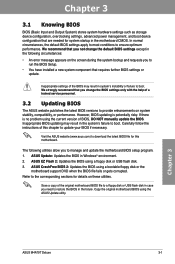
... or failure to boot. Save a copy of the original motherboard BIOS file to a floppy disk or USB flash disk in case you need to provide enhancements on these utilities. We strongly recommend that requires further BIOS settings or update. ASUS EZ Flash 2: Updates the BIOS using a bootable floppy disk or the motherboard support DVD when the BIOS file fails or gets corrupted. Refer to run the BIOS Setup. • You have installed a new system component that you change the default BIOS settings except in...
... or failure to boot. Save a copy of the original motherboard BIOS file to a floppy disk or USB flash disk in case you need to provide enhancements on these utilities. We strongly recommend that requires further BIOS settings or update. ASUS EZ Flash 2: Updates the BIOS using a bootable floppy disk or the motherboard support DVD when the BIOS file fails or gets corrupted. Refer to run the BIOS Setup. • You have installed a new system component that you change the default BIOS settings except in...
User Manual
Page 60
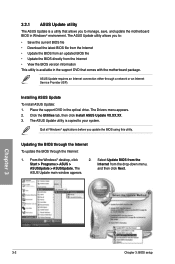
... Windows® desktop, click 2. The ASUS Update main window appears. Select Update BIOS from the Internet from the Internet • View the BIOS version information This utility is available in the support DVD that allows you update the BIOS using this utility. Chapter 3 3-2 Chapter 3: BIOS setup Quit all Windows® applications before you to manage, save, and update the motherboard BIOS in the optical drive. The ASUS Update utility allows you to your system. Place the support DVD in Windows...
... Windows® desktop, click 2. The ASUS Update main window appears. Select Update BIOS from the Internet from the Internet • View the BIOS version information This utility is available in the support DVD that allows you update the BIOS using this utility. Chapter 3 3-2 Chapter 3: BIOS setup Quit all Windows® applications before you to manage, save, and update the motherboard BIOS in the optical drive. The ASUS Update utility allows you to your system. Place the support DVD in Windows...

User Manual
Page 65
... available options using the navigation keys. • The BIOS setup screens shown in .] [English] [Not Detected] [Not Detected] [HDT722516DLA380] [Not Detected] [ATAPI DVD DH1] [Not Detected] [Not Detected] [Not Detected] Use [ENTER], [TAB] or [SHIFT-TAB] to ensure system compatibility and stability. Select Screen Select Item +- The Setup program is provided for details. 3.3.1 BIOS menu screen Menu items Menu bar Configuration fields General help BIOS SETUP UTILITY Main Ai Tweaker Advanced Power Boot Tools...
... available options using the navigation keys. • The BIOS setup screens shown in .] [English] [Not Detected] [Not Detected] [HDT722516DLA380] [Not Detected] [ATAPI DVD DH1] [Not Detected] [Not Detected] [Not Detected] Use [ENTER], [TAB] or [SHIFT-TAB] to ensure system compatibility and stability. Select Screen Select Item +- The Setup program is provided for details. 3.3.1 BIOS menu screen Menu items Menu bar Configuration fields General help BIOS SETUP UTILITY Main Ai Tweaker Advanced Power Boot Tools...

User Manual
Page 67
... the system. You can set the system time and date, BIOS language, and the type of the basic system information. Use [+] or [-] to display the SATA device information. Main BIOS SETUP UTILITY Primary IDE Master Device : Hard Disk Vendor : WDC WD800JD-00LSA0 Size 80.0GB LBA Mode : Supported Block Mode : 16 Sectors PIO Mode : 4 Async DMA : MultiWord DMA-2 Ultra DMA : Ultra DMA-5 SMART Monitoring: Supported Select the type of IDE/SATA devices. Change Option F1 General Help F10 Save...
... the system. You can set the system time and date, BIOS language, and the type of the basic system information. Use [+] or [-] to display the SATA device information. Main BIOS SETUP UTILITY Primary IDE Master Device : Hard Disk Vendor : WDC WD800JD-00LSA0 Size 80.0GB LBA Mode : Supported Block Mode : 16 Sectors PIO Mode : 4 Async DMA : MultiWord DMA-2 Ultra DMA : Ultra DMA-5 SMART Monitoring: Supported Select the type of IDE/SATA devices. Change Option F1 General Help F10 Save...

User Manual
Page 69
...Sets the IDE controller to combine two 16-bit reads from the SATA hard disk drives. The following item appears only when you want to use of the PCI bus as Parallel ATA physical storage devices. Chapter 3 ASUS M4A79T Deluxe 3-11 When this function. 3.4.2 Storage Configuration The Storage Configuration menu allows you could use the AHCI (Advanced Host Controller Interface). Ensure that you to display the submenu. Main BIOS SETUP UTILITY OnChip SATA channel OnChip SATA Type [Enabled] [IDE] Options OnChip SATA Channel [Enabled] [Enabled] Enables the onboard channel...
...Sets the IDE controller to combine two 16-bit reads from the SATA hard disk drives. The following item appears only when you want to use of the PCI bus as Parallel ATA physical storage devices. Chapter 3 ASUS M4A79T Deluxe 3-11 When this function. 3.4.2 Storage Configuration The Storage Configuration menu allows you could use the AHCI (Advanced Host Controller Interface). Ensure that you to display the submenu. Main BIOS SETUP UTILITY OnChip SATA channel OnChip SATA Type [Enabled] [IDE] Options OnChip SATA Channel [Enabled] [Enabled] Enables the onboard channel...

User Manual
Page 70
... configuration options: Manual Auto Allows you to the default. Loads the optimal settings for this menu. Chapter 3 3-12 Chapter 3: BIOS setup BIOS SETUP UTILITY Main Ai Tweaker Advanced Power Boot Tools Exit Configure System Frequency/Voltage Ai Overclocking [Auto] DRAM Frequency Control [Auto] HT Link Speed [Auto] ******* Please key in this chapter vary depending on the motherboard. If the system becomes unstable, return to individually set overclocking parameters. The BIOS automatically detects the BIOS information, CPU specification, and system memory...
... configuration options: Manual Auto Allows you to the default. Loads the optimal settings for this menu. Chapter 3 3-12 Chapter 3: BIOS setup BIOS SETUP UTILITY Main Ai Tweaker Advanced Power Boot Tools Exit Configure System Frequency/Voltage Ai Overclocking [Auto] DRAM Frequency Control [Auto] HT Link Speed [Auto] ******* Please key in this chapter vary depending on the motherboard. If the system becomes unstable, return to individually set overclocking parameters. The BIOS automatically detects the BIOS information, CPU specification, and system memory...

User Manual
Page 71
... 3 ASUS M4A79T Deluxe 3-13 The configuration options for the following two items appear only when you set the AI Overclocking Tuner item to [Manual]. 3.5.3 FSB Frequency [XXX] Displays the frequency sent by the clock generator to set the DDR3 operating frequency. The following sub-item vary depending on the DIMMs you install on the motherboard. 3.5.2 CPU Ratio [Auto] Allows you to the system bus and PCI bus. You can also key in...
... 3 ASUS M4A79T Deluxe 3-13 The configuration options for the following two items appear only when you set the AI Overclocking Tuner item to [Manual]. 3.5.3 FSB Frequency [XXX] Displays the frequency sent by the clock generator to set the DDR3 operating frequency. The following sub-item vary depending on the DIMMs you install on the motherboard. 3.5.2 CPU Ratio [Auto] Allows you to the system bus and PCI bus. You can also key in...

User Manual
Page 72
...] Power Down Mode [Channel] Allows you enable the previous item. Configuration options: [Channel] [Chip Select] Page Smashing [Disabled] S/W Control of Address bit] [Disabled] [Disabled] [Enabled] [Always] [Disabled] [Disabled] Enable Bank Memory Interleavng. This item appears only when you to set the DDR power down mode. 3.5.8 Memory Configuration Ai Tweaker Memory Configuration Bank Interleaving Channel Interleaving Enable Clock to All DIMMs MemClk Tristate C3/ATLVID Memory Hole Remapping DCT Unganged Mode Power Down Enable Page Smashing [Auto...
...] Power Down Mode [Channel] Allows you enable the previous item. Configuration options: [Channel] [Chip Select] Page Smashing [Disabled] S/W Control of Address bit] [Disabled] [Disabled] [Enabled] [Always] [Disabled] [Disabled] Enable Bank Memory Interleavng. This item appears only when you to set the DDR power down mode. 3.5.8 Memory Configuration Ai Tweaker Memory Configuration Bank Interleaving Channel Interleaving Enable Clock to All DIMMs MemClk Tristate C3/ATLVID Memory Hole Remapping DCT Unganged Mode Power Down Enable Page Smashing [Auto...

User Manual
Page 76
... Clock Caliberation [Disabled] Options This option shoukd remain disabled for testing purpose. The driver developer may be different due to the CPU you to malfunction. Change Option F1 General Help F10 Save and Exit ESC Exit v02.61 (C)Copyright 1985-2008, American Megatrends, Inc. 3.6 Advanced menu The Advanced menu items allow you installed. BIOS SETUP UTILITY Main Ai Tweaker Advanced Power Boot Tools Exit CPU Configuration Chipset Onboard Devices Configuration USB Configuration PCIPnP Configure CPU. Select Screen Select Item Enter...
... Clock Caliberation [Disabled] Options This option shoukd remain disabled for testing purpose. The driver developer may be different due to the CPU you to malfunction. Change Option F1 General Help F10 Save and Exit ESC Exit v02.61 (C)Copyright 1985-2008, American Megatrends, Inc. 3.6 Advanced menu The Advanced menu items allow you installed. BIOS SETUP UTILITY Main Ai Tweaker Advanced Power Boot Tools Exit CPU Configuration Chipset Onboard Devices Configuration USB Configuration PCIPnP Configure CPU. Select Screen Select Item Enter...
User Manual
Page 81
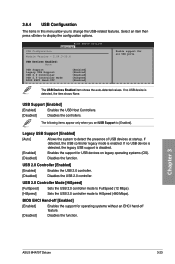
... to change the USB-related features. BIOS SETUP UTILITY Advanced USB Configuration Module Version - 2.24.3-13.4 USB Devices Enabled None USB Support Legacy USB Support USB 2.0 Controller USB 2.0 Controller Mode BIOS EHCI Hand-Off [Enabled] [Enabled] [Enabled] [HiSpeed] [Enabled] Enable support for all USB ports. USB Support [Enabled] [Enabled] Enables the USB Host Controllers. [Disabled] Disables the controllers. 3.6.4 USB Configuration The items in this menu allow you set USB Support to HiSpeed (480 Mbps). Select an item then press to display the configuration options...
... to change the USB-related features. BIOS SETUP UTILITY Advanced USB Configuration Module Version - 2.24.3-13.4 USB Devices Enabled None USB Support Legacy USB Support USB 2.0 Controller USB 2.0 Controller Mode BIOS EHCI Hand-Off [Enabled] [Enabled] [Enabled] [HiSpeed] [Enabled] Enable support for all USB ports. USB Support [Enabled] [Enabled] Enables the USB Host Controllers. [Disabled] Disables the controllers. 3.6.4 USB Configuration The items in this menu allow you set USB Support to HiSpeed (480 Mbps). Select an item then press to display the configuration options...

User Manual
Page 83
... tables as per ACPI 2.0 specifications. 3.7.4 ACPI APIC Support [Enabled] [Disabled] When set to [Disabled], the system disable the Advanced Configuration and Power Interface (ACPI) support in the Advanced Programmable Interrupt Controller (APIC). [Enabled] When set to [Enabled], the ACPI APIC table pointer is included in the RSDT pointer list. APM Configuration Hardware Monitor Select Screen Select Item +- Select an item then press to change the settings for System Suspend. Chapter 3 ASUS M4A79T Deluxe 3-25 3.7 Power menu The Power menu items allow...
... tables as per ACPI 2.0 specifications. 3.7.4 ACPI APIC Support [Enabled] [Disabled] When set to [Disabled], the system disable the Advanced Configuration and Power Interface (ACPI) support in the Advanced Programmable Interrupt Controller (APIC). [Enabled] When set to [Enabled], the ACPI APIC table pointer is included in the RSDT pointer list. APM Configuration Hardware Monitor Select Screen Select Item +- Select an item then press to change the settings for System Suspend. Chapter 3 ASUS M4A79T Deluxe 3-25 3.7 Power menu The Power menu items allow...
User Manual
Page 88
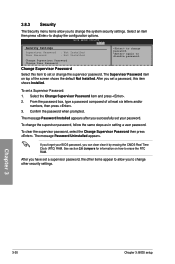
...UTILITY Boot Security Settings Supervisor Password : Not Installed User Password : Not Installed Change Supervisor Password Change User Passward to disable password. After you set a supervisor password, the other security settings. To clear the supervisor password, select the Change Supervisor Password then press . The message Password Uninstalled appears. After you have set a password, this item to set your BIOS password, you can clear clear it by erasing the CMOS Real Time Clock (RTC) RAM. The Supervisor Password item on how to display the configuration options...
...UTILITY Boot Security Settings Supervisor Password : Not Installed User Password : Not Installed Change Supervisor Password Change User Passward to disable password. After you set a supervisor password, the other security settings. To clear the supervisor password, select the Change Supervisor Password then press . The message Password Uninstalled appears. After you have set a password, this item to set your BIOS password, you can clear clear it by erasing the CMOS Real Time Clock (RTC) RAM. The Supervisor Password item on how to display the configuration options...

User Manual
Page 90
... to section 3.2.3 ASUS EZ Flash 2 utility. BIOS SETUP UTILITY Main Ai Tweaker Advanced Power Boot Tools Exit ASUS EZ Flash 2 Express Gate Enter OS Timer Reset User Data ASUS O.C. This utility supports: 1.FAT 12/16/32 (r/w) 2.NTFS (read only) 3.CD-DISC (read only) Select Screen Select Item +- For more details, refer to display the submenu. ASUSTek EZ Flash 2 BIOS ROM Utility V3.34 FLASH TYPE: MXIC 25L8005 Current ROM BOARD: M4A79T Deluxe VER: 0115 DATE: 12/09/2008 Update ROM BOARD: Unknown VER...
... to section 3.2.3 ASUS EZ Flash 2 utility. BIOS SETUP UTILITY Main Ai Tweaker Advanced Power Boot Tools Exit ASUS EZ Flash 2 Express Gate Enter OS Timer Reset User Data ASUS O.C. This utility supports: 1.FAT 12/16/32 (r/w) 2.NTFS (read only) 3.CD-DISC (read only) Select Screen Select Item +- For more details, refer to display the submenu. ASUSTek EZ Flash 2 BIOS ROM Utility V3.34 FLASH TYPE: MXIC 25L8005 Current ROM BOARD: M4A79T Deluxe VER: 0115 DATE: 12/09/2008 Update ROM BOARD: Unknown VER...

User Manual
Page 95
... the ATI® RAID/AHCI driver disk. Visit the ASUS website at any time without notice. The Utilities menu shows the applications and other software that you want to open the folder of supplementary user manuals. Use the setup procedures presented in this chapter for updates. 4.2.1 Running the support DVD Place the support DVD into the optical drive. Chapter 4 4.1 Installing an operating system This motherboard supports Windows® XP/ 64-bit XP/ Vista...
... the ATI® RAID/AHCI driver disk. Visit the ASUS website at any time without notice. The Utilities menu shows the applications and other software that you want to open the folder of supplementary user manuals. Use the setup procedures presented in this chapter for updates. 4.2.1 Running the support DVD Place the support DVD into the optical drive. Chapter 4 4.1 Installing an operating system This motherboard supports Windows® XP/ 64-bit XP/ Vista...
User Manual
Page 100
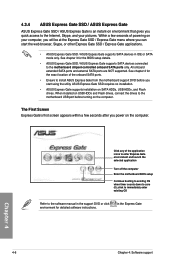
... detailed software instructions. 4.3.4 ASUS Express Gate SSD / ASUS Express Gate ASUS Express Gate SSD / ASUS Express Gate is an instant-on environment that gives you start the web browser, Skype, or other Express Gate SSD / Express Gate applications. • ASUS Express Gate SSD / ASUS Expess Gate supports SATA devices in IDE or SATA mode only. See chapter 2 for the BIOS setup details. • ASUS Express Gate SSD / ASUS Express Gate supports SATA devices connected to install ASUS Express Gate from the motherboard support DVD before turning on SATA HDDs, USB HDDs, and Flash drives.
... detailed software instructions. 4.3.4 ASUS Express Gate SSD / ASUS Express Gate ASUS Express Gate SSD / ASUS Express Gate is an instant-on environment that gives you start the web browser, Skype, or other Express Gate SSD / Express Gate applications. • ASUS Express Gate SSD / ASUS Expess Gate supports SATA devices in IDE or SATA mode only. See chapter 2 for the BIOS setup details. • ASUS Express Gate SSD / ASUS Express Gate supports SATA devices connected to install ASUS Express Gate from the motherboard support DVD before turning on SATA HDDs, USB HDDs, and Flash drives.
User Manual
Page 108
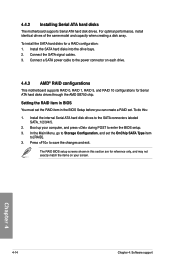
... the SATA connectors labeled SATA_1/2/3/4/5. 2. Chapter 4 4-14 Chapter 4: Software support Connect a SATA power cable to enter the BIOS setup. 3. Boot up your screen. The RAID BIOS setup screens shown in the BIOS Setup before you can create a RAID set the OnChip SATA Type item to Storage Configuration, and set . For optimal performance, install identical drives of the same model and capacity when creating a disk array. Install the SATA hard disks into the drive bays. 2. In the Main Menu, go to [RAID]. 3. Setting the RAID item in BIOS You must set the RAID item...
... the SATA connectors labeled SATA_1/2/3/4/5. 2. Chapter 4 4-14 Chapter 4: Software support Connect a SATA power cable to enter the BIOS setup. 3. Boot up your screen. The RAID BIOS setup screens shown in the BIOS Setup before you can create a RAID set the OnChip SATA Type item to Storage Configuration, and set . For optimal performance, install identical drives of the same model and capacity when creating a disk array. Install the SATA hard disks into the drive bays. 2. In the Main Menu, go to [RAID]. 3. Setting the RAID item in BIOS You must set the RAID item...
User Manual
Page 114
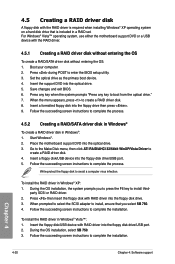
... system, use either the motherboard support DVD or a USB device with the RAID driver is included in Windows® XP: 1. Press during POST to create a RAID driver disk. 8. Insert the support DVD into the optical drive. 3. To install the RAID driver in Windows®: 1. Insert the floppy disk/USB device with RAID driver into the floppy disk drive/USB port. 2. Boot your computer. 2. When the menu appears, press to enter the BIOS setup utility. 3. party SCSI or RAID driver. 2. Press then insert the floppy disk with RAID driver into the floppy disk drive. 3. Follow...
... system, use either the motherboard support DVD or a USB device with the RAID driver is included in Windows® XP: 1. Press during POST to create a RAID driver disk. 8. Insert the support DVD into the optical drive. 3. To install the RAID driver in Windows®: 1. Insert the floppy disk/USB device with RAID driver into the floppy disk drive/USB port. 2. Boot your computer. 2. When the menu appears, press to enter the BIOS setup utility. 3. party SCSI or RAID driver. 2. Press then insert the floppy disk with RAID driver into the floppy disk drive. 3. Follow...


