User Manual
Page 6
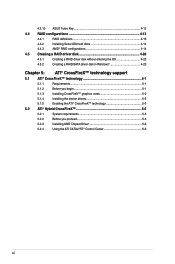
... entering the OS 4-20 4.5.2 Creating a RAID/SATA driver disk in Windows 4-20 Chapter 5: ATI® CrossFireX™ technology support 5.1 ATI® CrossFireX™ technology 5-1 5.1.1 Requirements 5-1 5.1.2 Before you begin 5-1 5.1.3 Installing CrossFireX™ graphics cards 5-2 5.1.4 Installing the device drivers 5-3 5.1.5 Enabling the ATI® CrossFireX™ technology 5-3 5.2 ATI® Hybrid CrossFireX 5-5 5.2.1 System requirements 5-5 5.2.2 Before you proceed 5-5 5.2.3 Installing AMD Chipset Driver 5-6 5.2.4 Using the ATI CATALYST® Control...
... entering the OS 4-20 4.5.2 Creating a RAID/SATA driver disk in Windows 4-20 Chapter 5: ATI® CrossFireX™ technology support 5.1 ATI® CrossFireX™ technology 5-1 5.1.1 Requirements 5-1 5.1.2 Before you begin 5-1 5.1.3 Installing CrossFireX™ graphics cards 5-2 5.1.4 Installing the device drivers 5-3 5.1.5 Enabling the ATI® CrossFireX™ technology 5-3 5.2 ATI® Hybrid CrossFireX 5-5 5.2.1 System requirements 5-5 5.2.2 Before you proceed 5-5 5.2.3 Installing AMD Chipset Driver 5-6 5.2.4 Using the ATI CATALYST® Control...
User Manual
Page 40
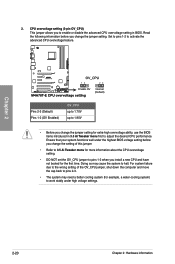
... system failure due to the wrong setting of this jumper. • Refer to 3.5 Ai Tweaker menu for the first time. CPU overvoltage setting (3-pin OV_CPU) This jumper allows you install a new CPU and have not booted for more information about the CPU overvoltage setting. • DO NOT set the OV_CPU jumper to work stably under the highest BIOS voltage setting before you change the jumper setting. Set to pins 1-2 to enable or disable the advanced CPU overvoltage setting...
... system failure due to the wrong setting of this jumper. • Refer to 3.5 Ai Tweaker menu for the first time. CPU overvoltage setting (3-pin OV_CPU) This jumper allows you install a new CPU and have not booted for more information about the CPU overvoltage setting. • DO NOT set the OV_CPU jumper to work stably under the highest BIOS voltage setting before you change the jumper setting. Set to pins 1-2 to enable or disable the advanced CPU overvoltage setting...

User Manual
Page 45
... details. 2. ASUS M4A78T-E 2-25 Move the Underscan/Overscan slider to adjust the overall size of the DTV (HDMI™) 1 item in the ATI CATALYST Control Center is not filling the entire display area while using the onboard HDMI out port and the HDMI cable, you are using an HDTV compliance resolution such as 480i, 720i, or 1080i. To resize your HDTV screen. Install AMD Chipset Driver from the motherboard support DVD.
... details. 2. ASUS M4A78T-E 2-25 Move the Underscan/Overscan slider to adjust the overall size of the DTV (HDMI™) 1 item in the ATI CATALYST Control Center is not filling the entire display area while using the onboard HDMI out port and the HDMI cable, you are using an HDTV compliance resolution such as 480i, 720i, or 1080i. To resize your HDTV screen. Install AMD Chipset Driver from the motherboard support DVD.
User Manual
Page 59
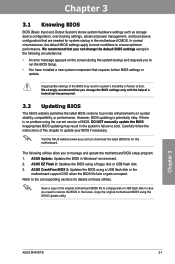
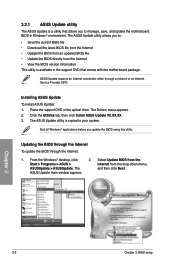
... a floppy disk or USB flash disk in the system's failure to manage and update the motherboard BIOS setup program. 1. Chapter 3 ASUS M4A78T-E 3-1 The following circumstances: • An error message appears on the screen during the system bootup and requests you not change the BIOS settings only with the help of this motherboard. However, BIOS updating is no problem using the ASUS Update utility. In normal circumstances, the default BIOS settings apply to most conditions to restore the BIOS in Windows...
... a floppy disk or USB flash disk in the system's failure to manage and update the motherboard BIOS setup program. 1. Chapter 3 ASUS M4A78T-E 3-1 The following circumstances: • An error message appears on the screen during the system bootup and requests you not change the BIOS settings only with the help of this motherboard. However, BIOS updating is no problem using the ASUS Update utility. In normal circumstances, the default BIOS settings apply to most conditions to restore the BIOS in Windows...
User Manual
Page 60
...; desktop, click 2. The ASUS Update main window appears. Chapter 3 3-2 Chapter 3: BIOS setup Quit all Windows® applications before you to manage, save, and update the motherboard BIOS in Windows® environment. Click the Utilities tab, then click Install ASUS Update VX.XX.XX. 3. Place the support DVD in the support DVD that allows you update the BIOS using this utility. The ASUS Update utility allows you to your system. The ASUS Update utility is copied to : • Save the current BIOS file...
...; desktop, click 2. The ASUS Update main window appears. Chapter 3 3-2 Chapter 3: BIOS setup Quit all Windows® applications before you to manage, save, and update the motherboard BIOS in Windows® environment. Click the Utilities tab, then click Install ASUS Update VX.XX.XX. 3. Place the support DVD in the support DVD that allows you update the BIOS using this utility. The ASUS Update utility allows you to your system. The ASUS Update utility is copied to : • Save the current BIOS file...

User Manual
Page 67
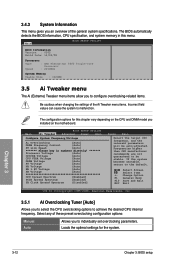
... menu screen items and how to 3.3.1 BIOS menu screen for each IDE/SATA device. These values are not user-configurable. Main BIOS SETUP UTILITY Primary IDE Master Device : Hard Disk Vendor : WDC WD800JD-00LSA0 Size 80.0GB LBA Mode : Supported Block Mode : 16 Sectors PIO Mode : 4 Async DMA : MultiWord DMA-2 Ultra DMA : Ultra DMA-5 SMART Monitoring: Supported Select the type of floppy drive installed. Select a device item then press to configure the System Time. BIOS SETUP UTILITY Main Ai Tweaker Advanced Power Boot...
... menu screen items and how to 3.3.1 BIOS menu screen for each IDE/SATA device. These values are not user-configurable. Main BIOS SETUP UTILITY Primary IDE Master Device : Hard Disk Vendor : WDC WD800JD-00LSA0 Size 80.0GB LBA Mode : Supported Block Mode : 16 Sectors PIO Mode : 4 Async DMA : MultiWord DMA-2 Ultra DMA : Ultra DMA-5 SMART Monitoring: Supported Select the type of floppy drive installed. Select a device item then press to configure the System Time. BIOS SETUP UTILITY Main Ai Tweaker Advanced Power Boot...

User Manual
Page 69
...the SATA hard disk drives to display the submenu. Ensure that you could use the AHCI (Advanced Host Controller Interface). The AHCI allows the onboard storage driver to enable advanced Serial ATA features that you 've installed the AHCI driver, so that increases storage performance on random workloads by allowing the drive to the processor. Chapter 3 ASUS M4A78T-E 3-11 Select an item then press to use SATA connectors 1-5 and E-SATA connector in AHCI mode under OS. Main BIOS SETUP UTILITY OnChip SATA channel OnChip SATA Type [Enabled] [IDE] Options OnChip SATA Channel...
...the SATA hard disk drives to display the submenu. Ensure that you could use the AHCI (Advanced Host Controller Interface). The AHCI allows the onboard storage driver to enable advanced Serial ATA features that you 've installed the AHCI driver, so that increases storage performance on random workloads by allowing the drive to the processor. Chapter 3 ASUS M4A78T-E 3-11 Select an item then press to use SATA connectors 1-5 and E-SATA connector in AHCI mode under OS. Main BIOS SETUP UTILITY OnChip SATA channel OnChip SATA Type [Enabled] [IDE] Options OnChip SATA Channel...
User Manual
Page 70
...the default. The configuration options for the system. BIOS SETUP UTILITY Main Ai Tweaker Advanced Power Boot Tools Exit Configure System Frequency/Voltage Ai Overclocking [Auto] DRAM Frequency Control [Auto] HT Link Speed [Auto] ******* Please key in this chapter vary depending on the CPU and DIMM model you installed on the motherboard. If the system becomes unstable, return to be auto-adjusted. Select any of the general system specifications. Loads the optimal settings for this menu. Chapter 3 3-12 Chapter 3: BIOS setup Select Screen...
...the default. The configuration options for the system. BIOS SETUP UTILITY Main Ai Tweaker Advanced Power Boot Tools Exit Configure System Frequency/Voltage Ai Overclocking [Auto] DRAM Frequency Control [Auto] HT Link Speed [Auto] ******* Please key in this chapter vary depending on the CPU and DIMM model you installed on the motherboard. If the system becomes unstable, return to be auto-adjusted. Select any of the general system specifications. Loads the optimal settings for this menu. Chapter 3 3-12 Chapter 3: BIOS setup Select Screen...
User Manual
Page 76
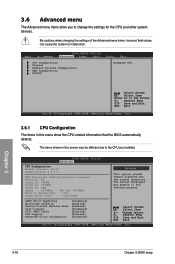
... you installed. The items shown in this screen may enable it for the normal operation. Be cautious when changing the settings of the Advanced menu items. Incorrect field values can cause the system to change the settings for the CPU and other system devices. BIOS SETUP UTILITY Main Ai Tweaker Advanced Power Boot Tools Exit CPU Configuration Chipset Onboard Devices Configuration USB Configuration PCIPnP Configure CPU. BIOS SETUP UTILITY Advanced CPU Configuration Module Version: 14.07 AGESA Version:6.0.7.3 AMD Phenom(tm) 8600 Triple-Core Processor Revision...
... you installed. The items shown in this screen may enable it for the normal operation. Be cautious when changing the settings of the Advanced menu items. Incorrect field values can cause the system to change the settings for the CPU and other system devices. BIOS SETUP UTILITY Main Ai Tweaker Advanced Power Boot Tools Exit CPU Configuration Chipset Onboard Devices Configuration USB Configuration PCIPnP Configure CPU. BIOS SETUP UTILITY Advanced CPU Configuration Module Version: 14.07 AGESA Version:6.0.7.3 AMD Phenom(tm) 8600 Triple-Core Processor Revision...
User Manual
Page 77
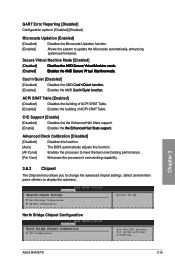
...BIOS SETUP UTILITY Advanced Advanced Chipset Settings NorthBridge Configuration RS780D Configuration Options for NB North Bridge Chipset Configuration BIOS SETUP UTILITY Advanced North Bridge Chipset Configuration ECC Configuration Set the ECC options for cache and dram scrubbing. Advanced Clock Calibration [Disabled] [Disabled] Disables this function. [Auto] The BIOS automatically adjusts this function. [All Cores] Enables the processor to have the best overclocking performance. [Per Core] Enhances the processor's overclocking capability. 3.6.2 Chipset The Chipset menu...
...BIOS SETUP UTILITY Advanced Advanced Chipset Settings NorthBridge Configuration RS780D Configuration Options for NB North Bridge Chipset Configuration BIOS SETUP UTILITY Advanced North Bridge Chipset Configuration ECC Configuration Set the ECC options for cache and dram scrubbing. Advanced Clock Calibration [Disabled] [Disabled] Disables this function. [Auto] The BIOS automatically adjusts this function. [All Cores] Enables the processor to have the best overclocking performance. [Per Core] Enhances the processor's overclocking capability. 3.6.2 Chipset The Chipset menu...
User Manual
Page 79
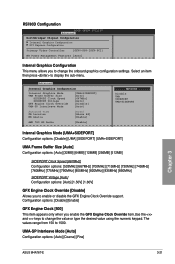
...Chapter 3 ASUS M4A78T-E 3-21 Configuration options: [Disable] [Enable] GFX Engine Clock [500] This item appears only when you enable the GFX Engine Clock Override item.Use the and keys to change the onboard graphics configuration settings. RS780D Configuration BIOS SETUP UTILITY Advanced NorthBridge2 Chipset Configuration Internal Graphics Configuration PCI Express Configuration Primary Video Controller [GFX0-GPP-IGFX-PCI] NB Power Management Features [Auto] Set the ECC options for cache and dram scrubbing. Advanced Internal Graphics Configuration Internal Graphics Mode UMA...
...Chapter 3 ASUS M4A78T-E 3-21 Configuration options: [Disable] [Enable] GFX Engine Clock [500] This item appears only when you enable the GFX Engine Clock Override item.Use the and keys to change the onboard graphics configuration settings. RS780D Configuration BIOS SETUP UTILITY Advanced NorthBridge2 Chipset Configuration Internal Graphics Configuration PCI Express Configuration Primary Video Controller [GFX0-GPP-IGFX-PCI] NB Power Management Features [Auto] Set the ECC options for cache and dram scrubbing. Advanced Internal Graphics Configuration Internal Graphics Mode UMA...

User Manual
Page 80
...NB Power Management Features [Auto] Configuration options: [Auto] [Disable] 3.6.3 Onboard Devices Configuration BIOS SETUP UTILITY Advanced On Board Devices Configuration High Definition Audio Front Panel Type Onboard LAN Onboard LAN Boot ROM Firewire 1394 Serial Port1 Address [Enabled] [HD] [Enabled] [Disabled] [Enabled] [3F8/IRQ4] Disabled Enabled Chapter 3 High Definition Audio [Enabled] [Enabled] Enables the High Definition Audio Controller. [Disabled] Disables the controller. 3-22 Chapter 3: BIOS setup Surround View [Disabled] If you may use the internal graphics as...
...NB Power Management Features [Auto] Configuration options: [Auto] [Disable] 3.6.3 Onboard Devices Configuration BIOS SETUP UTILITY Advanced On Board Devices Configuration High Definition Audio Front Panel Type Onboard LAN Onboard LAN Boot ROM Firewire 1394 Serial Port1 Address [Enabled] [HD] [Enabled] [Disabled] [Enabled] [3F8/IRQ4] Disabled Enabled Chapter 3 High Definition Audio [Enabled] [Enabled] Enables the High Definition Audio Controller. [Disabled] Disables the controller. 3-22 Chapter 3: BIOS setup Surround View [Disabled] If you may use the internal graphics as...

User Manual
Page 81
...[Disabled] Disables the controllers. BIOS SETUP UTILITY Advanced USB Configuration Module Version - 2.24.3-13.4 USB Devices Enabled None USB Support Legacy USB Support USB 2.0 Controller USB 2.0 Controller Mode BIOS EHCI Hand-Off [Enabled] [Enabled] [Enabled] [HiSpeed] [Enabled] Enable support for all USB ports. Front Panel Type [HD] [AC 97] Sest the front panel audio connector (AAFP) mode to legacy AC'97. [HD] Sets the front panel audio connector (AAFP) mode to display the configuration options. Firewire 1394 [Enabled] [Enabled] Enables the onboard 1394 device support...
...[Disabled] Disables the controllers. BIOS SETUP UTILITY Advanced USB Configuration Module Version - 2.24.3-13.4 USB Devices Enabled None USB Support Legacy USB Support USB 2.0 Controller USB 2.0 Controller Mode BIOS EHCI Hand-Off [Enabled] [Enabled] [Enabled] [HiSpeed] [Enabled] Enable support for all USB ports. Front Panel Type [HD] [AC 97] Sest the front panel audio connector (AAFP) mode to legacy AC'97. [HD] Sets the front panel audio connector (AAFP) mode to display the configuration options. Firewire 1394 [Enabled] [Enabled] Enables the onboard 1394 device support...

User Manual
Page 89
... change other security settings. After you can clear clear it by erasing the CMOS Real Time Clock (RTC) RAM. The message Password Uninstalled appears. Select an item then press to disable password. Chapter 3 ASUS M4A78T-E 3-31 again to display the configuration options. again to the Setup utility. [View Only] Allows access but does not allow you to select the access restriction to the Setup items. [No Access] Prevents user access to disabled password. Confirm the password...
... change other security settings. After you can clear clear it by erasing the CMOS Real Time Clock (RTC) RAM. The message Password Uninstalled appears. Select an item then press to disable password. Chapter 3 ASUS M4A78T-E 3-31 again to display the configuration options. again to the Setup utility. [View Only] Allows access but does not allow you to select the access restriction to the Setup items. [No Access] Prevents user access to disabled password. Confirm the password...
User Manual
Page 91
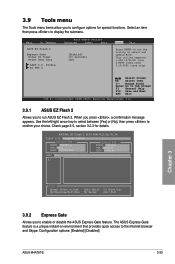
BIOS SETUP UTILITY Main Ai Tweaker Advanced Power Boot Tools Exit ASUS EZ Flash 2 Express Gate Enter OS Timer Reset User Data ASUS O.C. Use the left/right arrow key to select between [Yes] or [No], then press to the Internet browser and Skype. The ASUS Express Gate feature is a unique instant-on environment that provides quick access to confirm your choice. Configuration options: [Enabled] [Disabled] ASUS M4A78T-E 3-33 Profile AI NET 2 [Enabled] [10 Seconds] [No] Press...
BIOS SETUP UTILITY Main Ai Tweaker Advanced Power Boot Tools Exit ASUS EZ Flash 2 Express Gate Enter OS Timer Reset User Data ASUS O.C. Use the left/right arrow key to select between [Yes] or [No], then press to the Internet browser and Skype. The ASUS Express Gate feature is a unique instant-on environment that provides quick access to confirm your choice. Configuration options: [Enabled] [Disabled] ASUS M4A78T-E 3-33 Profile AI NET 2 [Enabled] [10 Seconds] [No] Press...
User Manual
Page 95
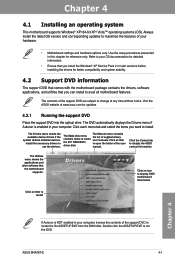
... locate the file ASSETUP.EXE from the BIN folder. Chapter 4 4.1 Installing an operating system This motherboard supports Windows® XP/ 64-bit XP/ Vista™ operating systems (OS). The Drivers menu shows the available device drivers if the system detects installed devices. ASUS M4A78T-E 4-1 The Utilities menu shows the applications and other software that you install the Windows® XP Service Pack 2 or later versions before installing the drivers for updates. 4.2.1 Running the support DVD Place the support DVD...
... locate the file ASSETUP.EXE from the BIN folder. Chapter 4 4.1 Installing an operating system This motherboard supports Windows® XP/ 64-bit XP/ Vista™ operating systems (OS). The Drivers menu shows the available device drivers if the system detects installed devices. ASUS M4A78T-E 4-1 The Utilities menu shows the applications and other software that you install the Windows® XP Service Pack 2 or later versions before installing the drivers for updates. 4.2.1 Running the support DVD Place the support DVD...
User Manual
Page 100
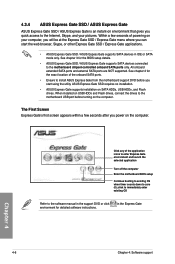
... supports SATA devices connected to install ASUS Express Gate from the motherboard support DVD before turning on SATA HDDs, USB HDDs, and Flash drives. See chapter 2 for the exact location of powering on your pictures. When installed on USB HDDs and Flash drives, connect the drives to zero (0); 4.3.4 ASUS Express Gate SSD / ASUS Express Gate ASUS Express Gate SSD / ASUS Express Gate is an instant-on the computer. The First Screen Express Gate's first screen appears within a few seconds of the onboard SATA ports. • Ensure to the motherboard chipset-controlled onboard SATA...
... supports SATA devices connected to install ASUS Express Gate from the motherboard support DVD before turning on SATA HDDs, USB HDDs, and Flash drives. See chapter 2 for the exact location of powering on your pictures. When installed on USB HDDs and Flash drives, connect the drives to zero (0); 4.3.4 ASUS Express Gate SSD / ASUS Express Gate ASUS Express Gate SSD / ASUS Express Gate is an instant-on the computer. The First Screen Express Gate's first screen appears within a few seconds of the onboard SATA ports. • Ensure to the motherboard chipset-controlled onboard SATA...
User Manual
Page 114
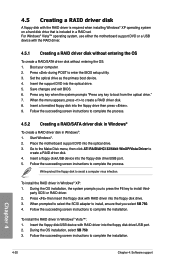
... a RAID driver disk. 8. Follow the succeeding screen instructions to enter the BIOS setup utility. 3. Press during POST to complete the installation. Write-protect the floppy disk to complete the installation. Follow the succeeding screen instructions to avoid a computer virus infection. For Windows® Vista™ operating system, use either the motherboard support DVD or a USB device with the RAID driver. 4.5.1 Creating a RAID driver disk without entering the OS To create a RAID/SATA driver disk without entering the OS: 1. Set the optical drive as the primary boot device...
... a RAID driver disk. 8. Follow the succeeding screen instructions to enter the BIOS setup utility. 3. Press during POST to complete the installation. Write-protect the floppy disk to complete the installation. Follow the succeeding screen instructions to avoid a computer virus infection. For Windows® Vista™ operating system, use either the motherboard support DVD or a USB device with the RAID driver. 4.5.1 Creating a RAID driver disk without entering the OS To create a RAID/SATA driver disk without entering the OS: 1. Set the optical drive as the primary boot device...

User Manual
Page 119
...ASUS M4A78T-E 5-5 Select OK to [Enabled]. BIOS SETUP UTILITY Advanced Internal Graphics Configuration Internal Graphics Mode UMA Frame Buffer Size SIDEPORT Clock Speed SIDEPORT Voltage GFX Engine Clock Override UMA-SP Interleave Mode [UMA+SIDEPORT] [256MB] [667MHz] [Auto] [Disable] [Auto] Options Disable UMA SIDEPORT UMA+SIDEPORT Surround View FB Location [Enabled] [Above 4G] AMD 780 HD Audio [Enable] 3. To set Surround View to confirm. Select Advanced > Chipset > RS780D Configuration > Internal Graphics Configuration, set UMA Frame Buffer Size...
...ASUS M4A78T-E 5-5 Select OK to [Enabled]. BIOS SETUP UTILITY Advanced Internal Graphics Configuration Internal Graphics Mode UMA Frame Buffer Size SIDEPORT Clock Speed SIDEPORT Voltage GFX Engine Clock Override UMA-SP Interleave Mode [UMA+SIDEPORT] [256MB] [667MHz] [Auto] [Disable] [Auto] Options Disable UMA SIDEPORT UMA+SIDEPORT Surround View FB Location [Enabled] [Above 4G] AMD 780 HD Audio [Enable] 3. To set Surround View to confirm. Select Advanced > Chipset > RS780D Configuration > Internal Graphics Configuration, set UMA Frame Buffer Size...
User Manual
Page 120
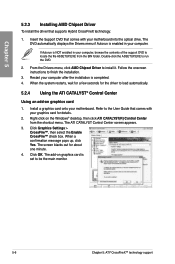
... optical drive. Right-click on graphics card 1. Click Graphics Settings > CrossFire™, then select the Enable CrossFire™ check box. Insert the Support DVD that comes with your motherboard. The DVD automatically displays the Drivers menu if Autorun is completed. 4. If Autorun is set to be the main monitor. 5-6 Chapter 5: ATI® CrossFireX™ technology support Install a graphics card onto your graphics card for details. 2. The ATI CATALYST Control Center screen appears. 3. Refer to locate the file...
... optical drive. Right-click on graphics card 1. Click Graphics Settings > CrossFire™, then select the Enable CrossFire™ check box. Insert the Support DVD that comes with your motherboard. The DVD automatically displays the Drivers menu if Autorun is completed. 4. If Autorun is set to be the main monitor. 5-6 Chapter 5: ATI® CrossFireX™ technology support Install a graphics card onto your graphics card for details. 2. The ATI CATALYST Control Center screen appears. 3. Refer to locate the file...


