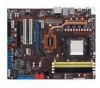

User Manual
Page 4
... Using the dual function power switch 3-2 Chapter 4: BIOS setup 4.1 Managing and updating your BIOS 4-1 4.1.1 ASUS Update utility 4-1 4.1.2 Creating a bootable floppy disk 4-4 4.1.3 ASUS EZ Flash 2 utility 4-5 4.1.4 Updating the BIOS 4-6 4.1.5 Saving the current BIOS file 4-8 4.2 BIOS setup... program 4-9 4.2.1 BIOS menu screen 4-10 4.2.2 Menu bar 4-10 4.2.3 Legend bar 4-11 4.2.4 Menu items 4-11 4.2.5 Sub-menu items 4-11 4.2.6 Configuration fields 4-11 4.2.7 Pop-up window...
... Using the dual function power switch 3-2 Chapter 4: BIOS setup 4.1 Managing and updating your BIOS 4-1 4.1.1 ASUS Update utility 4-1 4.1.2 Creating a bootable floppy disk 4-4 4.1.3 ASUS EZ Flash 2 utility 4-5 4.1.4 Updating the BIOS 4-6 4.1.5 Saving the current BIOS file 4-8 4.2 BIOS setup... program 4-9 4.2.1 BIOS menu screen 4-10 4.2.2 Menu bar 4-10 4.2.3 Legend bar 4-11 4.2.4 Menu items 4-11 4.2.5 Sub-menu items 4-11 4.2.6 Configuration fields 4-11 4.2.7 Pop-up window...
User Manual
Page 6
...14 5.3.4 ASUS PC Probe II 5-22 5.3.5 ASUS AI Suite 5-28 5.3.6 ASUS AI Gear 2 5-30 5.3.7 ASUS AI Nap 5-31 5.3.8 ASUS Q-Fan 2 5-32 5.3.9 ASUS AI Booster 5-33 5.3.10 ASUS Express Gate... 5-34 5.4 RAID configurations 5-42 5.4.1 RAID definitions 5-42 5.4.2 NVIDIA® RAID configurations 5-43 5.5 Creating a RAID driver disk 5-50 5.5.1 Creating a RAID driver disk without entering the OS.... 5-50 5.5.2 Creating a RAID/SATA driver disk in Windows...
...14 5.3.4 ASUS PC Probe II 5-22 5.3.5 ASUS AI Suite 5-28 5.3.6 ASUS AI Gear 2 5-30 5.3.7 ASUS AI Nap 5-31 5.3.8 ASUS Q-Fan 2 5-32 5.3.9 ASUS AI Booster 5-33 5.3.10 ASUS Express Gate... 5-34 5.4 RAID configurations 5-42 5.4.1 RAID definitions 5-42 5.4.2 NVIDIA® RAID configurations 5-43 5.5 Creating a RAID driver disk 5-50 5.5.1 Creating a RAID driver disk without entering the OS.... 5-50 5.5.2 Creating a RAID/SATA driver disk in Windows...
User Manual
Page 11
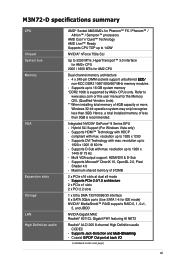
... GB system memory *DDR2 1066 is recommended. Supports D-Sub with max. Supports up to 140W NVIDIA® nForce 750a SLI Up to www.asus.com or this user manual for IDE mode) NVIDIA® MediaShield™ RAID supports RAID 0, 1, 0+1, 5, and JBOD NVIDIA Gigabit MAC ...10, OpenGL 2.0, Pixel Shader 4.0 - Hence, a total installed memory of 4GB capacity or more, Windows 32-bit operation system may onlyl recognize less than 3GB is supported by AM2+ CPUs only. M3N72-D specifications summary CPU Chipset System bus Memory VGA Expansion slots Storage LAN High Definition audio AMD®...
... GB system memory *DDR2 1066 is recommended. Supports D-Sub with max. Supports up to 140W NVIDIA® nForce 750a SLI Up to www.asus.com or this user manual for IDE mode) NVIDIA® MediaShield™ RAID supports RAID 0, 1, 0+1, 5, and JBOD NVIDIA Gigabit MAC ...10, OpenGL 2.0, Pixel Shader 4.0 - Hence, a total installed memory of 4GB capacity or more, Windows 32-bit operation system may onlyl recognize less than 3GB is supported by AM2+ CPUs only. M3N72-D specifications summary CPU Chipset System bus Memory VGA Expansion slots Storage LAN High Definition audio AMD®...
User Manual
Page 20
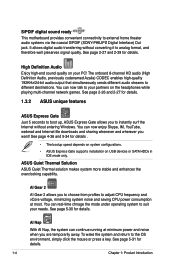
...Windows. The onboard 8-channel HD audio (High Definition Audio, previously codenamed Azalia) CODEC enables high-quality 192KHz/24-bit audio output that simultaneously sends different audio streams to analog format, and therefore well preserves signal quality. You can continue running at most. See page 2-27 and 2-39 for details. 1.3.2 ASUS unique features ASUS...systems via the coaxial S/PDIF (SONY-PHILIPS Digital Interface) Out jack. S/PDIF digital sound ready This motherboard provides convenient connectivity to the OS environment, simply click the mouse or press a key. See page...
...Windows. The onboard 8-channel HD audio (High Definition Audio, previously codenamed Azalia) CODEC enables high-quality 192KHz/24-bit audio output that simultaneously sends different audio streams to analog format, and therefore well preserves signal quality. You can continue running at most. See page 2-27 and 2-39 for details. 1.3.2 ASUS unique features ASUS...systems via the coaxial S/PDIF (SONY-PHILIPS Digital Interface) Out jack. S/PDIF digital sound ready This motherboard provides convenient connectivity to the OS environment, simply click the mouse or press a key. See page...

User Manual
Page 22
... Booster allows you can easily monitor the critical components of booting the BIOS. feature of the motherboard BIOS allows automatic re-setting to achieve maximum system performance. ASUS MyLogo 2™ This feature allows you to fine tune the CPU/memory voltage and gradually increase the memory,... Front Side Bus (FSB) and PCI Express frequency at 1MHz increment to the BIOS default settings in Windows environment without the hassle...
... Booster allows you can easily monitor the critical components of booting the BIOS. feature of the motherboard BIOS allows automatic re-setting to achieve maximum system performance. ASUS MyLogo 2™ This feature allows you to fine tune the CPU/memory voltage and gradually increase the memory,... Front Side Bus (FSB) and PCI Express frequency at 1MHz increment to the BIOS default settings in Windows environment without the hassle...

User Manual
Page 36
... - - Any excess memory from the same vendor. • If you install Windows® XP/Vista 32-bit operation system, a total memory of less than 3GB because the address space is recommended. • This motherboard does not support memory modules made up to 16 GB on each slot. 64-...bit Windows® XP Professional x64 Edition Windows® Vista x64 Edition 2-12 Chapter 2: Hardware information This limitation appears on...
... - - Any excess memory from the same vendor. • If you install Windows® XP/Vista 32-bit operation system, a total memory of less than 3GB because the address space is recommended. • This motherboard does not support memory modules made up to 16 GB on each slot. 64-...bit Windows® XP Professional x64 Edition Windows® Vista x64 Edition 2-12 Chapter 2: Hardware information This limitation appears on...
User Manual
Page 48
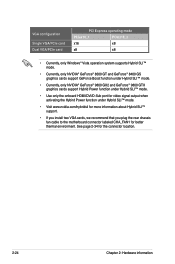
VGA configuration Single VGA/PCIe card Dual VGA/PCIe card PCI Express operating mode PCIex16_1 PCIex16_2 x16 x8 x8 x8 • Currently, only Windows® Vista operation system supports Hybrid SLI™ mode. • Currently, only NVIDIA® GeForce® 8500 GT and GeForce® 8400 GS graphics... Hybrid SLI™ support. • If you install two VGA cards, we recommend that you plug the rear chassis fan cable to the motherboard connector labeled CHA_FAN1 for the connector location. 2-24 Chapter 2: Hardware information See page 2-34 for better thermal environment.
VGA configuration Single VGA/PCIe card Dual VGA/PCIe card PCI Express operating mode PCIex16_1 PCIex16_2 x16 x8 x8 x8 • Currently, only Windows® Vista operation system supports Hybrid SLI™ mode. • Currently, only NVIDIA® GeForce® 8500 GT and GeForce® 8400 GS graphics... Hybrid SLI™ support. • If you install two VGA cards, we recommend that you plug the rear chassis fan cable to the motherboard connector labeled CHA_FAN1 for the connector location. 2-24 Chapter 2: Hardware information See page 2-34 for better thermal environment.
User Manual
Page 55
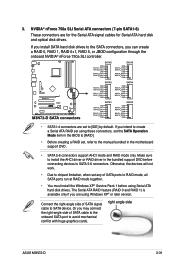
3. right angle side ASUS M3N72-D 2-31 Make sure to install the AHCI driver or RAID driver ...Serial ATA connectors (7-pin SATA1-6) These connectors are using these connectors, set the SATA Operation Mode item in the motherboard support DVD. • SATA 5-6 connectors support AHCI mode and RAID mode only. If you are for the Serial...RAID 5, or JBOD configuration through the onboard NVIDIA® nForce 750a SLI controller. • SATA1-4 connectors are set using Windows XP® or later version. If you install SATA hard disk drives to the SATA connectors, you may connect the ...
3. right angle side ASUS M3N72-D 2-31 Make sure to install the AHCI driver or RAID driver ...Serial ATA connectors (7-pin SATA1-6) These connectors are using these connectors, set the SATA Operation Mode item in the motherboard support DVD. • SATA 5-6 connectors support AHCI mode and RAID mode only. If you are for the Serial...RAID 5, or JBOD configuration through the onboard NVIDIA® nForce 750a SLI controller. • SATA1-4 connectors are set using Windows XP® or later version. If you install SATA hard disk drives to the SATA connectors, you may connect the ...

User Manual
Page 70
... for more than four seconds puts the system to sleep mode or to soft-off mode, depending on the BIOS setting. If you are using Windows® XP: 1. Refer to shut down the computer. 3. Click the Turn Off button to section 4.5 Power Menu in Chapter 4 for less than four ...seconds lets the system enter the soft-off after Windows® shuts down. 3.2.2 Using the dual function power switch While the system is ON, pressing the power switch for details. 3-2 Chapter 3: Powering up 3.2 ...
... for more than four seconds puts the system to sleep mode or to soft-off mode, depending on the BIOS setting. If you are using Windows® XP: 1. Refer to shut down the computer. 3. Click the Turn Off button to section 4.5 Power Menu in Chapter 4 for less than four ...seconds lets the system enter the soft-off after Windows® shuts down. 3.2.2 Using the dual function power switch While the system is ON, pressing the power switch for details. 3-2 Chapter 3: Powering up 3.2 ...
User Manual
Page 73
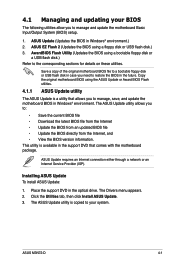
... Utility (Updates the BIOS using a floppy disk or USB flash disk.) 3. This utility is available in Windows® environment.) 2. ASUS M3N72-D 4-1 Copy the original motherboard BIOS using the ASUS Update or Award BIOS Flash utilities. 4.1.1 ASUS Update utility The ASUS Update is copied to your BIOS The following utilities allow you to manage, save, and update the...
... Utility (Updates the BIOS using a floppy disk or USB flash disk.) 3. This utility is available in Windows® environment.) 2. ASUS M3N72-D 4-1 Copy the original motherboard BIOS using the ASUS Update or Award BIOS Flash utilities. 4.1.1 ASUS Update utility The ASUS Update is copied to your BIOS The following utilities allow you to manage, save, and update the...
User Manual
Page 74
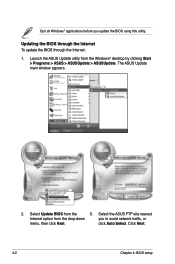
Select Update BIOS from the Windows® desktop by clicking Start > Programs > ASUS > ASUSUpdate > ASUSUpdate. Select the ASUS FTP site nearest Internet option from the drop‑down you update the BIOS using this utility. click Auto Select. Updating the BIOS through the Internet To update the BIOS through the Internet: 1. Quit all Windows® applications before you to avoid network traffic, or menu, then click Next. Click Next. 4-2 Chapter 4: BIOS setup Launch the ASUS Update utility from the 3. The ASUS Update main window appears. 2.
Select Update BIOS from the Windows® desktop by clicking Start > Programs > ASUS > ASUSUpdate > ASUSUpdate. Select the ASUS FTP site nearest Internet option from the drop‑down you update the BIOS using this utility. click Auto Select. Updating the BIOS through the Internet To update the BIOS through the Internet: 1. Quit all Windows® applications before you to avoid network traffic, or menu, then click Next. Click Next. 4-2 Chapter 4: BIOS setup Launch the ASUS Update utility from the 3. The ASUS Update main window appears. 2.

User Manual
Page 75
Updating the BIOS through a BIOS file To update the BIOS through the Internet. The ASUS Update utility is capable of updating itself through a BIOS file: 1. Launch the ASUS Update utility from the Open window, then click Open. 4. M3N72-D.bin M3N72-D ASUS M3N72-D 4-3 Follow the screen instructions to download. From the FTP site, select the BIOS version that you...
Updating the BIOS through a BIOS file To update the BIOS through the Internet. The ASUS Update utility is capable of updating itself through a BIOS file: 1. Launch the ASUS Update utility from the Open window, then click Open. 4. M3N72-D.bin M3N72-D ASUS M3N72-D 4-3 Follow the screen instructions to download. From the FTP site, select the BIOS version that you...
User Manual
Page 76
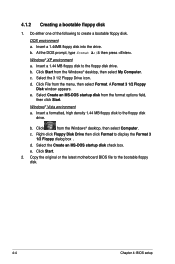
.... Click Start. 2. b. Insert a 1.44MB floppy disk into the drive. Click File from the Windows® desktop, then select My Computer. A Format 3 1/2 Floppy Disk window appears. Copy the original or the latest motherboard BIOS file to the floppy disk drive. Windows® XP environment a. Insert a formatted, high density 1.44 MB floppy disk to the bootable...
.... Click Start. 2. b. Insert a 1.44MB floppy disk into the drive. Click File from the Windows® desktop, then select My Computer. A Format 3 1/2 Floppy Disk window appears. Copy the original or the latest motherboard BIOS file to the floppy disk drive. Windows® XP environment a. Insert a formatted, high density 1.44 MB floppy disk to the bootable...
User Manual
Page 83
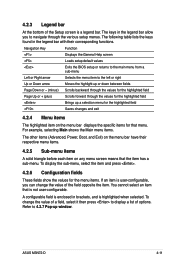
... other items (Advanced, Power, Boot, and Exit) on the menu bar have their corresponding functions. To change the value of the field opposite the item. ASUS M3N72-D 4-11 Refer to the left or right Up or Down arrow Moves the highlight up or down between fields Page Down or - (minus) Scrolls backward... main menu from a sub‑menu Left or Right arrow Selects the menu item to 4.2.7 Pop-up a selection menu for the highlighted field Brings up window. 4.2.3 Legend bar At the bottom of the Setup screen is highlighted when selected.
... other items (Advanced, Power, Boot, and Exit) on the menu bar have their corresponding functions. To change the value of the field opposite the item. ASUS M3N72-D 4-11 Refer to the left or right Up or Down arrow Moves the highlight up or down between fields Page Down or - (minus) Scrolls backward... main menu from a sub‑menu Left or Right arrow Selects the menu item to 4.2.7 Pop-up a selection menu for the highlighted field Brings up window. 4.2.3 Legend bar At the bottom of the Setup screen is highlighted when selected.

User Manual
Page 84
...Select Item →←: Select Menu -/+: Change Value F5: Setup Defaults Enter: Select SubMenu F10: Save and Exit Pop-up window with the configuration options for that item. 4.2.7 Pop-up window Select a menu item then press to display a pop-up menu 4.2.8 General help At the top right corner of the menu ...Tools Exit System Time System Date 15 : 30 : 36 Thu, Apr 6 2006 Legacy Diskette A: [1.44M, 3.5 in.] Primary IDE MasterLegac[ySTD3i2s1k1e2t2tAe] A: Primary IDE Slave [ASUS CDS520/A] SATA1 SATA3 SATA2 SATA4 D71i2.s04aK4bM[[[[l,,NNNNeooood33nnnn..eeee55]]]] in .
...Select Item →←: Select Menu -/+: Change Value F5: Setup Defaults Enter: Select SubMenu F10: Save and Exit Pop-up window with the configuration options for that item. 4.2.7 Pop-up window Select a menu item then press to display a pop-up menu 4.2.8 General help At the top right corner of the menu ...Tools Exit System Time System Date 15 : 30 : 36 Thu, Apr 6 2006 Legacy Diskette A: [1.44M, 3.5 in.] Primary IDE MasterLegac[ySTD3i2s1k1e2t2tAe] A: Primary IDE Slave [ASUS CDS520/A] SATA1 SATA3 SATA2 SATA4 D71i2.s04aK4bM[[[[l,,NNNNeooood33nnnn..eeee55]]]] in .
User Manual
Page 108
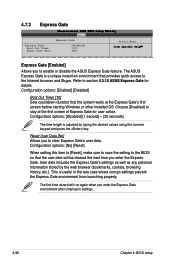
...30 seconds] The time length is a unique instant-on environment that provides quick access to stay at the Express Gate's first screen before starting Windows or other installed OS. Refer to clear Express Gate's user data. The first time wizard will be cleared the next time you enter the.... Configuration options: [No] [Reset] When setting this item to [Reset], make sure to save the setting to enable or disable the ASUS Express Gate feature. 4.7.2 Express Gate Phoenix-Award BIOS CMOS Setup Utility Tools Express Gate Select Menu Express Gate [Enabled] Boot Out Timer [10...
...30 seconds] The time length is a unique instant-on environment that provides quick access to stay at the Express Gate's first screen before starting Windows or other installed OS. Refer to clear Express Gate's user data. The first time wizard will be cleared the next time you enter the.... Configuration options: [No] [Reset] When setting this item to [Reset], make sure to save the setting to enable or disable the ASUS Express Gate feature. 4.7.2 Express Gate Phoenix-Award BIOS CMOS Setup Utility Tools Express Gate Select Menu Express Gate [Enabled] Boot Out Timer [10...
User Manual
Page 109
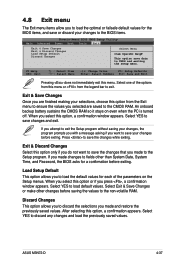
...or make other than System Date, System Time, and Password, the BIOS asks for each of the options from this option, a confirmation window appears. Select one of the parameters on even when the PC is turned off. Load Setup Default This option allows you to the Setup program...to save your changes before saving the values to the CMOS RAM. ASUS M3N72-D 4-37 Exit & Discard Changes Select this menu. When you select this option, a confirmation appears. After selecting this option or if you press , a confirmation window appears. 4.8 Exit menu The Exit menu items allow you to load...
...or make other than System Date, System Time, and Password, the BIOS asks for each of the options from this option, a confirmation window appears. Select one of the parameters on even when the PC is turned off. Load Setup Default This option allows you to the Setup program...to save your changes before saving the values to the CMOS RAM. ASUS M3N72-D 4-37 Exit & Discard Changes Select this menu. When you select this option, a confirmation appears. After selecting this option or if you press , a confirmation window appears. 4.8 Exit menu The Exit menu items allow you to load...
User Manual
Page 113
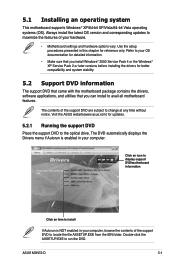
... for updates. 5.2.1 Running the support DVD Place the support DVD to change at any time without notice. Double-click the ASSETUP.EXE to avail all motherboard features. ASUS M3N72-D 5-1 5.1 Installing an operating system This motherboard supports Windows® XP/64-bit XP/Vista/64-bit Vista operating systems (OS).
... for updates. 5.2.1 Running the support DVD Place the support DVD to change at any time without notice. Double-click the ASSETUP.EXE to avail all motherboard features. ASUS M3N72-D 5-1 5.1 Installing an operating system This motherboard supports Windows® XP/64-bit XP/Vista/64-bit Vista operating systems (OS).
User Manual
Page 117
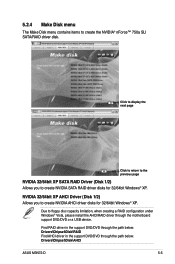
... below : Drivers\Chipset\Disk\AHCI ASUS M3N72-D 5-5 Due to create the NVIDIA® nForce™ 750a SLI SATA/RAID driver disk. 5.2.4 Make Disk menu The Make Disk menu contains items to floppy disc capacity limitation, when creating a RAID configuration under Windows® Vista, please install the ...AHCI/RAID driver through the path below : Drivers\Chipset\Disk\RAID Find AHCI driver in the support DVD/DVD through the motherboard support DVD/DVD or a USB device. Click to ...
... below : Drivers\Chipset\Disk\AHCI ASUS M3N72-D 5-5 Due to create the NVIDIA® nForce™ 750a SLI SATA/RAID driver disk. 5.2.4 Make Disk menu The Make Disk menu contains items to floppy disc capacity limitation, when creating a RAID configuration under Windows® Vista, please install the ...AHCI/RAID driver through the path below : Drivers\Chipset\Disk\RAID Find AHCI driver in the support DVD/DVD through the motherboard support DVD/DVD or a USB device. Click to ...

User Manual
Page 121
...™: 1. Launch the ASUS Update utility. Select Options from the support DVD. The ASUS MyLogo window appears. 6. From the left window pane, select the folder that the BIOS item Full Screen Logo is automatically installed when you wish to [Enabled] if you install the ASUS Update utility from the drop down menu, then click Next. 5. ASUS M3N72-D 5-9
...™: 1. Launch the ASUS Update utility. Select Options from the support DVD. The ASUS MyLogo window appears. 6. From the left window pane, select the folder that the BIOS item Full Screen Logo is automatically installed when you wish to [Enabled] if you install the ASUS Update utility from the drop down menu, then click Next. 5. ASUS M3N72-D 5-9


