
User Manual
Page 4
... 4.1 Managing and updating your BIOS 4-1 4.1.1 ASUS Update utility 4-1 4.1.2 Creating a bootable floppy disk 4-4 4.1.3 ASUS EZ Flash 2 utility 4-5 4.1.4 Updating the BIOS 4-6 4.1.5 Saving the current BIOS file 4-8 4.2 BIOS setup program 4-9 4.2.1 BIOS menu screen 4-10 4.2.2 Menu bar 4-10 4.2.3 Legend bar 4-11 4.2.4 Menu items 4-11 4.2.5 Sub-menu items 4-11 4.2.6 Configuration fields 4-11 4.2.7 Pop-up window 4-12 4.2.8 General help 4-12 4.3 Main...
... 4.1 Managing and updating your BIOS 4-1 4.1.1 ASUS Update utility 4-1 4.1.2 Creating a bootable floppy disk 4-4 4.1.3 ASUS EZ Flash 2 utility 4-5 4.1.4 Updating the BIOS 4-6 4.1.5 Saving the current BIOS file 4-8 4.2 BIOS setup program 4-9 4.2.1 BIOS menu screen 4-10 4.2.2 Menu bar 4-10 4.2.3 Legend bar 4-11 4.2.4 Menu items 4-11 4.2.5 Sub-menu items 4-11 4.2.6 Configuration fields 4-11 4.2.7 Pop-up window 4-12 4.2.8 General help 4-12 4.3 Main...
User Manual
Page 6
...14 5.3.4 ASUS PC Probe II 5-22 5.3.5 ASUS AI Suite 5-28 5.3.6 ASUS AI Gear 2 5-30 5.3.7 ASUS AI Nap 5-31 5.3.8 ASUS Q-Fan 2 5-32 5.3.9 ASUS AI Booster 5-33 5.3.10 ASUS Express Gate... 5-34 5.4 RAID configurations 5-42 5.4.1 RAID definitions 5-42 5.4.2 NVIDIA® RAID configurations 5-43 5.5 Creating a RAID driver disk 5-50 5.5.1 Creating a RAID driver disk without entering the OS.... 5-50 5.5.2 Creating a RAID/SATA driver disk in Windows...
...14 5.3.4 ASUS PC Probe II 5-22 5.3.5 ASUS AI Suite 5-28 5.3.6 ASUS AI Gear 2 5-30 5.3.7 ASUS AI Nap 5-31 5.3.8 ASUS Q-Fan 2 5-32 5.3.9 ASUS AI Booster 5-33 5.3.10 ASUS Express Gate... 5-34 5.4 RAID configurations 5-42 5.4.1 RAID definitions 5-42 5.4.2 NVIDIA® RAID configurations 5-43 5.5 Creating a RAID driver disk 5-50 5.5.1 Creating a RAID driver disk without entering the OS.... 5-50 5.5.2 Creating a RAID/SATA driver disk in Windows...
User Manual
Page 11
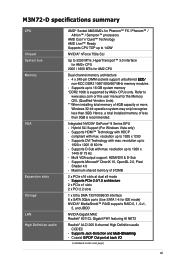
M3N72-D specifications summary CPU Chipset System bus Memory VGA Expansion slots Storage LAN High ...750a SLI Up to 1920 x 1200 @ 60 Hz - Hence, a total installed memory of 4GB capacity or more, Windows 32-bit operation system may onlyl recognize less than 3GB is supported by AM2+ CPUs only. resolution up to 1920 x ...continued on the next page) xi Hybrid SLI Support (For Windows Vista only) - resolution up to 5200 MT/s; Supports Microsoft® DirectX 10, OpenGL 2.0, Pixel Shader 4.0 - resolution up to www.asus.com or this user manual for the Memory QVL (Qualified Vendors...
M3N72-D specifications summary CPU Chipset System bus Memory VGA Expansion slots Storage LAN High ...750a SLI Up to 1920 x 1200 @ 60 Hz - Hence, a total installed memory of 4GB capacity or more, Windows 32-bit operation system may onlyl recognize less than 3GB is supported by AM2+ CPUs only. resolution up to 1920 x ...continued on the next page) xi Hybrid SLI Support (For Windows Vista only) - resolution up to 5200 MT/s; Supports Microsoft® DirectX 10, OpenGL 2.0, Pixel Shader 4.0 - resolution up to www.asus.com or this user manual for the Memory QVL (Qualified Vendors...
User Manual
Page 108
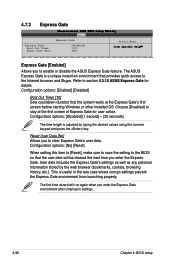
...enable or disable the ASUS Express Gate feature. Refer to stay at the Express Gate's first screen before starting Windows or other installed OS. Reset User Data [No] Allows you enter the Express Gate. Configuration options: [Enabled] [Disabled] Boot Out Timer [10] Sets countdown duration...second] ~ [30 seconds] The time length is adjusted by the web browser (bookmarks, cookies, browsing history, etc.). Choose [Disabled] to section 5.3.10 ASUS Express Gate for user action. Configuration options: [No] [Reset] When setting this item to [Reset], make sure to save the setting to clear ...
...enable or disable the ASUS Express Gate feature. Refer to stay at the Express Gate's first screen before starting Windows or other installed OS. Reset User Data [No] Allows you enter the Express Gate. Configuration options: [Enabled] [Disabled] Boot Out Timer [10] Sets countdown duration...second] ~ [30 seconds] The time length is adjusted by the web browser (bookmarks, cookies, browsing history, etc.). Choose [Disabled] to section 5.3.10 ASUS Express Gate for user action. Configuration options: [No] [Reset] When setting this item to [Reset], make sure to save the setting to clear ...

User Manual
Page 122
When the screen returns to the ASUS Update utility, flash the original BIOS to your desired size by clicking on it. 8. 7. Adjust the boot image to load the new boot logo. 10. After flashing the BIOS, restart the computer to enlarge by selecting a value on the right window pane, select an image to display the new boot logo during POST. 5-10 Chapter 5: Software support When the logo images appear on the Ratio box. 9.
When the screen returns to the ASUS Update utility, flash the original BIOS to your desired size by clicking on it. 8. 7. Adjust the boot image to load the new boot logo. 10. After flashing the BIOS, restart the computer to enlarge by selecting a value on the right window pane, select an image to display the new boot logo during POST. 5-10 Chapter 5: Software support When the logo images appear on the Ratio box. 9.

