
User Manual
Page 4
... Using the dual function power switch 3-2 Chapter 4: BIOS setup 4.1 Managing and updating your BIOS 4-1 4.1.1 ASUS Update utility 4-1 4.1.2 Creating a bootable floppy disk 4-4 4.1.3 ASUS EZ Flash 2 utility 4-5 4.1.4 Updating the BIOS 4-6 4.1.5 Saving the current BIOS file 4-8 4.2 BIOS setup... program 4-9 4.2.1 BIOS menu screen 4-10 4.2.2 Menu bar 4-10 4.2.3 Legend bar 4-11 4.2.4 Menu items 4-11 4.2.5 Sub-menu items 4-11 4.2.6 Configuration fields 4-11 4.2.7 Pop-up window...
... Using the dual function power switch 3-2 Chapter 4: BIOS setup 4.1 Managing and updating your BIOS 4-1 4.1.1 ASUS Update utility 4-1 4.1.2 Creating a bootable floppy disk 4-4 4.1.3 ASUS EZ Flash 2 utility 4-5 4.1.4 Updating the BIOS 4-6 4.1.5 Saving the current BIOS file 4-8 4.2 BIOS setup... program 4-9 4.2.1 BIOS menu screen 4-10 4.2.2 Menu bar 4-10 4.2.3 Legend bar 4-11 4.2.4 Menu items 4-11 4.2.5 Sub-menu items 4-11 4.2.6 Configuration fields 4-11 4.2.7 Pop-up window...
User Manual
Page 6
...14 5.3.4 ASUS PC Probe II 5-22 5.3.5 ASUS AI Suite 5-28 5.3.6 ASUS AI Gear 2 5-30 5.3.7 ASUS AI Nap 5-31 5.3.8 ASUS Q-Fan 2 5-32 5.3.9 ASUS AI Booster 5-33 5.3.10 ASUS Express Gate... 5-34 5.4 RAID configurations 5-42 5.4.1 RAID definitions 5-42 5.4.2 NVIDIA® RAID configurations 5-43 5.5 Creating a RAID driver disk 5-50 5.5.1 Creating a RAID driver disk without entering the OS.... 5-50 5.5.2 Creating a RAID/SATA driver disk in Windows...
...14 5.3.4 ASUS PC Probe II 5-22 5.3.5 ASUS AI Suite 5-28 5.3.6 ASUS AI Gear 2 5-30 5.3.7 ASUS AI Nap 5-31 5.3.8 ASUS Q-Fan 2 5-32 5.3.9 ASUS AI Booster 5-33 5.3.10 ASUS Express Gate... 5-34 5.4 RAID configurations 5-42 5.4.1 RAID definitions 5-42 5.4.2 NVIDIA® RAID configurations 5-43 5.5 Creating a RAID driver disk 5-50 5.5.1 Creating a RAID driver disk without entering the OS.... 5-50 5.5.2 Creating a RAID/SATA driver disk in Windows...
User Manual
Page 11
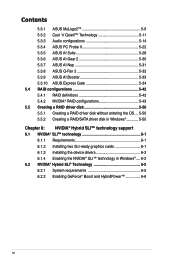
...;I�/�O� (continued on the next page) xi resolution up to www.asus.com or this user manual for AM2 CPU Dual-channel memory architecture - 4 x...;�C���C�/ non-ECC DDR2 1066*/800/667 MHz memory modules - M3N72-D specifications summary CPU Chipset System bus Memory VGA Expansion slots Storage LAN High Definition audio AMD...to 5200 MT/s; Integrated NVIDIA® GeForce® 8 Series GPU - Hybrid SLI Support (For Windows Vista only) - Supports HDMI™ Technology with HDCP compliant with max. Supports DVI Technology with...
...;I�/�O� (continued on the next page) xi resolution up to www.asus.com or this user manual for AM2 CPU Dual-channel memory architecture - 4 x...;�C���C�/ non-ECC DDR2 1066*/800/667 MHz memory modules - M3N72-D specifications summary CPU Chipset System bus Memory VGA Expansion slots Storage LAN High Definition audio AMD...to 5200 MT/s; Integrated NVIDIA® GeForce® 8 Series GPU - Hybrid SLI Support (For Windows Vista only) - Supports HDMI™ Technology with HDCP compliant with max. Supports DVI Technology with...
User Manual
Page 20
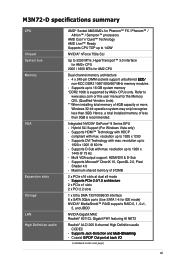
...for details . • The bootup speed depends on system configurations. • ASUS Express Gate supports installation on your needs. S/PDIF digital sound ready This motherboard provides convenient connectivity to analog format, and therefore well preserves signal quality. It ...allows digital audio transferring without entering Windows. See page 4-36 and 5-34 for details. 1-4 Chapter 1: Product Introduction See page 5-30 for details. 1.3.2 ASUS unique features ASUS ...
...for details . • The bootup speed depends on system configurations. • ASUS Express Gate supports installation on your needs. S/PDIF digital sound ready This motherboard provides convenient connectivity to analog format, and therefore well preserves signal quality. It ...allows digital audio transferring without entering Windows. See page 4-36 and 5-34 for details. 1-4 Chapter 1: Product Introduction See page 5-30 for details. 1.3.2 ASUS unique features ASUS ...

User Manual
Page 22
... Bus (FSB) and PCI Express frequency at 1MHz increment to convert your screen. When using ASUS PC Probe II, you to achieve maximum system performance. feature of the motherboard BIOS allows automatic re-setting to open the system chassis and clear the RTC data. eliminates ...the need to the BIOS default settings in Windows environment without the hassle of the computer. ASUS MyLogo 2™ This feature allows you ...
... Bus (FSB) and PCI Express frequency at 1MHz increment to convert your screen. When using ASUS PC Probe II, you to achieve maximum system performance. feature of the motherboard BIOS allows automatic re-setting to open the system chassis and clear the RTC data. eliminates ...the need to the BIOS default settings in Windows environment without the hassle of the computer. ASUS MyLogo 2™ This feature allows you ...

User Manual
Page 36
.../Vista 32-bit operation system, a total memory of less than 3GB because the address space is recommended. • This motherboard does not support memory modules made up to 16 GB on Windows® XP/Vista 32-bit operation system which does not support Physical Address Extension (PAE). • If you install four...
.../Vista 32-bit operation system, a total memory of less than 3GB because the address space is recommended. • This motherboard does not support memory modules made up to 16 GB on Windows® XP/Vista 32-bit operation system which does not support Physical Address Extension (PAE). • If you install four...
User Manual
Page 48
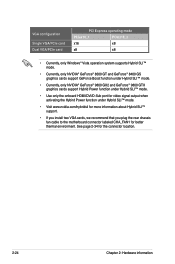
VGA configuration Single VGA/PCIe card Dual VGA/PCIe card PCI Express operating mode PCIex16_1 PCIex16_2 x16 x8 x8 x8 • Currently, only Windows® Vista operation system supports Hybrid SLI™ mode. • Currently, only NVIDIA® GeForce® 8500 GT and GeForce® 8400 GS graphics... Hybrid SLI™ support. • If you install two VGA cards, we recommend that you plug the rear chassis fan cable to the motherboard connector labeled CHA_FAN1 for the connector location. 2-24 Chapter 2: Hardware information See page 2-34 for better thermal environment.
VGA configuration Single VGA/PCIe card Dual VGA/PCIe card PCI Express operating mode PCIex16_1 PCIex16_2 x16 x8 x8 x8 • Currently, only Windows® Vista operation system supports Hybrid SLI™ mode. • Currently, only NVIDIA® GeForce® 8500 GT and GeForce® 8400 GS graphics... Hybrid SLI™ support. • If you install two VGA cards, we recommend that you plug the rear chassis fan cable to the motherboard connector labeled CHA_FAN1 for the connector location. 2-24 Chapter 2: Hardware information See page 2-34 for better thermal environment.
User Manual
Page 55
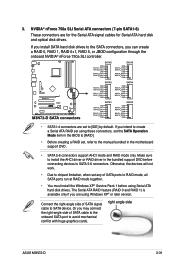
...not work. • Due to chipset limitation, when set to [IDE] by default. right angle side ASUS M3N72-D 2-31 If you install SATA hard disk drives to the SATA connectors, you are using these connectors, ...of SATA ports to RAID mode, all SATA ports run at RAID mode together. • You must install the Windows XP® Service Pack 1 before connecting devices to the manual bundled in the bundled support DVD before using Serial... SATA signal cable to install the AHCI driver or RAID driver in the motherboard support DVD. • SATA 5-6 connectors support AHCI mode and RAID mode only.
...not work. • Due to chipset limitation, when set to [IDE] by default. right angle side ASUS M3N72-D 2-31 If you install SATA hard disk drives to the SATA connectors, you are using these connectors, ...of SATA ports to RAID mode, all SATA ports run at RAID mode together. • You must install the Windows XP® Service Pack 1 before connecting devices to the manual bundled in the bundled support DVD before using Serial... SATA signal cable to install the AHCI driver or RAID driver in the motherboard support DVD. • SATA 5-6 connectors support AHCI mode and RAID mode only.

User Manual
Page 70
.... Pressing the power switch for details. 3-2 Chapter 3: Powering up The power supply should turn off mode regardless of the BIOS setting. If you are using Windows® XP: 1. Refer to section 4.5 Power Menu in Chapter 4 for more than four seconds puts the system to sleep mode or to shut down .... switch While the system is ON, pressing the power switch for less than four seconds lets the system enter the soft-off after Windows® shuts down the computer. 3. Click the Start button then select Turn Off Computer. 2. Click the Start button then select ShutDown. 2.
.... Pressing the power switch for details. 3-2 Chapter 3: Powering up The power supply should turn off mode regardless of the BIOS setting. If you are using Windows® XP: 1. Refer to section 4.5 Power Menu in Chapter 4 for more than four seconds puts the system to sleep mode or to shut down .... switch While the system is ON, pressing the power switch for less than four seconds lets the system enter the soft-off after Windows® shuts down the computer. 3. Click the Start button then select Turn Off Computer. 2. Click the Start button then select ShutDown. 2.
User Manual
Page 73
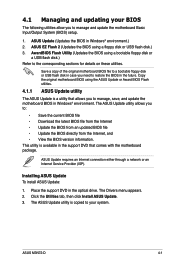
... manage, save, and update the motherboard BIOS in Windows® environment. Click the Utilities tab, then click Install ASUS Update. 3. The ASUS Update utility is available in the support DVD that allows you to restore the BIOS in case you to the corresponding sections for details on these utilities. ASUS M3N72-D 4-1 Save a copy of the original...
... manage, save, and update the motherboard BIOS in Windows® environment. Click the Utilities tab, then click Install ASUS Update. 3. The ASUS Update utility is available in the support DVD that allows you to restore the BIOS in case you to the corresponding sections for details on these utilities. ASUS M3N72-D 4-1 Save a copy of the original...
User Manual
Page 74
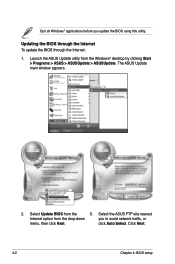
Launch the ASUS Update utility from the 3. Updating the BIOS through the Internet To update the BIOS through the Internet: 1. Select the ASUS FTP site nearest Internet option from the drop‑down you update the BIOS using this utility. click Auto Select. Select Update BIOS from the Windows® desktop by clicking Start > Programs > ASUS > ASUSUpdate > ASUSUpdate. Quit all Windows® applications before you to avoid network traffic, or menu, then click Next. The ASUS Update main window appears. 2. Click Next. 4-2 Chapter 4: BIOS setup
Launch the ASUS Update utility from the 3. Updating the BIOS through the Internet To update the BIOS through the Internet: 1. Select the ASUS FTP site nearest Internet option from the drop‑down you update the BIOS using this utility. click Auto Select. Select Update BIOS from the Windows® desktop by clicking Start > Programs > ASUS > ASUSUpdate > ASUSUpdate. Quit all Windows® applications before you to avoid network traffic, or menu, then click Next. The ASUS Update main window appears. 2. Click Next. 4-2 Chapter 4: BIOS setup

User Manual
Page 75
... drop‑down menu, then click Next. 3. Follow the screen instructions to avail all its features. M3N72-D.bin M3N72-D ASUS M3N72-D 4-3 Follow the screen instructions to download. 4. Launch the ASUS Update utility from the Windows® desktop by clicking Start > Programs > ASUS > ASUSUpdate > ASUSUpdate. From the FTP site, select the BIOS version that you wish to complete...
... drop‑down menu, then click Next. 3. Follow the screen instructions to avail all its features. M3N72-D.bin M3N72-D ASUS M3N72-D 4-3 Follow the screen instructions to download. 4. Launch the ASUS Update utility from the Windows® desktop by clicking Start > Programs > ASUS > ASUSUpdate > ASUSUpdate. From the FTP site, select the BIOS version that you wish to complete...
User Manual
Page 76
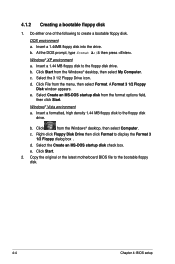
...4: BIOS setup e. Click Start from the format options field, then click Start. c. A Format 3 1/2 Floppy Disk window appears. Click Start. 2. Copy the original or the latest motherboard BIOS file to display the Format 3 1/2 Floppy dialog box . Insert a 1.44MB floppy disk into the drive.... Windows® XP environment a. Select the 3 1/2 Floppy Drive icon. d. Click from the menu, then select Format. ...
...4: BIOS setup e. Click Start from the format options field, then click Start. c. A Format 3 1/2 Floppy Disk window appears. Click Start. 2. Copy the original or the latest motherboard BIOS file to display the Format 3 1/2 Floppy dialog box . Insert a 1.44MB floppy disk into the drive.... Windows® XP environment a. Select the 3 1/2 Floppy Drive icon. d. Click from the menu, then select Format. ...
User Manual
Page 83
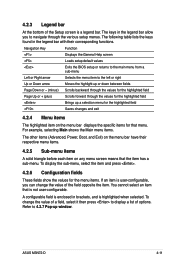
... the specific items for the highlighted field Page Up or + (plus) Scrolls forward through the various setup menus. You cannot select an item that menu. ASUS M3N72-D 4-11 A configurable field is enclosed in the legend bar allow you can change the value of a field, select it then press to navigate through the... when selected. To display the sub-menu, select the item and press . 4.2.6 Configuration fields These fields show the values for the highlighted field Brings up window.
... the specific items for the highlighted field Page Up or + (plus) Scrolls forward through the various setup menus. You cannot select an item that menu. ASUS M3N72-D 4-11 A configurable field is enclosed in the legend bar allow you can change the value of a field, select it then press to navigate through the... when selected. To display the sub-menu, select the item and press . 4.2.6 Configuration fields These fields show the values for the highlighted field Brings up window.

User Manual
Page 84
4.2.7 Pop-up window Select a menu item then press to display a pop-up menu 4.2.8 General help At the top right corner of the menu screen is a brief description of ...:Help ESC: Exit ↑↓ : Select Item →←: Select Menu -/+: Change Value F5: Setup Defaults Enter: Select SubMenu F10: Save and Exit Pop-up window with the configuration options for that item. Main Phoenix-AwardBIOS CMOS Setup Utility Advanced Power Boot Tools Exit System Time System Date 15 : 30 : 36...
4.2.7 Pop-up window Select a menu item then press to display a pop-up menu 4.2.8 General help At the top right corner of the menu screen is a brief description of ...:Help ESC: Exit ↑↓ : Select Item →←: Select Menu -/+: Change Value F5: Setup Defaults Enter: Select SubMenu F10: Save and Exit Pop-up window with the configuration options for that item. Main Phoenix-AwardBIOS CMOS Setup Utility Advanced Power Boot Tools Exit System Time System Date 15 : 30 : 36...
User Manual
Page 108
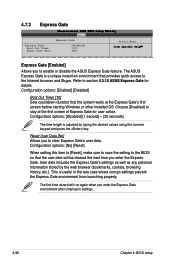
... Internet browser and Skype. The first time wizard will be cleared the next time you to section 5.3.10 ASUS Express Gate for user action. 4.7.2 Express Gate Phoenix-Award BIOS CMOS Setup Utility Tools Express Gate Select Menu...browser (bookmarks, cookies, browsing history, etc.). Reset User Data [No] Allows you enter the Express Gate. The ASUS Express Gate is useful in the rare case where corrupt settings prevent the Express Gate environment from launching properly. Configuration options...to stay at the Express Gate's first screen before starting Windows or other installed OS.
... Internet browser and Skype. The first time wizard will be cleared the next time you to section 5.3.10 ASUS Express Gate for user action. 4.7.2 Express Gate Phoenix-Award BIOS CMOS Setup Utility Tools Express Gate Select Menu...browser (bookmarks, cookies, browsing history, etc.). Reset User Data [No] Allows you enter the Express Gate. The ASUS Express Gate is useful in the rare case where corrupt settings prevent the Express Gate environment from launching properly. Configuration options...to stay at the Express Gate's first screen before starting Windows or other installed OS.
User Manual
Page 109
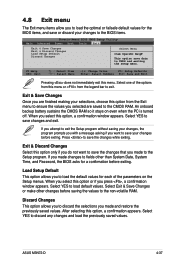
... the values you select this option from the legend bar to exit. Exit & Save Changes Once you are saved to the CMOS RAM. ASUS M3N72-D 4-37 When you selected are finished making your changes to the BIOS items. Phoenix-Award BIOS CMOS Setup Utility Main Advanced Power Boot Tools... a message asking if you made and restore the previously saved values. Press to save or discard your selections, choose this option, a confirmation window appears. Select one of the parameters on even when the PC is turned off. Select YES to discard any changes and load the previously saved...
... the values you select this option from the legend bar to exit. Exit & Save Changes Once you are saved to the CMOS RAM. ASUS M3N72-D 4-37 When you selected are finished making your changes to the BIOS items. Phoenix-Award BIOS CMOS Setup Utility Main Advanced Power Boot Tools... a message asking if you made and restore the previously saved values. Press to save or discard your selections, choose this option, a confirmation window appears. Select one of the parameters on even when the PC is turned off. Select YES to discard any changes and load the previously saved...
User Manual
Page 113
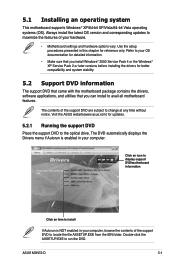
...change at any time without notice. Double-click the ASSETUP.EXE to your hardware. • Motherboard settings and hardware options vary. 5.1 Installing an operating system This motherboard supports Windows® XP/64-bit XP/Vista/64-bit Vista operating systems (OS). Always install the latest...to the optical drive. Click an icon to display support DVD/motherboard information Click an item to install If Autorun is enabled in this chapter for updates. 5.2.1 Running the support DVD Place the support DVD to avail all motherboard features. Refer to run the DVD. ASUS M3N72-D 5-1
...change at any time without notice. Double-click the ASSETUP.EXE to your hardware. • Motherboard settings and hardware options vary. 5.1 Installing an operating system This motherboard supports Windows® XP/64-bit XP/Vista/64-bit Vista operating systems (OS). Always install the latest...to the optical drive. Click an icon to display support DVD/motherboard information Click an item to install If Autorun is enabled in this chapter for updates. 5.2.1 Running the support DVD Place the support DVD to avail all motherboard features. Refer to run the DVD. ASUS M3N72-D 5-1
User Manual
Page 117
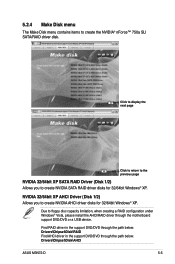
... AHCI driver in the support DVD/DVD through the motherboard support DVD/DVD or a USB device. Find RAID driver in the support DVD/DVD through the path below : Drivers\Chipset\Disk\AHCI ASUS M3N72-D 5-5 Due to create NVIDIA AHCI driver disks for 32/64bit Windows® XP. NVIDIA 32/64bit XP AHCI Driver (Disk...
... AHCI driver in the support DVD/DVD through the motherboard support DVD/DVD or a USB device. Find RAID driver in the support DVD/DVD through the path below : Drivers\Chipset\Disk\AHCI ASUS M3N72-D 5-5 Due to create NVIDIA AHCI driver disks for 32/64bit Windows® XP. NVIDIA 32/64bit XP AHCI Driver (Disk...

User Manual
Page 121
...formats. • The file size should be smaller than 150 K. To launch the ASUS MyLogo2™: 1. Launch the ASUS Update utility. Select Update BIOS from a file from the ASUS website. ASUS M3N72-D 5-9 See section 4.1.4 AFUDOS utility. • Make sure that appears on screen ... from the support DVD. The ASUS MyLogo window appears. 6. Refer to replace system boot logo before flashing BIOS, then click Next. 4. Check the option Launch MyLogo to section 4.1.1 ASUS Update utility for more information. 5.3.1 ASUS MyLogo2™ The ASUS MyLogo2™ utility lets you ...
...formats. • The file size should be smaller than 150 K. To launch the ASUS MyLogo2™: 1. Launch the ASUS Update utility. Select Update BIOS from a file from the ASUS website. ASUS M3N72-D 5-9 See section 4.1.4 AFUDOS utility. • Make sure that appears on screen ... from the support DVD. The ASUS MyLogo window appears. 6. Refer to replace system boot logo before flashing BIOS, then click Next. 4. Check the option Launch MyLogo to section 4.1.1 ASUS Update utility for more information. 5.3.1 ASUS MyLogo2™ The ASUS MyLogo2™ utility lets you ...


