User Manual
Page 4
... computer 3-2 3.2.1 Using the OS shut down function 3-2 3.2.2 Using the dual function power switch 3-2 Chapter 4: BIOS setup 4.1 Managing and updating your BIOS 4-1 4.1.1 ASUS Update utility 4-1 4.1.2 Creating a bootable floppy disk 4-4 4.1.3 ASUS EZ Flash 2 utility 4-5 4.1.4 Updating the BIOS 4-6 4.1.5 Saving the current BIOS file 4-8 4.2 BIOS setup program 4-9 4.2.1 BIOS menu screen 4-10 4.2.2 Menu bar 4-10 4.2.3 Legend bar 4-11 4.2.4 Menu items 4-11 4.2.5 Sub-menu...
... computer 3-2 3.2.1 Using the OS shut down function 3-2 3.2.2 Using the dual function power switch 3-2 Chapter 4: BIOS setup 4.1 Managing and updating your BIOS 4-1 4.1.1 ASUS Update utility 4-1 4.1.2 Creating a bootable floppy disk 4-4 4.1.3 ASUS EZ Flash 2 utility 4-5 4.1.4 Updating the BIOS 4-6 4.1.5 Saving the current BIOS file 4-8 4.2 BIOS setup program 4-9 4.2.1 BIOS menu screen 4-10 4.2.2 Menu bar 4-10 4.2.3 Legend bar 4-11 4.2.4 Menu items 4-11 4.2.5 Sub-menu...
User Manual
Page 9
... guide contains the information you have been added by your dealer. ASUS websites The ASUS website provides updated information on the motherboard. • Chapter 3: Powering up This chapter describes the power up sequence and ways of shutting down the system. • Chapter 4: BIOS setup This chapter tells how to perform when installing system components...
... guide contains the information you have been added by your dealer. ASUS websites The ASUS website provides updated information on the motherboard. • Chapter 3: Powering up This chapter describes the power up sequence and ways of shutting down the system. • Chapter 4: BIOS setup This chapter tells how to perform when installing system components...
User Manual
Page 13
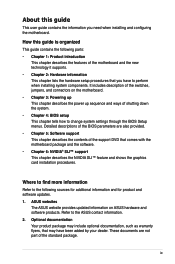
...voltage at 1 MHz increment Overclocking protection: - ASUS C.P.R. (CPU Parameter Recall) Uses 100% All High-quality Conductive Polymer Capacitors! M3N-HT Deluxe Series specifications summary ASUS exclusive overclocking features Other features Rear panel I/O ports...ATX 12V Power connector System Panel (Q-Connector) (continued on the next page) xiii AI Overclocking (Intelligent CPU frequency tuner) - Memory tuning from 533 MHz up to 600 MHz at 1 MHz increment - ASUS MyLogo 2™ Multi-language BIOS 1 x PS/2 keyboard port (purple) 1 x S/PDIF Out (Coaxial + Optical) 1 x HDMI...
...voltage at 1 MHz increment Overclocking protection: - ASUS C.P.R. (CPU Parameter Recall) Uses 100% All High-quality Conductive Polymer Capacitors! M3N-HT Deluxe Series specifications summary ASUS exclusive overclocking features Other features Rear panel I/O ports...ATX 12V Power connector System Panel (Q-Connector) (continued on the next page) xiii AI Overclocking (Intelligent CPU frequency tuner) - Memory tuning from 533 MHz up to 600 MHz at 1 MHz increment - ASUS MyLogo 2™ Multi-language BIOS 1 x PS/2 keyboard port (purple) 1 x S/PDIF Out (Coaxial + Optical) 1 x HDMI...
User Manual
Page 14
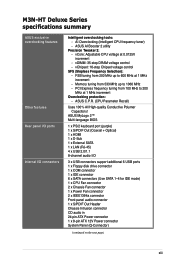
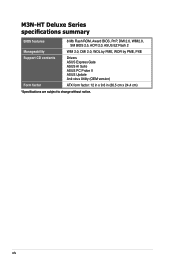
M3N-HT Deluxe Series specifications summary BIOS features 8 Mb Flash ROM, Award BIOS, PnP, DMI 2.0, WfM2.0, SM BIOS 2.5, ACPI 2.0, ASUS EZ Flash 2 Manageability WfM 2.0, DMI 2.0, WOL by PME, WOR by PME, PXE Support CD contents Drivers ASUS Express Gate ASUS AI Suite ASUS PC Probe II ASUS Update Anti-virus Utility (OEM version) Form factor ATX form factor: 12 in x 9.6 in (30.5 cm x 24.4 cm) *Specifications are subject to change without notice. xiv
M3N-HT Deluxe Series specifications summary BIOS features 8 Mb Flash ROM, Award BIOS, PnP, DMI 2.0, WfM2.0, SM BIOS 2.5, ACPI 2.0, ASUS EZ Flash 2 Manageability WfM 2.0, DMI 2.0, WOL by PME, WOR by PME, PXE Support CD contents Drivers ASUS Express Gate ASUS AI Suite ASUS PC Probe II ASUS Update Anti-virus Utility (OEM version) Form factor ATX form factor: 12 in x 9.6 in (30.5 cm x 24.4 cm) *Specifications are subject to change without notice. xiv
User Manual
Page 23
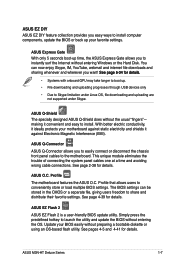
... it convenient and easy to install. Simply press the predefined hotkey to boot up your favorite settings. ASUS O.C. Profile that allows users to the motherboard. The BIOS settings can now enjoy Skype, IM, YouTube, webmail and internet file downloads and sharing whenever and wherever... 4-39 for details. See pages 4-5 and 4-41 for details. ASUS EZ Flash 2 ASUS EZ Flash 2 is a user-friendly BIOS update utility. ASUS M3N-HT Deluxe Series 1-7 ASUS Express Gate With only 5 seconds boot-up time, the ASUS Express Gate allows you to easily connect or disconnect the chassis front panel...
... it convenient and easy to install. Simply press the predefined hotkey to boot up your favorite settings. ASUS O.C. Profile that allows users to the motherboard. The BIOS settings can now enjoy Skype, IM, YouTube, webmail and internet file downloads and sharing whenever and wherever... 4-39 for details. See pages 4-5 and 4-41 for details. ASUS EZ Flash 2 ASUS EZ Flash 2 is a user-friendly BIOS update utility. ASUS M3N-HT Deluxe Series 1-7 ASUS Express Gate With only 5 seconds boot-up time, the ASUS Express Gate allows you to easily connect or disconnect the chassis front panel...
User Manual
Page 24
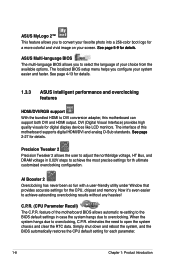
... user to adjust the northbridge voltage, HT Bus, and DRAM voltage in case the...The interface of this motherboard can support both DVI and HDMI output. When the system hangs due to DVI conversion adapter, this motherboard supports digital HDMI/DVI and analog ...motherboard BIOS allows automatic re-setting to the BIOS default settings in 0.02V steps to achieve astounding overclocking results without any hassles! Simply shut down and reboot the system, and the BIOS automatically restores the CPU default setting for the CPU, chipset and memory. ASUS Multi-language BIOS The multi-language BIOS...
... user to adjust the northbridge voltage, HT Bus, and DRAM voltage in case the...The interface of this motherboard can support both DVI and HDMI output. When the system hangs due to DVI conversion adapter, this motherboard supports digital HDMI/DVI and analog ...motherboard BIOS allows automatic re-setting to the BIOS default settings in 0.02V steps to achieve astounding overclocking results without any hassles! Simply shut down and reboot the system, and the BIOS automatically restores the CPU default setting for the CPU, chipset and memory. ASUS Multi-language BIOS The multi-language BIOS...
User Manual
Page 29
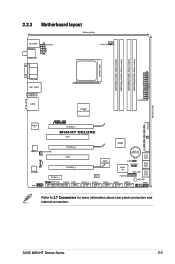
ASUS M3N-HT Deluxe Series 2-3 30.5cm (12.0in) 2.2.3 Motherboard layout 24.4cm (9.6in) KB_USB56 EATX12V CPU_FAN SPDIF_O12 DDR DIMM_A1 (64bit, 240-pin module) DDR DIMM_A2 (64bit, 240-pin module) DDR DIMM_B1 (64bit...LAN1_USB12 ESATA AUDIO nVidia® nForce 780a SLI EATXPWR PRI_IDE Attansic F1 PCIEX16_1 M3N-HT DELUXE PCI1 88SE6111 CHA_FAN2 PCIEX16_2 PCI2 CD AD1988B AAFP PCIEX16_3 PCIEX1_1 SPDIF_OUT FLOPPY COM1 SF200 Lithium Cell CMOS Power SATA1 SATA2 agere L-FW3227 BIOS IE1394_2 IE1394_1 USB34 SATA3 SATA4 CLRTC CHASSIS Super I/O CHA_FAN1 SATA5 SATA6 PWR_FAN ...
ASUS M3N-HT Deluxe Series 2-3 30.5cm (12.0in) 2.2.3 Motherboard layout 24.4cm (9.6in) KB_USB56 EATX12V CPU_FAN SPDIF_O12 DDR DIMM_A1 (64bit, 240-pin module) DDR DIMM_A2 (64bit, 240-pin module) DDR DIMM_B1 (64bit...LAN1_USB12 ESATA AUDIO nVidia® nForce 780a SLI EATXPWR PRI_IDE Attansic F1 PCIEX16_1 M3N-HT DELUXE PCI1 88SE6111 CHA_FAN2 PCIEX16_2 PCI2 CD AD1988B AAFP PCIEX16_3 PCIEX1_1 SPDIF_OUT FLOPPY COM1 SF200 Lithium Cell CMOS Power SATA1 SATA2 agere L-FW3227 BIOS IE1394_2 IE1394_1 USB34 SATA3 SATA4 CLRTC CHASSIS Super I/O CHA_FAN1 SATA5 SATA6 PWR_FAN ...
User Manual
Page 46
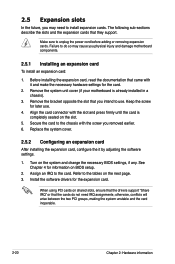
... the card is already installed in a chassis). 3. See Chapter 4 for the expansion card. Install the software drivers for information on BIOS setup. 2. Remove the bracket opposite the slot that they support. Assign an IRQ to unplug the power cord before adding or removing ...software settings. 1. Keep the screw for the card. 2. 2.5 Expansion slots In the future, you may cause you physical injury and damage motherboard components. 2.5.1 Installing an expansion card To install an expansion card: 1. Before installing the expansion card, read the documentation that the cards do...
... the card is already installed in a chassis). 3. See Chapter 4 for the expansion card. Install the software drivers for information on BIOS setup. 2. Remove the bracket opposite the slot that they support. Assign an IRQ to unplug the power cord before adding or removing ...software settings. 1. Keep the screw for the card. 2. 2.5 Expansion slots In the future, you may cause you physical injury and damage motherboard components. 2.5.1 Installing an expansion card To install an expansion card: 1. Before installing the expansion card, read the documentation that the cards do...
User Manual
Page 50
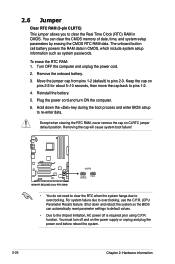
... is required prior using C.P.R. The onboard button cell battery powers the RAM data in CMOS. Hold down and reboot the system so the BIOS can clear the CMOS memory of date, time, and system setup parameters by erasing the CMOS RTC RAM data. Shut down the key ...during the boot process and enter BIOS setup to the chipset limitation, AC power off and on pins 2-3 for about 5~10 seconds, then move the cap back to pins 1-2. 4. Removing the cap will cause system boot failure! M3N-HT DELUXE M3N-HT DELUXE Clear RTC RAM CLRTC 12 23 Disable (Default) ...
... is required prior using C.P.R. The onboard button cell battery powers the RAM data in CMOS. Hold down and reboot the system so the BIOS can clear the CMOS memory of date, time, and system setup parameters by erasing the CMOS RTC RAM data. Shut down the key ...during the boot process and enter BIOS setup to the chipset limitation, AC power off and on pins 2-3 for about 5~10 seconds, then move the cap back to pins 1-2. 4. Removing the cap will cause system boot failure! M3N-HT DELUXE M3N-HT DELUXE Clear RTC RAM CLRTC 12 23 Disable (Default) ...
User Manual
Page 56
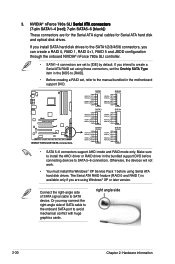
M3N-HT DELUXE M3N-HT DELUXE SATA connectors SATA1 GND RSATA_TXP1 RSATA_TXN1 GND RSATA_RXP1 RSATA_RXN1 GND SATA2 GND ... only. Or you intend to create a Serial ATA RAID set using these connectors, set the Onchip SATA Type item in the BIOS to [RAID]. • Before creating a RAID set to SATA 5-6 connectors. The Serial ATA RAID feature (RAID 0 and...-angle side of SATA cable to the onboard SATA port to install the AHCI driver or RAID driver in the motherboard support DVD. Make sure to avoid mechanical conflict with huge graphics cards. Otherwise, the devices will not work. ...
M3N-HT DELUXE M3N-HT DELUXE SATA connectors SATA1 GND RSATA_TXP1 RSATA_TXN1 GND RSATA_RXP1 RSATA_RXN1 GND SATA2 GND ... only. Or you intend to create a Serial ATA RAID set using these connectors, set the Onchip SATA Type item in the BIOS to [RAID]. • Before creating a RAID set to SATA 5-6 connectors. The Serial ATA RAID feature (RAID 0 and...-angle side of SATA cable to the onboard SATA port to install the AHCI driver or RAID driver in the motherboard support DVD. Make sure to avoid mechanical conflict with huge graphics cards. Otherwise, the devices will not work. ...

User Manual
Page 62
... one end of the motherboard's high-definition audio capability. • If you want to connect a high-definition front panel audio module to this connector, set the Front Panel Support Type item in the BIOS setup to [AC97]. Chapter 2: Hardware information GND PRESENCE# SENSE1_RETUR SENSE2_RETUR AGND NC NC NC 2-36 M3N-HT DELUXE AAFP PIN 1 PIN...
... one end of the motherboard's high-definition audio capability. • If you want to connect a high-definition front panel audio module to this connector, set the Front Panel Support Type item in the BIOS setup to [AC97]. Chapter 2: Hardware information GND PRESENCE# SENSE1_RETUR SENSE2_RETUR AGND NC NC NC 2-36 M3N-HT DELUXE AAFP PIN 1 PIN...
User Manual
Page 64
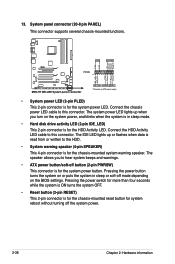
.... The system power LED lights up or flashes when data is read from or written to hear system beeps and warnings. • ATX power button/soft-off button (2-pin PWRSW) This connector is for the chassis-mounted reset button for the system power LED. Connect the...off the system power. 2-38 Chapter 2: Hardware information Pressing the power button turns the system on the BIOS settings. PWR Ground Reset Ground M3N-HT DELUXE System panel connector IDE_LED PWRSW RESET * Requires an ATX power supply • System power LED (2-pin PLED) This 2-pin connector is for the HDD Activity...
.... The system power LED lights up or flashes when data is read from or written to hear system beeps and warnings. • ATX power button/soft-off button (2-pin PWRSW) This connector is for the chassis-mounted reset button for the system power LED. Connect the...off the system power. 2-38 Chapter 2: Hardware information Pressing the power button turns the system on the BIOS settings. PWR Ground Reset Ground M3N-HT DELUXE System panel connector IDE_LED PWRSW RESET * Requires an ATX power supply • System power LED (2-pin PLED) This 2-pin connector is for the HDD Activity...
User Manual
Page 69
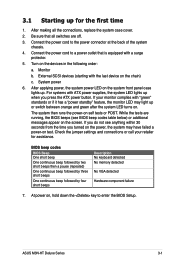
... or POST. System power 6. The system then runs the power-on test. If you do not see BIOS beep codes table below) or additional messages appear on the chain) c. ASUS M3N-HT Deluxe Series 3-1 Check the jumper settings and connections or call your monitor complies with the last device on the screen... back of the system chassis. 4. Monitor b. 3.1 Starting up for assistance. After making all switches are running, the BIOS beeps (see anything within 30 seconds from the time you press the ATX power button. After applying power, the system power LED on , hold down the key to enter the...
... or POST. System power 6. The system then runs the power-on test. If you do not see BIOS beep codes table below) or additional messages appear on the chain) c. ASUS M3N-HT Deluxe Series 3-1 Check the jumper settings and connections or call your monitor complies with the last device on the screen... back of the system chassis. 4. Monitor b. 3.1 Starting up for assistance. After making all switches are running, the BIOS beeps (see anything within 30 seconds from the time you press the ATX power button. After applying power, the system power LED on , hold down the key to enter the...
User Manual
Page 70
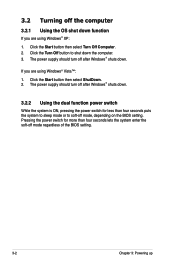
... Start button then select ShutDown. 2. Pressing the power switch for less than four seconds lets the system enter the soft-off mode regardless of the BIOS setting. 3-2 Chapter 3: Powering up Click the Start button then select Turn Off Computer. 2. 3.2 Turning off the computer 3.2.1 Using the OS shut ...Windows® Vista™: 1. If you are using Windows® XP: 1. Click the Turn Off button to soft-off mode, depending on the BIOS setting. The power supply should turn off after Windows® shuts down. 3.2.2 Using the dual function power switch While the system is ON, pressing...
... Start button then select ShutDown. 2. Pressing the power switch for less than four seconds lets the system enter the soft-off mode regardless of the BIOS setting. 3-2 Chapter 3: Powering up Click the Start button then select Turn Off Computer. 2. 3.2 Turning off the computer 3.2.1 Using the OS shut ...Windows® Vista™: 1. If you are using Windows® XP: 1. Click the Turn Off button to soft-off mode, depending on the BIOS setting. The power supply should turn off after Windows® shuts down. 3.2.2 Using the dual function power switch While the system is ON, pressing...
User Manual
Page 71
Detailed descriptions of the BIOS parameters are also provided. Chapter 4: 4 BIOS setup This chapter tells how to change the system settings through the BIOS Setup menus.
Detailed descriptions of the BIOS parameters are also provided. Chapter 4: 4 BIOS setup This chapter tells how to change the system settings through the BIOS Setup menus.
User Manual
Page 72
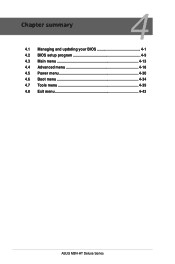
Chapter summary 4 4.1 Managing and updating your BIOS 4-1 4.2 BIOS setup program 4-9 4.3 Main menu 4-13 4.4 Advanced menu 4-18 4.5 Power menu 4-30 4.6 Boot menu 4-34 4.7 Tools menu 4-39 4.8 Exit menu 4-43 ASUS M3N-HT Deluxe Series
Chapter summary 4 4.1 Managing and updating your BIOS 4-1 4.2 BIOS setup program 4-9 4.3 Main menu 4-13 4.4 Advanced menu 4-18 4.5 Power menu 4-30 4.6 Boot menu 4-34 4.7 Tools menu 4-39 4.8 Exit menu 4-43 ASUS M3N-HT Deluxe Series
User Manual
Page 73
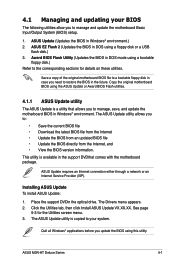
... The ASUS Update is available in Windows® environment. Installing ASUS Update To install ASUS Update: 1. Click the Utilities tab, then click Install ASUS Update VX.XX.XX. Copy the original motherboard BIOS using this utility. The ASUS Update utility allows you to manage, save, and update the motherboard BIOS in the support DVDthat comes with the motherboard package. ASUS M3N-HT Deluxe Series...
... The ASUS Update is available in Windows® environment. Installing ASUS Update To install ASUS Update: 1. Click the Utilities tab, then click Install ASUS Update VX.XX.XX. Copy the original motherboard BIOS using this utility. The ASUS Update utility allows you to manage, save, and update the motherboard BIOS in the support DVDthat comes with the motherboard package. ASUS M3N-HT Deluxe Series...
User Manual
Page 74
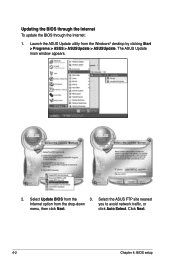
Select Update BIOS from the drop‑down you to avoid network traffic, or menu, then click Next. Select the ASUS FTP site nearest Internet option from the 3. Click Next. 4-2 Chapter 4: BIOS setup The ASUS Update main window appears. 2. click Auto Select. Launch the ASUS Update utility from the Windows® desktop by clicking Start > Programs > ASUS > ASUSUpdate > ASUSUpdate. Updating the BIOS through the Internet To update the BIOS through the Internet: 1.
Select Update BIOS from the drop‑down you to avoid network traffic, or menu, then click Next. Select the ASUS FTP site nearest Internet option from the 3. Click Next. 4-2 Chapter 4: BIOS setup The ASUS Update main window appears. 2. click Auto Select. Launch the ASUS Update utility from the Windows® desktop by clicking Start > Programs > ASUS > ASUSUpdate > ASUSUpdate. Updating the BIOS through the Internet To update the BIOS through the Internet: 1.

User Manual
Page 75
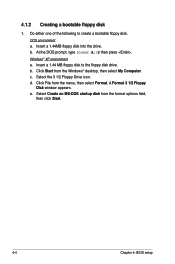
...;down menu, then click Next. 3. Locate the BIOS file from the Open window, then click Open. 4. The ASUS Update main window appears. 2. Follow the screen instructions to avail all its features. Updating the BIOS through a BIOS file To update the BIOS through the Internet. 4. M3NHTDLX.BIN M3NHTDLX ASUS M3N-HT Deluxe Series 4-3 Always update the utility to complete the...
...;down menu, then click Next. 3. Locate the BIOS file from the Open window, then click Open. 4. The ASUS Update main window appears. 2. Follow the screen instructions to avail all its features. Updating the BIOS through a BIOS file To update the BIOS through the Internet. 4. M3NHTDLX.BIN M3NHTDLX ASUS M3N-HT Deluxe Series 4-3 Always update the utility to complete the...
User Manual
Page 76
... to create a bootable floppy disk. Select the 3 1/2 Floppy Drive icon. e. 4.1.2 Creating a bootable floppy disk 1. Click File from the format options field, then click Start. 4-4 Chapter 4: BIOS setup A Format 3 1/2 Floppy Disk window appears. Select Create an MS-DOS startup disk from the menu, then select Format. Do either one of the following...
... to create a bootable floppy disk. Select the 3 1/2 Floppy Drive icon. e. 4.1.2 Creating a bootable floppy disk 1. Click File from the format options field, then click Start. 4-4 Chapter 4: BIOS setup A Format 3 1/2 Floppy Disk window appears. Select Create an MS-DOS startup disk from the menu, then select Format. Do either one of the following...


