
User Manual
Page 1
Motherboard
Motherboard

User Manual
Page 1
M2N68-AM SE Motherboard
M2N68-AM SE Motherboard
User Manual
Page 3
Contents Notices...v Safety information vi About this guide vi M2N68-AM SE specifications summary viii Chapter 1: Product introduction 1.1 Before you proceed 1-1 1.2 Motherboard overview 1-2 1.2.1 Motherboard layout 1-2 1.2.2 Layout contents 1-2 1.3 Central Processing Unit (CPU 1-3 1.4 System memory 1-3 1.4.1 Overview 1-3 1.4.2 Memory configurations 1-4 1.5 Expansion... connectors 1-10 1.8 Software support 1-15 1.8.1 Installing an operating system 1-15 1.8.2 Support DVD information 1-15 1.8.3 ASUS Express Gate 1-16 Chapter 2: BIOS information 2.1 Managing and updating your BIOS...
Contents Notices...v Safety information vi About this guide vi M2N68-AM SE specifications summary viii Chapter 1: Product introduction 1.1 Before you proceed 1-1 1.2 Motherboard overview 1-2 1.2.1 Motherboard layout 1-2 1.2.2 Layout contents 1-2 1.3 Central Processing Unit (CPU 1-3 1.4 System memory 1-3 1.4.1 Overview 1-3 1.4.2 Memory configurations 1-4 1.5 Expansion... connectors 1-10 1.8 Software support 1-15 1.8.1 Installing an operating system 1-15 1.8.2 Support DVD information 1-15 1.8.3 ASUS Express Gate 1-16 Chapter 2: BIOS information 2.1 Managing and updating your BIOS...

User Manual
Page 5
... receiving antenna. • Increase the separation between the equipment and receiver. • Connect the equipment to radio communications. If this equipment. DO NOT throw the motherboard in the Radio Interference Regulations of the Canadian Department of the FCC Rules.
... receiving antenna. • Increase the separation between the equipment and receiver. • Connect the equipment to radio communications. If this equipment. DO NOT throw the motherboard in the Radio Interference Regulations of the Canadian Department of the FCC Rules.

User Manual
Page 6
... contact your retailer. Detailed descriptions of the electrical outlet you add a device. • Before connecting or removing signal cables from the motherboard, ensure that came with the product, contact a qualified service technician or your dealer immediately. • To avoid short circuits, keep ...power supply is organized This guide contains the following parts: • Chapter 1: Product introduction This chapter describes the features of the motherboard and the new technology it supports. • Chapter 2: BIOS information This chapter tells how to fix it , carefully read ...
... contact your retailer. Detailed descriptions of the electrical outlet you add a device. • Before connecting or removing signal cables from the motherboard, ensure that came with the product, contact a qualified service technician or your dealer immediately. • To avoid short circuits, keep ...power supply is organized This guide contains the following parts: • Chapter 1: Product introduction This chapter describes the features of the motherboard and the new technology it supports. • Chapter 2: BIOS information This chapter tells how to fix it , carefully read ...
User Manual
Page 10
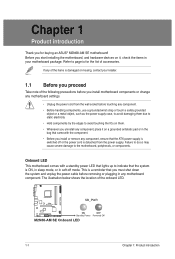
... below shows the location of accessories. Refer to page ix for buying an ASUS® M2N68-AM SE motherboard! Failure to do so may cause severe damage to the motherboard, peripherals, or components. M2N68-AM SE SB_PWR ON OFF Standby Power Powered Off M2N68-AM SE Onboard LED 1-1 Chapter 1: Product introduction Chapter 1 Product introduction Thank you start installing the...
... below shows the location of accessories. Refer to page ix for buying an ASUS® M2N68-AM SE motherboard! Failure to do so may cause severe damage to the motherboard, peripherals, or components. M2N68-AM SE SB_PWR ON OFF Standby Power Powered Off M2N68-AM SE Onboard LED 1-1 Chapter 1: Product introduction Chapter 1 Product introduction Thank you start installing the...
User Manual
Page 11
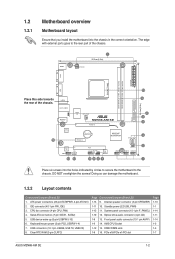
... the holes indicated by circles to secure the motherboard to the rear part of the chassis. 16 15 USB34 24.4cm(9.6in) LAN1_USB12 AUDIO RTL 8201CP USBPW1-4 Super I/O CPU_FAN M2N68-AM SE PCIEX16 Lithium Cell CMOS Power PCIEX1_1 NVIDIA® MCP68PVNT PRI_IDE SATA1 SATA2 ALC 662 CD AAFP 13 12 PCI1 F_PANEL SB_PWR... chassis. DO NOT overtighten the screws! System panel connector (10-1 pin F_PANEL) 1-10 12. PCIe x16/PCIe x1/PCI slot Page 1-13 1-1 1-14 1-11 1-14 1-3 1-3 1-7 ASUS M2N68-AM SE 1-2
... the holes indicated by circles to secure the motherboard to the rear part of the chassis. 16 15 USB34 24.4cm(9.6in) LAN1_USB12 AUDIO RTL 8201CP USBPW1-4 Super I/O CPU_FAN M2N68-AM SE PCIEX16 Lithium Cell CMOS Power PCIEX1_1 NVIDIA® MCP68PVNT PRI_IDE SATA1 SATA2 ALC 662 CD AAFP 13 12 PCI1 F_PANEL SB_PWR... chassis. DO NOT overtighten the screws! System panel connector (10-1 pin F_PANEL) 1-10 12. PCIe x16/PCIe x1/PCI slot Page 1-13 1-1 1-14 1-11 1-14 1-3 1-3 1-7 ASUS M2N68-AM SE 1-2

User Manual
Page 12
...is designed for the AMD Opteron™ processor. The figure illustrates the location of the DDR2 DIMM sockets: DIMM_A1 DIMM_B1 M2N68-AM SE M2N68-AM SE 240-pin DDR2 DIMM sockets Channel Channel A Channel B Sockets DIMM_A1 DIMM_B1 1-3 Chapter 1: Product introduction DDR2 DIMMs are ...notched differently to the 184-pin DDR DIMM. 1.3 Central Processing Unit (CPU) This motherboard comes with two Double Data Rate 2 (DDR2) Dual Inline...
...is designed for the AMD Opteron™ processor. The figure illustrates the location of the DDR2 DIMM sockets: DIMM_A1 DIMM_B1 M2N68-AM SE M2N68-AM SE 240-pin DDR2 DIMM sockets Channel Channel A Channel B Sockets DIMM_A1 DIMM_B1 1-3 Chapter 1: Product introduction DDR2 DIMMs are ...notched differently to the 184-pin DDR DIMM. 1.3 Central Processing Unit (CPU) This motherboard comes with two Double Data Rate 2 (DDR2) Dual Inline...
User Manual
Page 13
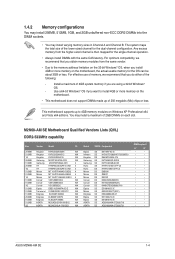
... for the OS can be about 3GB or less. Install a maximum of 256 megabits (Mb) chips or less. M2N68-AM SE Motherboard Qualified Vendors Lists (QVL) DDR2-533MHz capability Size 256MB 512MB 1G 256MB 512MB 256MB 1G 512MB 512MB 1G 512MB 512MB 1G...• • • • • • • • • • • • • • • • • • • • • ASUS M2N68-AM SE 1-4 Use a 64-bit Windows® OS if you are using a 32-bit Windows® OS. - Any excess memory from the same vendor. • Due to...
... for the OS can be about 3GB or less. Install a maximum of 256 megabits (Mb) chips or less. M2N68-AM SE Motherboard Qualified Vendors Lists (QVL) DDR2-533MHz capability Size 256MB 512MB 1G 256MB 512MB 256MB 1G 512MB 512MB 1G 512MB 512MB 1G...• • • • • • • • • • • • • • • • • • • • • ASUS M2N68-AM SE 1-4 Use a 64-bit Windows® OS if you are using a 32-bit Windows® OS. - Any excess memory from the same vendor. • Due to...
User Manual
Page 16
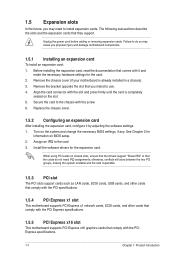
...that comply with the slot and press firmly until the card is already installed in a chassis). 3. Remove the chassis cover (if your motherboard is completely seated on BIOS setup. 2. otherwise, conflicts will arise between the two PCI groups, making the system unstable and the card...it and make the necessary hardware settings for information on the slot. 5. 1.5 Expansion slots In the future, you physical injury and damage motherboard components. 1.5.1 Installing an expansion card To install an expansion card: 1. When using PCI cards on the system and change the necessary ...
...that comply with the slot and press firmly until the card is already installed in a chassis). 3. Remove the chassis cover (if your motherboard is completely seated on BIOS setup. 2. otherwise, conflicts will arise between the two PCI groups, making the system unstable and the card...it and make the necessary hardware settings for information on the slot. 5. 1.5 Expansion slots In the future, you physical injury and damage motherboard components. 1.5.1 Installing an expansion card To install an expansion card: 1. When using PCI cards on the system and change the necessary ...
User Manual
Page 20
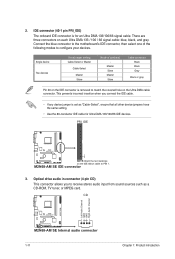
...cable. • If any device jumper is set as a CD-ROM, TV tuner, or MPEG card. Connect the blue connector to the motherboard's IDE connector, then select one of device(s) - This prevents incorrect insertion when you to PIN 1. Master Slave Master Slave Cable connector Black...onboard IDE connector is removed to configure your devices. CD Right Audio Channel Left Audio Channel GND GND M2N68-AM SE M2N68-AM SE Internal audio connector 1-11 Chapter 1: Product introduction PRI_IDE PIN1 M2N68-AM SE NOTE:Orient the red markings on each Ultra DMA 133 / 100 / 66 signal cable: blue, ...
...cable. • If any device jumper is set as a CD-ROM, TV tuner, or MPEG card. Connect the blue connector to the motherboard's IDE connector, then select one of device(s) - This prevents incorrect insertion when you to PIN 1. Master Slave Master Slave Cable connector Black...onboard IDE connector is removed to configure your devices. CD Right Audio Channel Left Audio Channel GND GND M2N68-AM SE M2N68-AM SE Internal audio connector 1-11 Chapter 1: Product introduction PRI_IDE PIN1 M2N68-AM SE NOTE:Orient the red markings on each Ultra DMA 133 / 100 / 66 signal cable: blue, ...
User Manual
Page 21
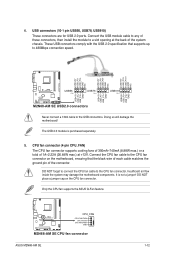
... for USB 2.0 ports. Doing so will damage the motherboard! DO NOT place a jumper cap on the motherboard, ensuring that supports up to any of the connector. M2N68-AM SE CPU_FAN CPU FAN PWM CPU FAN IN CPU FAN PWR GND M2N68-AM SE CPU fan connector ASUS M2N68-AM SE 1-12 These USB connectors comply with the USB 2.0 specification...
... for USB 2.0 ports. Doing so will damage the motherboard! DO NOT place a jumper cap on the motherboard, ensuring that supports up to any of the connector. M2N68-AM SE CPU_FAN CPU FAN PWM CPU FAN IN CPU FAN PWR GND M2N68-AM SE CPU fan connector ASUS M2N68-AM SE 1-12 These USB connectors comply with the USB 2.0 specification...

User Manual
Page 24
.... 1-15 Chapter 1: Product introduction Double-click ASSETUP.EXE to get all motherboard features. Click an icon to display Support DVD/ motherboard information Click an item to change at www.asus.com for better compatibility and system stability. 1.8.2 Support DVD information The Support... DVD that comes with the motherboard package contains drivers, software applications, and utilities...
.... 1-15 Chapter 1: Product introduction Double-click ASSETUP.EXE to get all motherboard features. Click an icon to display Support DVD/ motherboard information Click an item to change at www.asus.com for better compatibility and system stability. 1.8.2 Support DVD information The Support... DVD that comes with the motherboard package contains drivers, software applications, and utilities...
User Manual
Page 25
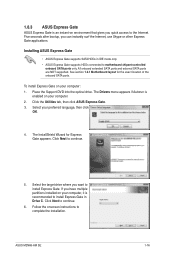
... the onscreen instructions to continue. 5. The Drivers menu appears if Autorun is an instant-on environment that gives you want to motherboard chipset-controlled onboard SATA ports only. ASUS M2N68-AM SE 1-16 All onboard extended SATA ports and external SATA ports are NOT supported. To install Express Gate on your preferred language, then...
... the onscreen instructions to continue. 5. The Drivers menu appears if Autorun is an instant-on environment that gives you want to motherboard chipset-controlled onboard SATA ports only. ASUS M2N68-AM SE 1-16 All onboard extended SATA ports and external SATA ports are NOT supported. To install Express Gate on your preferred language, then...
User Manual
Page 27
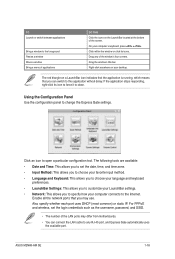
... allows you to customize your computer's keyboard, press + . ASUS M2N68-AM SE 1-18 Click within the window or click its icon to force it to the Internet. Drag the window's title bar. On your LaunchBar settings. • Network: This allows you may differ from motherboards. • You can switch to this application without delay...
... allows you to customize your computer's keyboard, press + . ASUS M2N68-AM SE 1-18 Click within the window or click its icon to force it to the Internet. Drag the window's title bar. On your LaunchBar settings. • Network: This allows you may differ from motherboards. • You can switch to this application without delay...
User Manual
Page 30
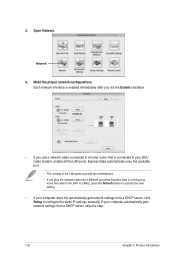
... that is running (e.g. Make the proper network configurations. Express Gate automatically uses the available port. • The number of the LAN ports vary with the motherboard. • If you use a network cable connected to your DSL/ cable modem, enable all the LAN ports.
... that is running (e.g. Make the proper network configurations. Express Gate automatically uses the available port. • The number of the LAN ports vary with the motherboard. • If you use a network cable connected to your DSL/ cable modem, enable all the LAN ports.
User Manual
Page 31
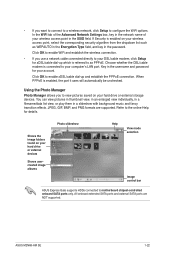
... cable connected directly to your hard drive or external devices Shows usercreated image albums Photo slideshow Help View mode selection Image control bar ASUS Express Gate supports HDDs connected to as WEPAUTO in the Encryption Type field, and key in the username and password for details. ...filename/data list view, or play them in the SSID field. ASUS M2N68-AM SE 1-22 Key in the password. Choose whether the DSL/cable modem is connected to enable xDSL/cable dial-up which is referred to motherboard chipset-controlled onboard SATA ports only. Click OK to your wireless access...
... cable connected directly to your hard drive or external devices Shows usercreated image albums Photo slideshow Help View mode selection Image control bar ASUS Express Gate supports HDDs connected to as WEPAUTO in the Encryption Type field, and key in the username and password for details. ...filename/data list view, or play them in the SSID field. ASUS M2N68-AM SE 1-22 Key in the password. Choose whether the DSL/cable modem is connected to enable xDSL/cable dial-up which is referred to motherboard chipset-controlled onboard SATA ports only. Click OK to your wireless access...

User Manual
Page 33
.... Select Update BIOS from the Internet a. Follow the onscreen instructions to launch the ASUS Update utility. 2. Chapter 2 BIOS information 2.1 Managing and updating your BIOS Save a copy of the original motherboard BIOS file to a USB flash disk in case you to avoid network traffic, ...BIOS version you update the BIOS using the ASUS Update utility. 2.1.1 ASUS Update utility The ASUS Update is available in the Support DVD that allows you to manage, save, and update the motherboard BIOS in Windows® environment. • ASUS Update requires an Internet connection either of ...
.... Select Update BIOS from the Internet a. Follow the onscreen instructions to launch the ASUS Update utility. 2. Chapter 2 BIOS information 2.1 Managing and updating your BIOS Save a copy of the original motherboard BIOS file to a USB flash disk in case you to avoid network traffic, ...BIOS version you update the BIOS using the ASUS Update utility. 2.1.1 ASUS Update utility The ASUS Update is available in the Support DVD that allows you to manage, save, and update the motherboard BIOS in Windows® environment. • ASUS Update requires an Internet connection either of ...
User Manual
Page 35
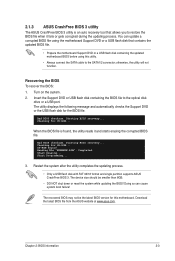
...www.asus.com. Chapter 2: BIOS information 2-3 Insert the Support DVD or USB flash disk containing the BIOS file to restore the BIOS file when it and starts erasing the corrupted BIOS file. Starting BIOS recovery... Doing so can update a corrupted BIOS file using the motherboard ...file is an auto recovery tool that contains the updated BIOS file. • Prepare the motherboard Support DVD or a USB flash disk containing the updated motherboard BIOS before using this motherboard. The utility displays the following message and automatically checks the Support DVD or the USB flash...
...www.asus.com. Chapter 2: BIOS information 2-3 Insert the Support DVD or USB flash disk containing the BIOS file to restore the BIOS file when it and starts erasing the corrupted BIOS file. Starting BIOS recovery... Doing so can update a corrupted BIOS file using the motherboard ...file is an auto recovery tool that contains the updated BIOS file. • Prepare the motherboard Support DVD or a USB flash disk containing the updated motherboard BIOS before using this motherboard. The utility displays the following message and automatically checks the Support DVD or the USB flash...

User Manual
Page 36
...] Allows you to set the system date. 2-4 ASUS M2N68-AM SE Use [+] or [-] to set the system time. 2.3.2 System Date [Day xx/xx/xxxx] Allows you an overview of the following procedures: • Restart using this section are installing a motherboard, reconfiguring your system, or prompted to ensure optimum ...2008] IDE Configuration Use [ENTER], [TAB] or [SHIFT-TAB] to your screen. • Visit the ASUS website at www.asus.com to download the latest BIOS file for this motherboard. 2.3 Main menu When you enter the BIOS Setup program, the Main menu screen appears, giving you to ...
...] Allows you to set the system date. 2-4 ASUS M2N68-AM SE Use [+] or [-] to set the system time. 2.3.2 System Date [Day xx/xx/xxxx] Allows you an overview of the following procedures: • Restart using this section are installing a motherboard, reconfiguring your system, or prompted to ensure optimum ...2008] IDE Configuration Use [ENTER], [TAB] or [SHIFT-TAB] to your screen. • Visit the ASUS website at www.asus.com to download the latest BIOS file for this motherboard. 2.3 Main menu When you enter the BIOS Setup program, the Main menu screen appears, giving you to ...


