
K8 series Quick Setup Guide
Page 4
... the I /O shield. 5. Before you install the motherboard, study the configuration of your chassis into it. 1. Screw the standoffs that the openings for the keyboard and mouse ports are aligned to most standard chassis.
... the I /O shield. 5. Before you install the motherboard, study the configuration of your chassis into it. 1. Screw the standoffs that the openings for the keyboard and mouse ports are aligned to most standard chassis.

K8 series Quick Setup Guide
Page 9
9 Connect the peripherals and accessories Power strip AC Keyboard Digital Speakers PDA cradle PS/2 S/PDIF Serial Storage device USB Microphone Mic Speakers Line Out PS/2 Mouse Parallel Printer IEEE 1394 RJ-45 Line in Mobile HDD Switch Hub Tape recorder VGA CRT Monitor DVI Flat Panel Monitor 9 English
9 Connect the peripherals and accessories Power strip AC Keyboard Digital Speakers PDA cradle PS/2 S/PDIF Serial Storage device USB Microphone Mic Speakers Line Out PS/2 Mouse Parallel Printer IEEE 1394 RJ-45 Line in Mobile HDD Switch Hub Tape recorder VGA CRT Monitor DVI Flat Panel Monitor 9 English

K8V User Manual
Page 10
x K8V specifications summary Back panel I/O Internal I/O BIOS features Industry standard Manageability Power Requirement Form Factor Support CD contents 1 x Parallel port 1 x Serial port 1 x PS/2 keyboard port 1 x PS/2 mouse port 4 x USB 2.0 ports 1 x S/PDIF out 1 x... RJ-45 port Line In/Line Out/Microphone ports 2 x USB 2.0 connector for 4 additional USB ports CPU/Chassis fan connectors 20-pin/4-pin ATX 12V power connectors CD/AUX connectors S/PDIF out connector GAME/MIDI connector 4Mb Flash EEPROM AMI BIOS with enhanced ACPI, PnP, DMI2.0, ASUS...
x K8V specifications summary Back panel I/O Internal I/O BIOS features Industry standard Manageability Power Requirement Form Factor Support CD contents 1 x Parallel port 1 x Serial port 1 x PS/2 keyboard port 1 x PS/2 mouse port 4 x USB 2.0 ports 1 x S/PDIF out 1 x... RJ-45 port Line In/Line Out/Microphone ports 2 x USB 2.0 connector for 4 additional USB ports CPU/Chassis fan connectors 20-pin/4-pin ATX 12V power connectors CD/AUX connectors S/PDIF out connector GAME/MIDI connector 4Mb Flash EEPROM AMI BIOS with enhanced ACPI, PnP, DMI2.0, ASUS...

K8V User Manual
Page 16
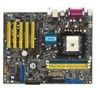
PRI_IDE 1.5 Motherboard overview 1.5.1 Motherboard layout PS/2KBMS T: Mouse B: Keyboard KBPWR ATX12V 24.5cm (9.6in) CPU_FAN SPDIF_O DDR DIMM1 (64 bit,184-pin module) DDR DIMM2 (64 bit,184-pin module) DDR DIMM3 (64 ...-45 Top:Line In Center:Line Out Below:Mic In VIA K8T800 Marvell Gigabit LAN SPDIF_OUT CD ADI AD1980 AUX FP_AUDIO Accelerated Graphics Port (AGP) K8V PCI1 CLRTC PCI2 PCI3 CR2032 3V Lithium Cell CMOS Power PCI4 ® PCI5 USBPWR56 USBPWR78 USB78 USB56 RAID Promise PDC20376 FLOPPY VIA VT8237 SATA2 PRI_RAID...
PRI_IDE 1.5 Motherboard overview 1.5.1 Motherboard layout PS/2KBMS T: Mouse B: Keyboard KBPWR ATX12V 24.5cm (9.6in) CPU_FAN SPDIF_O DDR DIMM1 (64 bit,184-pin module) DDR DIMM2 (64 bit,184-pin module) DDR DIMM3 (64 ...-45 Top:Line In Center:Line Out Below:Mic In VIA K8T800 Marvell Gigabit LAN SPDIF_OUT CD ADI AD1980 AUX FP_AUDIO Accelerated Graphics Port (AGP) K8V PCI1 CLRTC PCI2 PCI3 CR2032 3V Lithium Cell CMOS Power PCI4 ® PCI5 USBPWR56 USBPWR78 USB78 USB56 RAID Promise PDC20376 FLOPPY VIA VT8237 SATA2 PRI_RAID...

K8V User Manual
Page 23
... is keyed with the chassis. 2. Align a DIMM on the socket such that it fits in place and the DIMM is properly seated. ASUS K8V motherboard 1-13 DO NOT force a DIMM into the socket until the retaining clips snap back in only one direction. Assign an IRQ to...Real Time Clock 9* 4 IRQ holder for PCI steering 10* 5 IRQ holder for PCI steering 11* 6 IRQ holder for PCI steering 12* 7 PS/2 Compatible Mouse Port 13 8 Numeric Data Processor 14* 9 Primary IDE Channel 15* 10 Secondary IDE Channel * These IRQs are usually available for BIOS information. 3. Turn on...
... is keyed with the chassis. 2. Align a DIMM on the socket such that it fits in place and the DIMM is properly seated. ASUS K8V motherboard 1-13 DO NOT force a DIMM into the socket until the retaining clips snap back in only one direction. Assign an IRQ to...Real Time Clock 9* 4 IRQ holder for PCI steering 10* 5 IRQ holder for PCI steering 11* 6 IRQ holder for PCI steering 12* 7 PS/2 Compatible Mouse Port 13 8 Numeric Data Processor 14* 9 Primary IDE Channel 15* 10 Secondary IDE Channel * These IRQs are usually available for BIOS information. 3. Turn on...

K8V User Manual
Page 28
... 2.0 devices. 9. These two 4-pin Universal Serial Bus (USB) ports are available for a PS/2 keyboard. 1-18 Chapter 1: Product introduction This 9-pin COM1 port is for a PS/2 mouse. 2. PS/2 keyboard port. RJ-45 port. This Line In (light blue) jack connects a tape player or other devices. 3. In 6-channel mode, the function of this... of this jack becomes Front Speaker Out. 6. USB 2.0 ports 1 and 2. Line In jack. This purple connector is for serial devices. 10. USB 2.0 ports 3 and 4. PS/2 mouse port.
... 2.0 devices. 9. These two 4-pin Universal Serial Bus (USB) ports are available for a PS/2 keyboard. 1-18 Chapter 1: Product introduction This 9-pin COM1 port is for a PS/2 mouse. 2. PS/2 keyboard port. RJ-45 port. This Line In (light blue) jack connects a tape player or other devices. 3. In 6-channel mode, the function of this... of this jack becomes Front Speaker Out. 6. USB 2.0 ports 1 and 2. Line In jack. This purple connector is for serial devices. 10. USB 2.0 ports 3 and 4. PS/2 mouse port.

K8V User Manual
Page 63
...Enabled]. Configuration options: [Disabled] [1 Min] [2 Min] [4 Min] [8 Min] [10 Min] [20 Min] [30 Min] [40 Min] [50 Min] [60 Min] ASUS K8V Motherboard 2-27 When set to go into off or on state whatever the system state before the AC power loss. Configuration options: [Power Off] [Power... Hard Disk Power Down Mode Power On By RTC Alarm Power On External Modems Power On PCI Device Power On PS/2 Keyboard Power On PS/2 Mouse [Enabled] [On/Off] [C3] [Last State] [Disabled] [Disabled] [Suspend] [Enabled] [Disabled] [Disabled] [Disabled] [Disabled] [Disabled] Power Management/APM [...
...Enabled]. Configuration options: [Disabled] [1 Min] [2 Min] [4 Min] [8 Min] [10 Min] [20 Min] [30 Min] [40 Min] [50 Min] [60 Min] ASUS K8V Motherboard 2-27 When set to go into off or on state whatever the system state before the AC power loss. Configuration options: [Power Off] [Power... Hard Disk Power Down Mode Power On By RTC Alarm Power On External Modems Power On PCI Device Power On PS/2 Keyboard Power On PS/2 Mouse [Enabled] [On/Off] [C3] [Last State] [Disabled] [Disabled] [Suspend] [Enabled] [Disabled] [Disabled] [Disabled] [Disabled] [Disabled] Power Management/APM [...

K8V User Manual
Page 64
... feature requires an ATX power supply that provides at which the hard disk goes on the +5VSB lead. Configuration options: [Disabled] [Enabled] Power On PS/2 Mouse [Disabled] When set to [Enabled], this item is set values. Configuration options: [Disabled] [Enabled] 2-28 Chapter 2: BIOS Setup Configuration options: [Disabled] [..., and RTC Alarm Second appear with set to select the video power down mode. When this parameter allows you to use the PS/2 mouse to generate a wake event. Turning an external modem off and then back on while the computer is in minute at least 1A on...
... feature requires an ATX power supply that provides at which the hard disk goes on the +5VSB lead. Configuration options: [Disabled] [Enabled] Power On PS/2 Mouse [Disabled] When set to [Enabled], this item is set values. Configuration options: [Disabled] [Enabled] 2-28 Chapter 2: BIOS Setup Configuration options: [Disabled] [..., and RTC Alarm Second appear with set to select the video power down mode. When this parameter allows you to use the PS/2 mouse to generate a wake event. Turning an external modem off and then back on while the computer is in minute at least 1A on...

K8V User Manual
Page 67
...[Enabled] Hit 'DEL' Message Display [Enabled] When set to enable or disable support for option ROM. Configuration options: [Disabled] [Enabled] ASUS K8V Motherboard 2-31 Configuration options: [Force BIOS] [Keep Current] Bootup Num-Lock [On] Allows you wish to run Setup" during POST. Configuration ...pressed when error occurs. 2.6.2 Boot Settings Configuration Boot Settings Configuration Quick Boot Full Screen Logo AddOn ROM Display Mode Bootup Num-Lock PS/2 Mouse Support Wait for 'F1' If Error Hit 'DEL' Message Display Interrupt 19 Capture [Enabled] [Enabled] [Force BIOS] [On] [...
...[Enabled] Hit 'DEL' Message Display [Enabled] When set to enable or disable support for option ROM. Configuration options: [Disabled] [Enabled] ASUS K8V Motherboard 2-31 Configuration options: [Force BIOS] [Keep Current] Bootup Num-Lock [On] Allows you wish to run Setup" during POST. Configuration ...pressed when error occurs. 2.6.2 Boot Settings Configuration Boot Settings Configuration Quick Boot Full Screen Logo AddOn ROM Display Mode Bootup Num-Lock PS/2 Mouse Support Wait for 'F1' If Error Hit 'DEL' Message Display Interrupt 19 Capture [Enabled] [Enabled] [Force BIOS] [On] [...

K8V User Manual
Page 75
...LED is equipped with a BIOS-based audio playback feature called Instant Music Lite. A "beep" indicates this case, power up features (LAN, keyboard, mouse, USB) are deactivated. See section "1.10 Connectors" for this feature. Otherwise, you don't have only one optical drive (either CD-ROM, DVD-...the system wake-up the system using the Instant Music Lite function keys. 2. BIOS automatically detects and displays the installed drive type. 5. ASUS K8V motherboard 3-5 If you have to set Instant Music CDROM item. This feature is supported by pressing the key during the Power On Self...
...LED is equipped with a BIOS-based audio playback feature called Instant Music Lite. A "beep" indicates this case, power up features (LAN, keyboard, mouse, USB) are deactivated. See section "1.10 Connectors" for this feature. Otherwise, you don't have only one optical drive (either CD-ROM, DVD-...the system wake-up the system using the Instant Music Lite function keys. 2. BIOS automatically detects and displays the installed drive type. 5. ASUS K8V motherboard 3-5 If you have to set Instant Music CDROM item. This feature is supported by pressing the key during the Power On Self...
