
K8V SE Deluxe User's Manual
Page 4
... time 3-1 3.2 Powering off the computer 3-2 3.2.1 Using the OS shut down function 3-2 3.2.2 Using the dual function power switch 3-2 3.3 ASUS POST Reporter 3-3 3.3.1 Vocal POST messages 3-3 3.3.2 Winbond Voice Editor 3-5 Chapter 4: BIOS setup 4.1 Managing and updating your BIOS 4-1 4.1.1... with CrashFree BIOS 2 ....... 4-5 4.1.6 ASUS Update 4-7 4.2 BIOS Setup program 4-9 4.2.1 BIOS menu screen 4-10 4.2.2 Menu bar 4-10 4.2.3 Navigation keys 4-10 4.2.4 Menu items 4-11 4.2.5 Sub-menu items 4-11 4.2.6 Configuration fields 4-11 4.2.7 Pop-up window 4-11 4.2.8 Scroll bar 4-11 4.2.9 ...
... time 3-1 3.2 Powering off the computer 3-2 3.2.1 Using the OS shut down function 3-2 3.2.2 Using the dual function power switch 3-2 3.3 ASUS POST Reporter 3-3 3.3.1 Vocal POST messages 3-3 3.3.2 Winbond Voice Editor 3-5 Chapter 4: BIOS setup 4.1 Managing and updating your BIOS 4-1 4.1.1... with CrashFree BIOS 2 ....... 4-5 4.1.6 ASUS Update 4-7 4.2 BIOS Setup program 4-9 4.2.1 BIOS menu screen 4-10 4.2.2 Menu bar 4-10 4.2.3 Navigation keys 4-10 4.2.4 Menu items 4-11 4.2.5 Sub-menu items 4-11 4.2.6 Configuration fields 4-11 4.2.7 Pop-up window 4-11 4.2.8 Scroll bar 4-11 4.2.9 ...

K8V SE Deluxe User's Manual
Page 19
... function keys and enjoy the music! ASUS K8V SE Deluxe motherboard 1-5 Simply reboot the system and the BIOS shows the previous setting so users can easily update the system BIOS even before loading the operating system. See pages 4-28, 5-9. ASUS Multi-language BIOS The multi-language BIOS allows you to Windows™. No need to overclocking...
... function keys and enjoy the music! ASUS K8V SE Deluxe motherboard 1-5 Simply reboot the system and the BIOS shows the previous setting so users can easily update the system BIOS even before loading the operating system. See pages 4-28, 5-9. ASUS Multi-language BIOS The multi-language BIOS allows you to Windows™. No need to overclocking...

K8V SE Deluxe User's Manual
Page 46
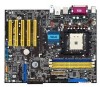
SATA2 K8V SATA1 ® K8V SE Deluxe SATA Connectors Important notes on SATA RAID configuration. 2-24 Chapter 2: Hardware information The current Serial ATA interface allows up to section "5.7 VIA RAID Configurations" for details on Serial ATA solution: • The Serial ATA cable is not available in this motherboard. • Install Windows® XP Service Pack 1 when...
SATA2 K8V SATA1 ® K8V SE Deluxe SATA Connectors Important notes on SATA RAID configuration. 2-24 Chapter 2: Hardware information The current Serial ATA interface allows up to section "5.7 VIA RAID Configurations" for details on Serial ATA solution: • The Serial ATA cable is not available in this motherboard. • Install Windows® XP Service Pack 1 when...

K8V SE Deluxe User's Manual
Page 58
... down option button is ON, pressing the power switch for more than four seconds puts the system to sleep mode or to soft-off after Windows® shuts down. 3.2.2 Using the dual function power switch While the system is selected, then click the OK button to shut down the computer. 3.... 3.2 Powering off the computer 3.2.1 Using the OS shut down function If you are using Windows® XP: 1. The power supply should turn off mode, depending on the BIOS setting. Pressing the power switch for less than four seconds lets the...
... down option button is ON, pressing the power switch for more than four seconds puts the system to sleep mode or to soft-off after Windows® shuts down. 3.2.2 Using the dual function power switch While the system is selected, then click the OK button to shut down the computer. 3.... 3.2 Powering off the computer 3.2.1 Using the OS shut down function If you are using Windows® XP: 1. The power supply should turn off mode, depending on the BIOS setting. Pressing the power switch for less than four seconds lets the...

K8V SE Deluxe User's Manual
Page 61
...Editor software allows you to use the Winbond Voice Editor. To avoid conflicts, do not run the Winbond Voice Editor while running the ASUS PC Probe. Default Messages POST Events Playing the default wave files To play the default wave files, simply click on a POST ...desktop, or from the Windows Start menu, select Programs->Winbond Voice Editor->Voice Editor. Launching the program Launch the program either from the utilities menu of the screen, then click the Play button. Follow these steps to customize the vocal POST messages. ASUS K8V SE Deluxe motherboard 3-5 Install the ...
...Editor software allows you to use the Winbond Voice Editor. To avoid conflicts, do not run the Winbond Voice Editor while running the ASUS PC Probe. Default Messages POST Events Playing the default wave files To play the default wave files, simply click on a POST ...desktop, or from the Windows Start menu, select Programs->Winbond Voice Editor->Voice Editor. Launching the program Launch the program either from the utilities menu of the screen, then click the Play button. Follow these steps to customize the vocal POST messages. ASUS K8V SE Deluxe motherboard 3-5 Install the ...

K8V SE Deluxe User's Manual
Page 62
Click Yes on the Voice Editor screen. A window showing the available languages appears. 2. Click the Write button to file size constraints. 3. The event messages for the language you selected . 3-6 Chapter 3: Powering up The next time you boot your desired language then click Open. Changing the default language 1. Select your computer, the POST messages are announced in the language that you selected appear on the confirmation window that appears. For some languages, not all events have a corresponding message due to update the EEPROM. 4. Click the Load button.
Click Yes on the Voice Editor screen. A window showing the available languages appears. 2. Click the Write button to file size constraints. 3. The event messages for the language you selected . 3-6 Chapter 3: Powering up The next time you boot your desired language then click Open. Changing the default language 1. Select your computer, the POST messages are announced in the language that you selected appear on the confirmation window that appears. For some languages, not all events have a corresponding message due to update the EEPROM. 4. Click the Load button.

K8V SE Deluxe User's Manual
Page 63
... done. The total compressed size for all the wave files must not exceed 1Mbit, so make your messages as short as Windows Recorder, to record your messages. 4. Launch the Voice Editor and take note of the list of POST events on the leftmost column of the screen. 2. ... keep them small. ASUS K8V SE Deluxe motherboard 3-7 It is not in the selection or if you wish to record your own POST messages to replace the pre-installed wave files, you save your POST messages. 1. Save the messages as wave files (.WAV). Follow these steps to display the Add Wave File window. 6. For example...
... done. The total compressed size for all the wave files must not exceed 1Mbit, so make your messages as short as Windows Recorder, to record your messages. 4. Launch the Voice Editor and take note of the list of POST events on the leftmost column of the screen. 2. ... keep them small. ASUS K8V SE Deluxe motherboard 3-7 It is not in the selection or if you wish to record your own POST messages to replace the pre-installed wave files, you save your POST messages. 1. Save the messages as wave files (.WAV). Follow these steps to display the Add Wave File window. 6. For example...

K8V SE Deluxe User's Manual
Page 64
...file and copy into the EEPROM. 14. Type a file name with a .flh extension, then click Save. 13. When done, click Save. The Event Sound Editor window appears. 8. Click the Write button to the Voice Editor screen. 10. Click Yes on the Voice Editor screen, then click the Edit button. 7. Select a POST... event on the confirmation window that the files exceed the total allowable size, do one or all of the following. • Try to make them shorter • Save the wave...
...file and copy into the EEPROM. 14. Type a file name with a .flh extension, then click Save. 13. When done, click Save. The Event Sound Editor window appears. 8. Click the Write button to the Voice Editor screen. 10. Click Yes on the Voice Editor screen, then click the Edit button. 7. Select a POST... event on the confirmation window that the files exceed the total allowable size, do one or all of the following. • Try to make them shorter • Save the wave...

K8V SE Deluxe User's Manual
Page 67
... case you to the corresponding sections for this motherboard using the ASUS Update or AFUDOS utilities. ASUS K8V SE Deluxe motherboard 4-1 From your BIOS The following to restore the BIOS in a Windows® environment. Windows® 98SE/ME/2000/XP environment a. b. ASUS AFUDOS - Updates the BIOS using Windows® XP, select Create an MS-DOS startup disk from the...
... case you to the corresponding sections for this motherboard using the ASUS Update or AFUDOS utilities. ASUS K8V SE Deluxe motherboard 4-1 From your BIOS The following to restore the BIOS in a Windows® environment. Windows® 98SE/ME/2000/XP environment a. b. ASUS AFUDOS - Updates the BIOS using Windows® XP, select Create an MS-DOS startup disk from the...
K8V SE Deluxe User's Manual
Page 73
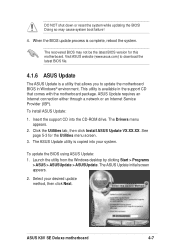
... (ISP). Click the Utilities tab, then click Install ASUS Update VX.XX.XX. Launch the utility from the Windows desktop by clicking Start > Programs > ASUS > ASUSUpdate > ASUSUpdate. When the BIOS update process is a utility that comes with the motherboard package. See page 5-3 for this motherboard. ASUS K8V SE Deluxe motherboard 4-7 This utility is available in the support...
... (ISP). Click the Utilities tab, then click Install ASUS Update VX.XX.XX. Launch the utility from the Windows desktop by clicking Start > Programs > ASUS > ASUSUpdate > ASUSUpdate. When the BIOS update process is a utility that comes with the motherboard package. See page 5-3 for this motherboard. ASUS K8V SE Deluxe motherboard 4-7 This utility is available in the support...

K8V SE Deluxe User's Manual
Page 74
If you select updating/ downloading from a file, a window prompts you to download. Select the file, click Save, then follow the screen instructions to complete the update process. 6. 3. Click Next. 5. Follow the instructions on the succeeding screens to complete the update process. 4-8 Chapter 4: BIOS Setup Click Next. 4. If you select the option to update the BIOS from the Internet, select the ASUS FTP site nearest you to locate the file. From the FTP site, select the BIOS version that you wish to avoid network traffic, or choose Auto Select.
If you select updating/ downloading from a file, a window prompts you to download. Select the file, click Save, then follow the screen instructions to complete the update process. 6. 3. Click Next. 5. Follow the instructions on the succeeding screens to complete the update process. 4-8 Chapter 4: BIOS Setup Click Next. 4. If you select the option to update the BIOS from the Internet, select the ASUS FTP site nearest you to locate the file. From the FTP site, select the BIOS version that you wish to avoid network traffic, or choose Auto Select.

K8V SE Deluxe User's Manual
Page 77
... press . 4.2.6 Configuration fields These fields show the values for the menu items. If an item is not user-configurable. Press Pop-up window with a sub-menu on the menu bar have their respective menu items. Main menu items Use [ENTER], [TAB] or [SHIFT-TAB]... or [-] to malfunction. Configure DRAM Timing by a solid triangle before the item. ASUS K8V SE Deluxe motherboard 4-11 Refer to "4.2.7 Pop-up window." 4.2.7 Pop-up window Select a menu item then press Enter to display a pop-up window Scroll bar Up/Down arrow keys or PageUp/ PageDown keys to display the other items...
... press . 4.2.6 Configuration fields These fields show the values for the menu items. If an item is not user-configurable. Press Pop-up window with a sub-menu on the menu bar have their respective menu items. Main menu items Use [ENTER], [TAB] or [SHIFT-TAB]... or [-] to malfunction. Configure DRAM Timing by a solid triangle before the item. ASUS K8V SE Deluxe motherboard 4-11 Refer to "4.2.7 Pop-up window." 4.2.7 Pop-up window Select a menu item then press Enter to display a pop-up window Scroll bar Up/Down arrow keys or PageUp/ PageDown keys to display the other items...

K8V SE Deluxe User's Manual
Page 104
... default values. Press to the Setup program. When you select this option or if you select this option, a confirmation appears. After selecting this option, a confirmation window appears. When you press , a confirmation...
... default values. Press to the Setup program. When you select this option or if you select this option, a confirmation appears. After selecting this option, a confirmation window appears. When you press , a confirmation...
K8V SE Deluxe User's Manual
Page 107
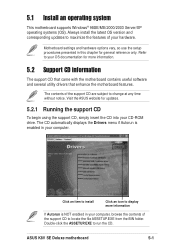
5.1 Install an operating system This motherboard supports Windows® 98SE/ME/2000/2003 Server/XP operating systems (OS). ASUS K8V SE Deluxe motherboard 5-1 Click an item to install Click an icon to your OS documentation for general reference only. Refer to display more information. 5.2 Support CD ... to maximize the features of your CD-ROM drive. Always install the latest OS version and corresponding updates to run the CD. Visit the ASUS website for updates. 5.2.1 Running the support CD To begin using the support CD, simply insert the CD into your hardware.
5.1 Install an operating system This motherboard supports Windows® 98SE/ME/2000/2003 Server/XP operating systems (OS). ASUS K8V SE Deluxe motherboard 5-1 Click an item to install Click an icon to your OS documentation for general reference only. Refer to display more information. 5.2 Support CD ... to maximize the features of your CD-ROM drive. Always install the latest OS version and corresponding updates to run the CD. Visit the ASUS website for updates. 5.2.1 Running the support CD To begin using the support CD, simply insert the CD into your hardware.

K8V SE Deluxe User's Manual
Page 114
... Chapter 5: Software support The next screen prompts you click on an image, it with the new boot logo. Instead of starting from the Windows Start menu to update the BIOS. 7. Click Next. Click Flash to change your desired scale. 6. After you may create your computer. You... may also launch ASUS MyLogo2 directly from ASUS Update, you have modified the BIOS file with the new boot logo. 4. From the selection that appears, choose a logo image. When...
... Chapter 5: Software support The next screen prompts you click on an image, it with the new boot logo. Instead of starting from the Windows Start menu to update the BIOS. 7. Click Next. Click Flash to change your desired scale. 6. After you may create your computer. You... may also launch ASUS MyLogo2 directly from ASUS Update, you have modified the BIOS file with the new boot logo. 4. From the selection that appears, choose a logo image. When...

K8V SE Deluxe User's Manual
Page 118
... be incorporated in Gigabit LAN only. • The Run button on the VCT Tester dialogue box is disabled if no problem is supported in Windows® XP and Windows® 2000 operating systems only. • The Virtual Cable Tester™ (VCT) feature works in the network systems software, making it ideal for...
... be incorporated in Gigabit LAN only. • The Run button on the VCT Tester dialogue box is disabled if no problem is supported in Windows® XP and Windows® 2000 operating systems only. • The Virtual Cable Tester™ (VCT) feature works in the network systems software, making it ideal for...
K8V SE Deluxe User's Manual
Page 119
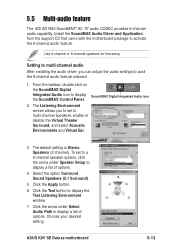
From the taskbar, double-click on the SoundMAX Digital Integrated Audio icon to display the Test Listening Environment window. 7. The default setting is Stereo Speakers (2-channel). Click the Apply button. 6. Click the Test button to display the SoundMAX Control Panel....driver, you to set to a 6-channel speaker system, click the arrow under Select Audio Path to avail the 6-channel audio feature onboard. 1. ASUS K8V SE Deluxe motherboard 5-13 Install the SoundMAX Audio Driver and Application from the support CD that came with the motherboard package to display a list of options....
From the taskbar, double-click on the SoundMAX Digital Integrated Audio icon to display the Test Listening Environment window. 7. The default setting is Stereo Speakers (2-channel). Click the Apply button. 6. Click the Test button to display the SoundMAX Control Panel....driver, you to set to a 6-channel speaker system, click the arrow under Select Audio Path to avail the 6-channel audio feature onboard. 1. ASUS K8V SE Deluxe motherboard 5-13 Install the SoundMAX Audio Driver and Application from the support CD that came with the motherboard package to display a list of options....

K8V SE Deluxe User's Manual
Page 121
... desktop) to display the Volume Control panel. Click Close. ASUS K8V SE Deluxe motherboard 5-15 Adjusting the volume settings 1. After rebooting the system, click the Volume Control icon on the Volume Control Advanced button from the Volume Control panel. The Advanced Controls for Volume Control window appears. To achieve 6-channel audio capability when playing DVDs...
... desktop) to display the Volume Control panel. Click Close. ASUS K8V SE Deluxe motherboard 5-15 Adjusting the volume settings 1. After rebooting the system, click the Volume Control icon on the Volume Control Advanced button from the Volume Control panel. The Advanced Controls for Volume Control window appears. To achieve 6-channel audio capability when playing DVDs...

K8V SE Deluxe User's Manual
Page 122
...Line In Line Out Mic In 4-Speaker 6-Speaker Line In Front Speaker Out Rear Speaker Out Bass/Center Front Speaker Out Rear Speaker Out Windows® 98SE only supports 4.1-channel speaker setting. 5-16 Chapter 5: Software support Click on the rear panel change when you select the 4-channel... or 6-channel audio configuration as the ASUS iPanel. 3. The rear panel microphone is automatically disabled when you installed a front panel audio device such as shown in the following table. ...
...Line In Line Out Mic In 4-Speaker 6-Speaker Line In Front Speaker Out Rear Speaker Out Bass/Center Front Speaker Out Rear Speaker Out Windows® 98SE only supports 4.1-channel speaker setting. 5-16 Chapter 5: Software support Click on the rear panel change when you select the 4-channel... or 6-channel audio configuration as the ASUS iPanel. 3. The rear panel microphone is automatically disabled when you installed a front panel audio device such as shown in the following table. ...
K8V SE Deluxe User's Manual
Page 123
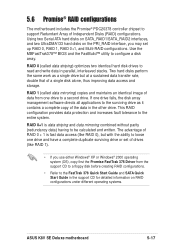
...two identical hard disk drives to read and write data in the support CD for detailed information on RAID configurations under different operating systems. ASUS K8V SE Deluxe motherboard 5-17 The advantage of RAID 0 + 1 is data striping and data mirroring combined without parity (redundancy data) having to ...two Serial ATA hard disks on SATA_RAID1/SATA_RAID2 interfaces, and two UltraDMA133 hard disks on the PRI_RAID interface, you use either Windows® XP or Windows® 2000 operating system (OS), copy first the Promise FastTrak 378 Driver from one drive and have a complete duplicate...
...two identical hard disk drives to read and write data in the support CD for detailed information on RAID configurations under different operating systems. ASUS K8V SE Deluxe motherboard 5-17 The advantage of RAID 0 + 1 is data striping and data mirroring combined without parity (redundancy data) having to ...two Serial ATA hard disks on SATA_RAID1/SATA_RAID2 interfaces, and two UltraDMA133 hard disks on the PRI_RAID interface, you use either Windows® XP or Windows® 2000 operating system (OS), copy first the Promise FastTrak 378 Driver from one drive and have a complete duplicate...


