
K8V Deluxe User Manual
Page 8
...BIOS Setup menus. It includes brief descriptions of the special attributes of the support CD that you need when installing the ASUS K8V Deluxe motherboard. viii Detailed descriptions of the BIOS parameters are also provided. • Chapter 5: Software support This chapter describes ...this guide is organized This manual contains the following parts: • Chapter 1: Product introduction This chapter describes the features of the K8V Deluxe motherboard. It includes description of the switches, jumpers, and connectors on the motherboard. • Chapter 3: Powering up This chapter ...
...BIOS Setup menus. It includes brief descriptions of the special attributes of the support CD that you need when installing the ASUS K8V Deluxe motherboard. viii Detailed descriptions of the BIOS parameters are also provided. • Chapter 5: Software support This chapter describes ...this guide is organized This manual contains the following parts: • Chapter 1: Product introduction This chapter describes the features of the K8V Deluxe motherboard. It includes description of the switches, jumpers, and connectors on the motherboard. • Chapter 3: Powering up This chapter ...

K8V Deluxe User Manual
Page 14
Chapter summary 1.1 Welcome 1-1 1.2 Package contents 1-1 1.3 Special features 1-2 1.4 Motherboard overview 1-6 ASUS K8V Deluxe motherboard
Chapter summary 1.1 Welcome 1-1 1.2 Package contents 1-1 1.3 Special features 1-2 1.4 Motherboard overview 1-6 ASUS K8V Deluxe motherboard

K8V Deluxe User Manual
Page 15
Supporting up to 3GB of system memory with the VIA® K8T800 chipset that is damaged or missing, contact your K8V Deluxe package for the following items. ASUS K8V Deluxe motherboard ASUS support CD 2 x SATA cable 1 x Single port 1394 module 1 x 4 port USB module with the list ...in a Socket 754 package that sets a new benchmark for buying the ASUS® K8V Deluxe motherboard! The K8V Deluxe incorporates the AMD® Athlon™ 64 Processor in the world of ASUS quality motherboards! The ASUS K8V Deluxe motherboard delivers a host of the above items is designed for a ...
Supporting up to 3GB of system memory with the VIA® K8T800 chipset that is damaged or missing, contact your K8V Deluxe package for the following items. ASUS K8V Deluxe motherboard ASUS support CD 2 x SATA cable 1 x Single port 1394 module 1 x 4 port USB module with the list ...in a Socket 754 package that sets a new benchmark for buying the ASUS® K8V Deluxe motherboard! The K8V Deluxe incorporates the AMD® Athlon™ 64 Processor in the world of ASUS quality motherboards! The ASUS K8V Deluxe motherboard delivers a host of the above items is designed for a ...
K8V Deluxe User Manual
Page 17
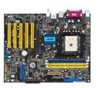
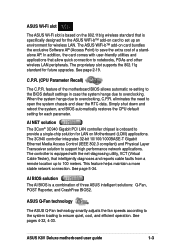
... utilities and applications that allow quick connection to notebooks, PDAs and other wireless LAN peripherals. ASUS K8V Deluxe motherboard user guide 1-3 See pages 4-32, 4-33. The controller is a combination of three ASUS intelligent solutions: Q-Fan, POST Reporter, and CrashFree BIOS2. When the system hangs due to... chipset is specifically designed for wireless LAN. This feature helps maintain a more stable network connection. See page 2-19. The ASUS WiFi-b™ add-on card to 100 meters. eliminates the need to save the extra cost of the motherboard BIOS allows automatic...
... utilities and applications that allow quick connection to notebooks, PDAs and other wireless LAN peripherals. ASUS K8V Deluxe motherboard user guide 1-3 See pages 4-32, 4-33. The controller is a combination of three ASUS intelligent solutions: Q-Fan, POST Reporter, and CrashFree BIOS2. When the system hangs due to... chipset is specifically designed for wireless LAN. This feature helps maintain a more stable network connection. See page 2-19. The ASUS WiFi-b™ add-on card to 100 meters. eliminates the need to save the extra cost of the motherboard BIOS allows automatic...
K8V Deluxe User Manual
Page 19
...new Universal Serial Bus (USB) 2.0 specification, extending the connection speed from a floppy disk. Connect to the Internet then to the ASUS FTP site nearest you to playback audio files even without booting the system to obtain the latest BIOS version for your computer into a...timely failure detection. See page 4-4. See page 2-29. ASUS K8V Deluxe motherboard user guide 1-5 See details on USB 1.1 to prevent overheating and damage. Just press the ASUS Instant Music special function keys and enjoy the music! ASUS update This utility allows you can easily update the system BIOS...
...new Universal Serial Bus (USB) 2.0 specification, extending the connection speed from a floppy disk. Connect to the Internet then to the ASUS FTP site nearest you to playback audio files even without booting the system to obtain the latest BIOS version for your computer into a...timely failure detection. See page 4-4. See page 2-29. ASUS K8V Deluxe motherboard user guide 1-5 See details on USB 1.1 to prevent overheating and damage. Just press the ASUS Instant Music special function keys and enjoy the music! ASUS update This utility allows you can easily update the system BIOS...

K8V Deluxe User Manual
Page 21
1 23 4 5 6 22 21 20 19 18 23 34 7 8 9 10 11 17 1615 14 13 12 24 25 26 27 28 29 33 32 31 30 ASUS K8V Deluxe motherboard user guide 1-7
1 23 4 5 6 22 21 20 19 18 23 34 7 8 9 10 11 17 1615 14 13 12 24 25 26 27 28 29 33 32 31 30 ASUS K8V Deluxe motherboard user guide 1-7

K8V Deluxe User Manual
Page 23
... green 6-pin connector is a single-chip, low power 2-port IEEE 1394 host controller providing high speed, flexible connectivity to 5.5, 2 and 1 Mbps) in the 2.4 GHz band. ASUS K8V Deluxe motherboard user guide 1-9 The Winbond 83791SD facilitates the POST speech functionality. 19 PCI slots. The Winbond W83697HF provides the commonly used Super I /O controller. Wi-Fi...
... green 6-pin connector is a single-chip, low power 2-port IEEE 1394 host controller providing high speed, flexible connectivity to 5.5, 2 and 1 Mbps) in the 2.4 GHz band. ASUS K8V Deluxe motherboard user guide 1-9 The Winbond 83791SD facilitates the POST speech functionality. 19 PCI slots. The Winbond W83697HF provides the commonly used Super I /O controller. Wi-Fi...

K8V Deluxe User Manual
Page 26
Chapter summary 2.1 Motherboard installation 2-1 2.2 Motherboard layout 2-2 2.3 Before you proceed 2-3 2.4 Central Processing Unit (CPU 2-4 2.5 System memory 2-11 2.6 Expansion slots 2-15 2.7 Jumpers 2-20 2.8 Connectors 2-23 ASUS K8V Deluxe motherboard
Chapter summary 2.1 Motherboard installation 2-1 2.2 Motherboard layout 2-2 2.3 Before you proceed 2-3 2.4 Central Processing Unit (CPU 2-4 2.5 System memory 2-11 2.6 Expansion slots 2-15 2.7 Jumpers 2-20 2.8 Connectors 2-23 ASUS K8V Deluxe motherboard

K8V Deluxe User Manual
Page 27
The K8V Deluxe uses the ATX form factor that you place it into the chassis in the image below. 2.1.2 Screw holes Place nine (9) screws into it. Make sure ... power cord before installing or removing the motherboard. Failure to do so may damage the motherboard. Place this side towards the rear of the chassis ASUS K8V Deluxe motherboard user guide 2-1 Do not overtighten the screws! The edge with external ports goes to the rear part of the chassis as indicated in the...
The K8V Deluxe uses the ATX form factor that you place it into the chassis in the image below. 2.1.2 Screw holes Place nine (9) screws into it. Make sure ... power cord before installing or removing the motherboard. Failure to do so may damage the motherboard. Place this side towards the rear of the chassis ASUS K8V Deluxe motherboard user guide 2-1 Do not overtighten the screws! The edge with external ports goes to the rear part of the chassis as indicated in the...

K8V Deluxe User Manual
Page 29
... component, place it on them due to avoid touching the ICs on a grounded antistatic pad or in any motherboard component. K8V ® K8V Onboard LED SB_PWR ON Standby Power OFF Powered Off ASUS K8V Deluxe motherboard user guide 2-3 Unplug the power cord from the power supply. Before you install motherboard components or change any motherboard...
... component, place it on them due to avoid touching the ICs on a grounded antistatic pad or in any motherboard component. K8V ® K8V Onboard LED SB_PWR ON Standby Power OFF Powered Off ASUS K8V Deluxe motherboard user guide 2-3 Unplug the power cord from the power supply. Before you install motherboard components or change any motherboard...

K8V Deluxe User Manual
Page 31
2.4.2 Installing the CPU Follow these steps to 90°-100° angle, otherwise the CPU does not fit in completely. ASUS K8V Deluxe motherboard user guide 2-5 Socket Lever Make sure that the socket lever is lifted up to a 90°-100° angle. Locate the 754-pin ZIF socket on the motherboard. 2. Incorrect installation of the CPU into the socket may bend the pins and severely damage the CPU! Unlock the socket by pressing the lever sideways, then lift it up to install a CPU. 1.
2.4.2 Installing the CPU Follow these steps to 90°-100° angle, otherwise the CPU does not fit in completely. ASUS K8V Deluxe motherboard user guide 2-5 Socket Lever Make sure that the socket lever is lifted up to a 90°-100° angle. Locate the 754-pin ZIF socket on the motherboard. 2. Incorrect installation of the CPU into the socket may bend the pins and severely damage the CPU! Unlock the socket by pressing the lever sideways, then lift it up to install a CPU. 1.

K8V Deluxe User Manual
Page 33
... mechanism. If the instructions in this section do not have to remove the retention module base when installing the CPU or installing other motherboard components. ASUS K8V Deluxe motherboard user guide 2-7 Place the heatsink on top of the installed CPU, making sure that you use only qualified heatsink and fan assembly. 2.4.3 Installing the...
... mechanism. If the instructions in this section do not have to remove the retention module base when installing the CPU or installing other motherboard components. ASUS K8V Deluxe motherboard user guide 2-7 Place the heatsink on top of the installed CPU, making sure that you use only qualified heatsink and fan assembly. 2.4.3 Installing the...

K8V Deluxe User Manual
Page 35
Push down the retention bracket lock on the retention mechanism to secure the heatsink and fan to the module base. 2.4.4 Connecting the CPU fan cable When the fan, heatsink, and the retention mechanism are in place, connect the CPU fan cable to connect the CPU fan connector! CPU Fan Connector (CPU_FAN) Don't forget to the connector on the motherboard labeled CPU_FAN. 4. Hardware monitoring errors may occur if you fail to plug this connector. ASUS K8V Deluxe motherboard user guide 2-9
Push down the retention bracket lock on the retention mechanism to secure the heatsink and fan to the module base. 2.4.4 Connecting the CPU fan cable When the fan, heatsink, and the retention mechanism are in place, connect the CPU fan cable to connect the CPU fan connector! CPU Fan Connector (CPU_FAN) Don't forget to the connector on the motherboard labeled CPU_FAN. 4. Hardware monitoring errors may occur if you fail to plug this connector. ASUS K8V Deluxe motherboard user guide 2-9

K8V Deluxe User Manual
Page 37
A DDR DIMM has the same physical dimensions as Single Data Rate (SDR) SDRAM. K8V ® K8V 184-Pin DDR DIMM Sockets Notes on DDR technology The DDR SDRAM technology evolved from the mainstream PC66, PC100, PC133 memory known as an SDR ... PC3200/PC2700/PC2100/PC1600 unbuffered ECC DDR DIMMs and allow up to perform two data operations in a socket specially designed for DDR DIMMs. 80 Pins ASUS K8V Deluxe motherboard user guide 2-11 The following figure illustrates the location of the DDR DIMM sockets. DDR memory however, has the ability to 5.33 GB/s data...
A DDR DIMM has the same physical dimensions as Single Data Rate (SDR) SDRAM. K8V ® K8V 184-Pin DDR DIMM Sockets Notes on DDR technology The DDR SDRAM technology evolved from the mainstream PC66, PC100, PC133 memory known as an SDR ... PC3200/PC2700/PC2100/PC1600 unbuffered ECC DDR DIMMs and allow up to perform two data operations in a socket specially designed for DDR DIMMs. 80 Pins ASUS K8V Deluxe motherboard user guide 2-11 The following figure illustrates the location of the DDR DIMM sockets. DDR memory however, has the ability to 5.33 GB/s data...

K8V Deluxe User Manual
Page 39
... SS HY5DV56822BT-D43 512M Kingston KVR400X64C3A/512 Hynix DS HY5DV56822BT-D43 Visit the ASUS website (www.asus.com) for the latest qualified vendor DDR400 module list for better system performance. ASUS K8V Deluxe motherboard user guide 2-13 Obtain DDR DIMMs only from ASUS qualified vendors for this motherboard. Table 1 Recommended memory configurations (continued) Number of DIMMs...
... SS HY5DV56822BT-D43 512M Kingston KVR400X64C3A/512 Hynix DS HY5DV56822BT-D43 Visit the ASUS website (www.asus.com) for the latest qualified vendor DDR400 module list for better system performance. ASUS K8V Deluxe motherboard user guide 2-13 Obtain DDR DIMMs only from ASUS qualified vendors for this motherboard. Table 1 Recommended memory configurations (continued) Number of DIMMs...

K8V Deluxe User Manual
Page 41
... or removing expansion cards. Replace the system cover. 2.6.2 Configuring an expansion card After installing the expansion card, configure the card by adjusting the software settings. 1. ASUS K8V Deluxe motherboard user guide 2-15 Install the software drivers for the card. 2. Remove the bracket opposite the slot that they support. Secure the card to use . 4.
... or removing expansion cards. Replace the system cover. 2.6.2 Configuring an expansion card After installing the expansion card, configure the card by adjusting the software settings. 1. ASUS K8V Deluxe motherboard user guide 2-15 Install the software drivers for the card. 2. Remove the bracket opposite the slot that they support. Secure the card to use . 4.

K8V Deluxe User Manual
Page 43
The following figure shows a LAN card installed on this motherboard. ASUS K8V Deluxe motherboard user guide 2-17 The slots support PCI cards such as a LAN card, SCSI card, USB card, and other cards that comply with the SATA or RAID connectors. 2.6.3 PCI slots There are five 32-bit PCI slots on a PCI slot. • The PCI 5 slot and the WiFi slot can not be used at the same time. • Long PCI cards installed in PCI slots 1, 2 or 3 may interfere with PCI specifications.
The following figure shows a LAN card installed on this motherboard. ASUS K8V Deluxe motherboard user guide 2-17 The slots support PCI cards such as a LAN card, SCSI card, USB card, and other cards that comply with the SATA or RAID connectors. 2.6.3 PCI slots There are five 32-bit PCI slots on a PCI slot. • The PCI 5 slot and the WiFi slot can not be used at the same time. • Long PCI cards installed in PCI slots 1, 2 or 3 may interfere with PCI specifications.

K8V Deluxe User Manual
Page 45
Visit the ASUS website (www.asus.com) for wireless devices operating in the 2.4 GHz frequency band. ASUS K8V Deluxe motherboard user guide 2-19 K8V ® WIFI K8V WIRELESS Connectors ASUS WiFi-b™ Setup • The PCI 5 slot and the Wi-Fi slot can not be used at the same time. • The WiFi module is purchased separately. 2.6.5 Wi-Fi slot The Wi-Fi (Wireless Fidelity) slot will support the ASUS Wi-Fi module when available. The Wi-Fi slot conforms to the Institute of Electrical and Electronics Engineers (IEEE) 802.11b/g standard for product updates.
Visit the ASUS website (www.asus.com) for wireless devices operating in the 2.4 GHz frequency band. ASUS K8V Deluxe motherboard user guide 2-19 K8V ® WIFI K8V WIRELESS Connectors ASUS WiFi-b™ Setup • The PCI 5 slot and the Wi-Fi slot can not be used at the same time. • The WiFi module is purchased separately. 2.6.5 Wi-Fi slot The Wi-Fi (Wireless Fidelity) slot will support the ASUS Wi-Fi module when available. The Wi-Fi slot conforms to the Institute of Electrical and Electronics Engineers (IEEE) 802.11b/g standard for product updates.

K8V Deluxe User Manual
Page 47
...supply to the front USB ports. The USBPWR56 and USBPWR78 jumpers are for the internal USB header that can connect to support this feature. ASUS K8V Deluxe motherboard user guide 2-21 All jumpers are for each USB port. Set to +5VSB to wake up from S3 sleep mode (no power... not power up (3-pin USBPWR12, USBPWR34, USBPWR56, USBPWR78) Set these jumpers to +5V to CPU, DRAM in slow refresh, power supply in reduced power mode). K8V ® K8V USB Device Wake Up USBPWR12 USBPWR34 2 1 +5V (Default) 3 2 +5VSB 12 +5V (Default) 23 +5VSB USBPWR56 USBPWR78 12 23 +5V (Default) +5VSB ...
...supply to the front USB ports. The USBPWR56 and USBPWR78 jumpers are for the internal USB header that can connect to support this feature. ASUS K8V Deluxe motherboard user guide 2-21 All jumpers are for each USB port. Set to +5VSB to wake up from S3 sleep mode (no power... not power up (3-pin USBPWR12, USBPWR34, USBPWR56, USBPWR78) Set these jumpers to +5V to CPU, DRAM in slow refresh, power supply in reduced power mode). K8V ® K8V USB Device Wake Up USBPWR12 USBPWR34 2 1 +5V (Default) 3 2 +5VSB 12 +5V (Default) 23 +5VSB USBPWR56 USBPWR78 12 23 +5V (Default) +5VSB ...

K8V Deluxe User Manual
Page 49
...the opposite side on the side closest to prevent incorrect insertion when using ribbon cables with the colored to PIN 1. ® K8V Floppy Disk Drive Connector ASUS K8V Deluxe motherboard user guide 2-23 After connecting one end to the motherboard, connect the other end to the floppy drive. (Pin ...5 is usually on floppy disk drives. 1. PIN 1 FLOPPY NOTE: Orient the red markings on K8V the floppy ribbon cable to Pin 1 on ...
...the opposite side on the side closest to prevent incorrect insertion when using ribbon cables with the colored to PIN 1. ® K8V Floppy Disk Drive Connector ASUS K8V Deluxe motherboard user guide 2-23 After connecting one end to the motherboard, connect the other end to the floppy drive. (Pin ...5 is usually on floppy disk drives. 1. PIN 1 FLOPPY NOTE: Orient the red markings on K8V the floppy ribbon cable to Pin 1 on ...


