K8 series Quick Setup Guide
Page 10
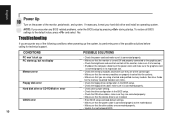
... calling for the memory Qualified Vendors List (QVL). • Check the floppy drive configuration in the BIOS setup. • Check the floppy drive cable, make sure it is connected properly. • Check drive jumper setting. • Check the drive configuration in the BIOS setup. • Check the IDE drive cables, make sure they are corrected properly. • Make sure that the device drivers are installed. • Enter BIOS setup and load default settings. • Make sure that the power cable is inserted...
... calling for the memory Qualified Vendors List (QVL). • Check the floppy drive configuration in the BIOS setup. • Check the floppy drive cable, make sure it is connected properly. • Check drive jumper setting. • Check the drive configuration in the BIOS setup. • Check the IDE drive cables, make sure they are corrected properly. • Make sure that the device drivers are installed. • Enter BIOS setup and load default settings. • Make sure that the power cable is inserted...
K8V Deluxe User Manual
Page 17
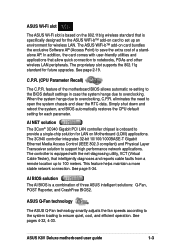
... stable network connection. See page 2-19. ASUS Q-Fan technology The ASUS Q-Fan technology smartly adjusts the fan speeds according to the system loading to overclocking, C.P.R. Simply shut down and reboot the system, and BIOS automatically restores the CPU default setting for future upgrades. The controller is equipped with user-friendly utilities and applications that allow quick connection to notebooks, PDAs and other wireless LAN peripherals. C.P.R. (CPU Parameter Recall) The C.P.R. ASUS Wi-Fi slot The ASUS Wi-Fi slot...
... stable network connection. See page 2-19. ASUS Q-Fan technology The ASUS Q-Fan technology smartly adjusts the fan speeds according to the system loading to overclocking, C.P.R. Simply shut down and reboot the system, and BIOS automatically restores the CPU default setting for future upgrades. The controller is equipped with user-friendly utilities and applications that allow quick connection to notebooks, PDAs and other wireless LAN peripherals. C.P.R. (CPU Parameter Recall) The C.P.R. ASUS Wi-Fi slot The ASUS Wi-Fi slot...

K8V Deluxe User Manual
Page 18
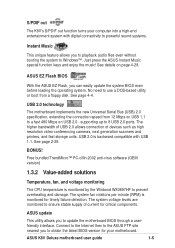
... you to buy a replacement ROM chip. ASUS MyLogo2™ This new feature present in the K8V Deluxe motherboard allows you enjoy highquality 6-channel audio without having to restore the original BIOS data from the available options. See pages 5-8. The localized BIOS menus allow you of the system boot status and causes of boot errors, if any. See page 2-30. 6-Channel Audio solution The K8V Deluxe uses an onboard audio CODEC that lets...
... you to buy a replacement ROM chip. ASUS MyLogo2™ This new feature present in the K8V Deluxe motherboard allows you enjoy highquality 6-channel audio without having to restore the original BIOS data from the available options. See pages 5-8. The localized BIOS menus allow you of the system boot status and causes of boot errors, if any. See page 2-30. 6-Channel Audio solution The K8V Deluxe uses an onboard audio CODEC that lets...
K8V Deluxe User Manual
Page 19
... to obtain the latest BIOS version for your motherboard. ASUS K8V Deluxe motherboard user guide 1-5 See page 4-4. USB 2.0 is monitored for timely failure detection. See page 2-29. USB 2.0 technology The motherboard implements the new Universal Serial Bus (USB) 2.0 specification, extending the connection speed from a floppy disk. Free bundled TrendMicro™ PC-cillin 2002 anti-virus software (OEM version) 1.3.2 Value-added solutions Temperature, fan, and voltage monitoring The CPU temperature is monitored by the Winbond W83697HF to 8 USB 2.0 ports. Connect to the Internet...
... to obtain the latest BIOS version for your motherboard. ASUS K8V Deluxe motherboard user guide 1-5 See page 4-4. USB 2.0 is monitored for timely failure detection. See page 2-29. USB 2.0 technology The motherboard implements the new Universal Serial Bus (USB) 2.0 specification, extending the connection speed from a floppy disk. Free bundled TrendMicro™ PC-cillin 2002 anti-virus software (OEM version) 1.3.2 Value-added solutions Temperature, fan, and voltage monitoring The CPU temperature is monitored by the Winbond W83697HF to 8 USB 2.0 ports. Connect to the Internet...
K8V Deluxe User Manual
Page 22
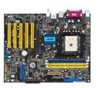
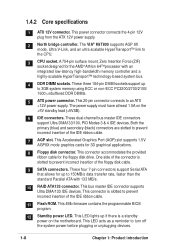
... ATX +12V power supply. This LED acts as a reminder to 3GB system memory using ECC or non-ECC PC3200/2700/2100/ 1600 unbuffered DDR DIMMs. 5 ATX power connector. These three 184-pin DIMM sockets support up to the CPU. 3 CPU socket. This 20-pin connector connects to prevent incorrect insertion of the IDE ribbon cable. 11 Flash ROM. This Accelerated Graphics Port (AGP) slot supports 1.5V AGP8X mode graphics cards for up to turn off the system power before plugging or unplugging devices...
... ATX +12V power supply. This LED acts as a reminder to 3GB system memory using ECC or non-ECC PC3200/2700/2100/ 1600 unbuffered DDR DIMMs. 5 ATX power connector. These three 184-pin DIMM sockets support up to the CPU. 3 CPU socket. This 20-pin connector connects to prevent incorrect insertion of the IDE ribbon cable. 11 Flash ROM. This Accelerated Graphics Port (AGP) slot supports 1.5V AGP8X mode graphics cards for up to turn off the system power before plugging or unplugging devices...

K8V Deluxe User Manual
Page 23
... port, 2 serial ports, the mouse and keyboard interface and the LPC (Low Pin Count) interface. 14 SouthBridge controller. The 3Com® Gigabit LAN delivers transfer rates up to eight USB 2.0 ports, LPC Super I /O functions including two Serial ATA ports, RAID functionality, 2-channel ATA/133 bus master IDE controller, up to a wide range of data such as IEEE 802.11b to 5.5, 2 and 1 Mbps) in the 2.4 GHz band. ASUS K8V Deluxe motherboard user guide...
... port, 2 serial ports, the mouse and keyboard interface and the LPC (Low Pin Count) interface. 14 SouthBridge controller. The 3Com® Gigabit LAN delivers transfer rates up to eight USB 2.0 ports, LPC Super I /O functions including two Serial ATA ports, RAID functionality, 2-channel ATA/133 bus master IDE controller, up to a wide range of data such as IEEE 802.11b to 5.5, 2 and 1 Mbps) in the 2.4 GHz band. ASUS K8V Deluxe motherboard user guide...

K8V Deluxe User Manual
Page 41
... installed in a chassis). 3. Turn on BIOS setup. 2. Assign an IRQ to use . 4. See Chapter 4 for the card. 2. Remove the bracket opposite the slot that you intend to the card. ASUS K8V Deluxe motherboard user guide 2-15 Align the card connector with the screw you removed earlier. 6. Replace the system cover. 2.6.2 Configuring an expansion card After installing the expansion card, configure the card by adjusting the software settings. 1. The motherboard has five PCI slots and one Accelerated Graphics Port (AGP) slot. Refer to unplug the power...
... installed in a chassis). 3. Turn on BIOS setup. 2. Assign an IRQ to use . 4. See Chapter 4 for the card. 2. Remove the bracket opposite the slot that you intend to the card. ASUS K8V Deluxe motherboard user guide 2-15 Align the card connector with the screw you removed earlier. 6. Replace the system cover. 2.6.2 Configuring an expansion card After installing the expansion card, configure the card by adjusting the software settings. 1. The motherboard has five PCI slots and one Accelerated Graphics Port (AGP) slot. Refer to unplug the power...

K8V Deluxe User Manual
Page 50
... configure the second drive as a slave device by setting its jumper accordingly. BIOS supports specific device bootup. one for the primary IDE connector and another UltraATA133/100/ 66 cable. IDE connectors (40-1 pin PRI_IDE, SEC_IDE) This connector supports the provided UltraATA133/100/66 IDE hard disk ribbon cable. If you install two hard disks, you connect non-UltraATA133/100/66 devices to the secondary IDE connector. Refer to PIN 1. K8V ® K8V IDE Connectors PIN 1 PIN 1 For UltraATA133/100/66 IDE devices, use an 80-conductor IDE cable. If you connect...
... configure the second drive as a slave device by setting its jumper accordingly. BIOS supports specific device bootup. one for the primary IDE connector and another UltraATA133/100/ 66 cable. IDE connectors (40-1 pin PRI_IDE, SEC_IDE) This connector supports the provided UltraATA133/100/66 IDE hard disk ribbon cable. If you install two hard disks, you connect non-UltraATA133/100/66 devices to the secondary IDE connector. Refer to PIN 1. K8V ® K8V IDE Connectors PIN 1 PIN 1 For UltraATA133/100/66 IDE devices, use an 80-conductor IDE cable. If you connect...
K8V Deluxe User Manual
Page 67
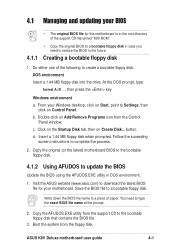
... Control Panel window. Follow the suceeding screen instructions to update the BIOS Update the BIOS using the AFUDOS.EXE utility in DOS environment. 1. Write down the BIOS file name to a piece of the following to create a bootable floppy disk. ASUS K8V Deluxe motherboard user guide 4-1 From your motherboard. Insert a 1.44 MB floppy disk when prompted. You need to restore the BIOS in case you need to a bootable floppy disk. DOS environment Insert a 1.44 MB floppy disk into the drive. b. 4.1 Managing and updating...
... Control Panel window. Follow the suceeding screen instructions to update the BIOS Update the BIOS using the AFUDOS.EXE utility in DOS environment. 1. Write down the BIOS file name to a piece of the following to create a bootable floppy disk. ASUS K8V Deluxe motherboard user guide 4-1 From your motherboard. Insert a 1.44 MB floppy disk when prompted. You need to restore the BIOS in case you need to a bootable floppy disk. DOS environment Insert a 1.44 MB floppy disk into the drive. b. 4.1 Managing and updating...
K8V Deluxe User Manual
Page 75
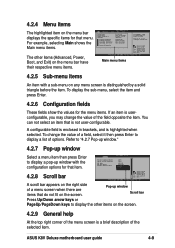
... Write Graphics Aperture Size [AGP] [Yes] [AGP 8X] [Enabled] [64MB] Select Screen Select Item +- You can not select an item that do not fit on the menu bar displays the specific items for the menu items. If an item is not user-configurable. ASUS K8V Deluxe motherboard user guide 4-9 For example, selecting Main shows the Main menu items. System Time System Date Legacy Diskette A Language Primary IDE Master Primary IDE Slave Secondary IDE...
... Write Graphics Aperture Size [AGP] [Yes] [AGP 8X] [Enabled] [64MB] Select Screen Select Item +- You can not select an item that do not fit on the menu bar displays the specific items for the menu items. If an item is not user-configurable. ASUS K8V Deluxe motherboard user guide 4-9 For example, selecting Main shows the Main menu items. System Time System Date Legacy Diskette A Language Primary IDE Master Primary IDE Slave Secondary IDE...
K8V Deluxe User Manual
Page 77
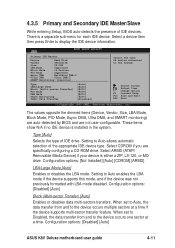
... entering Setup, BIOS auto-detects the presence of IDE drive. Type [Auto] Selects the type of IDE devices. Configuration options: [Disabled] [Auto] ASUS K8V Deluxe motherboard user guide 4-11 There is installed in the system. When set to Disabled, the data transfer from and to Auto enables the LBA mode if the device supports this mode, and if the device was not previously formatted with LBA mode disabled. Setting to the device occurs multiple sectors at a time. These items show N/A if no IDE device is a separate sub-menu...
... entering Setup, BIOS auto-detects the presence of IDE drive. Type [Auto] Selects the type of IDE devices. Configuration options: [Disabled] [Auto] ASUS K8V Deluxe motherboard user guide 4-11 There is installed in the system. When set to Disabled, the data transfer from and to Auto enables the LBA mode if the device supports this mode, and if the device was not previously formatted with LBA mode disabled. Setting to the device occurs multiple sectors at a time. These items show N/A if no IDE device is a separate sub-menu...
K8V Deluxe User Manual
Page 87
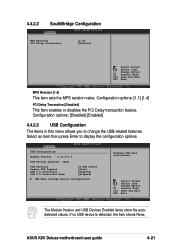
...PCI Delay Transaction [1.4] [Enabled] Select Screen Select Item +- ASUS K8V Deluxe motherboard user guide 4-21 Change Option F1 General Help F10 Save and Exit ESC Exit The Module Version and USB Devices Enabled items show the autodetected values. Configuration options: [Disabled] [Enabled] 4.4.2.3 USB Configuration The items in this menu allows you to display the configuration options. USB Configuration Module Version : 2.22.4-5.3 USB Devices Enabled : None USB Function Legacy USB Support USB 2.0 Controller USB 2.0 Controller Mode [8 USB Ports] [Auto] [Enabled] [HiSpeed] USB...
...PCI Delay Transaction [1.4] [Enabled] Select Screen Select Item +- ASUS K8V Deluxe motherboard user guide 4-21 Change Option F1 General Help F10 Save and Exit ESC Exit The Module Version and USB Devices Enabled items show the autodetected values. Configuration options: [Disabled] [Enabled] 4.4.2.3 USB Configuration The items in this menu allows you to display the configuration options. USB Configuration Module Version : 2.22.4-5.3 USB Devices Enabled : None USB Function Legacy USB Support USB 2.0 Controller USB 2.0 Controller Mode [8 USB Ports] [Auto] [Enabled] [HiSpeed] USB...

K8V Deluxe User Manual
Page 88
... controller legacy mode is disabled. Setting to Auto allows the system to enable or disable support for legacy USB devices. if no USB device is detected, the legacy USB support is enabled; Configuration options: [HiSpeed ] [Full Speed] 4.4.3 Onboard Devices Configuration OnBoard AC'97 Audio OnChip SATA BOOTROM OnBoard Promise Controller Operating Mode OnBoard LAN OnBoard LAN Boot ROM OnBoard 1394 Serial Port1 Address Serial Port2 Address Serial Port2 Mode Parallel Port Address Onboard Game Port Onboard MIDI Port [Auto] [Disabled] [Enabled] [Onboard IDE Operat] [Enabled] [Disabled...
... controller legacy mode is disabled. Setting to Auto allows the system to enable or disable support for legacy USB devices. if no USB device is detected, the legacy USB support is enabled; Configuration options: [HiSpeed ] [Full Speed] 4.4.3 Onboard Devices Configuration OnBoard AC'97 Audio OnChip SATA BOOTROM OnBoard Promise Controller Operating Mode OnBoard LAN OnBoard LAN Boot ROM OnBoard 1394 Serial Port1 Address Serial Port2 Address Serial Port2 Mode Parallel Port Address Onboard Game Port Onboard MIDI Port [Auto] [Disabled] [Enabled] [Onboard IDE Operat] [Enabled] [Disabled...

K8V Deluxe User Manual
Page 89
... disable the onboard LAN boot ROM. Configuration options: [Full Duplex] [Half Duplex] ASUS K8V Deluxe motherboard user guide 4-23 Configuration options: [Disabled] [Enabled] OnBoard LAN Boot ROM [Disabled] Allows you to enable or disable the onboard IEEE 1392 controller. Configuration options: [Disabled] [3F8/IRQ4] [3E8/IRQ4] [2E8/IRQ3] Serial Port2 Address [2F8/IRQ3] Allows you to enable or disable the onchip Serial ATA boot ROM. Configuration options: [Disabled] [Enabled] OnBoard 1394 [Enabled] Allows you to set to select full or half duplex mode for the serial port...
... disable the onboard LAN boot ROM. Configuration options: [Full Duplex] [Half Duplex] ASUS K8V Deluxe motherboard user guide 4-23 Configuration options: [Disabled] [Enabled] OnBoard LAN Boot ROM [Disabled] Allows you to enable or disable the onboard IEEE 1392 controller. Configuration options: [Disabled] [3F8/IRQ4] [3E8/IRQ4] [2E8/IRQ3] Serial Port2 Address [2F8/IRQ3] Allows you to enable or disable the onchip Serial ATA boot ROM. Configuration options: [Disabled] [Enabled] OnBoard 1394 [Enabled] Allows you to set to select full or half duplex mode for the serial port...

K8V Deluxe User Manual
Page 95
... then press Enter to display the configuration options. Configuration options: [Disabled] [Enabled] ASUS K8V Deluxe motherboard user guide 4-29 When set to Enabled, the ACPI APIC table pointer is included in the ASIC. Configuration options: [S1 (POS) Only] [S3 Only] [S1 (POS) & S3 (STR) Auto] 4.5.2 Repost Video on S3 Resume [No] Determines whether to invoke VGA BIOS POST on S3 Resume ACPI 2.0 Support ACPI APIC Support APM Configuration Hardware Monitor [S1 (POS) & S3 (STR)] [No] [No] [Enabled] Configure CPU. Configuration options: [No] [Yes] 4.5.3 ACPI 2.0 Support [No] Allows...
... then press Enter to display the configuration options. Configuration options: [Disabled] [Enabled] ASUS K8V Deluxe motherboard user guide 4-29 When set to Enabled, the ACPI APIC table pointer is included in the ASIC. Configuration options: [S1 (POS) Only] [S3 Only] [S1 (POS) & S3 (STR) Auto] 4.5.2 Repost Video on S3 Resume [No] Determines whether to invoke VGA BIOS POST on S3 Resume ACPI 2.0 Support ACPI APIC Support APM Configuration Hardware Monitor [S1 (POS) & S3 (STR)] [No] [No] [Enabled] Configure CPU. Configuration options: [No] [Yes] 4.5.3 ACPI 2.0 Support [No] Allows...

K8V Deluxe User Manual
Page 109
... CD automatically displays the Drivers menu if Autorun is enabled in this chapter for more information If Autorun is NOT enabled in your computer. Click an item to install Click an icon to locate the file ASSETUP.EXE from the BIN folder. Because motherboard settings and hardware options vary, use the setup procedures presented in your computer, browse the contents of your CD-ROM drive.
... CD automatically displays the Drivers menu if Autorun is enabled in this chapter for more information If Autorun is NOT enabled in your computer. Click an item to install Click an icon to locate the file ASSETUP.EXE from the BIN folder. Because motherboard settings and hardware options vary, use the setup procedures presented in your computer, browse the contents of your CD-ROM drive.

K8V Deluxe User Manual
Page 136
... Setup Configuration ] Mode Stripe Spare Drive 0 Drive(s) Used in Array 2 Array Disk Capacity (size in MB 8650 [ Keys Available ] [ ] Up [ ] Down [ , ,Space] Change Option [ESC] Exit [CTRL-Y] Save 2. Depending on the operating system you are installing, you have formatted the arrayed drives, install an operating system (OS). The Mode field displays "Stripe". 3. Use the arrow keys to go to install the RAID driver during or after the OS installation. 5-28 Chapter 5: Software support After...
... Setup Configuration ] Mode Stripe Spare Drive 0 Drive(s) Used in Array 2 Array Disk Capacity (size in MB 8650 [ Keys Available ] [ ] Up [ ] Down [ , ,Space] Change Option [ESC] Exit [CTRL-Y] Save 2. Depending on the operating system you are installing, you have formatted the arrayed drives, install an operating system (OS). The Mode field displays "Stripe". 3. Use the arrow keys to go to install the RAID driver during or after the OS installation. 5-28 Chapter 5: Software support After...

K8V Deluxe User Manual
Page 138
... 5-30 Chapter 5: Software support Depending on the operating system you are installing, you want to use. 6. Backup all the data from the support CD that the new hard drive you have formatted the arrayed drives, install an operating system (OS). 8. In the FastBuild™ utility main menu, press "1" to duplicate the image... The following message appears: Start to select Auto Setup. 2. The Mode field displays "Mirror". 3. Create...
... 5-30 Chapter 5: Software support Depending on the operating system you are installing, you want to use. 6. Backup all the data from the support CD that the new hard drive you have formatted the arrayed drives, install an operating system (OS). 8. In the FastBuild™ utility main menu, press "1" to duplicate the image... The following message appears: Start to select Auto Setup. 2. The Mode field displays "Mirror". 3. Create...

K8V Deluxe User Manual
Page 139
.... Select Y to reconfigure the system. ASUS K8V Deluxe motherboard user guide 5-31 When the duplication process is already installed), the RAID driver installation sequence may vary. 5.5.5 Other FastBuild Utility Commands Command options 3-6 on the operating system you to view the drive assignments of the defunct hard disk. 4. View Array (3): This command allows you are useful for setting up , an error message notifies of a system failure. 2. Rebuild Array (5): This command...
.... Select Y to reconfigure the system. ASUS K8V Deluxe motherboard user guide 5-31 When the duplication process is already installed), the RAID driver installation sequence may vary. 5.5.5 Other FastBuild Utility Commands Command options 3-6 on the operating system you to view the drive assignments of the defunct hard disk. 4. View Array (3): This command allows you are useful for setting up , an error message notifies of a system failure. 2. Rebuild Array (5): This command...

K8V Deluxe User Manual
Page 141
... driver is located in "\Drivers\VIARAID\6420RAID\DriverDisk\Makedisk.exe" of the support CD. A floppy disk with the RAID driver necessary when configuring RAID installations. 2. ASUS K8V Deluxe motherboard user guide 5-33 Use this utility when configuring Serial ATA RAID 0 or RAID 1. Write-protect the floppy disk to upload RAID driver. The Makedisk.exe utility for the VIA® RAID driver is [Onboard IDE Operate Mode] (default). 3. The Makedisk.exe utility for the VIA® or Promise® ATA/SATA RAID function before installing your operating system. 5. Use this utility...
... driver is located in "\Drivers\VIARAID\6420RAID\DriverDisk\Makedisk.exe" of the support CD. A floppy disk with the RAID driver necessary when configuring RAID installations. 2. ASUS K8V Deluxe motherboard user guide 5-33 Use this utility when configuring Serial ATA RAID 0 or RAID 1. Write-protect the floppy disk to upload RAID driver. The Makedisk.exe utility for the VIA® RAID driver is [Onboard IDE Operate Mode] (default). 3. The Makedisk.exe utility for the VIA® or Promise® ATA/SATA RAID function before installing your operating system. 5. Use this utility...


